• Home
  • Page Layouts
  • Page Templates
  • Theme Colors
    • Lifestyle Pro Blue
    • Lifestyle Pro Green
    • Lifestyle Pro Mustard
    • Lifestyle Pro Purple
    • Lifestyle Pro Red
    • Lifestyle Pro Teal

Relish The Bite

Taste of happiness

  • HOME
  • ABOUT
  • RECIPE INDEX
    • SNACKS & APPETIZERS
    • BREAKFAST
    • BAKED RECIPES
    • LUNCH & DINNER
      • RICE/BIRYANI VARIETIES
      • SIDES
        • DRY CURRY/STIR-FRY
        • SOUTH INDIAN CURRY/KUZHAMBU
        • NORTH INDIAN CURRY/DAL
        • RAITA/DIPS/CHUTNEY
        • Soups/Salads
      • PASTA PIZZA & TACOS
      • BREAD
      • CHINESE ASIAN INSPIRED
    • NON-VEG RECIPES
    • DESSERTS
    • BEVERAGES
  • SNACKS
  • BREAKFAST
  • NON-VEG RECIPES
  • RICE/BIRYANI VARIETIES
  • LAMB
  • SOUTH INDIAN CURRY/KUZHAMBU
  • VEGAN
  • NORTH INDIAN CURRY/DAL
  • DRY CURRY/STIR-FRY
  • PASTA & TACOS
  • CHINESE ASIAN INSPIRED
  • BAKED RECIPES
  • COLLECTIONS
  • BREAD
  • BEVERAGES
  • DESSERTS
  • FESTIVAL RECIPES
    • SNACKS & APPETIZERS
    • SWEETS/DESSERTS
  • RESOURCES
    • HOW TO START A BLOG
    • TITBITS
    • PRESS
  • CONTACT
You are here: Home / 2014 / Archives for November 2014

Archives for November 2014

Vengaya Kuzhambu / Onion Garlic Curry

November 29, 2014 by Suki 2 Comments

Kuzhambu-2-3
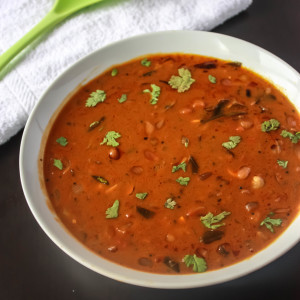
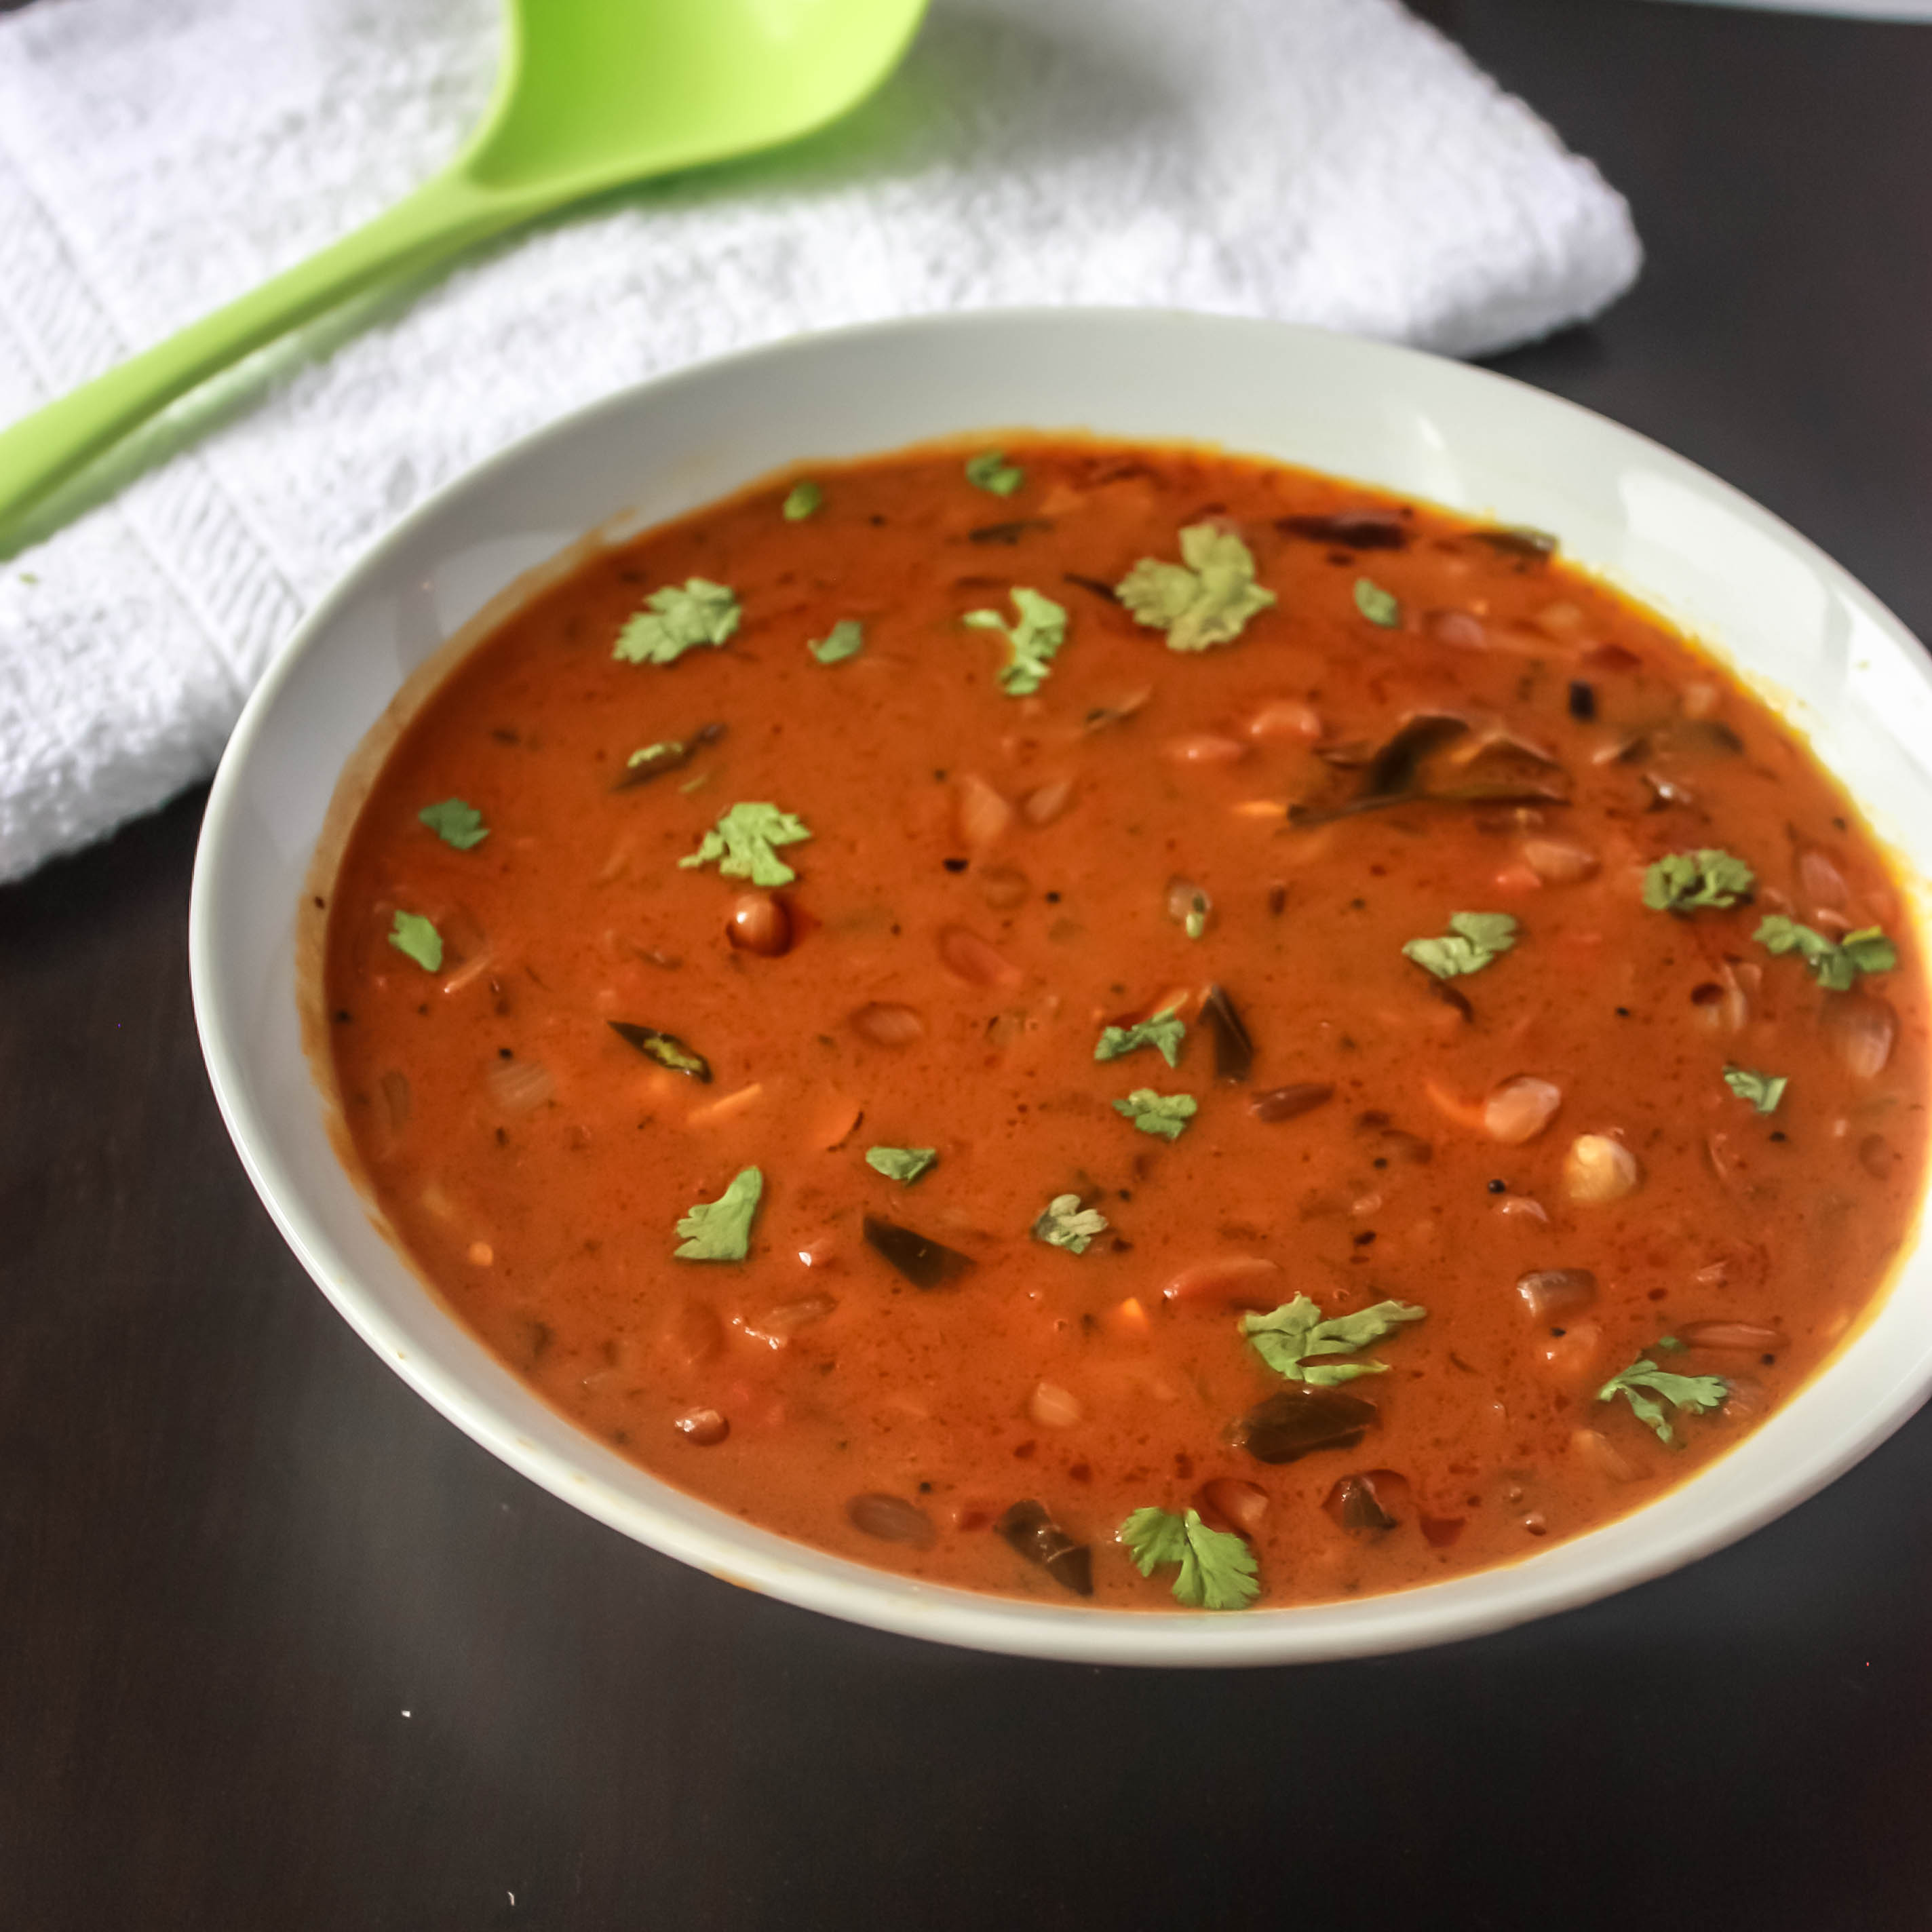
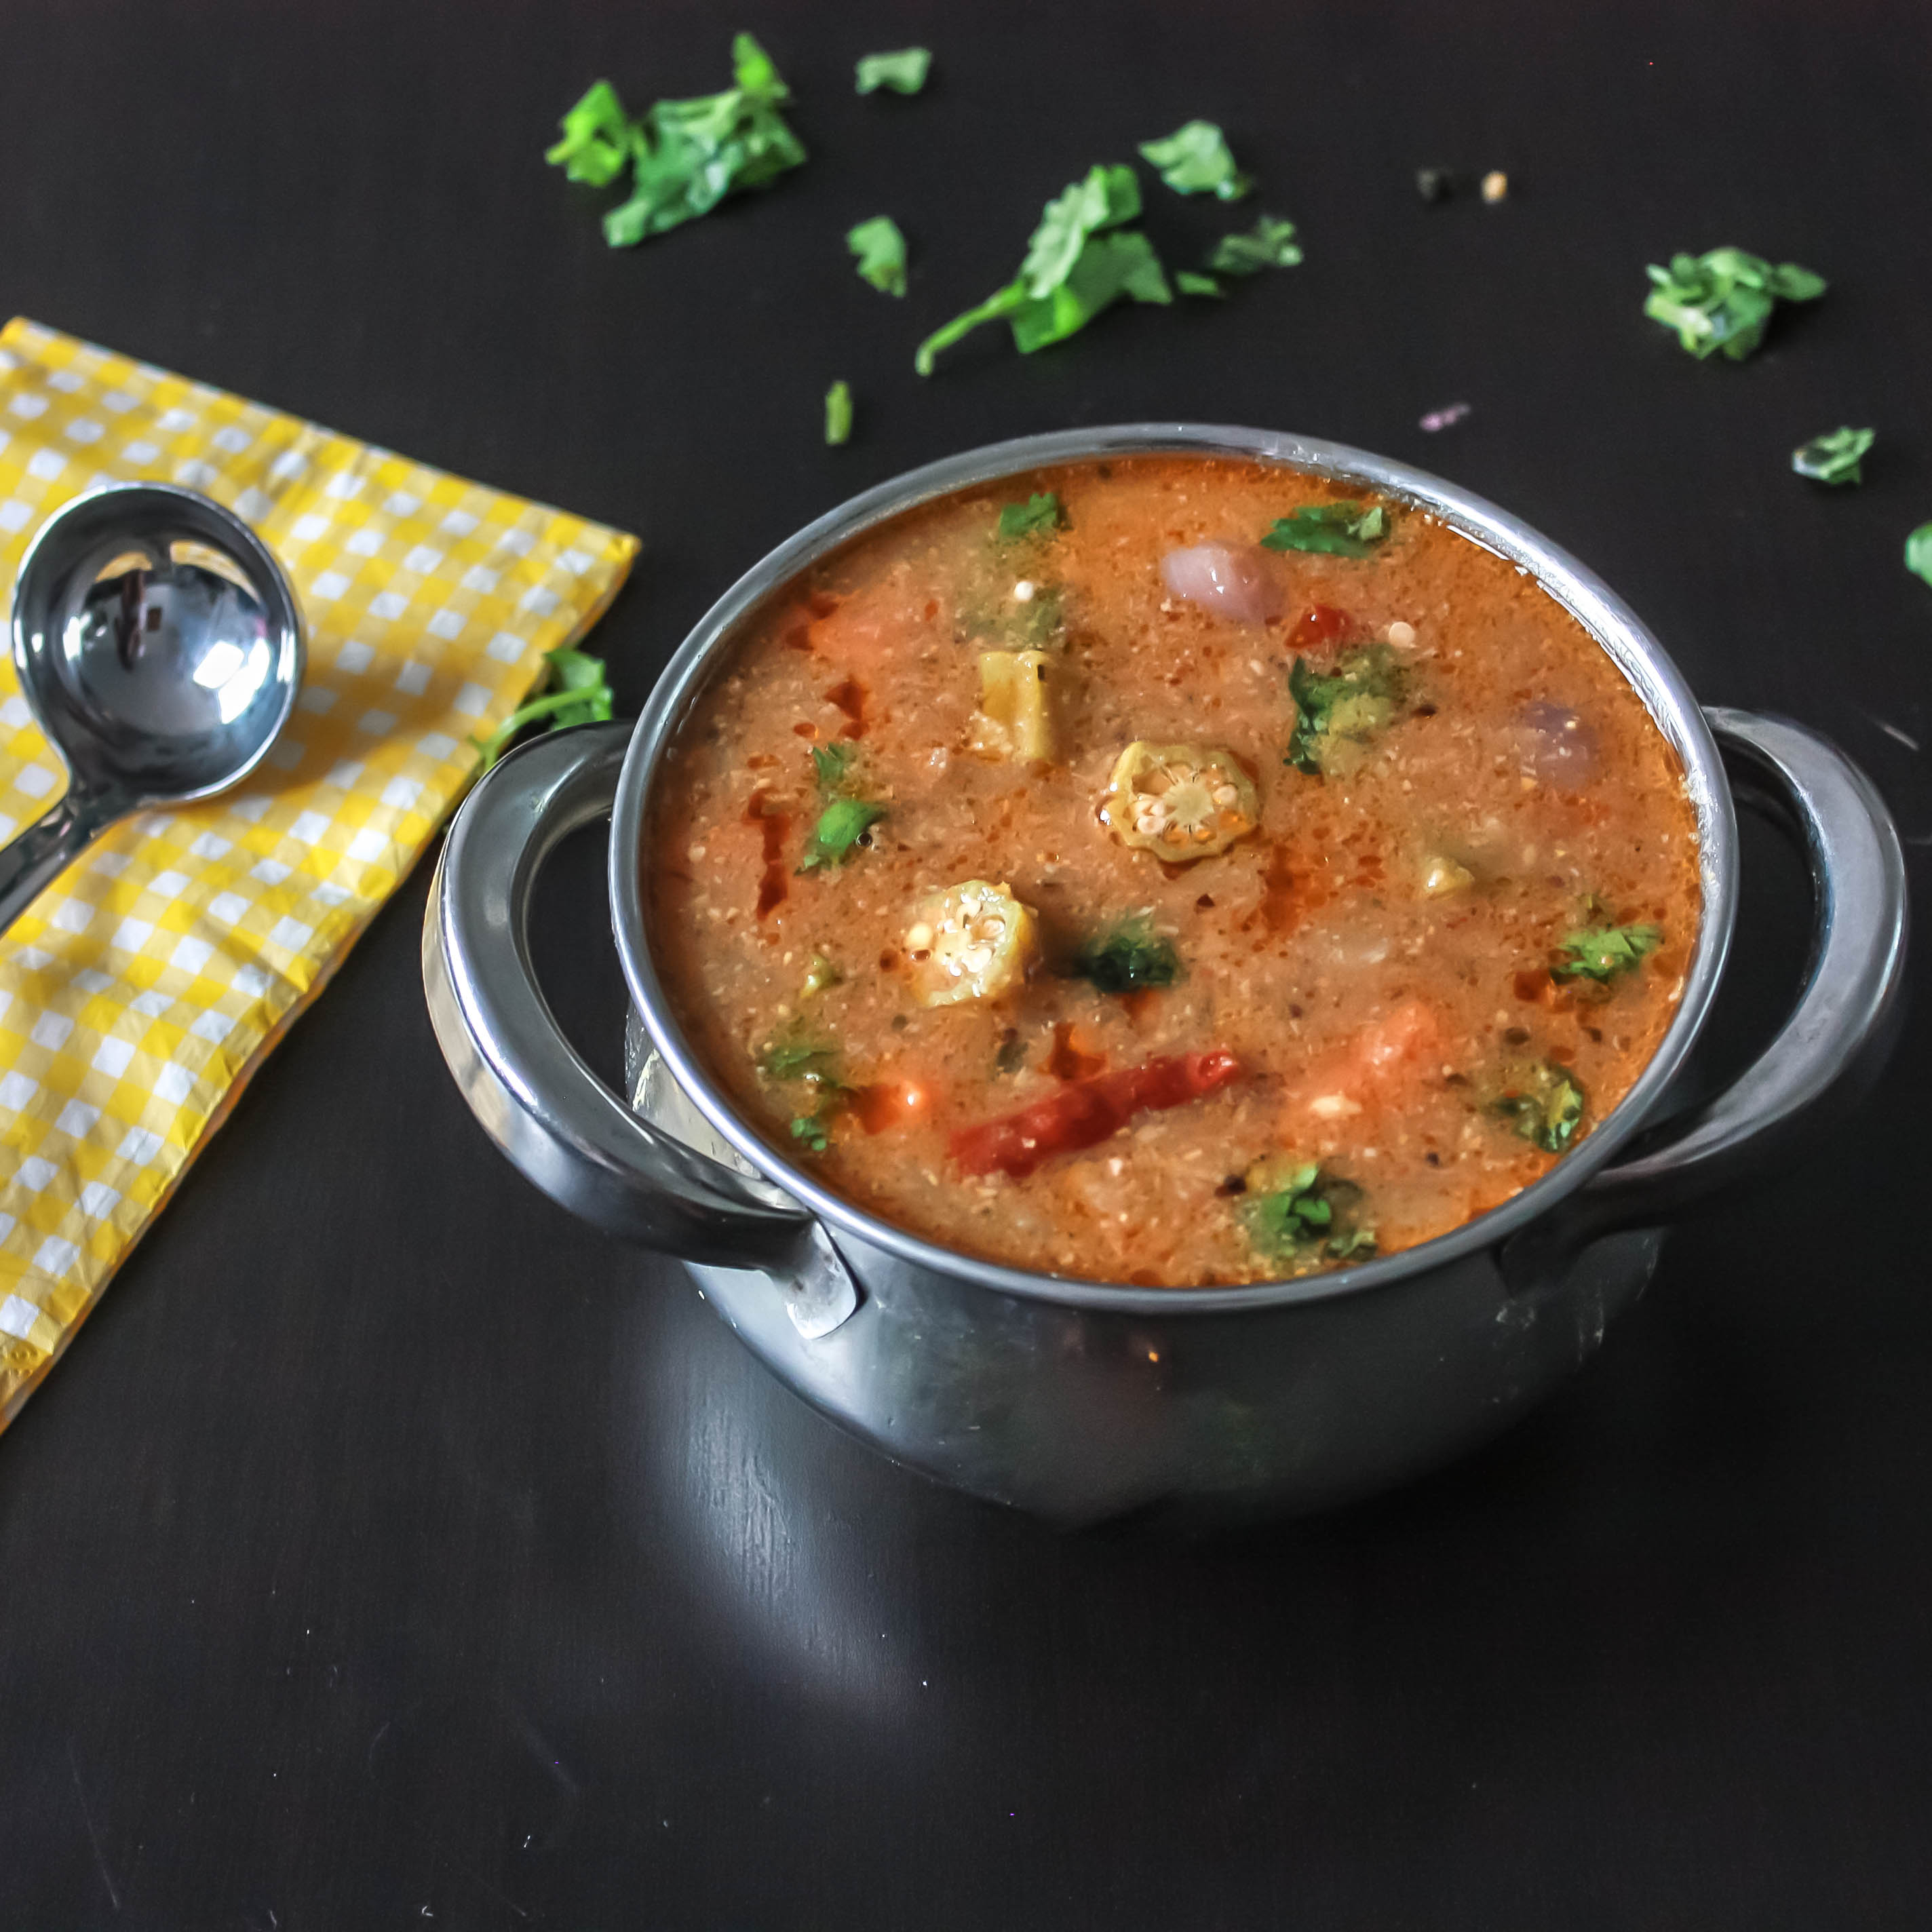
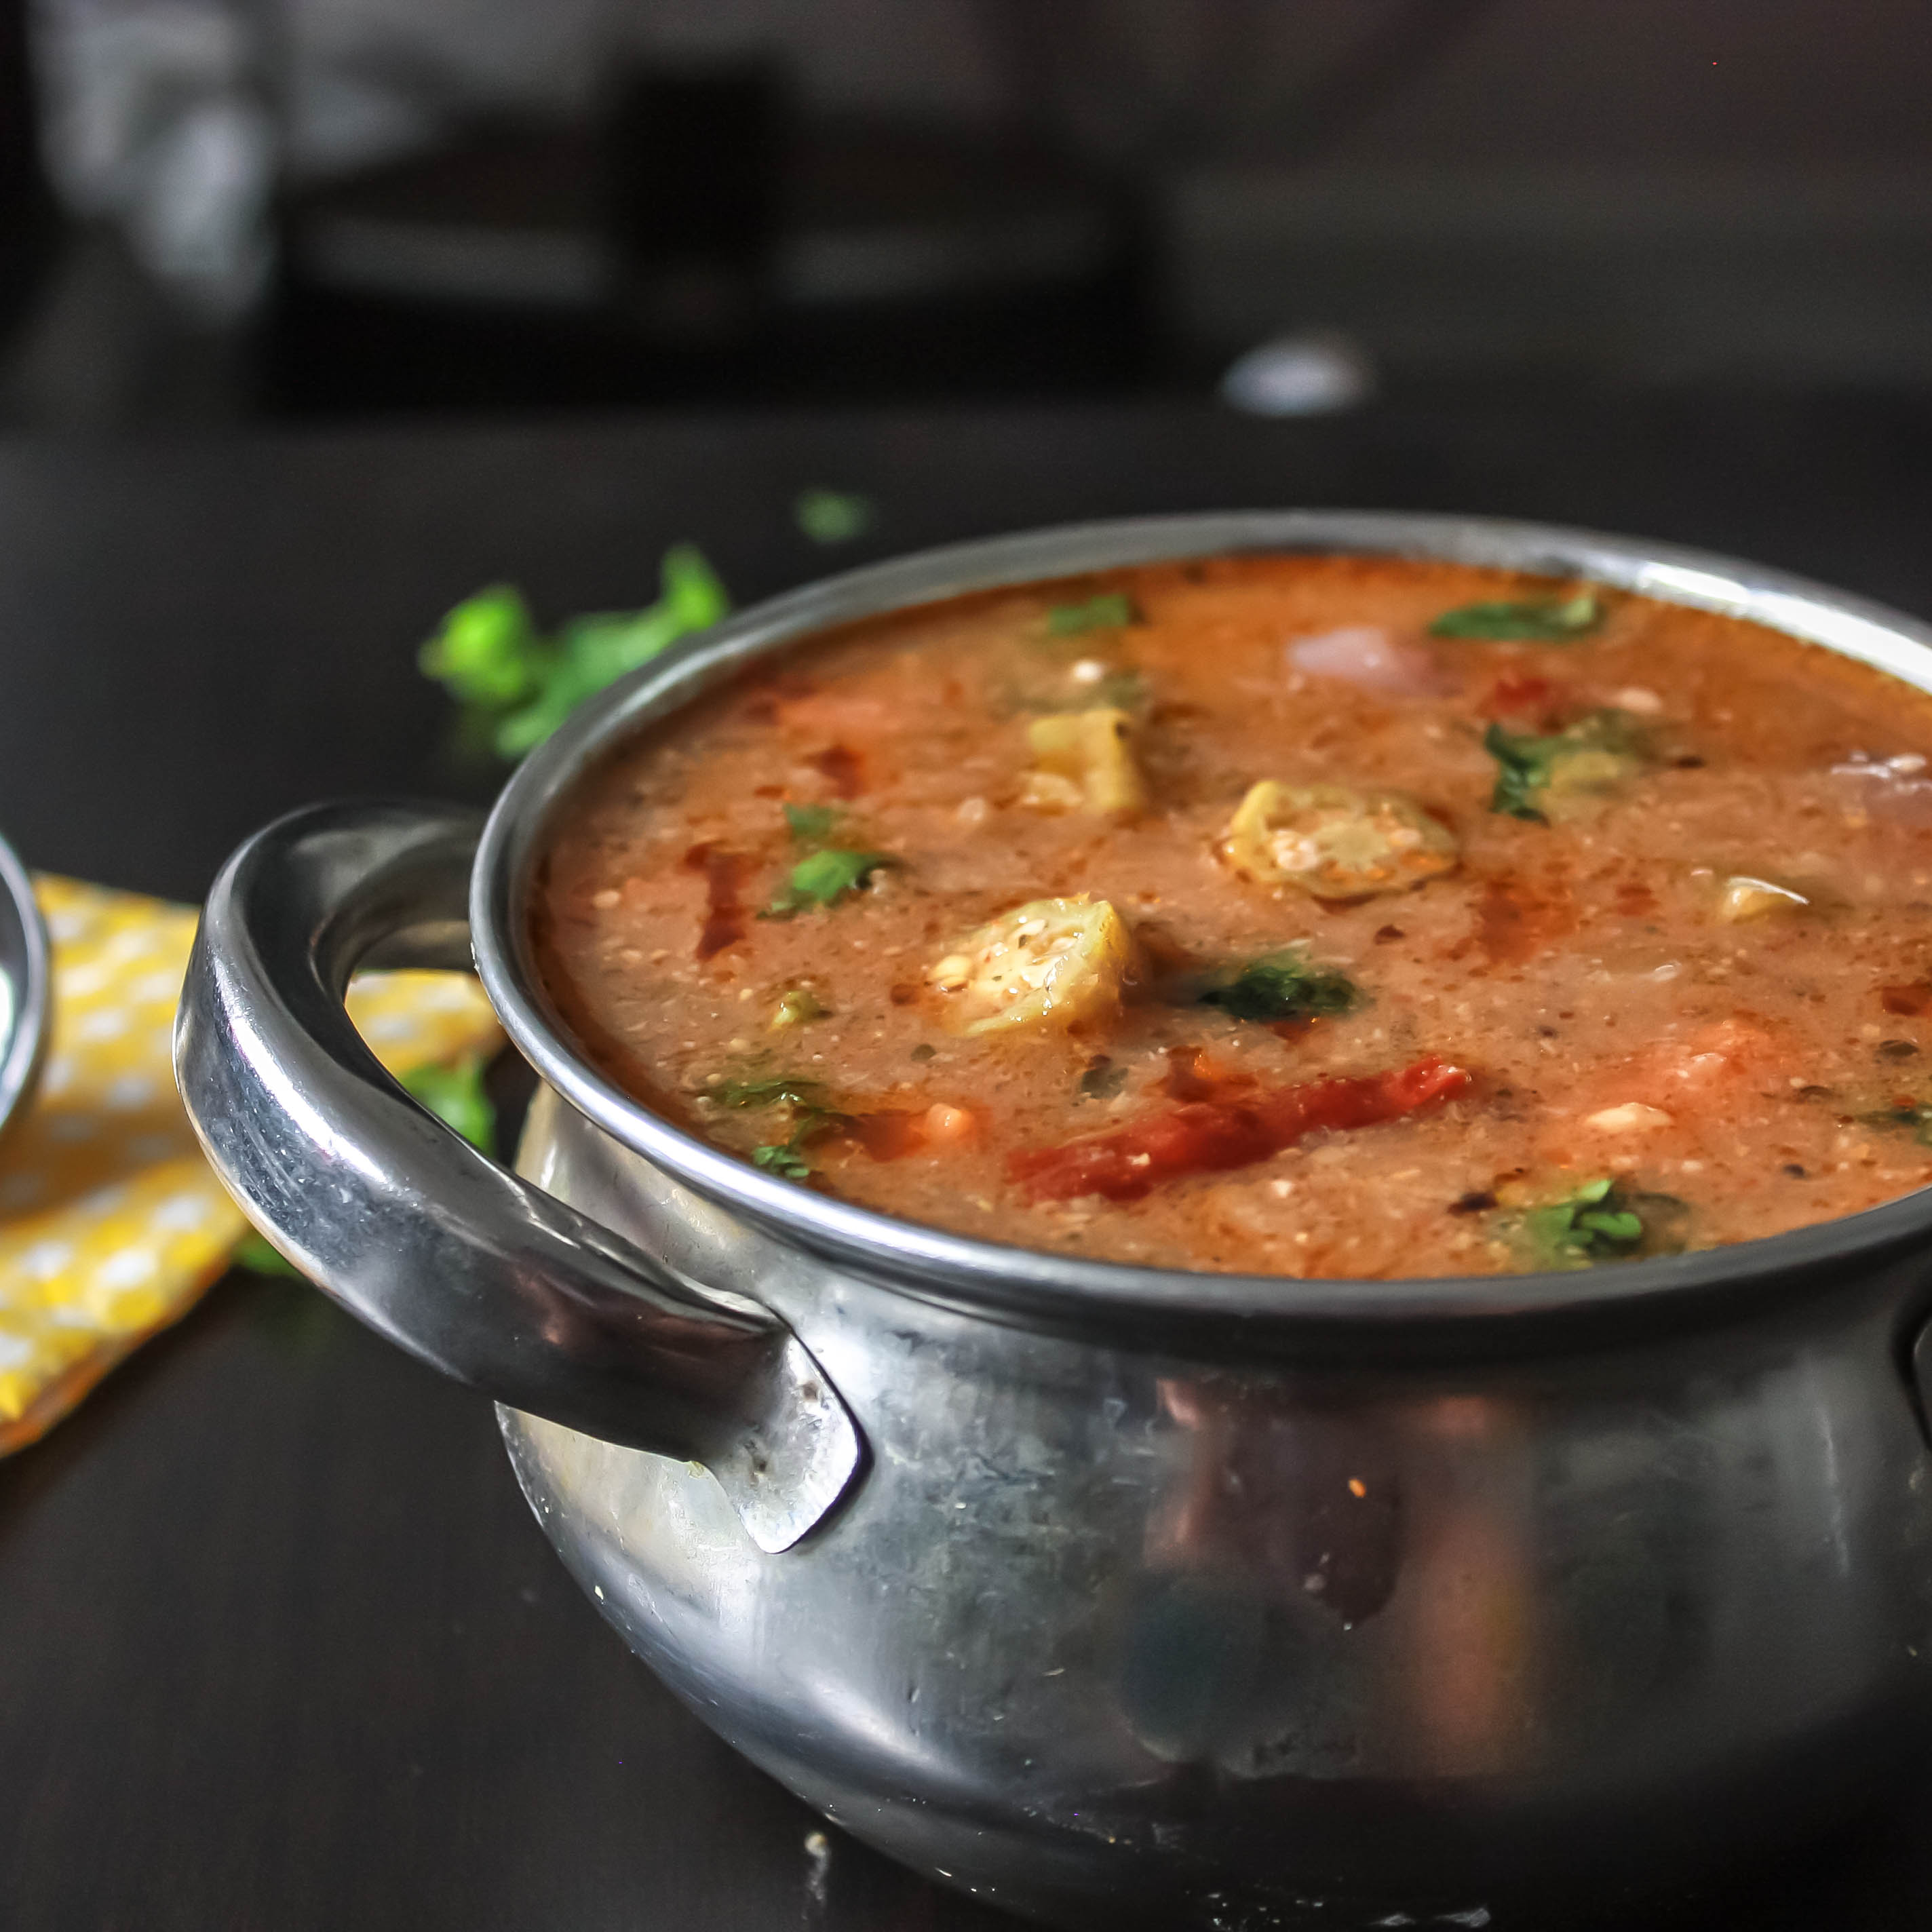
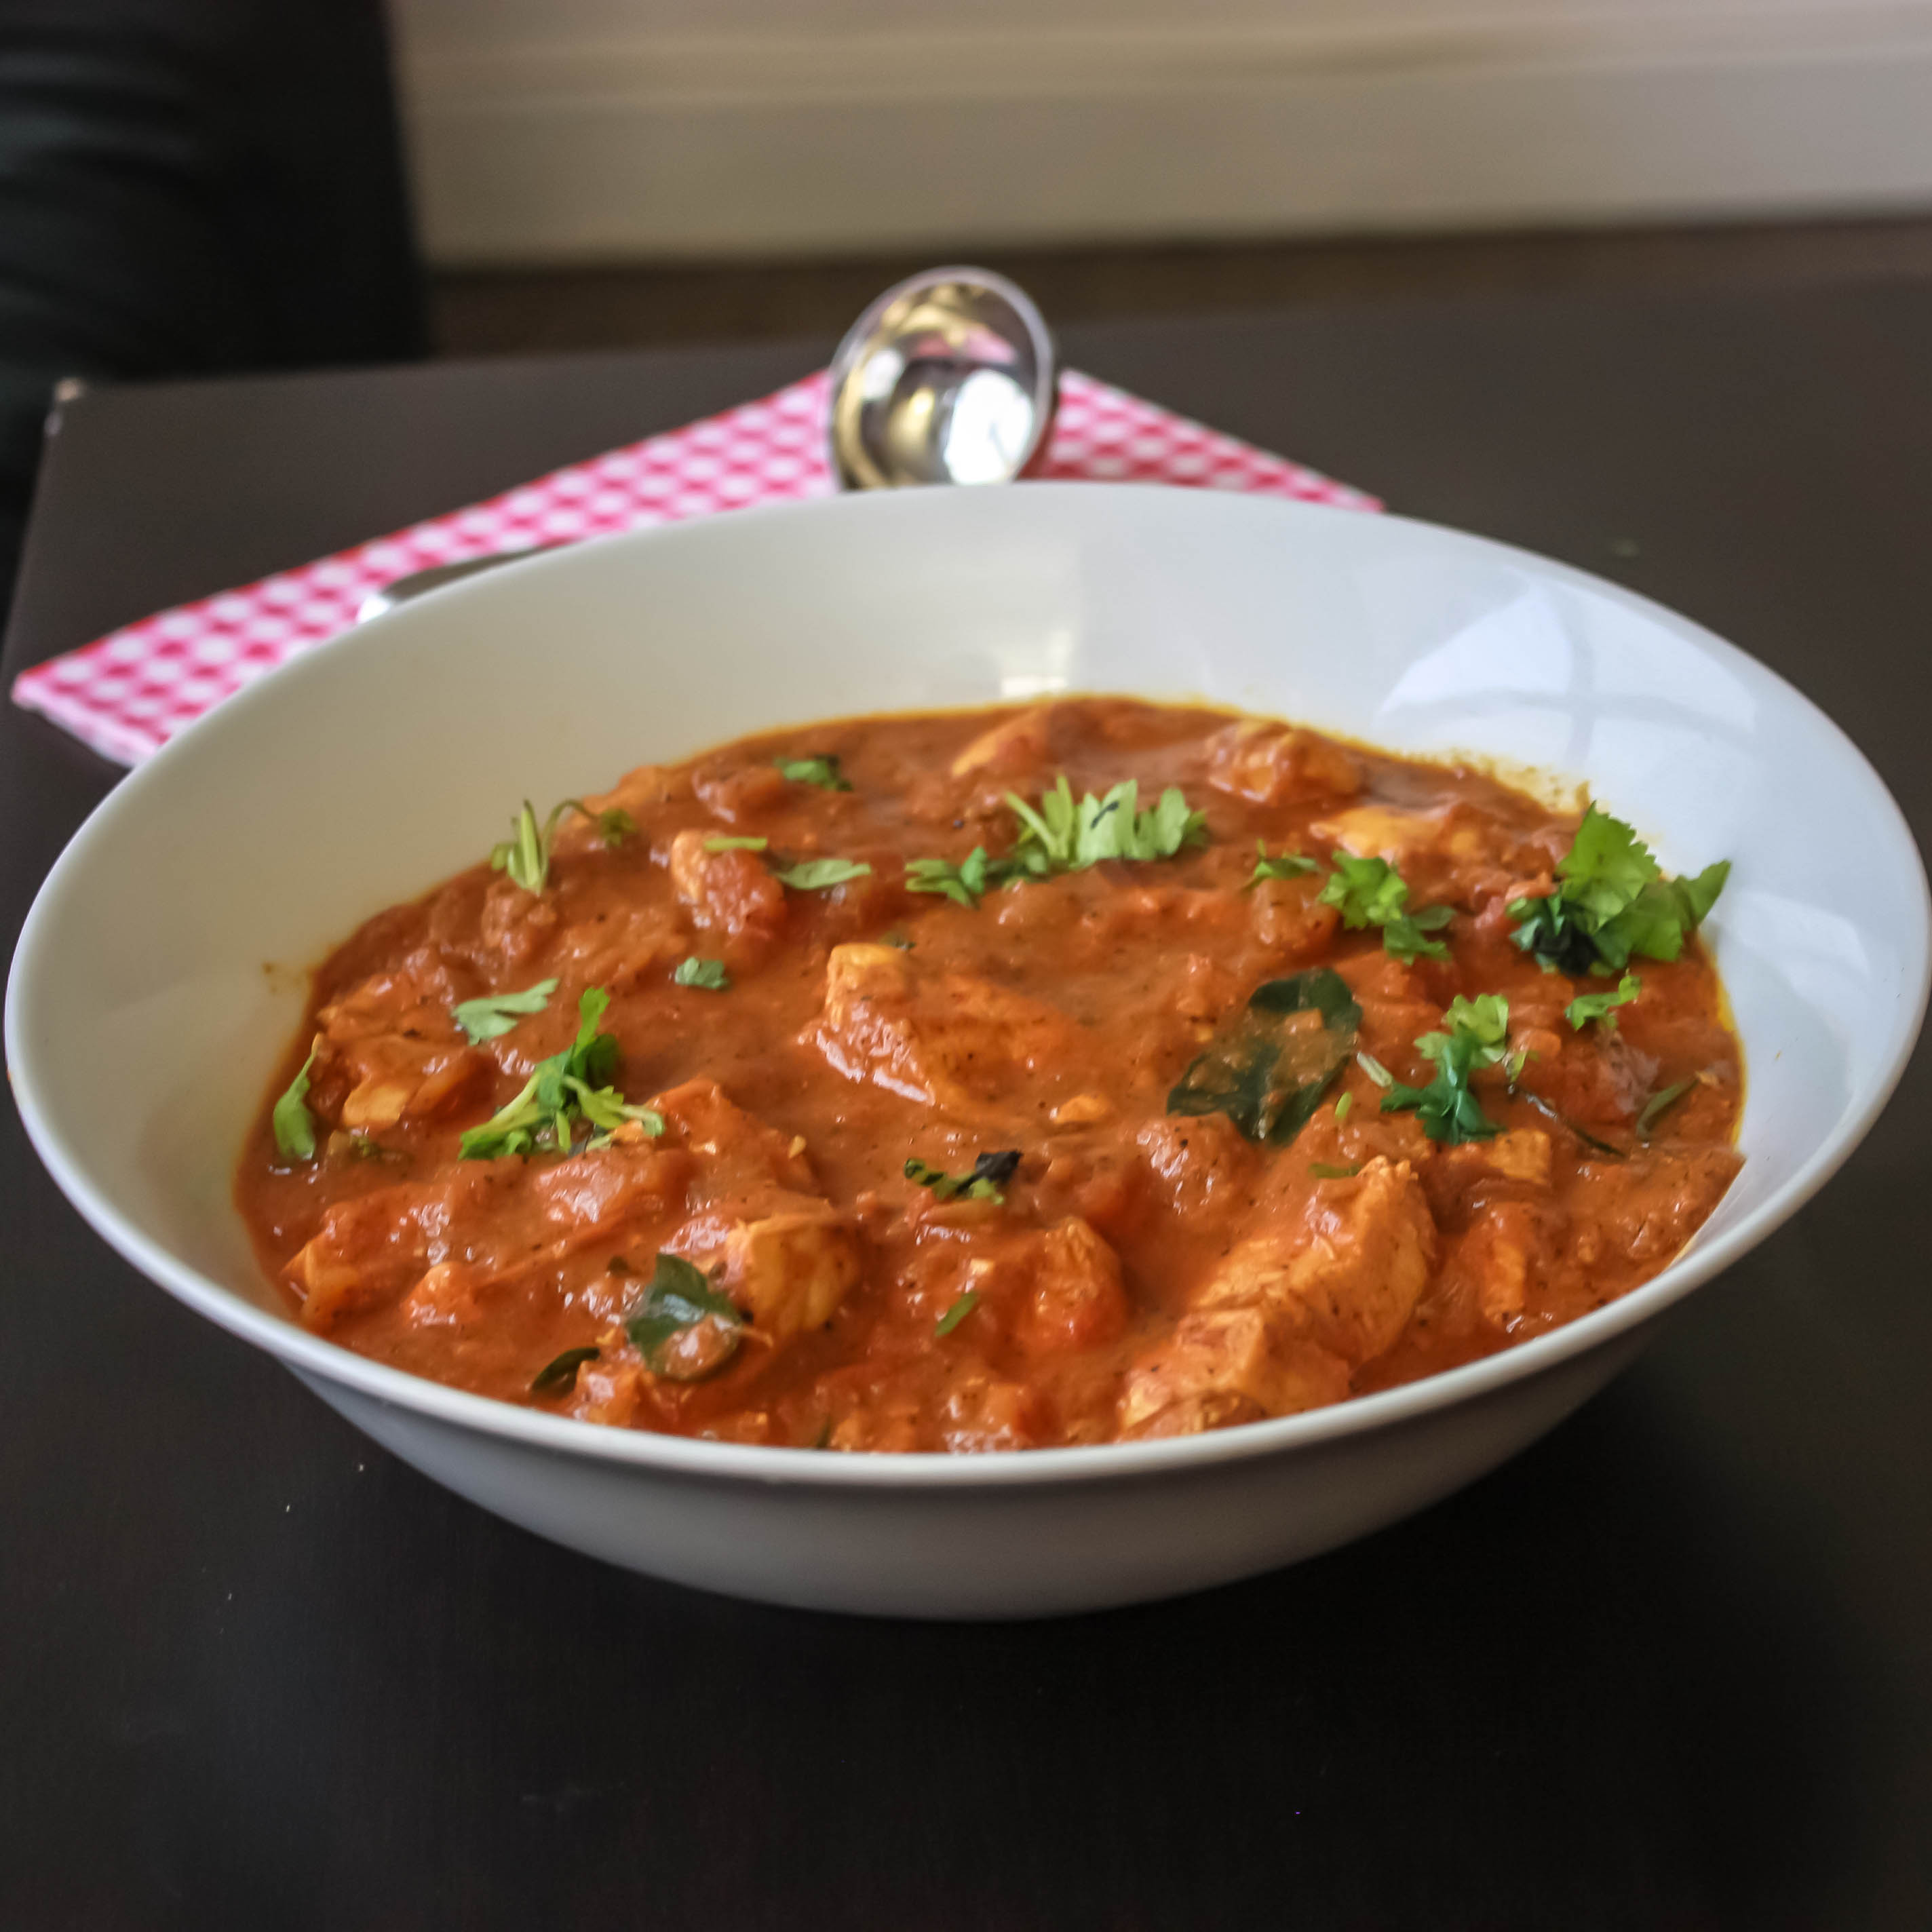
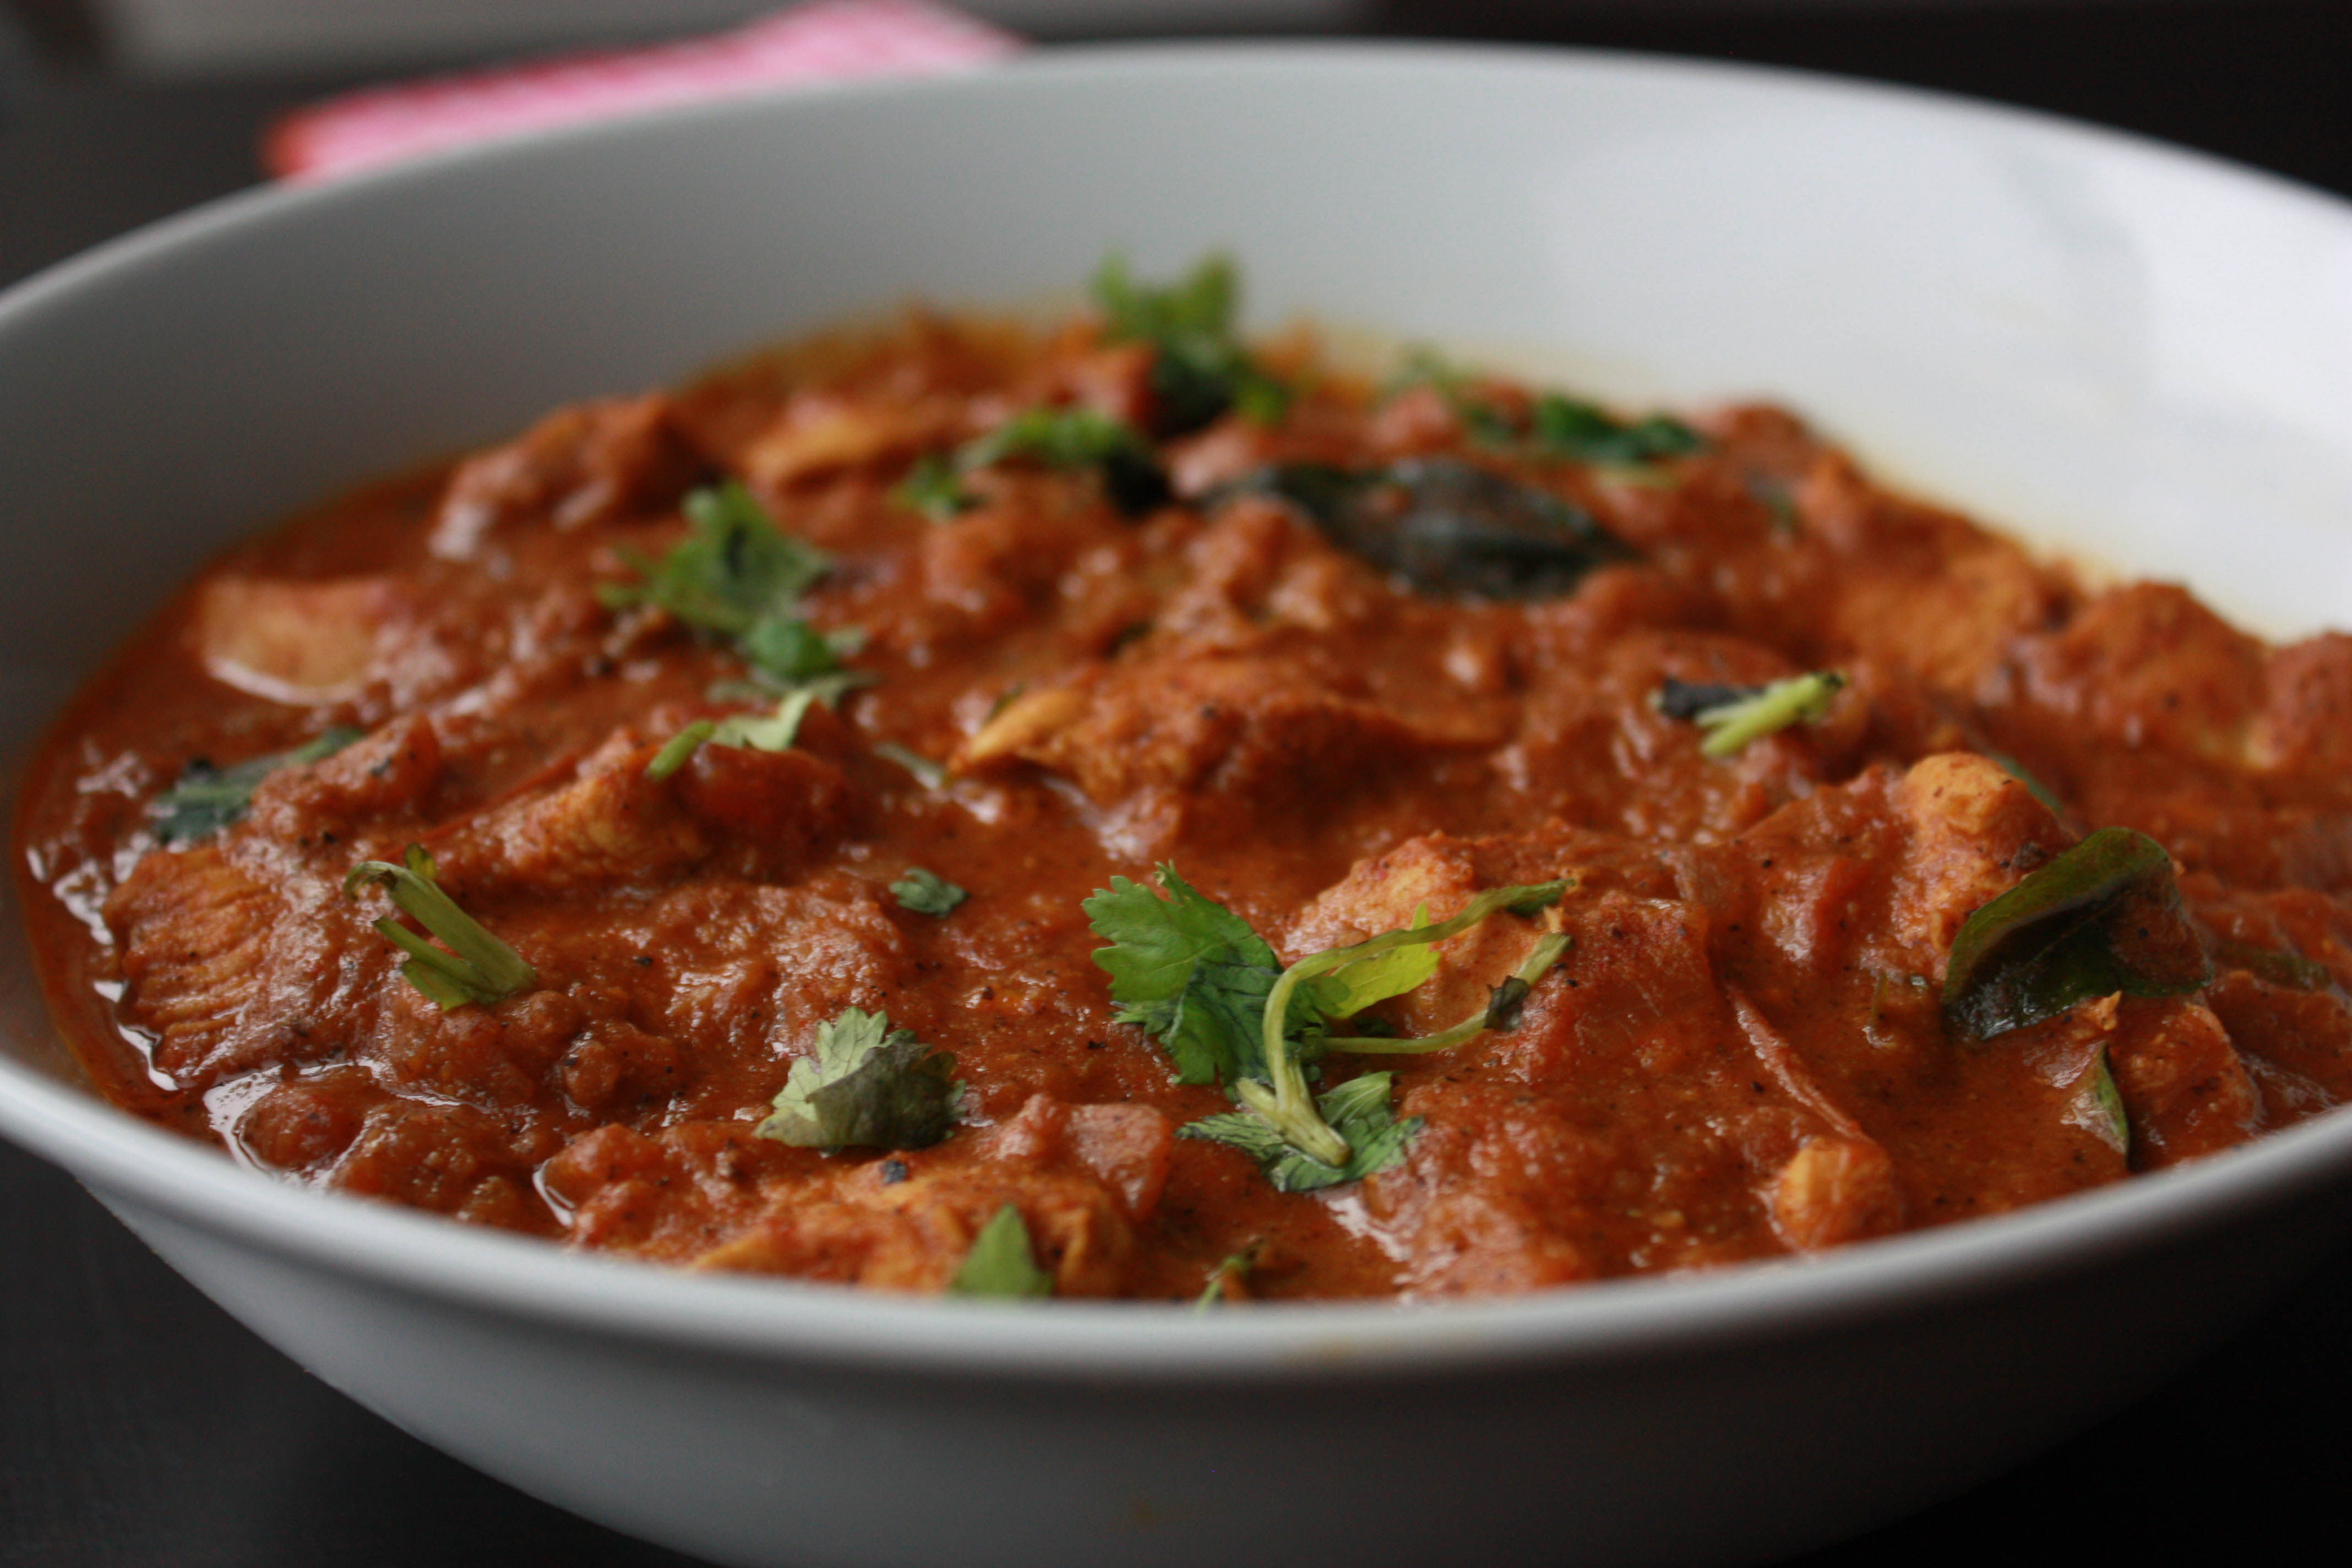
An authentic south Indian, tamarind based tangy curry with onions and garlic.


 This is one of my favorite curry/kuzhambu recipes. I can live with just this kuzhambu without having anything else for a week. I love this so much 🙂 My mom came to Montreal before a month for three days and she made this for me. I clicked this when she made it. I did not take great pictures as I was waiting to have it. 😀 Whatever my mom cooks I love 🙂 I guess it’s the same with all of you. But I love her tomato dal kurma, potato masala and channa masala a lot. And last month when i went to visit her at my sister place in Toronto, she brought me a suitcase full of cooking props, utensils and dresses and what not…You heard it right!! One full check in luggage! I just loved it 🙂 I was surprised. It was a 30 KG bag full of stuffs 🙂 ! Who will get me all that if not my Mom. 🙂 I was amazed 🙂 below is the picture with my Mom 🙂 Felt like sharing :)!

suganya&Mom

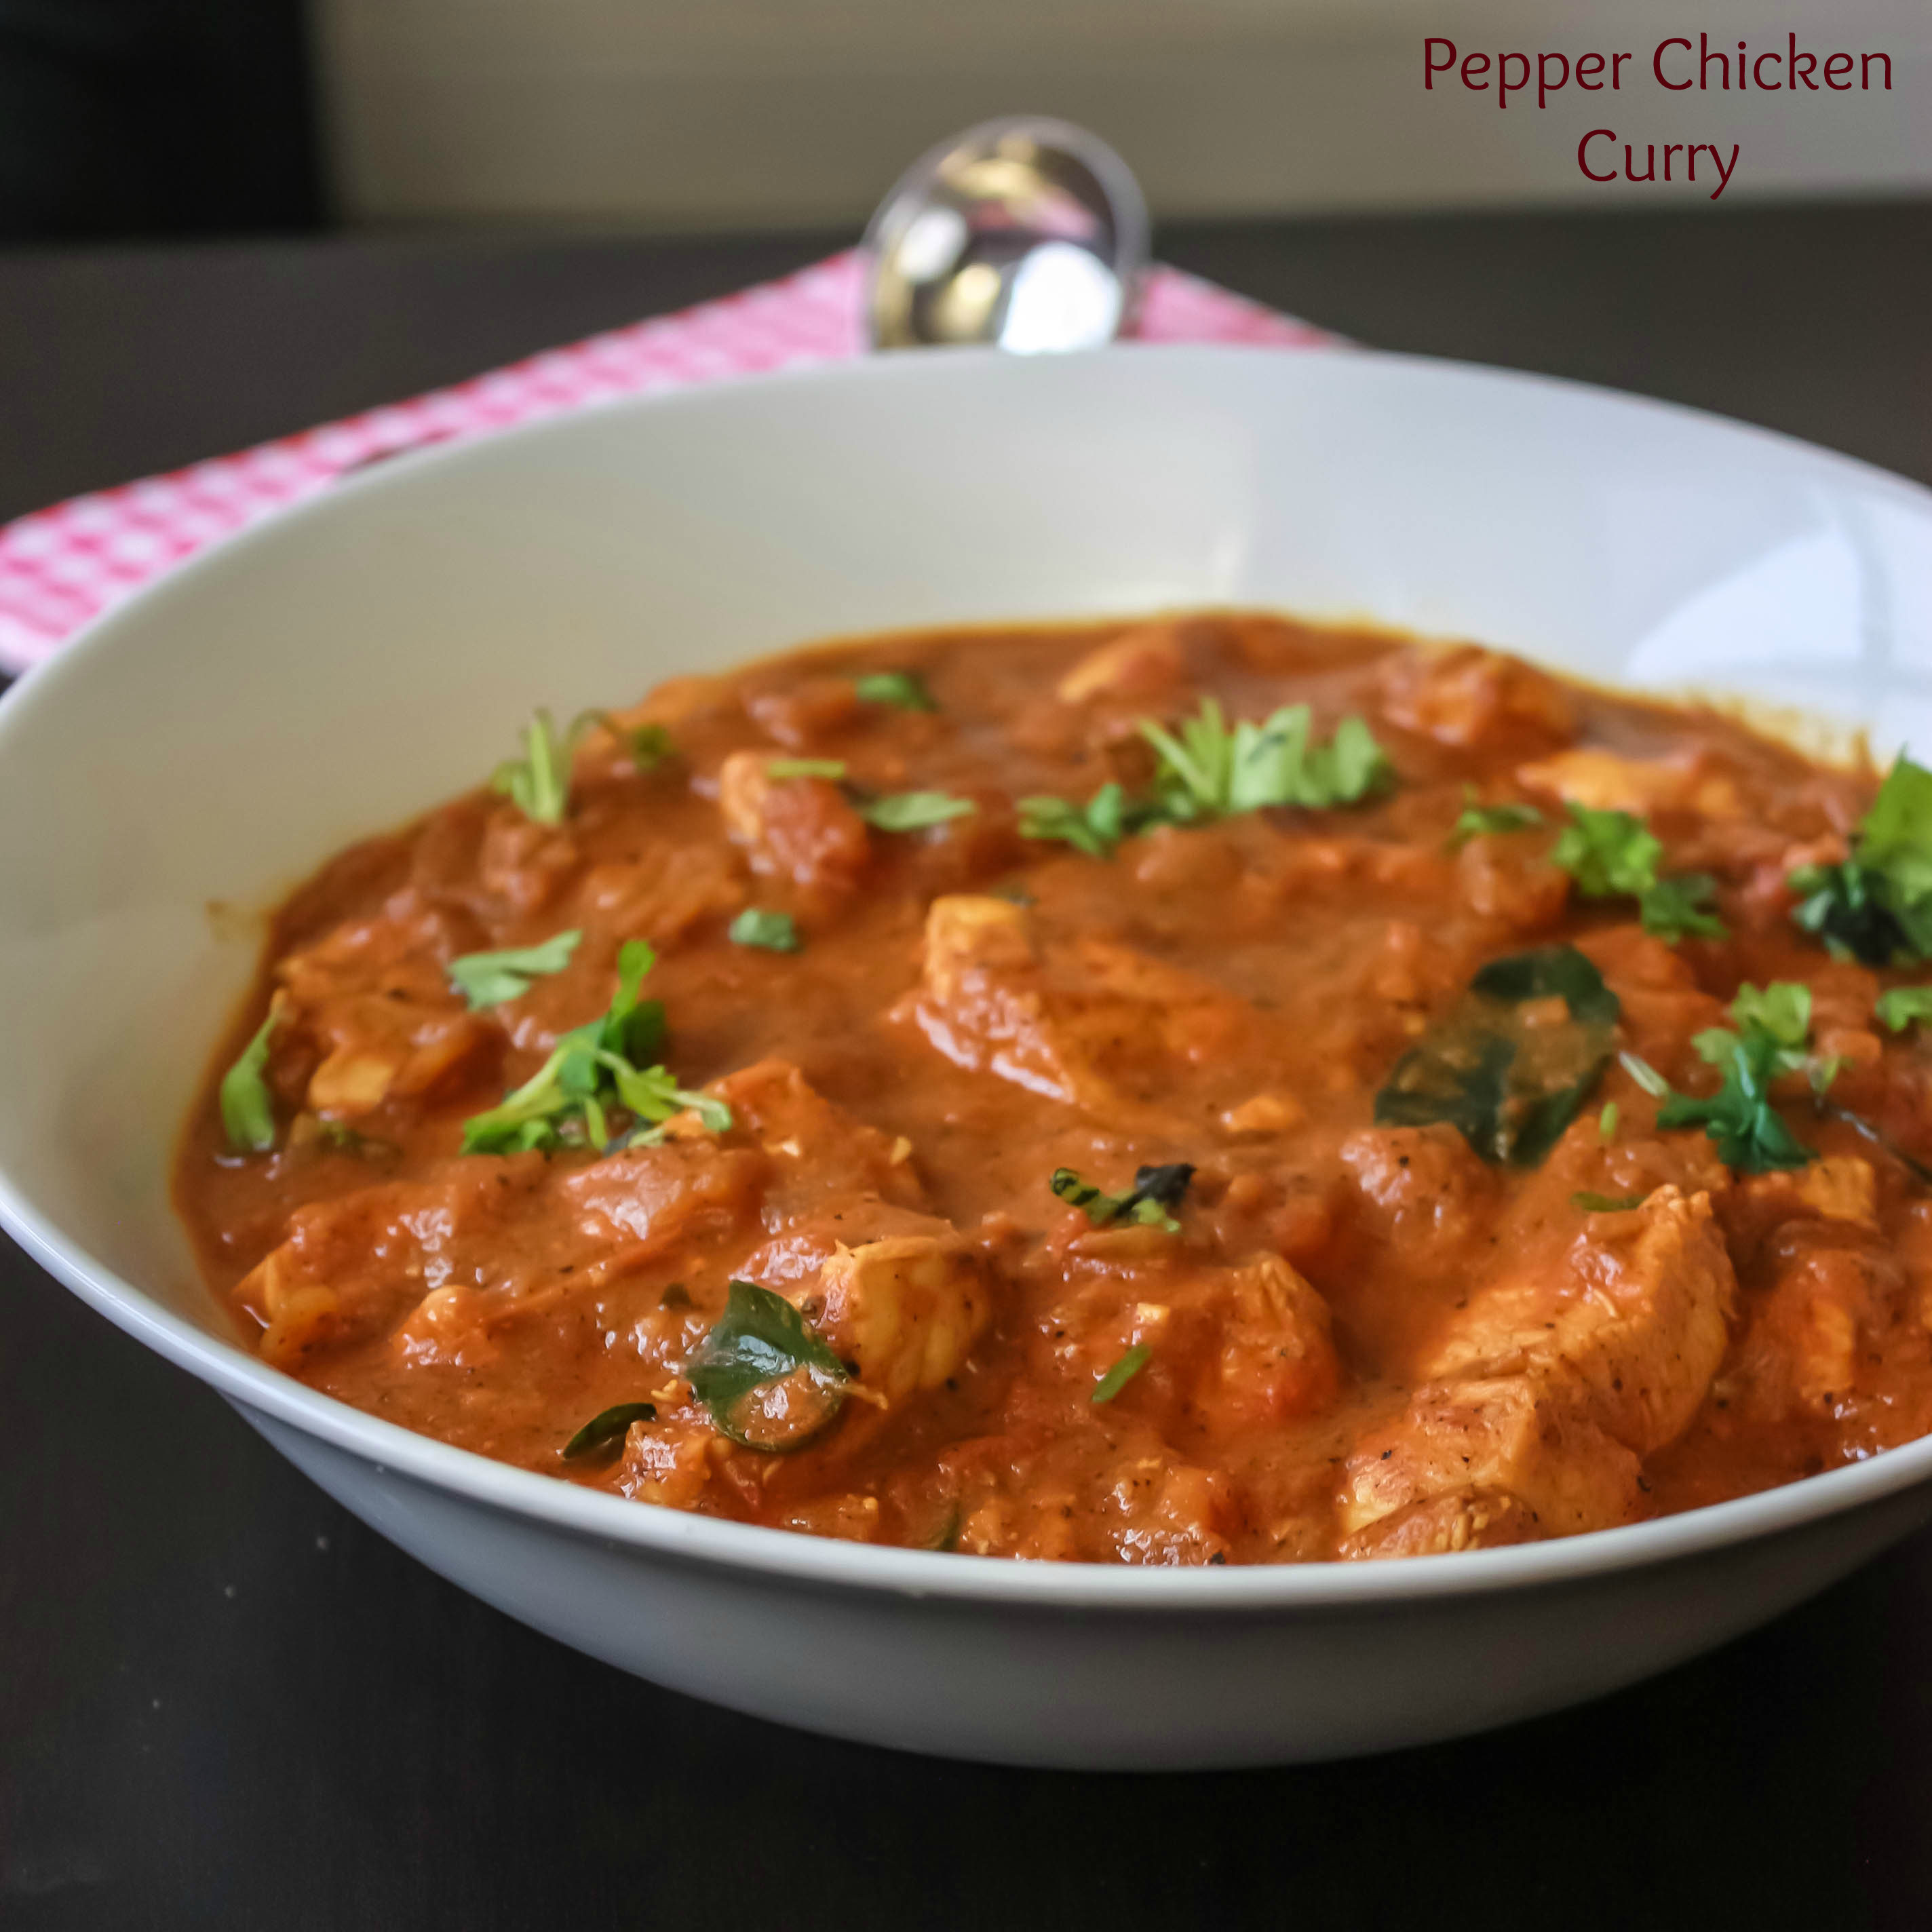
 Kuzhambu is a tangy curry. And you can make lots of different curries with veggeis or meat. Like Chicken curry, fish kuzhambu, okra curry, milagu kuzhambu and so on. Each gives different taste but the base curry is almost the same with onion, garlic and tomato.

Kuzhambu is different from sambhar, we don’t use much veggies like sambhar and no use of cooked dal. And kuzhambu will last for 3-4 days or even a week under refrigeration due to its high tamarind content.

5.0 from 1 reviews
Print
Vengaya Kuzhambu / Onion Garlic Curry
Author: Suganya Hariharan
Recipe type: Main
Cuisine: Indian
Cook time:  30 mins
Total time:  30 mins
Serves: 4
 
Ingredients
  • Sesame Oil - 2 tbsp
  • Mustard seeds - ½ tsp
  • urad dal – ¼ tsp
  • Channa dal - ¼ tsp
  • Vendayam / Fenugreek - ¼ tsp
  • Curry Leaves - few
  • Red Chilli - 1
  • Shallots/ Small onions - 10-12, skin peeled
  • Red onion - ½ cup, chopped finely
  • Garlic - 10 pods
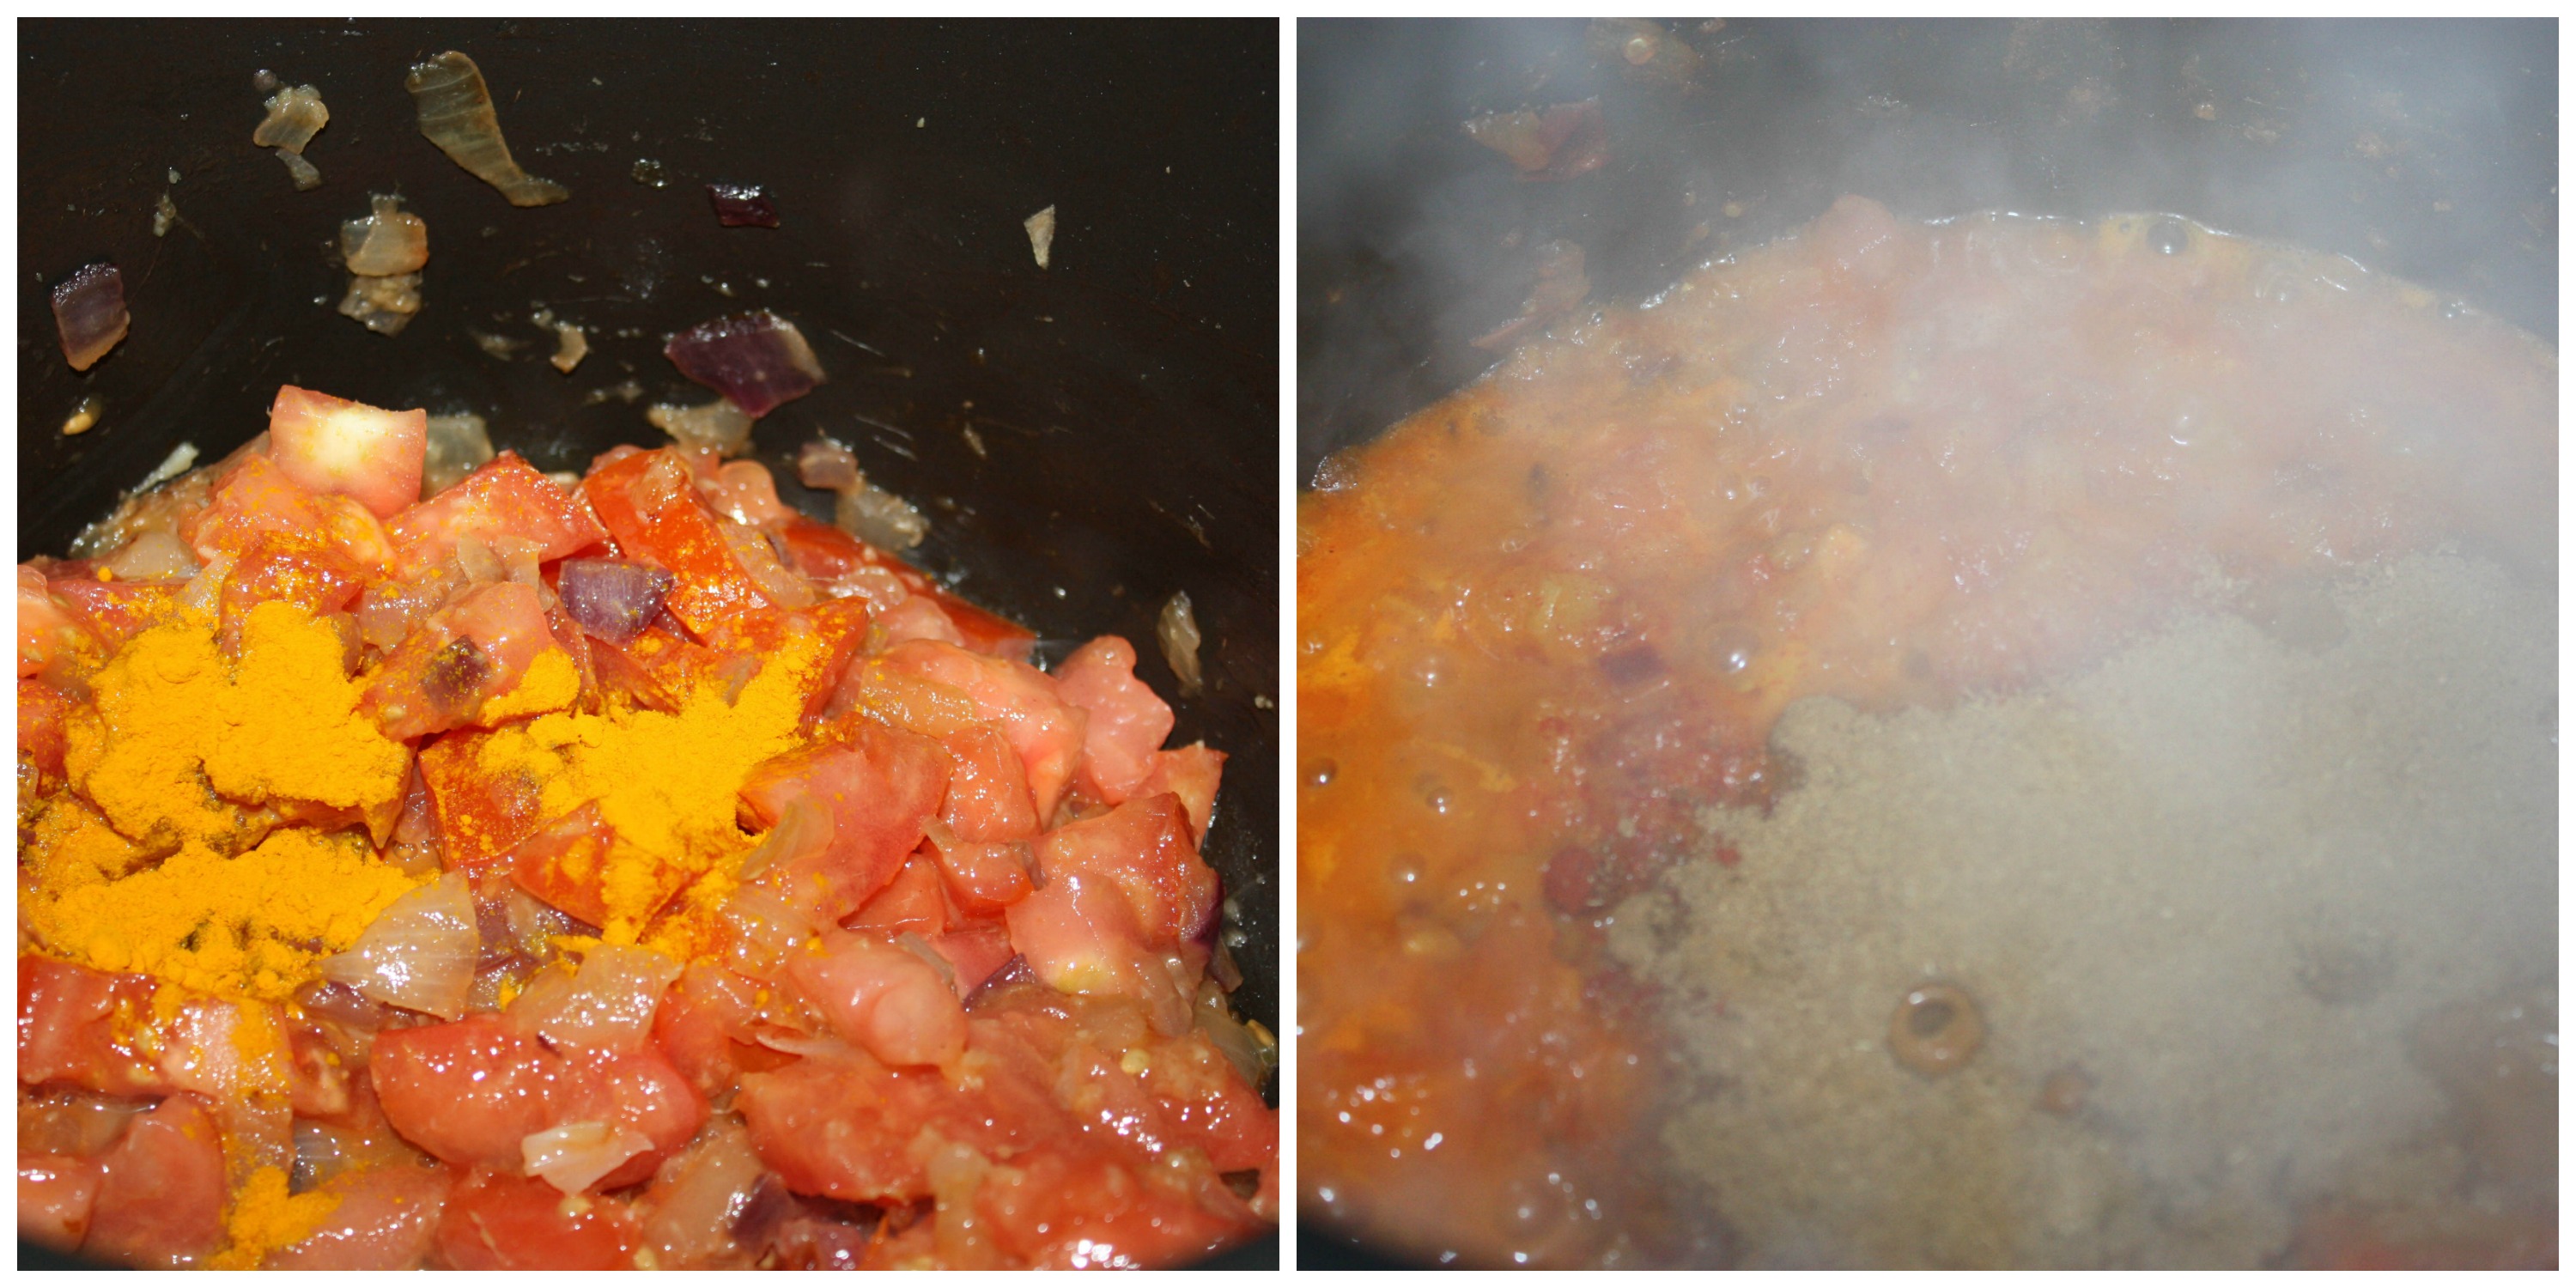
  • Tomato - ¼ cup, chopped
  • Turmeric Powder - 1 tsp
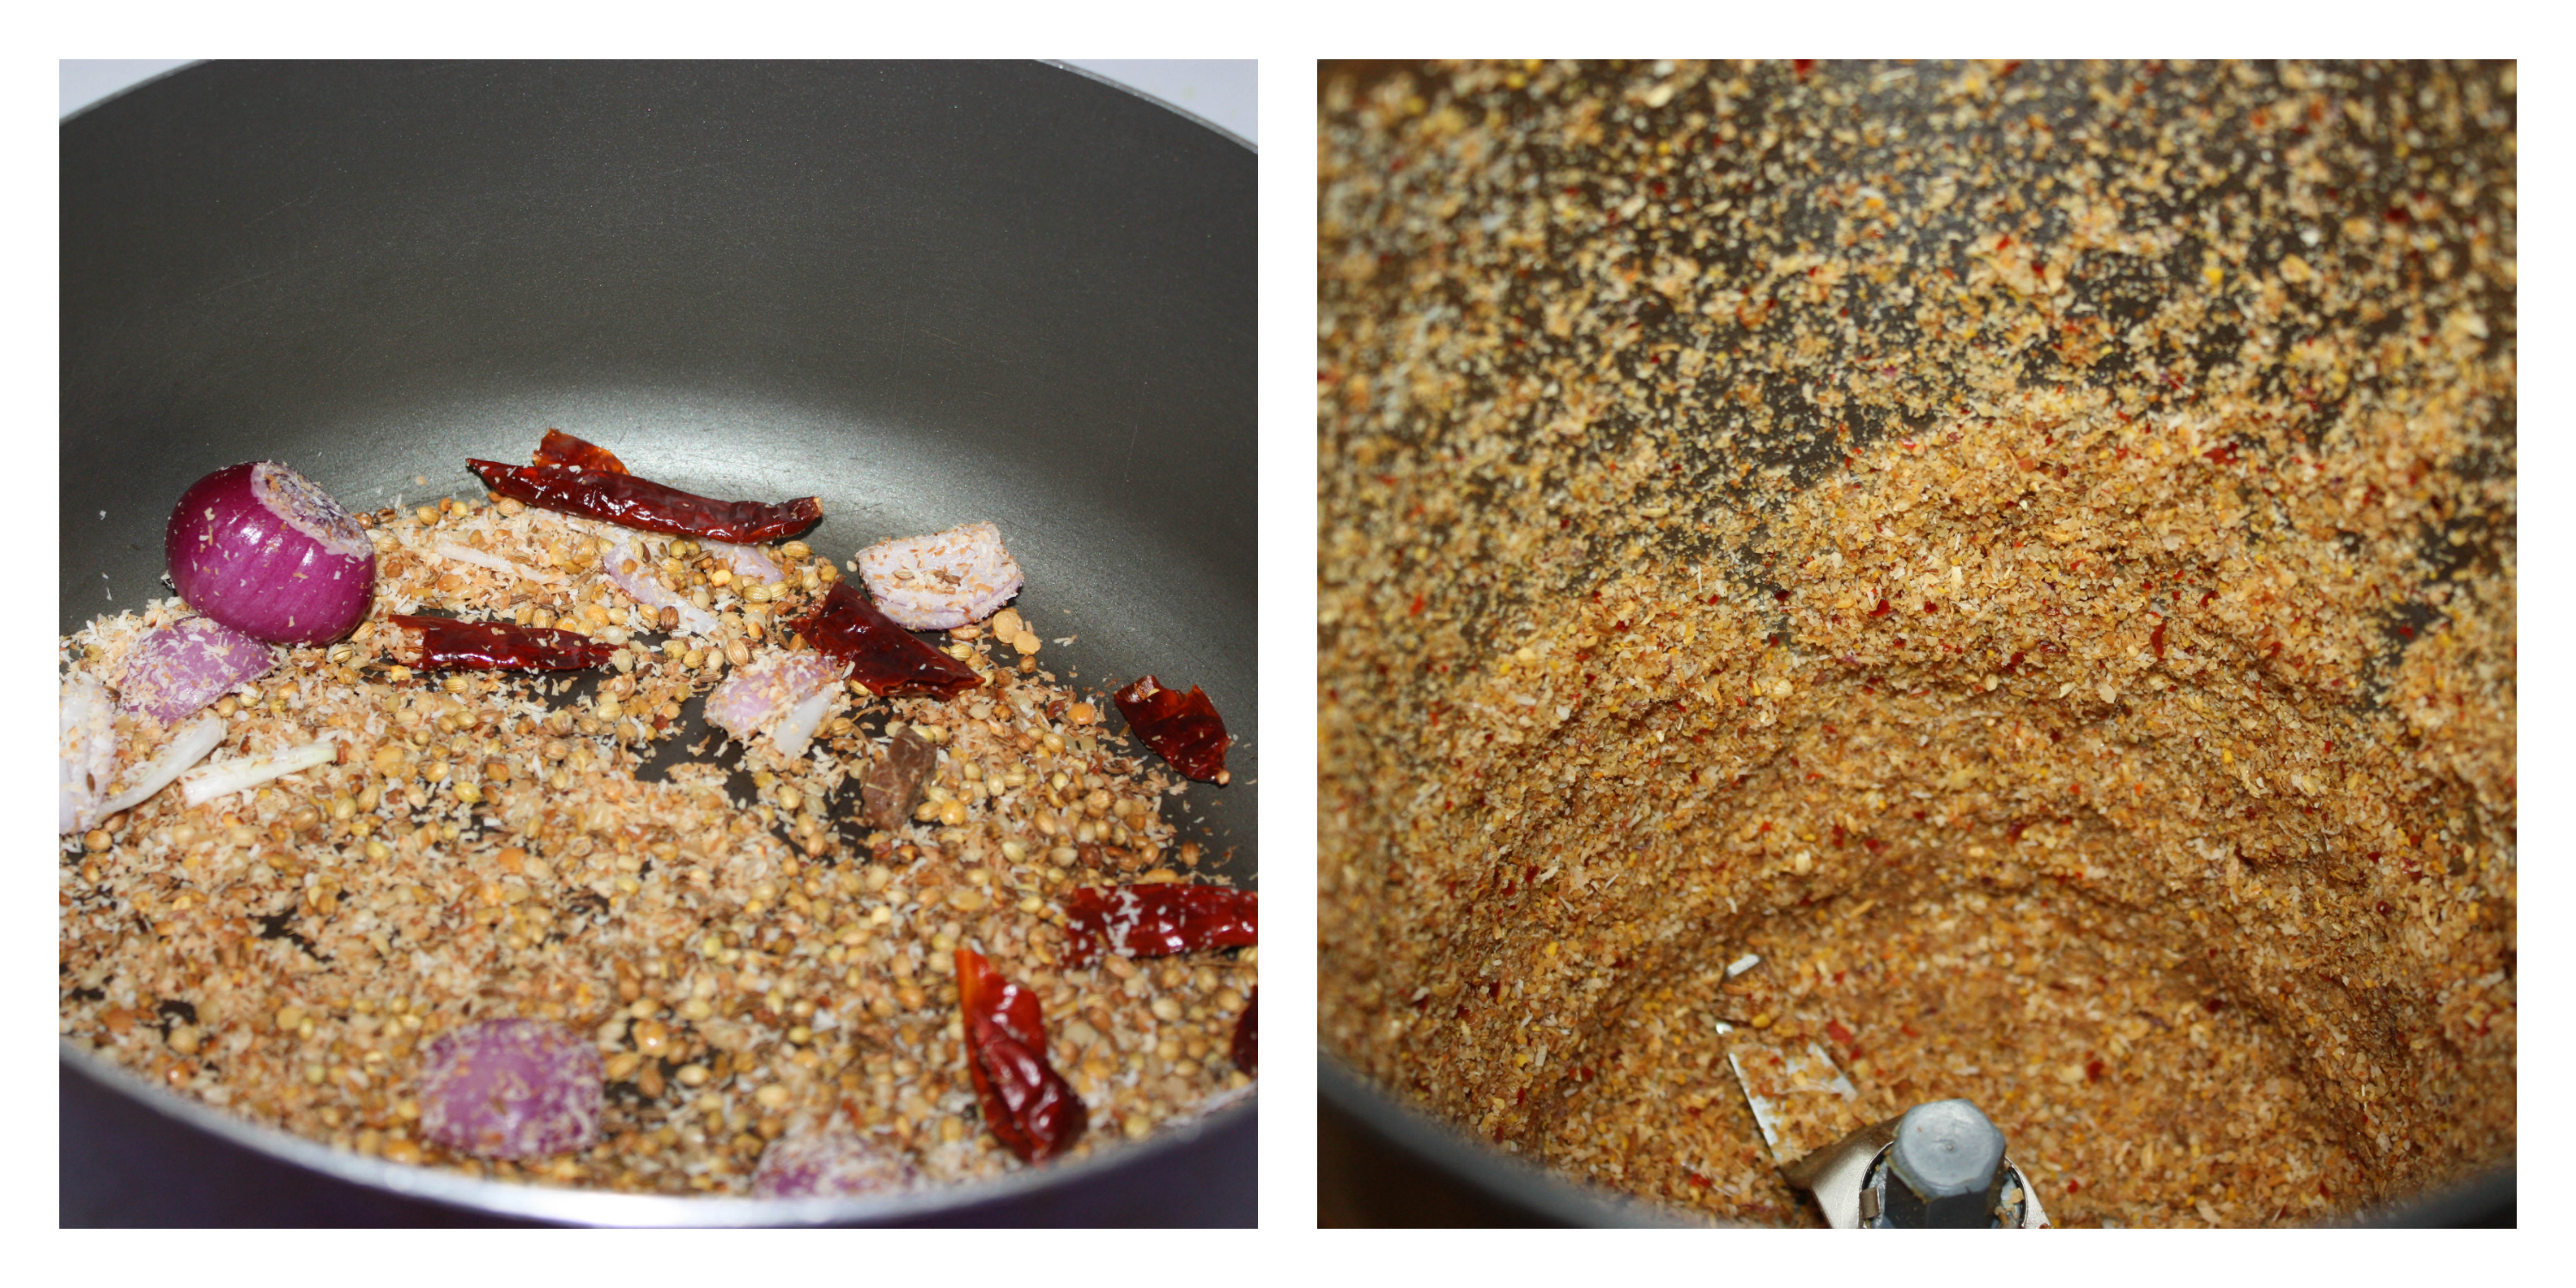
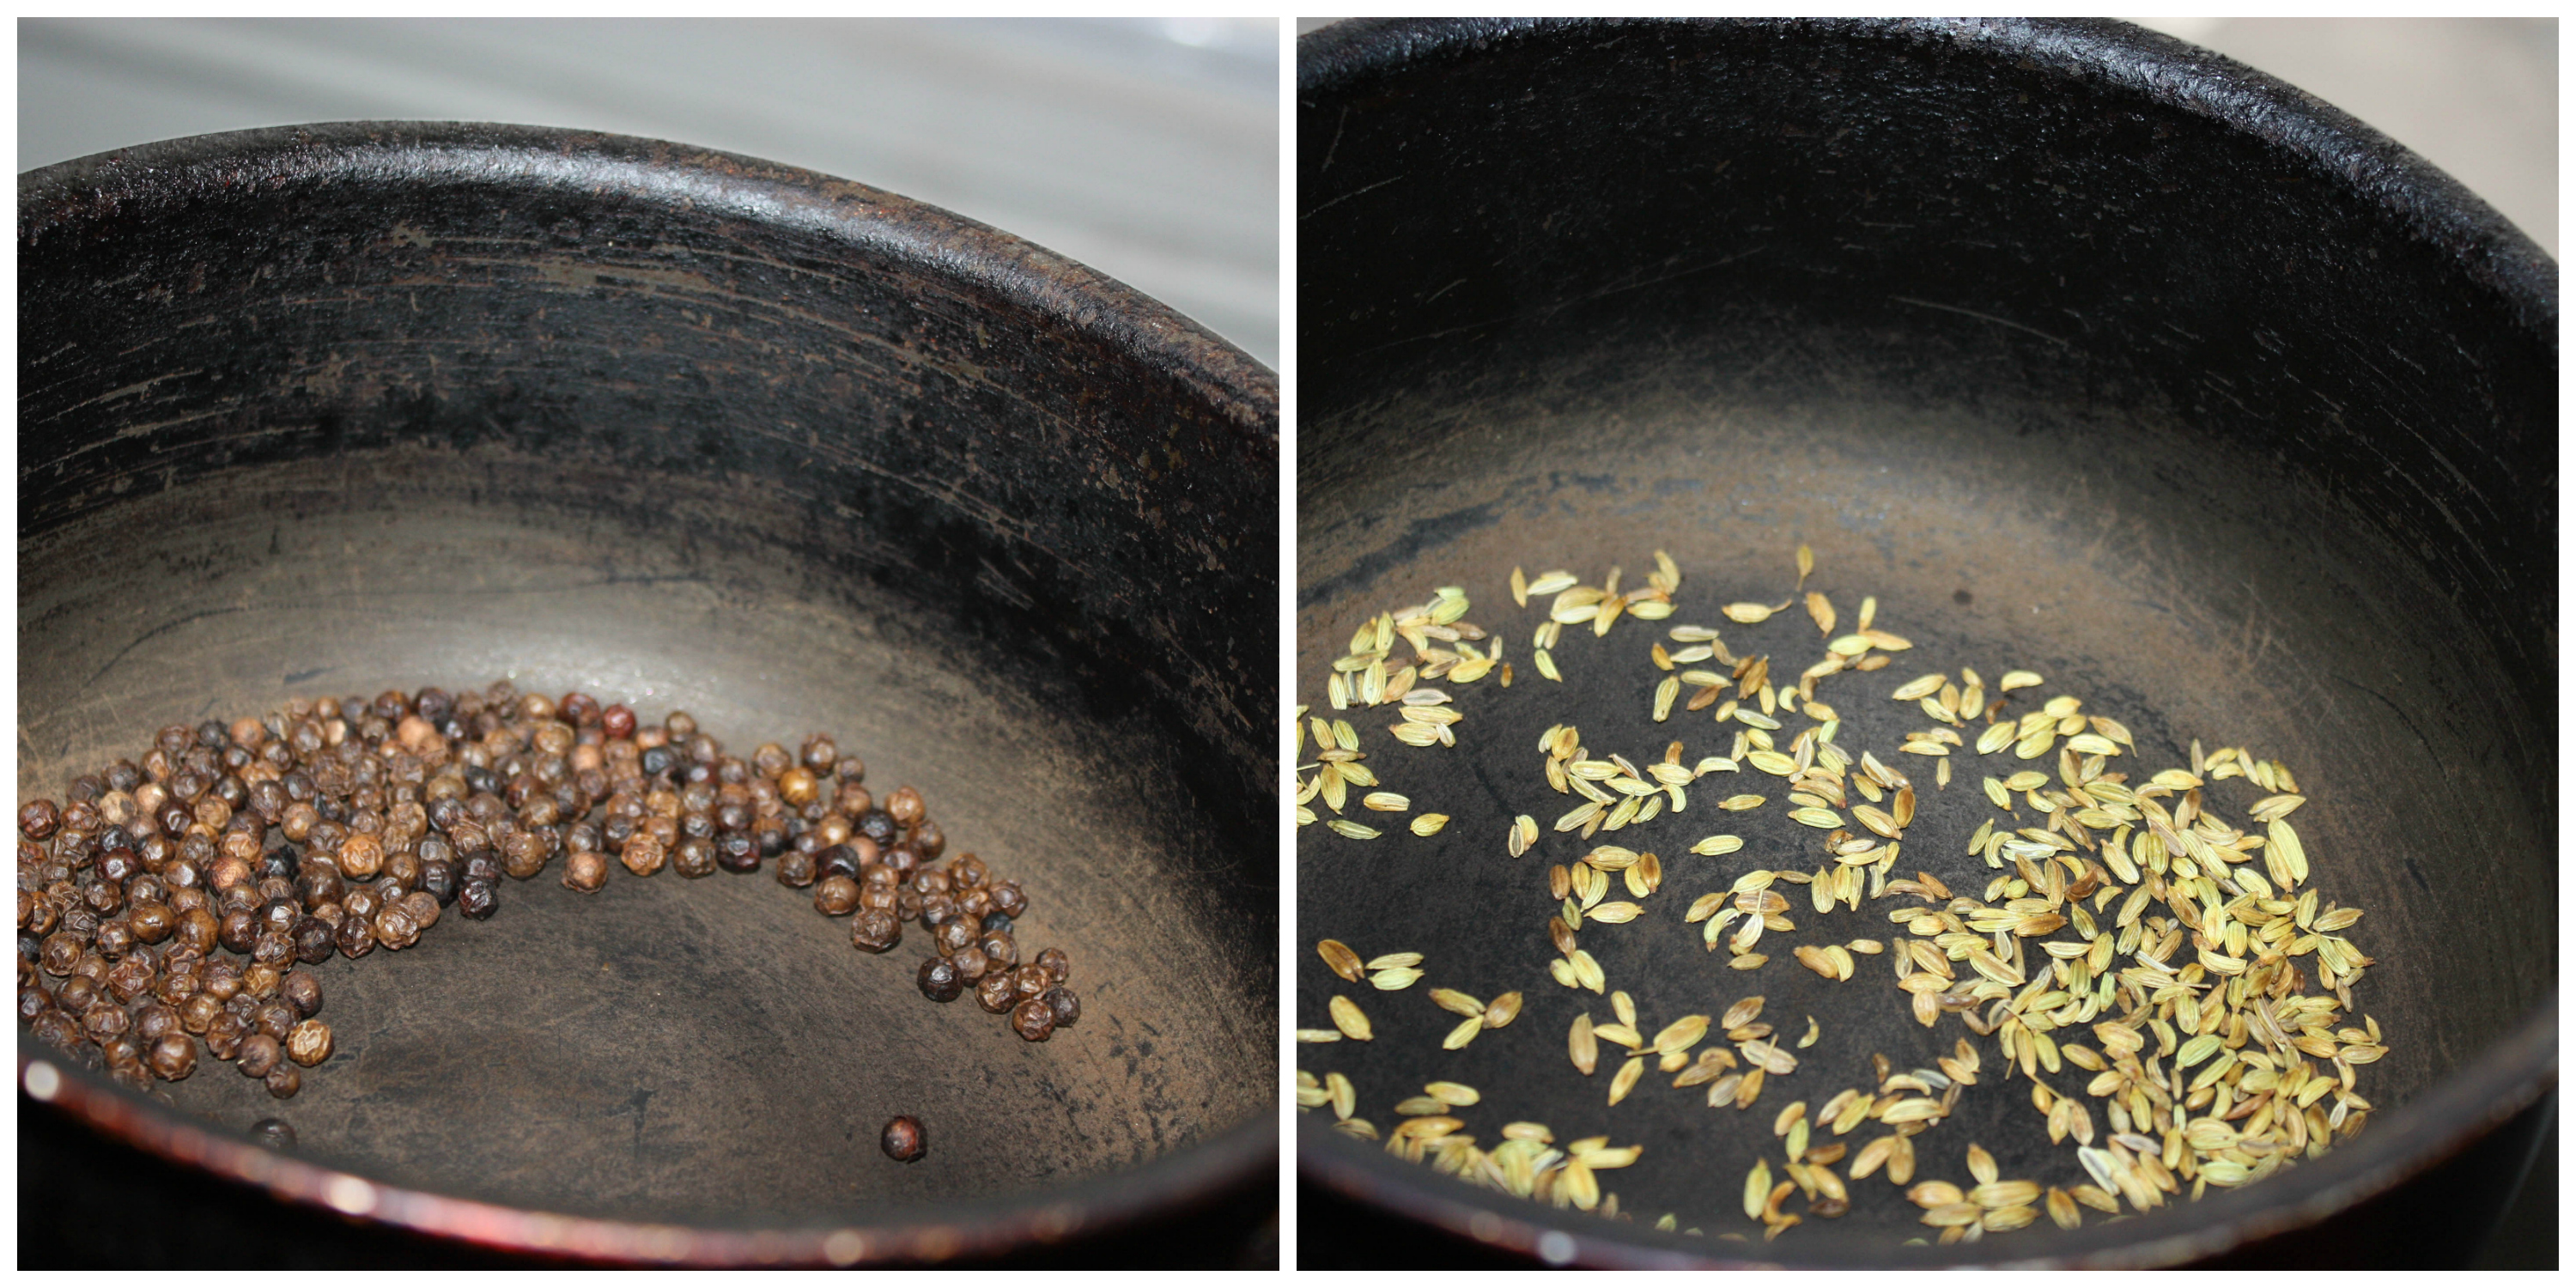
  • Sambar powder - 3 tbsp
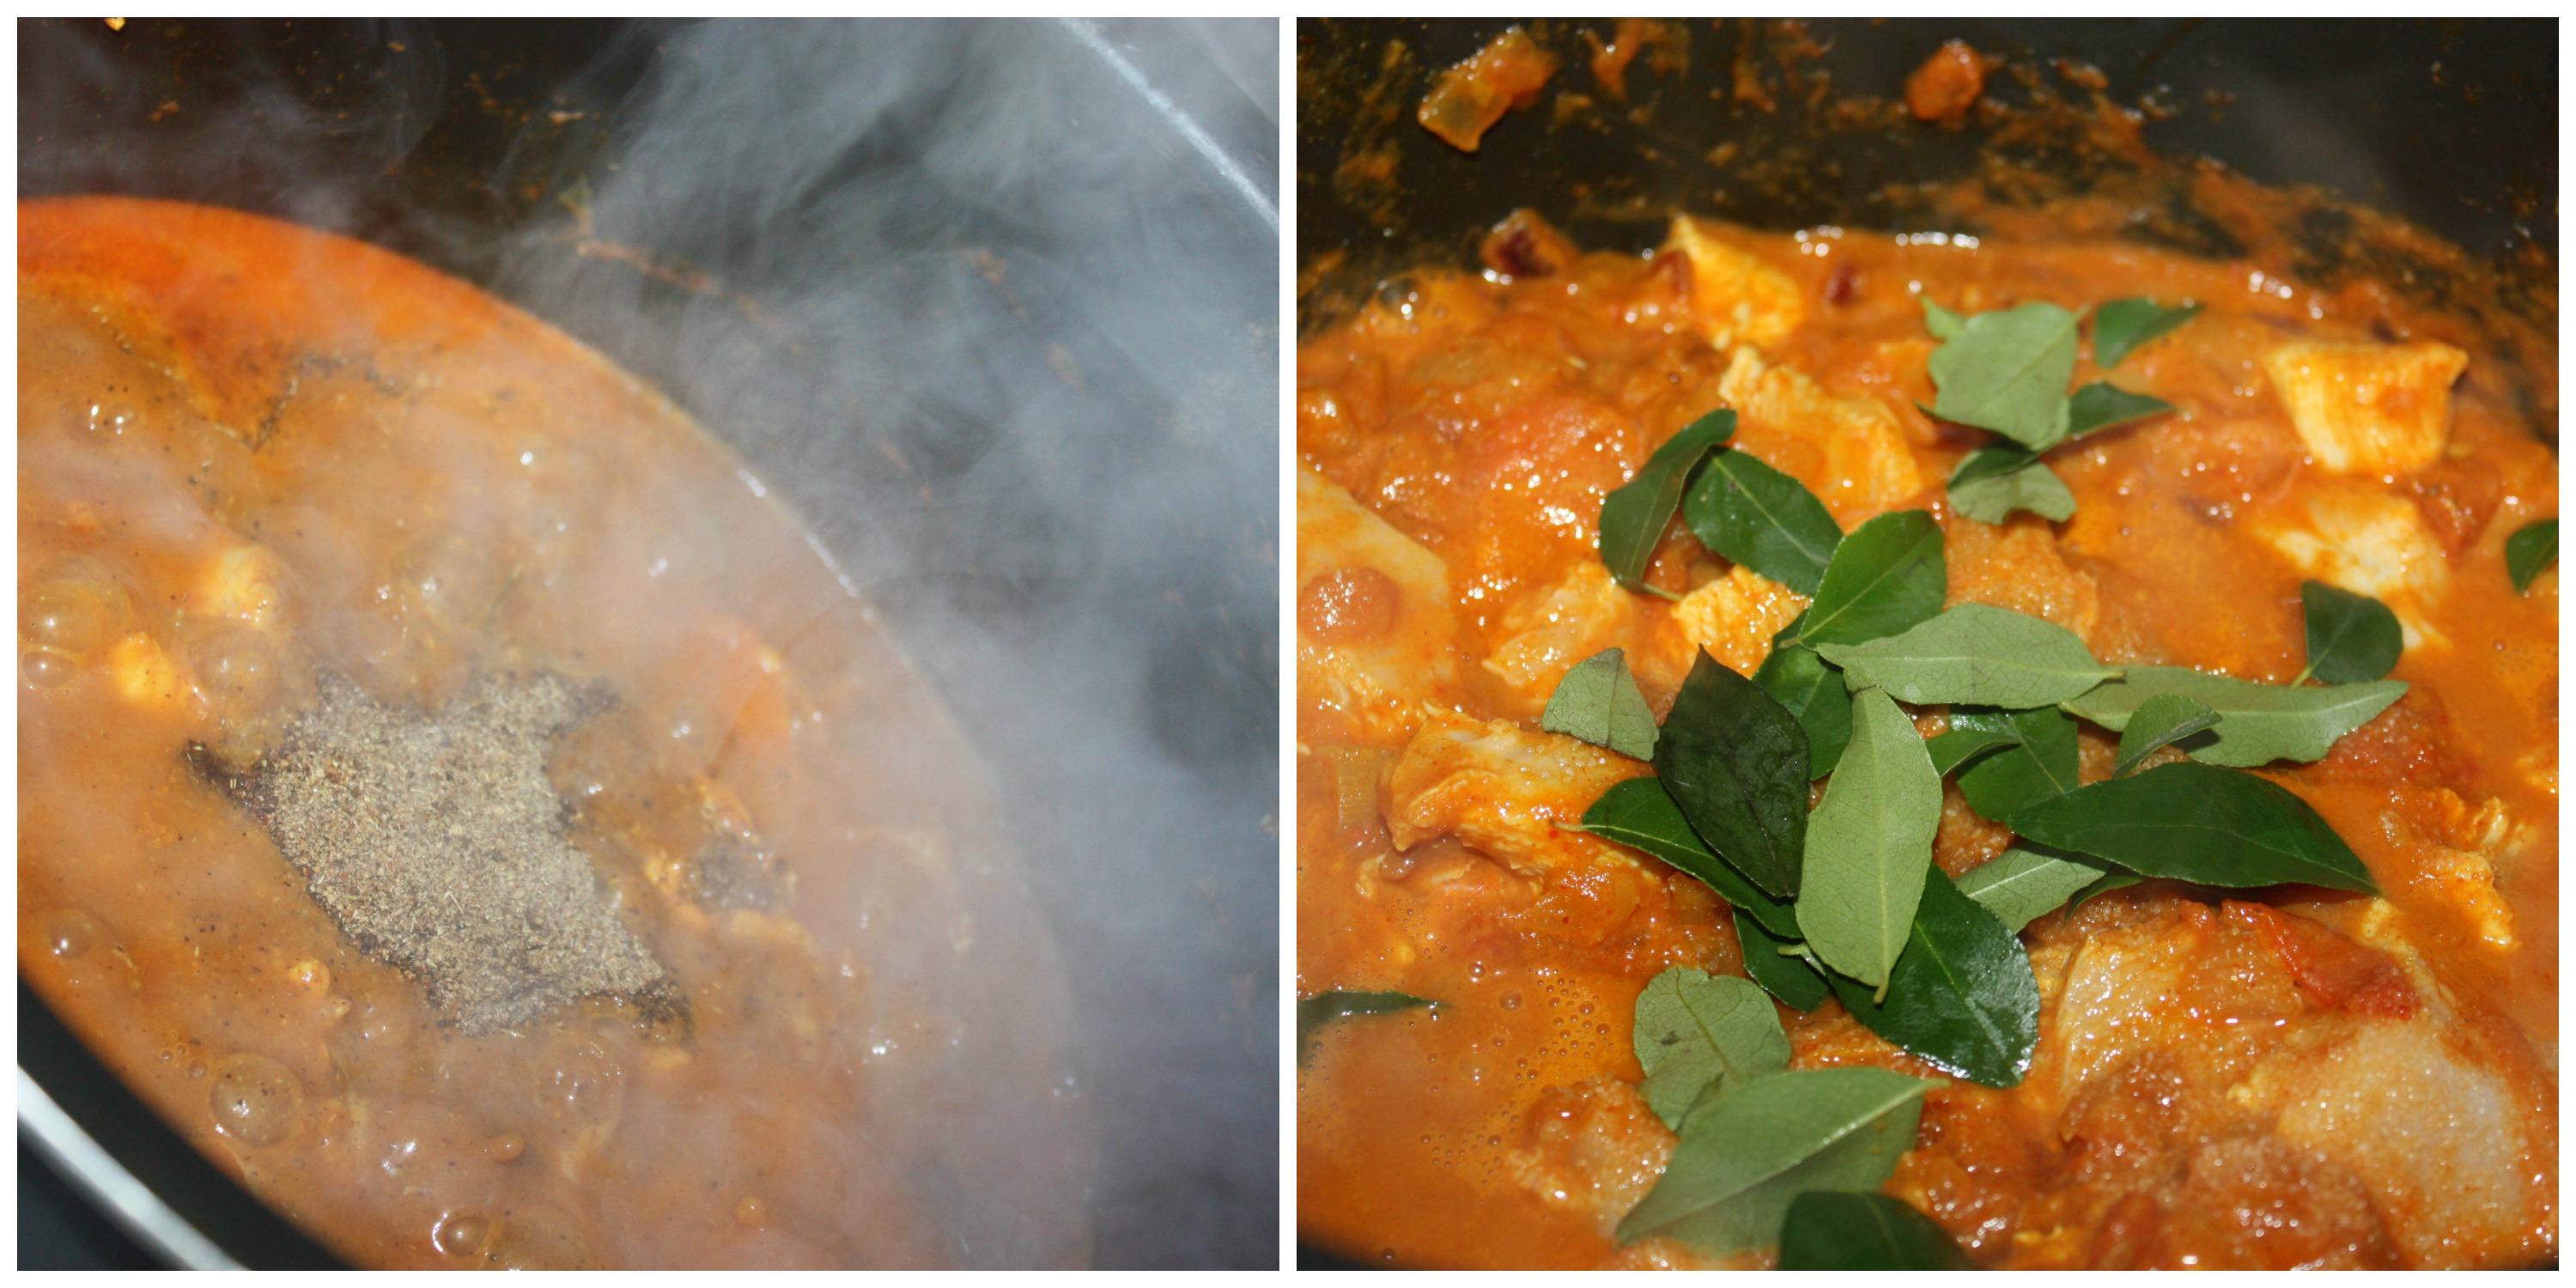
  • Tamarind water - 4 cups
  • Jaggery - 1tsp
  • Salt - as needed
Instructions
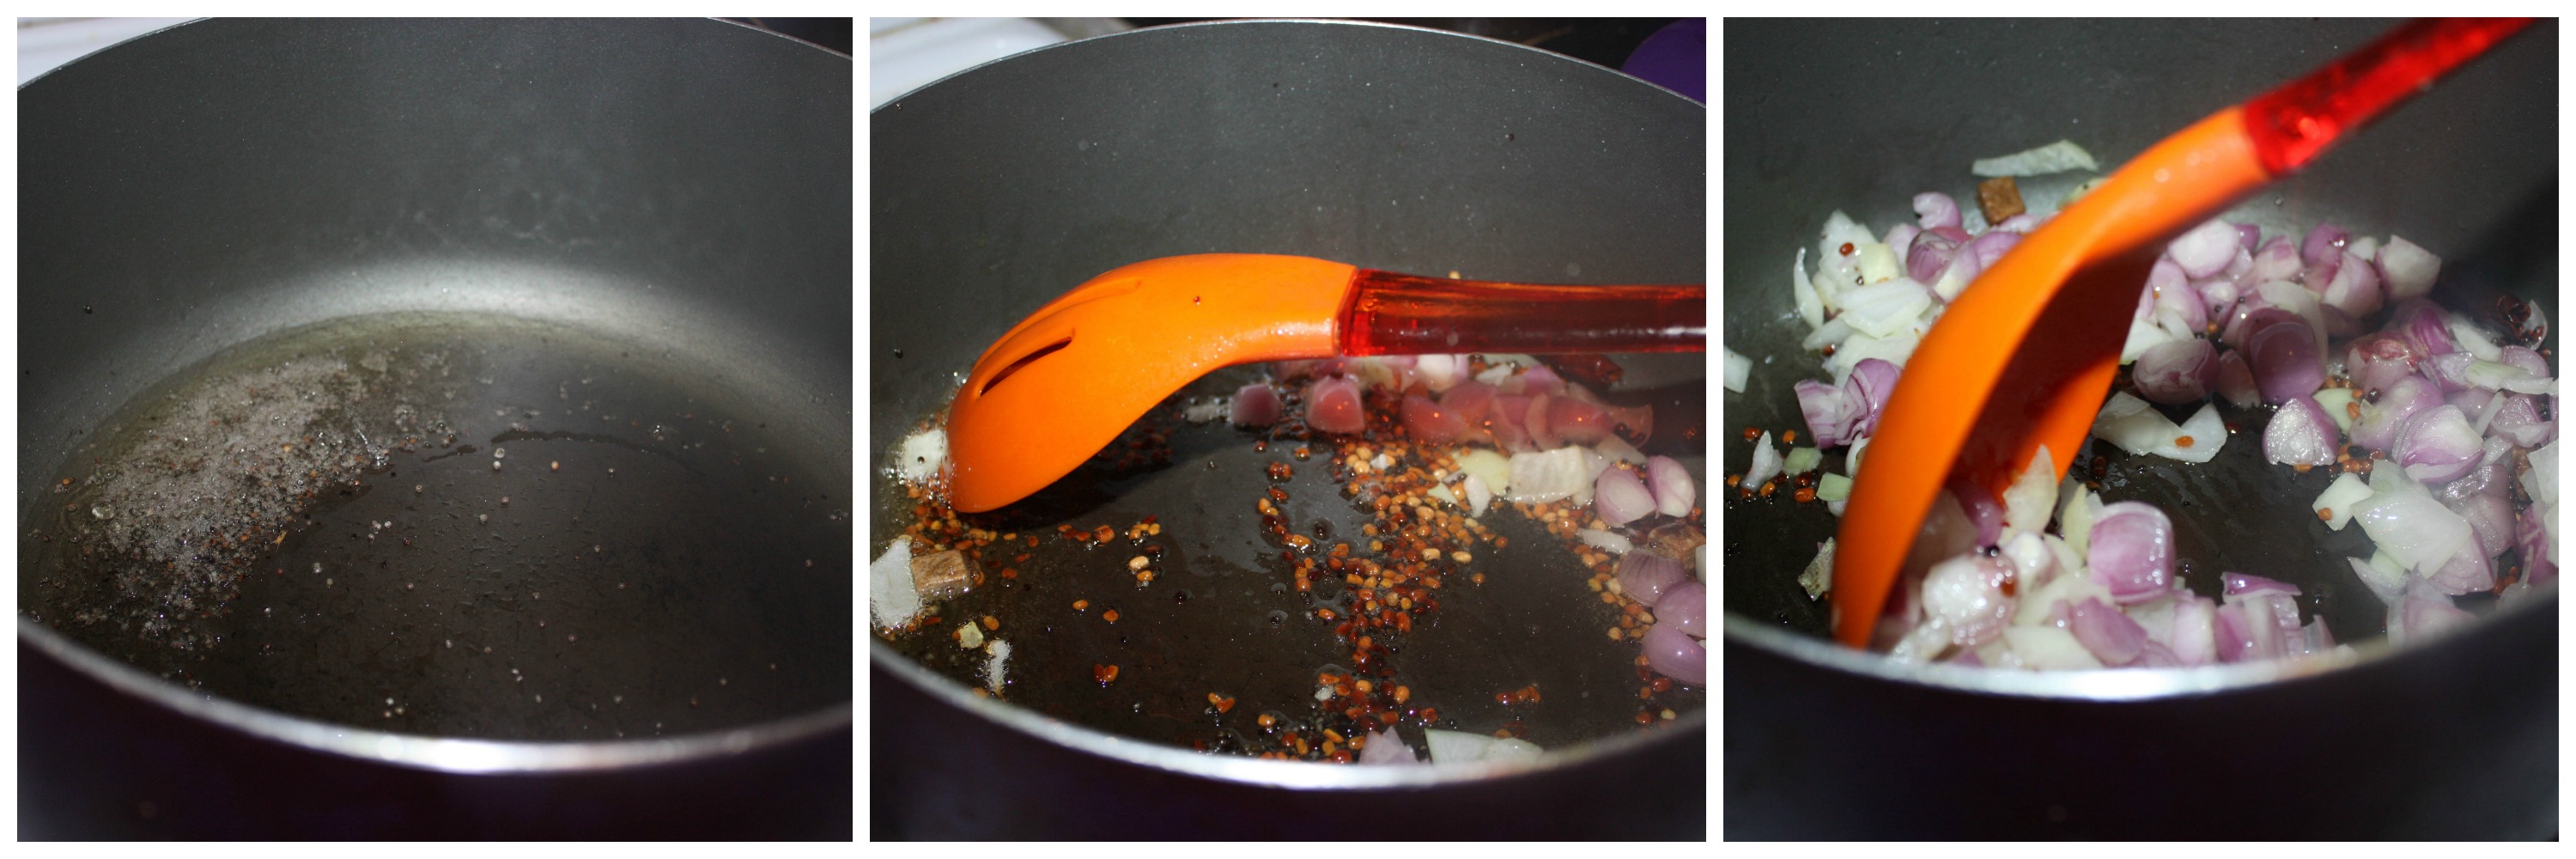
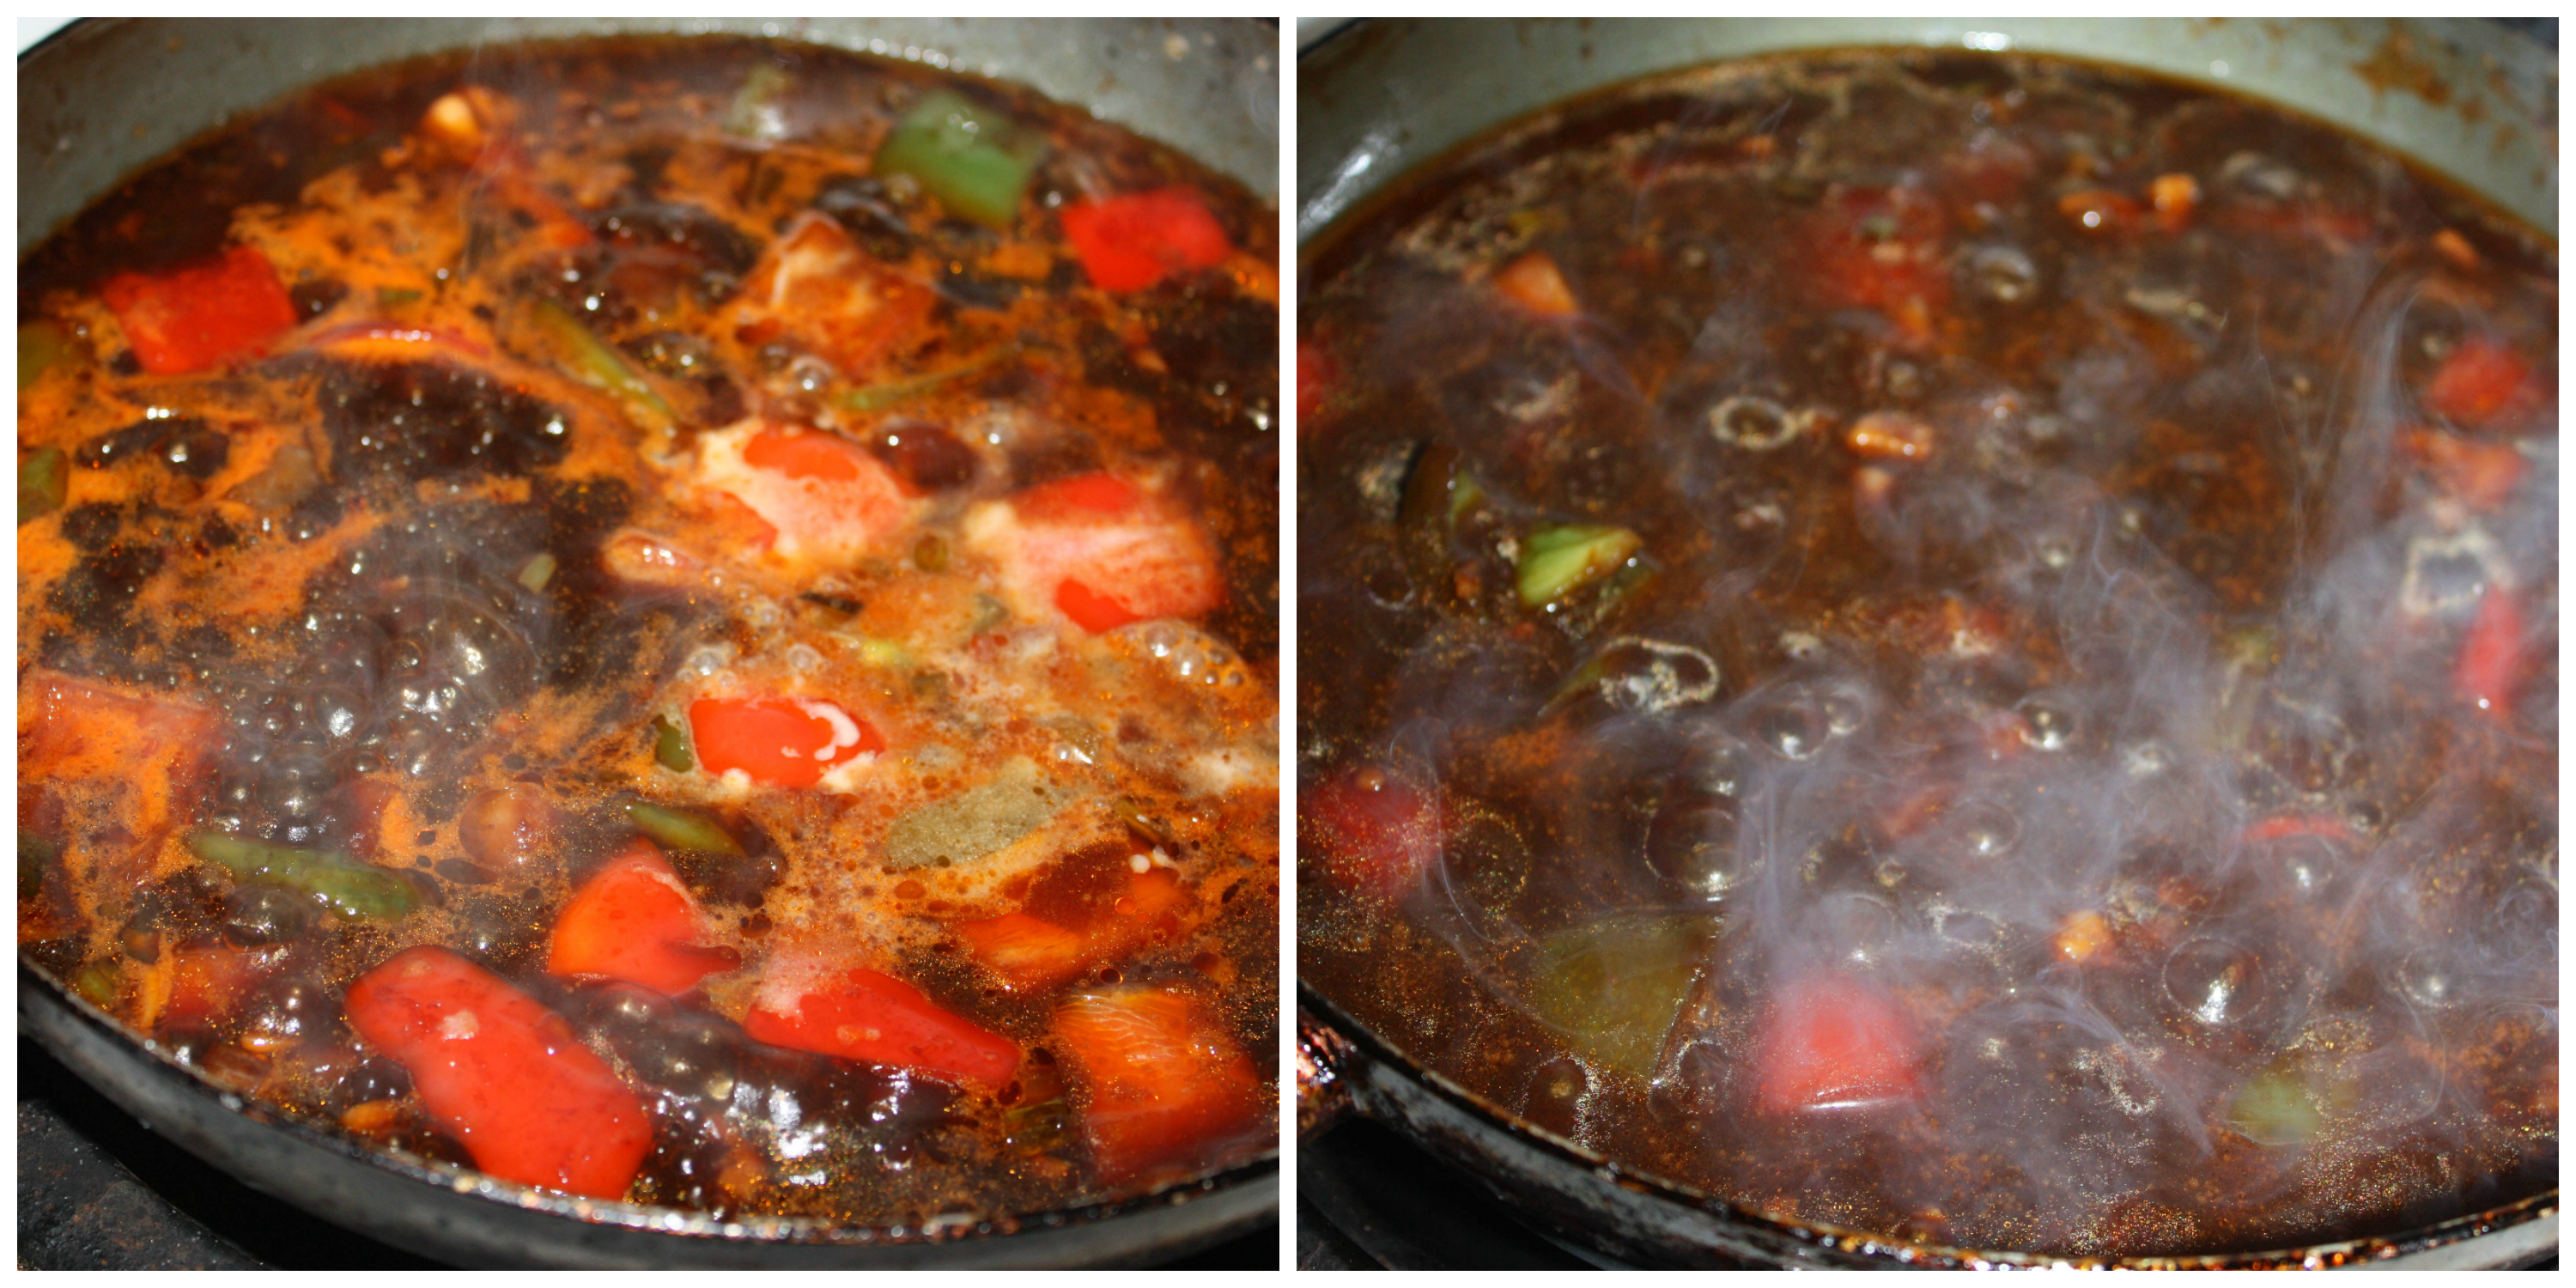
  1. Soak a big lemon sized tamarind in hot water for 5 minutes. Take the extract out this and set aside.
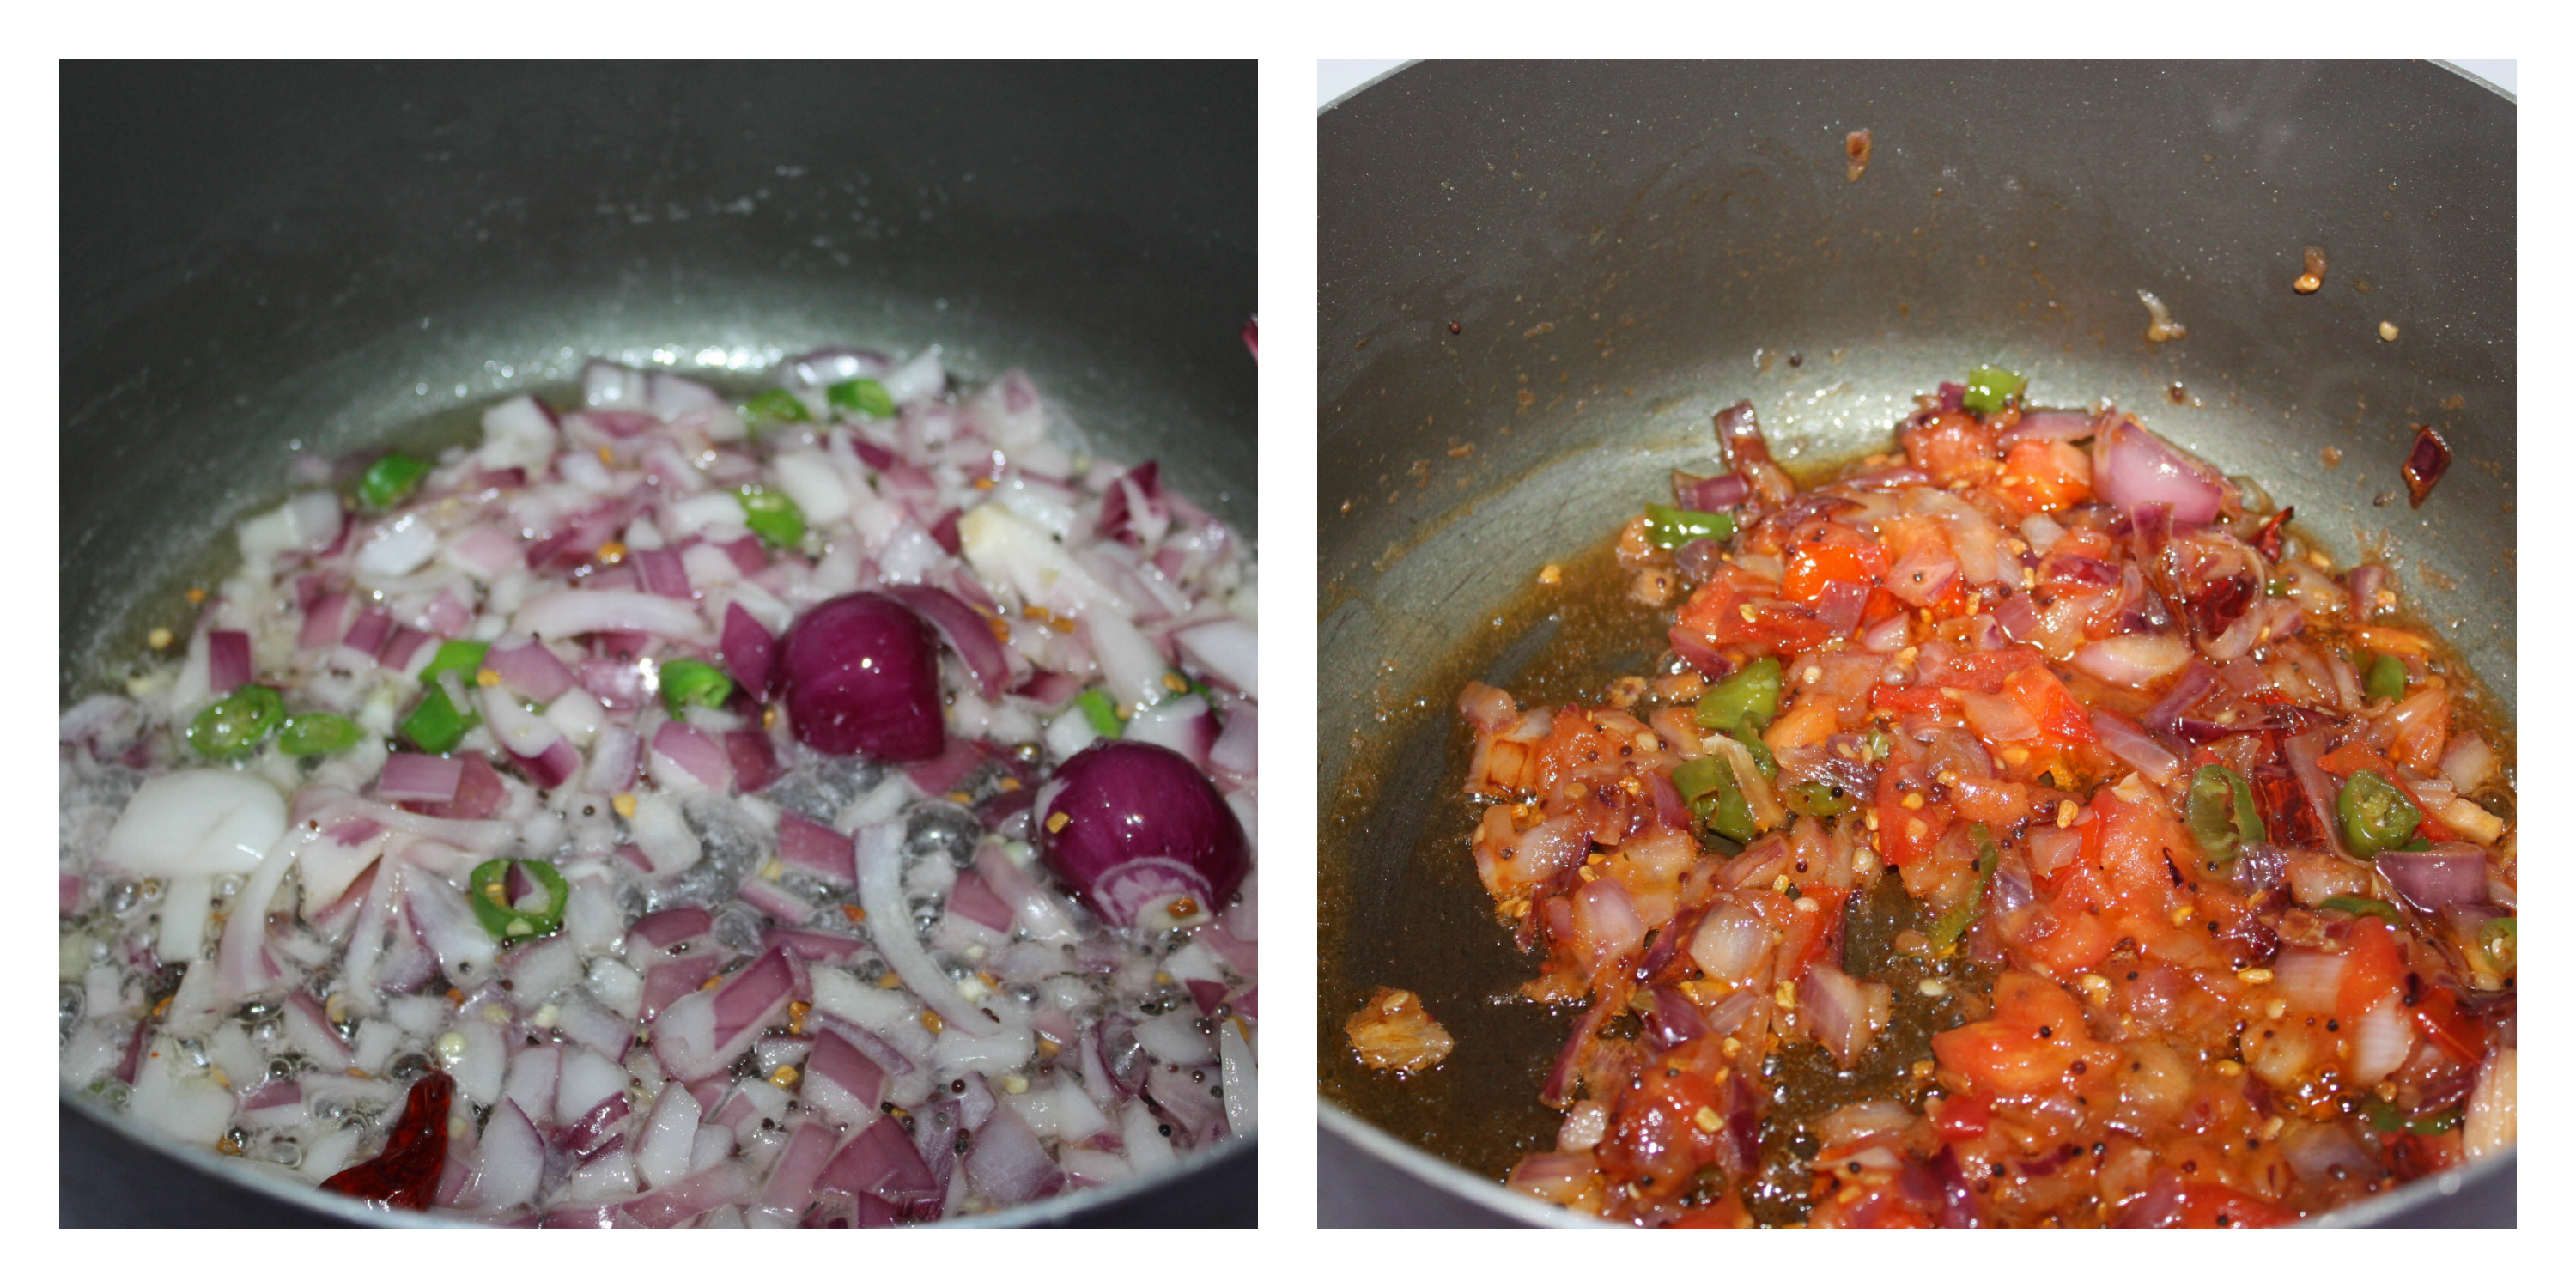
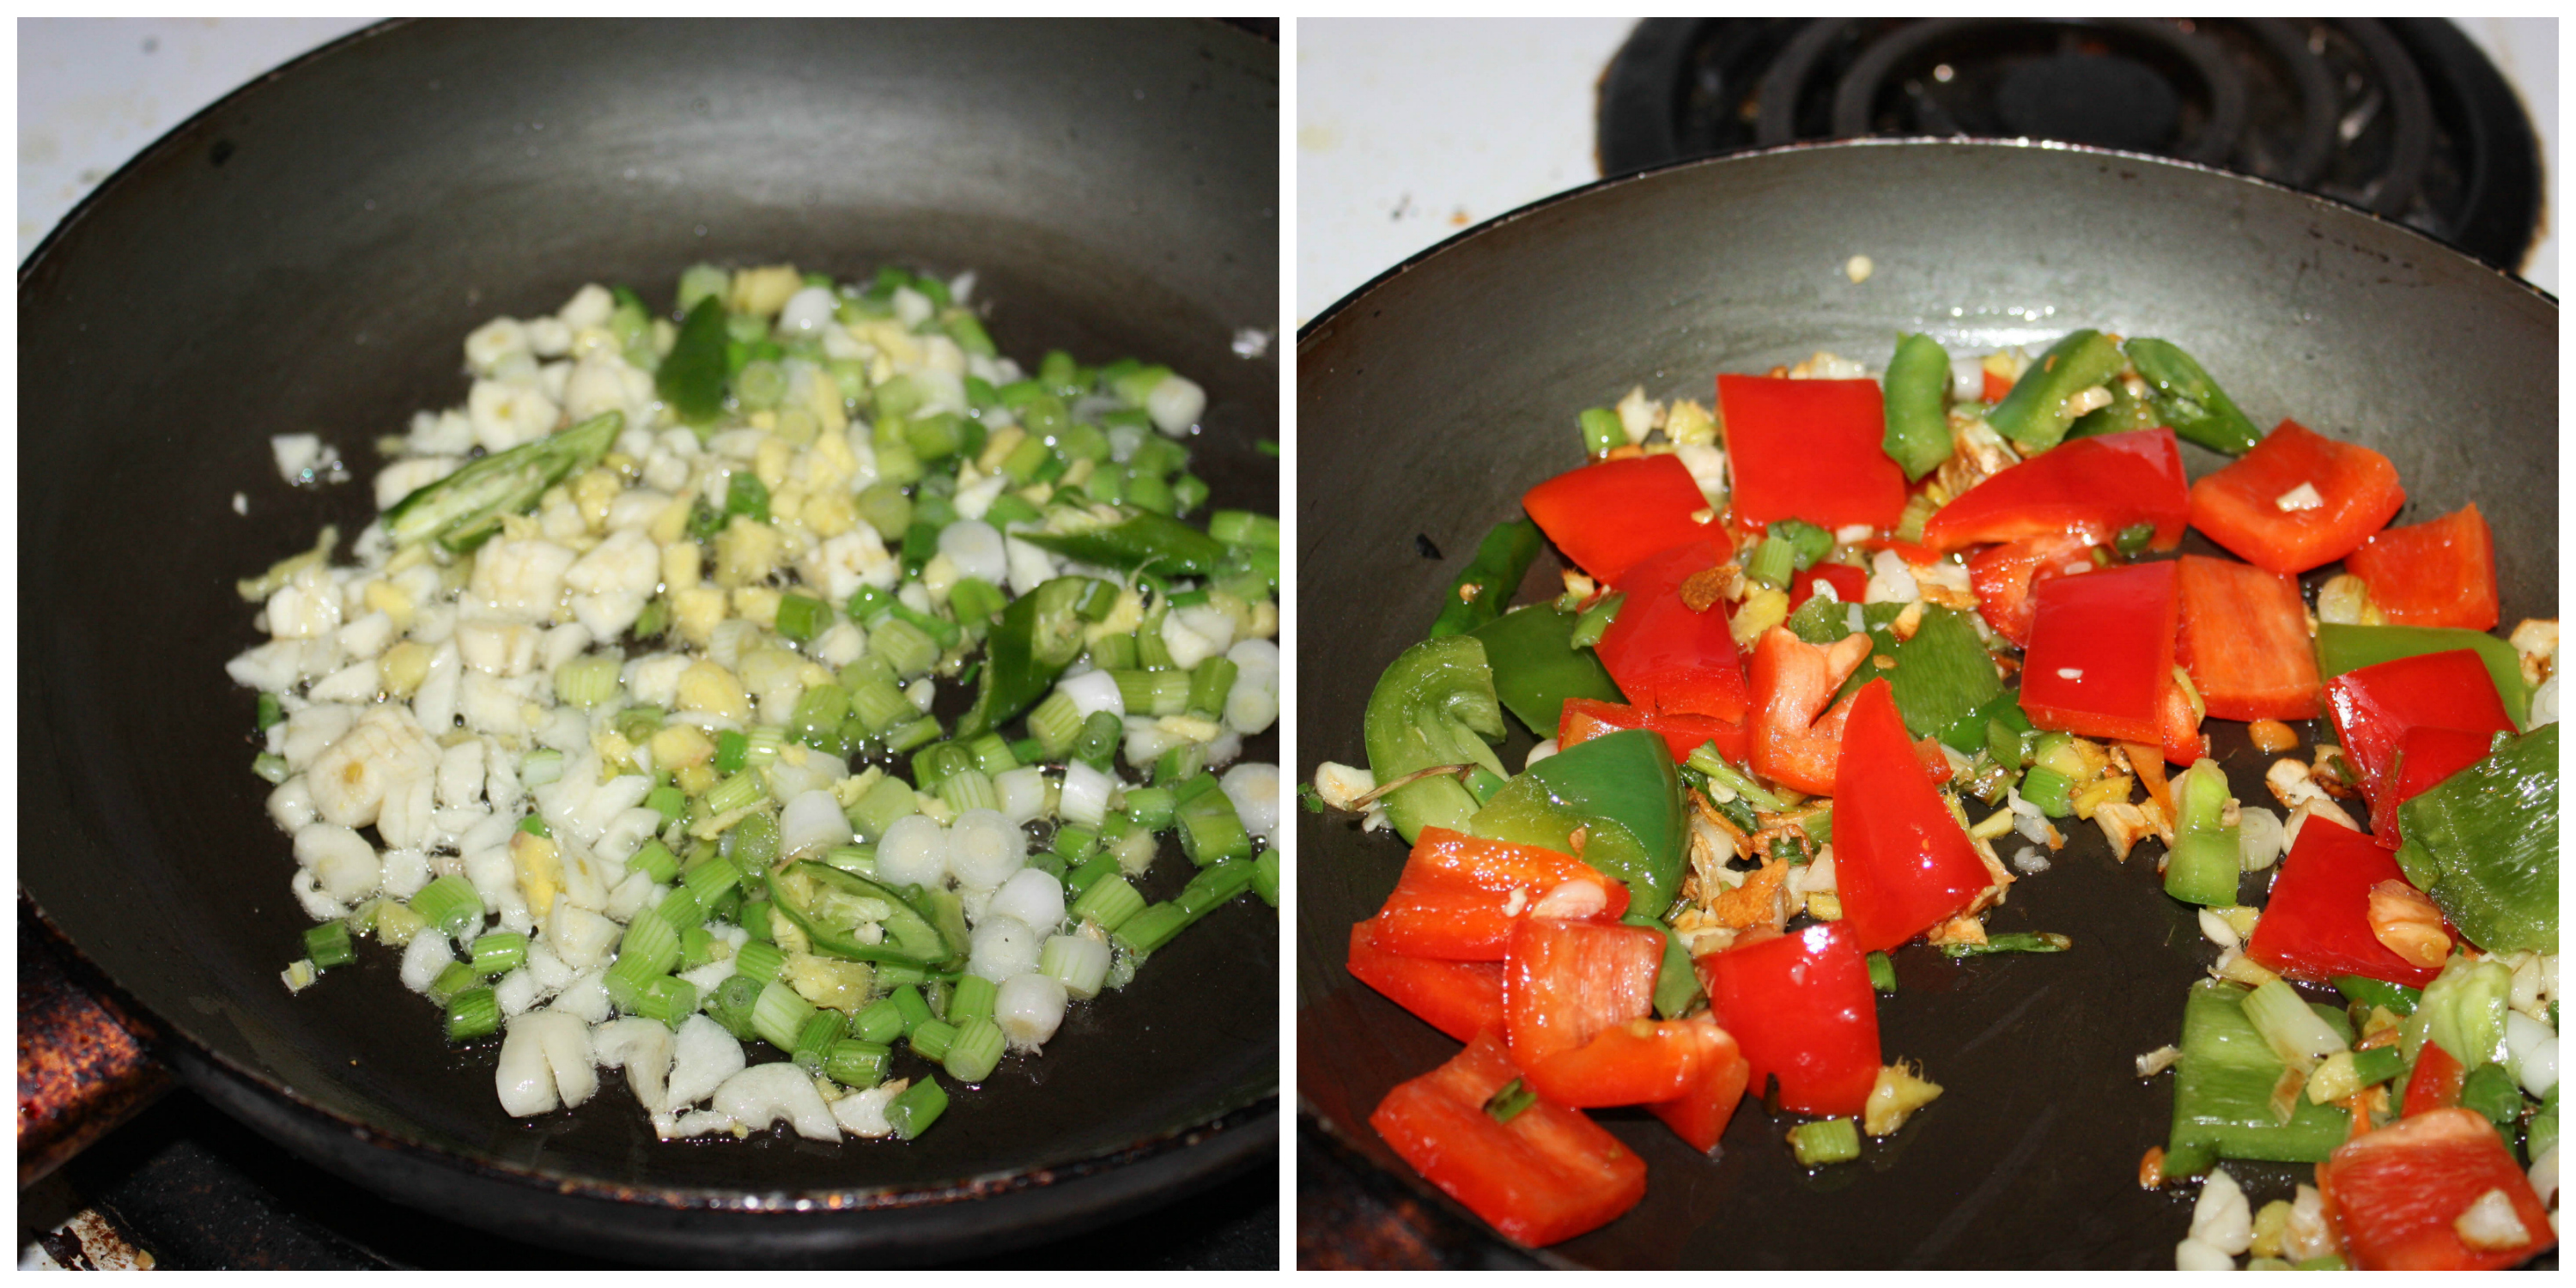
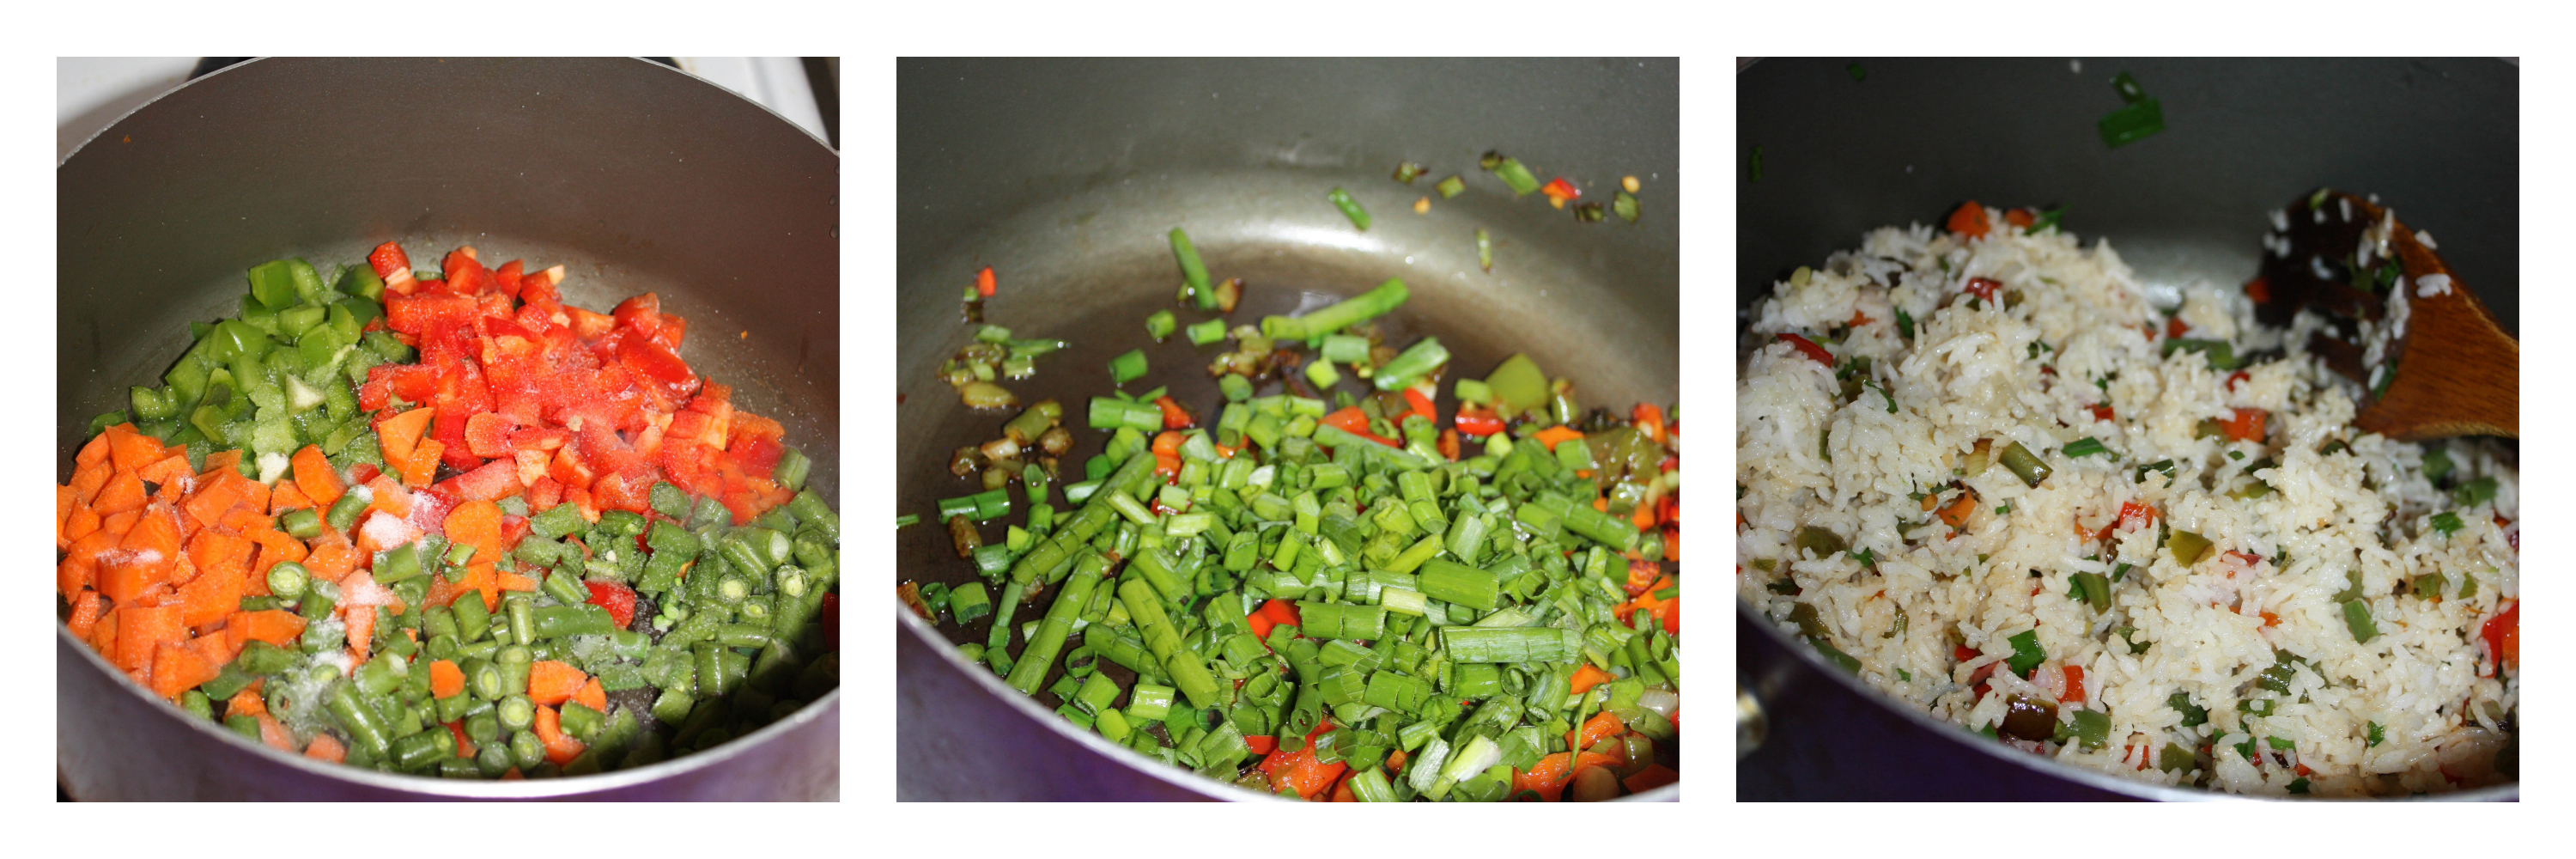
  2. Heat oil and throw in the mustard seeds, Fenugreek, channa dal, urad dal, curry leaves and red chilli. When the dal turns golden brown add the shallots and onions and garlic and fry them on a low flame till it turns brown. Do not burn it.
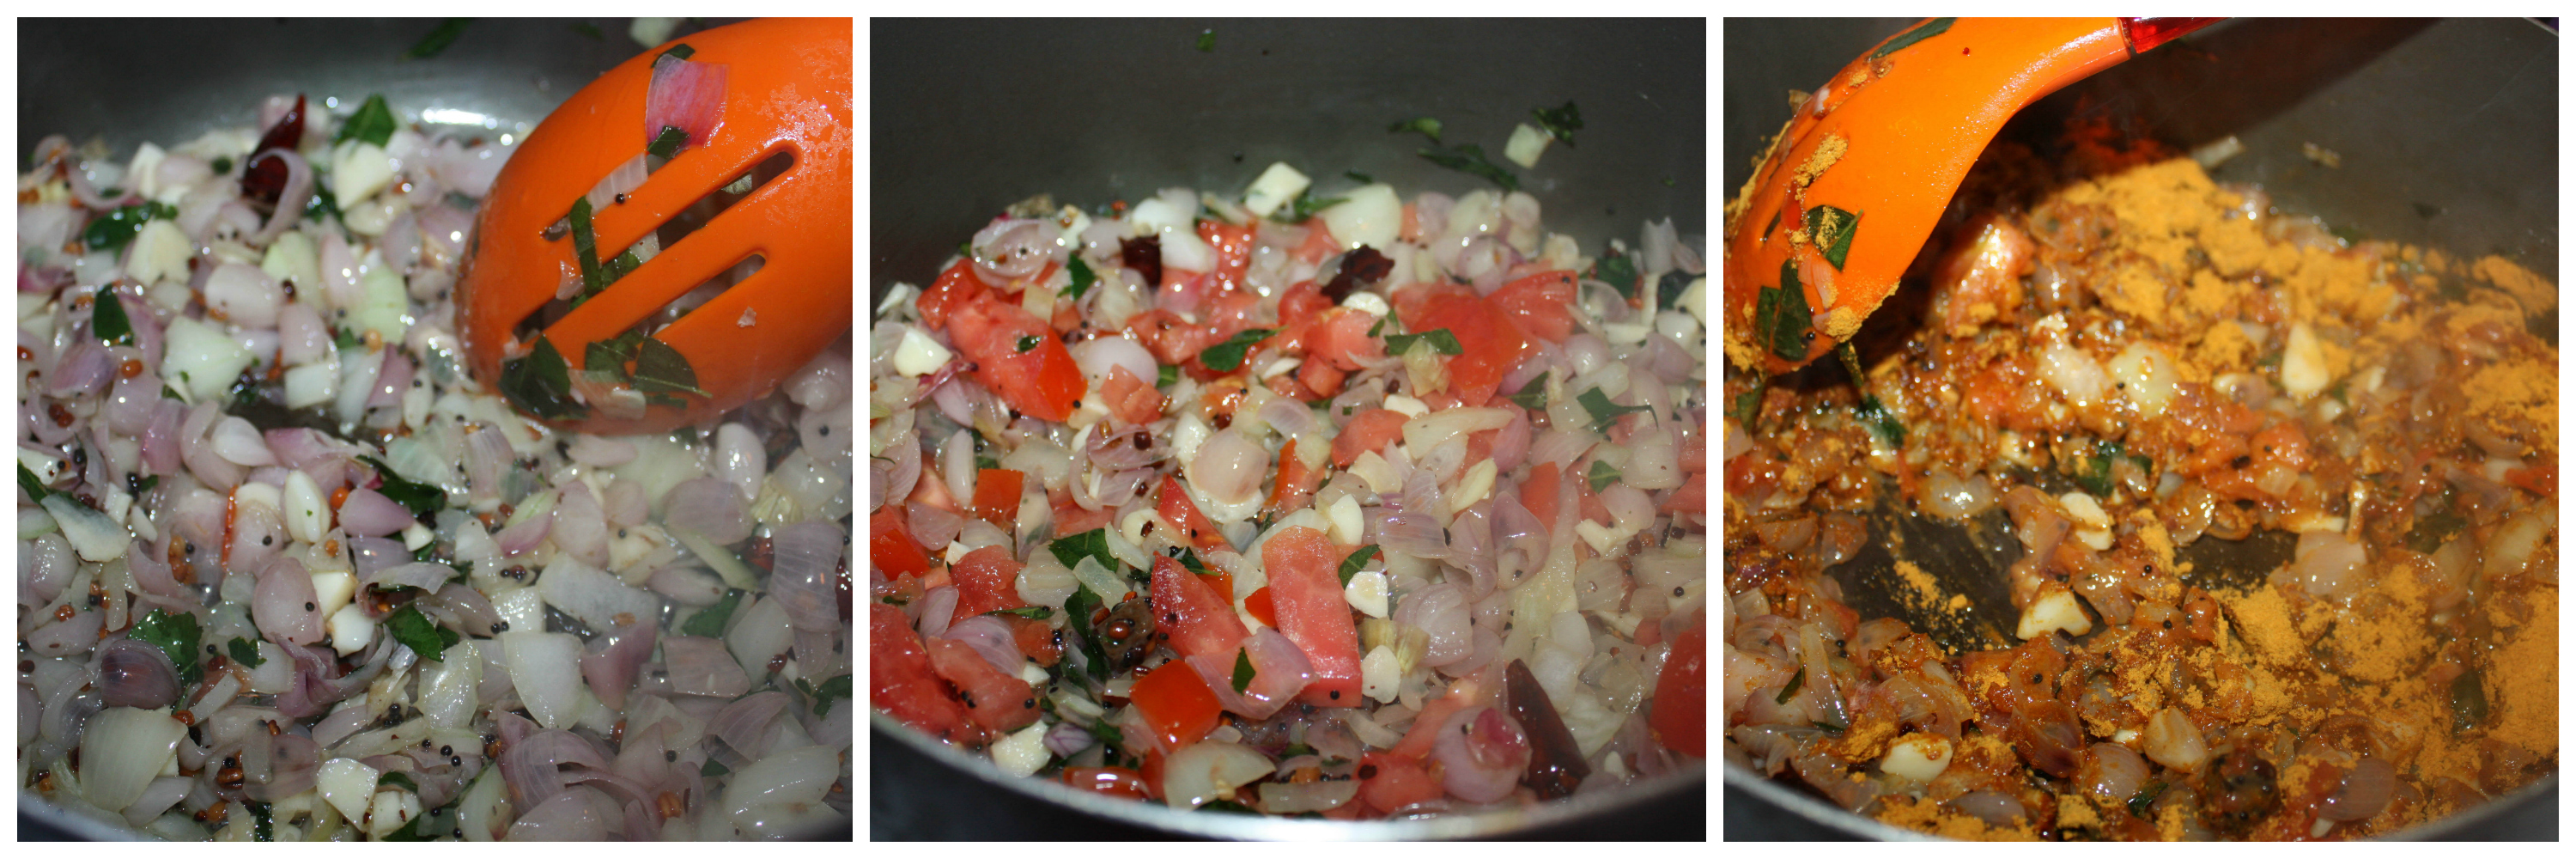
  3. Now add the tomato and turmeric powder and sauté till they are mushy.
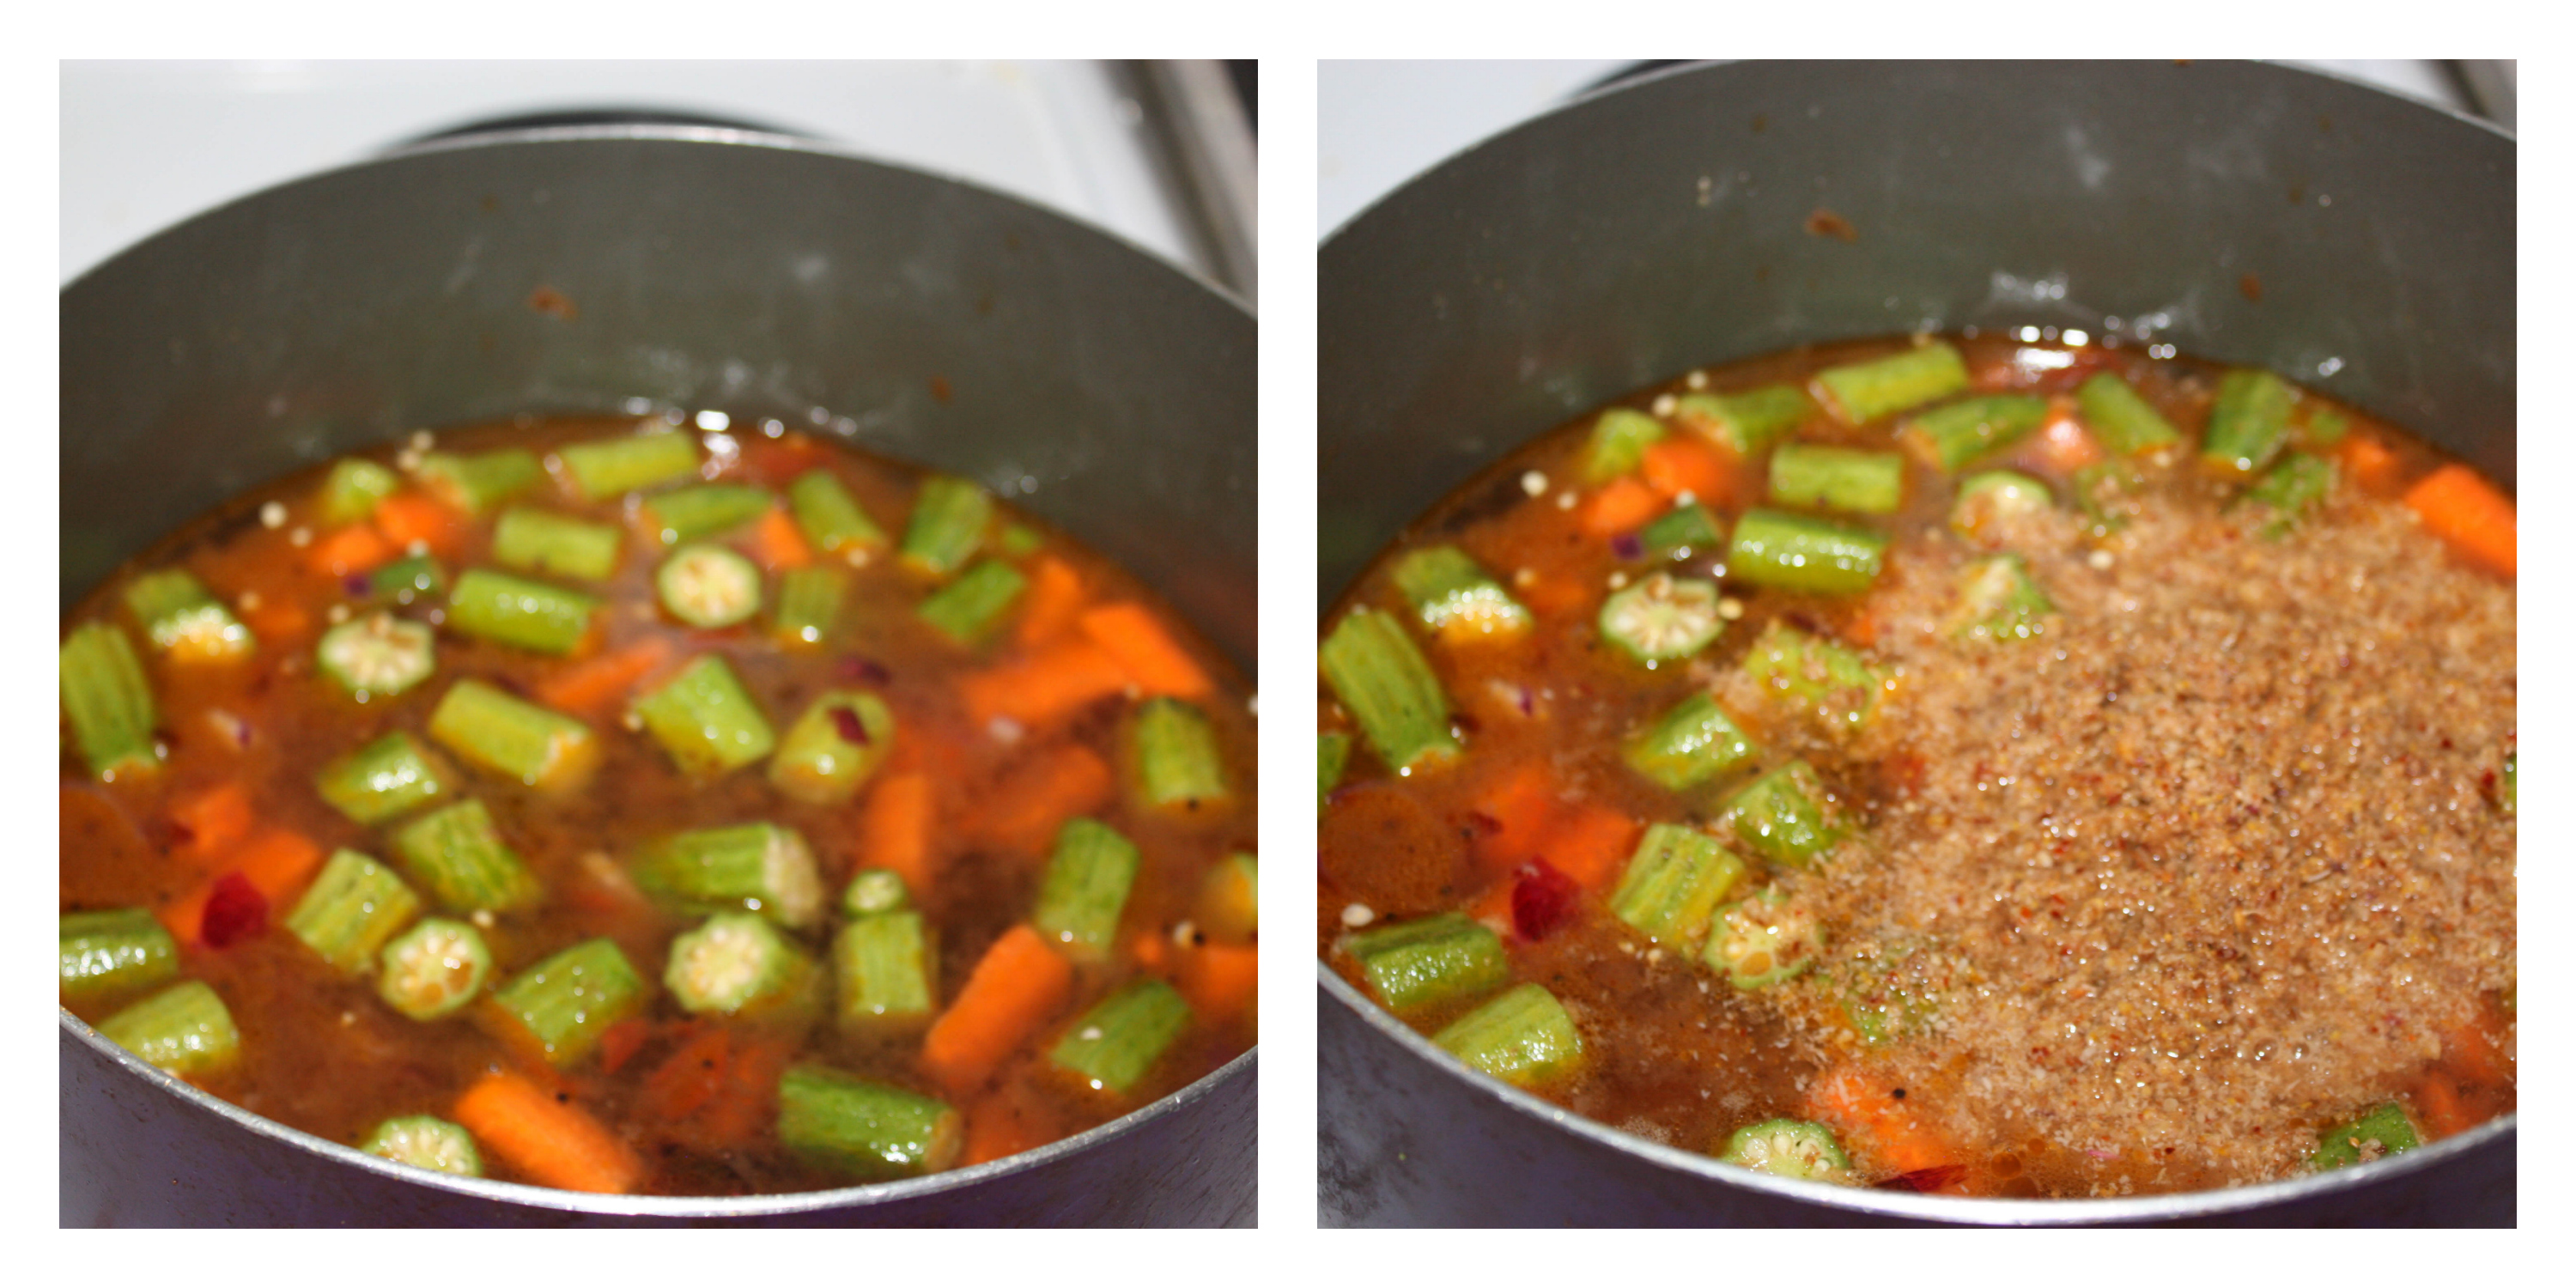
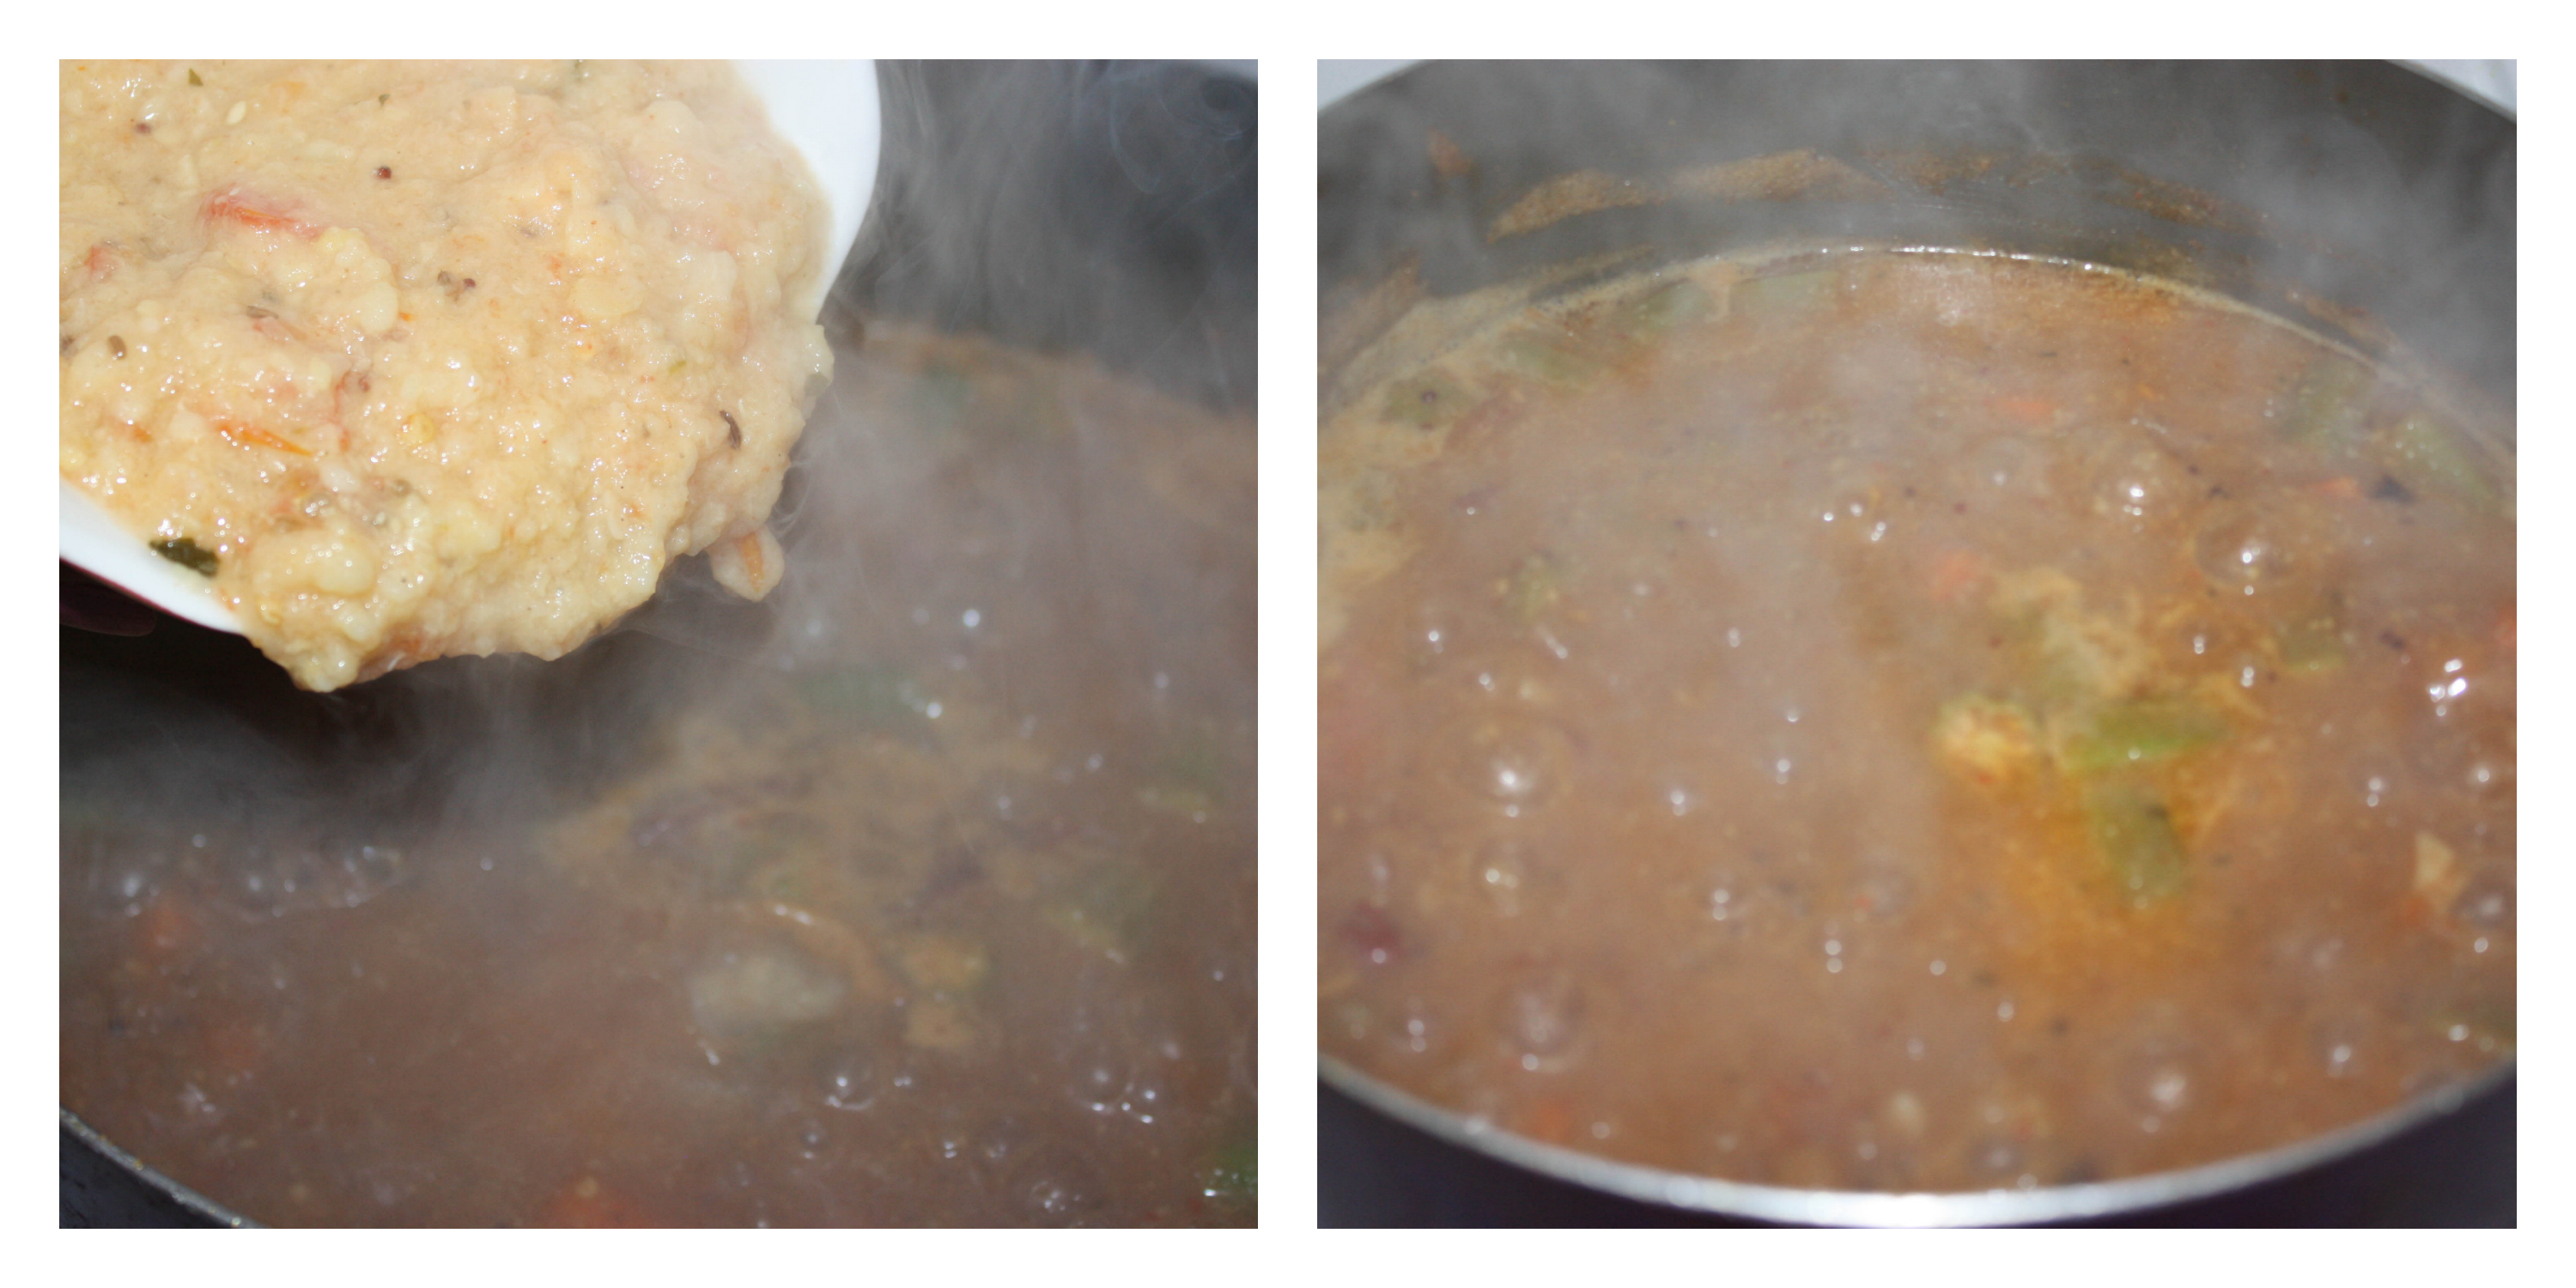
  4. Now add the sambhar powder to the oil and sauté for few seconds and add the tamarind water.
  5. Let this boil in a medium low flame for 15 minutes or till it reaches a thick consistency.
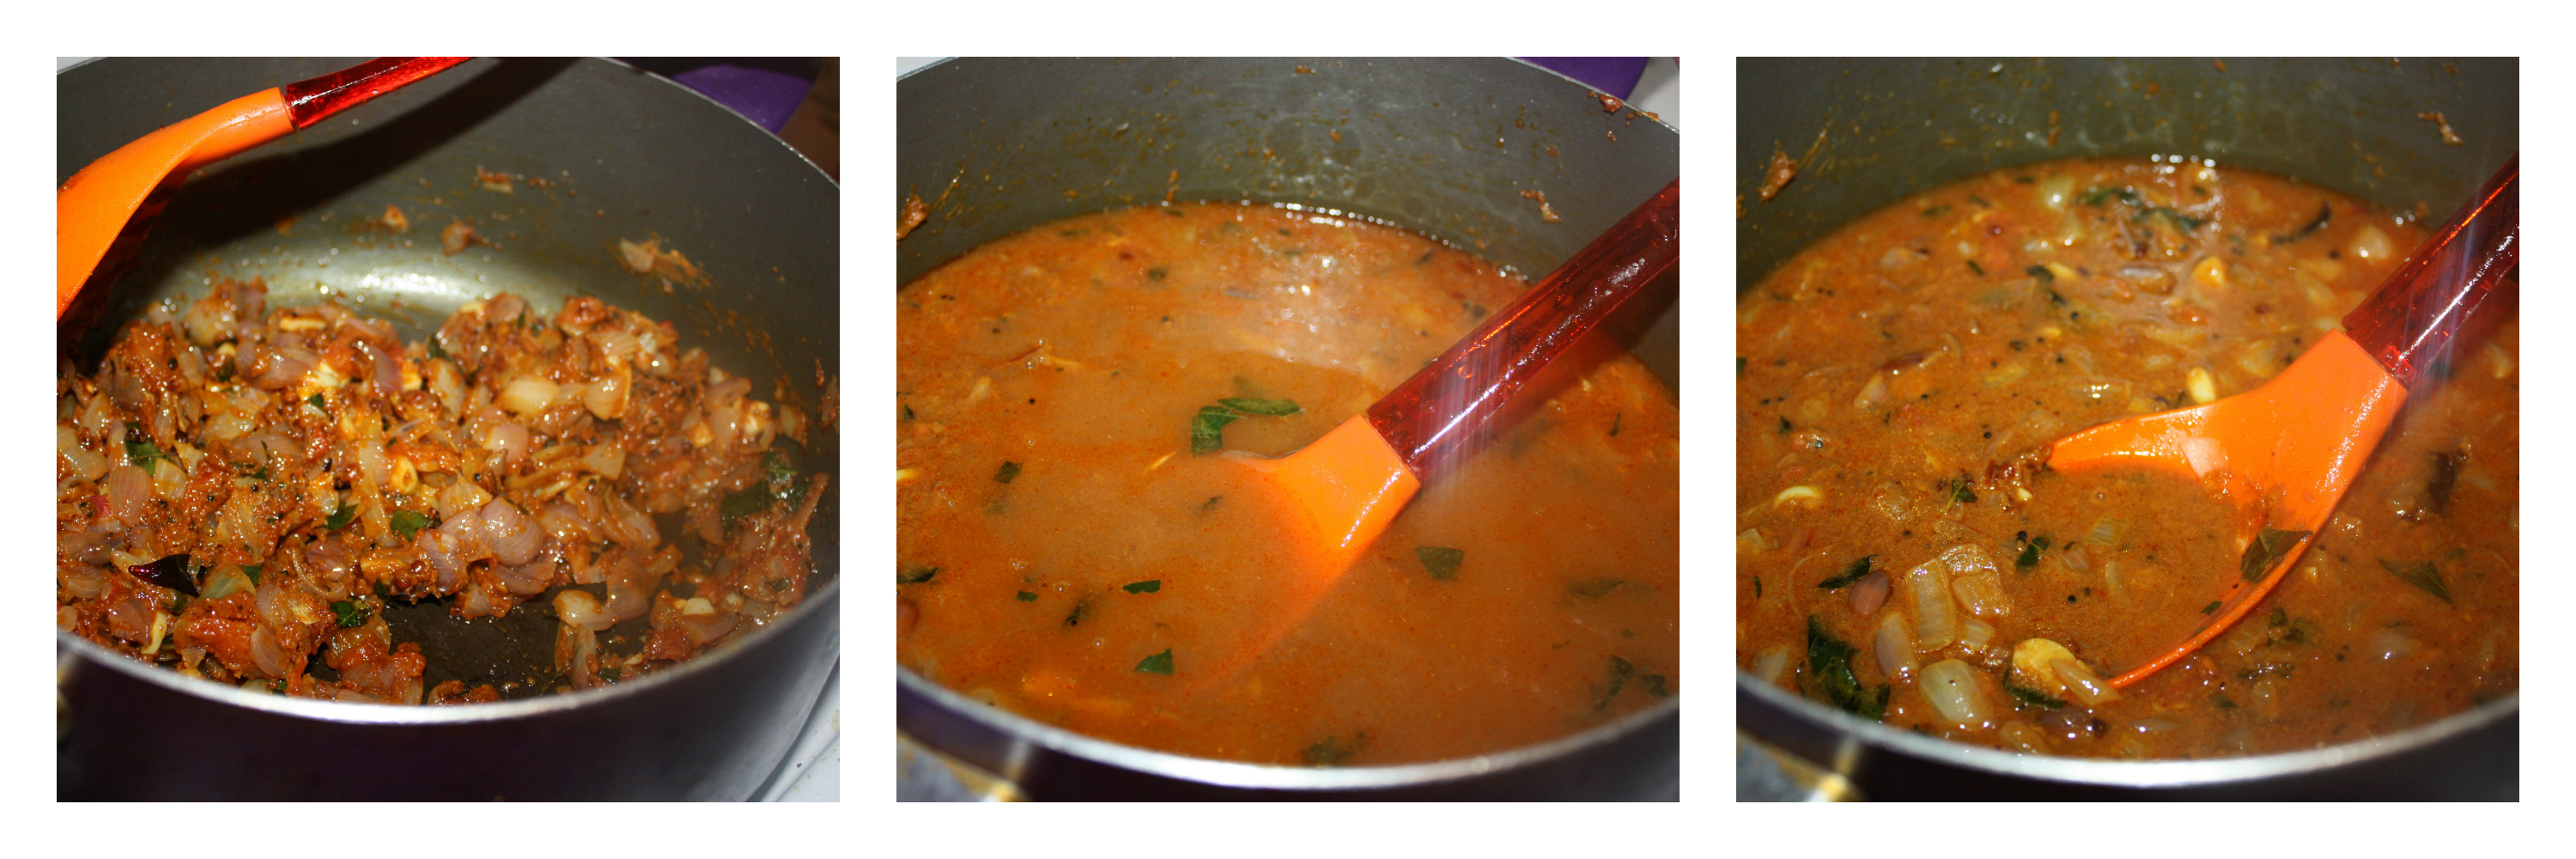
  6. Add the required salt, switch off the flame, add jaggery and add few curry leaves.
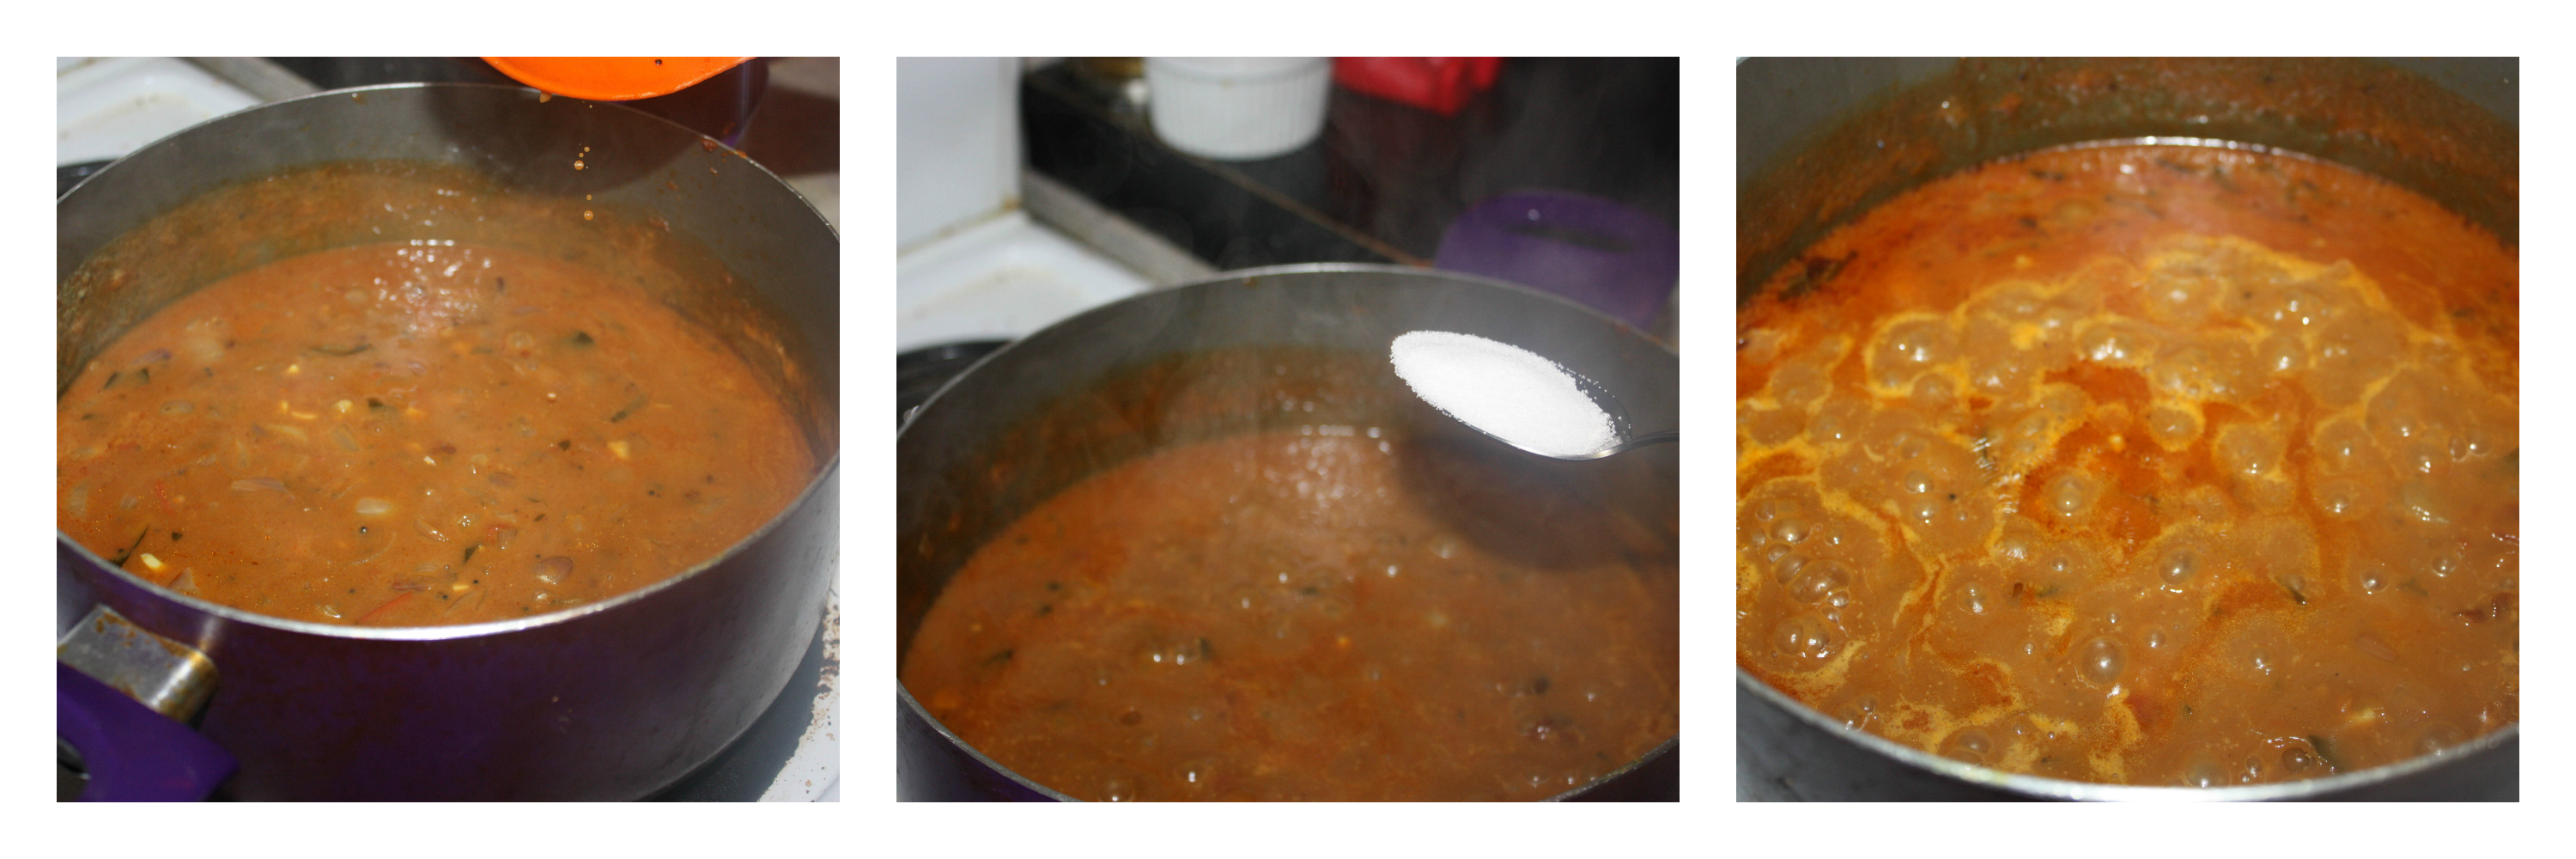
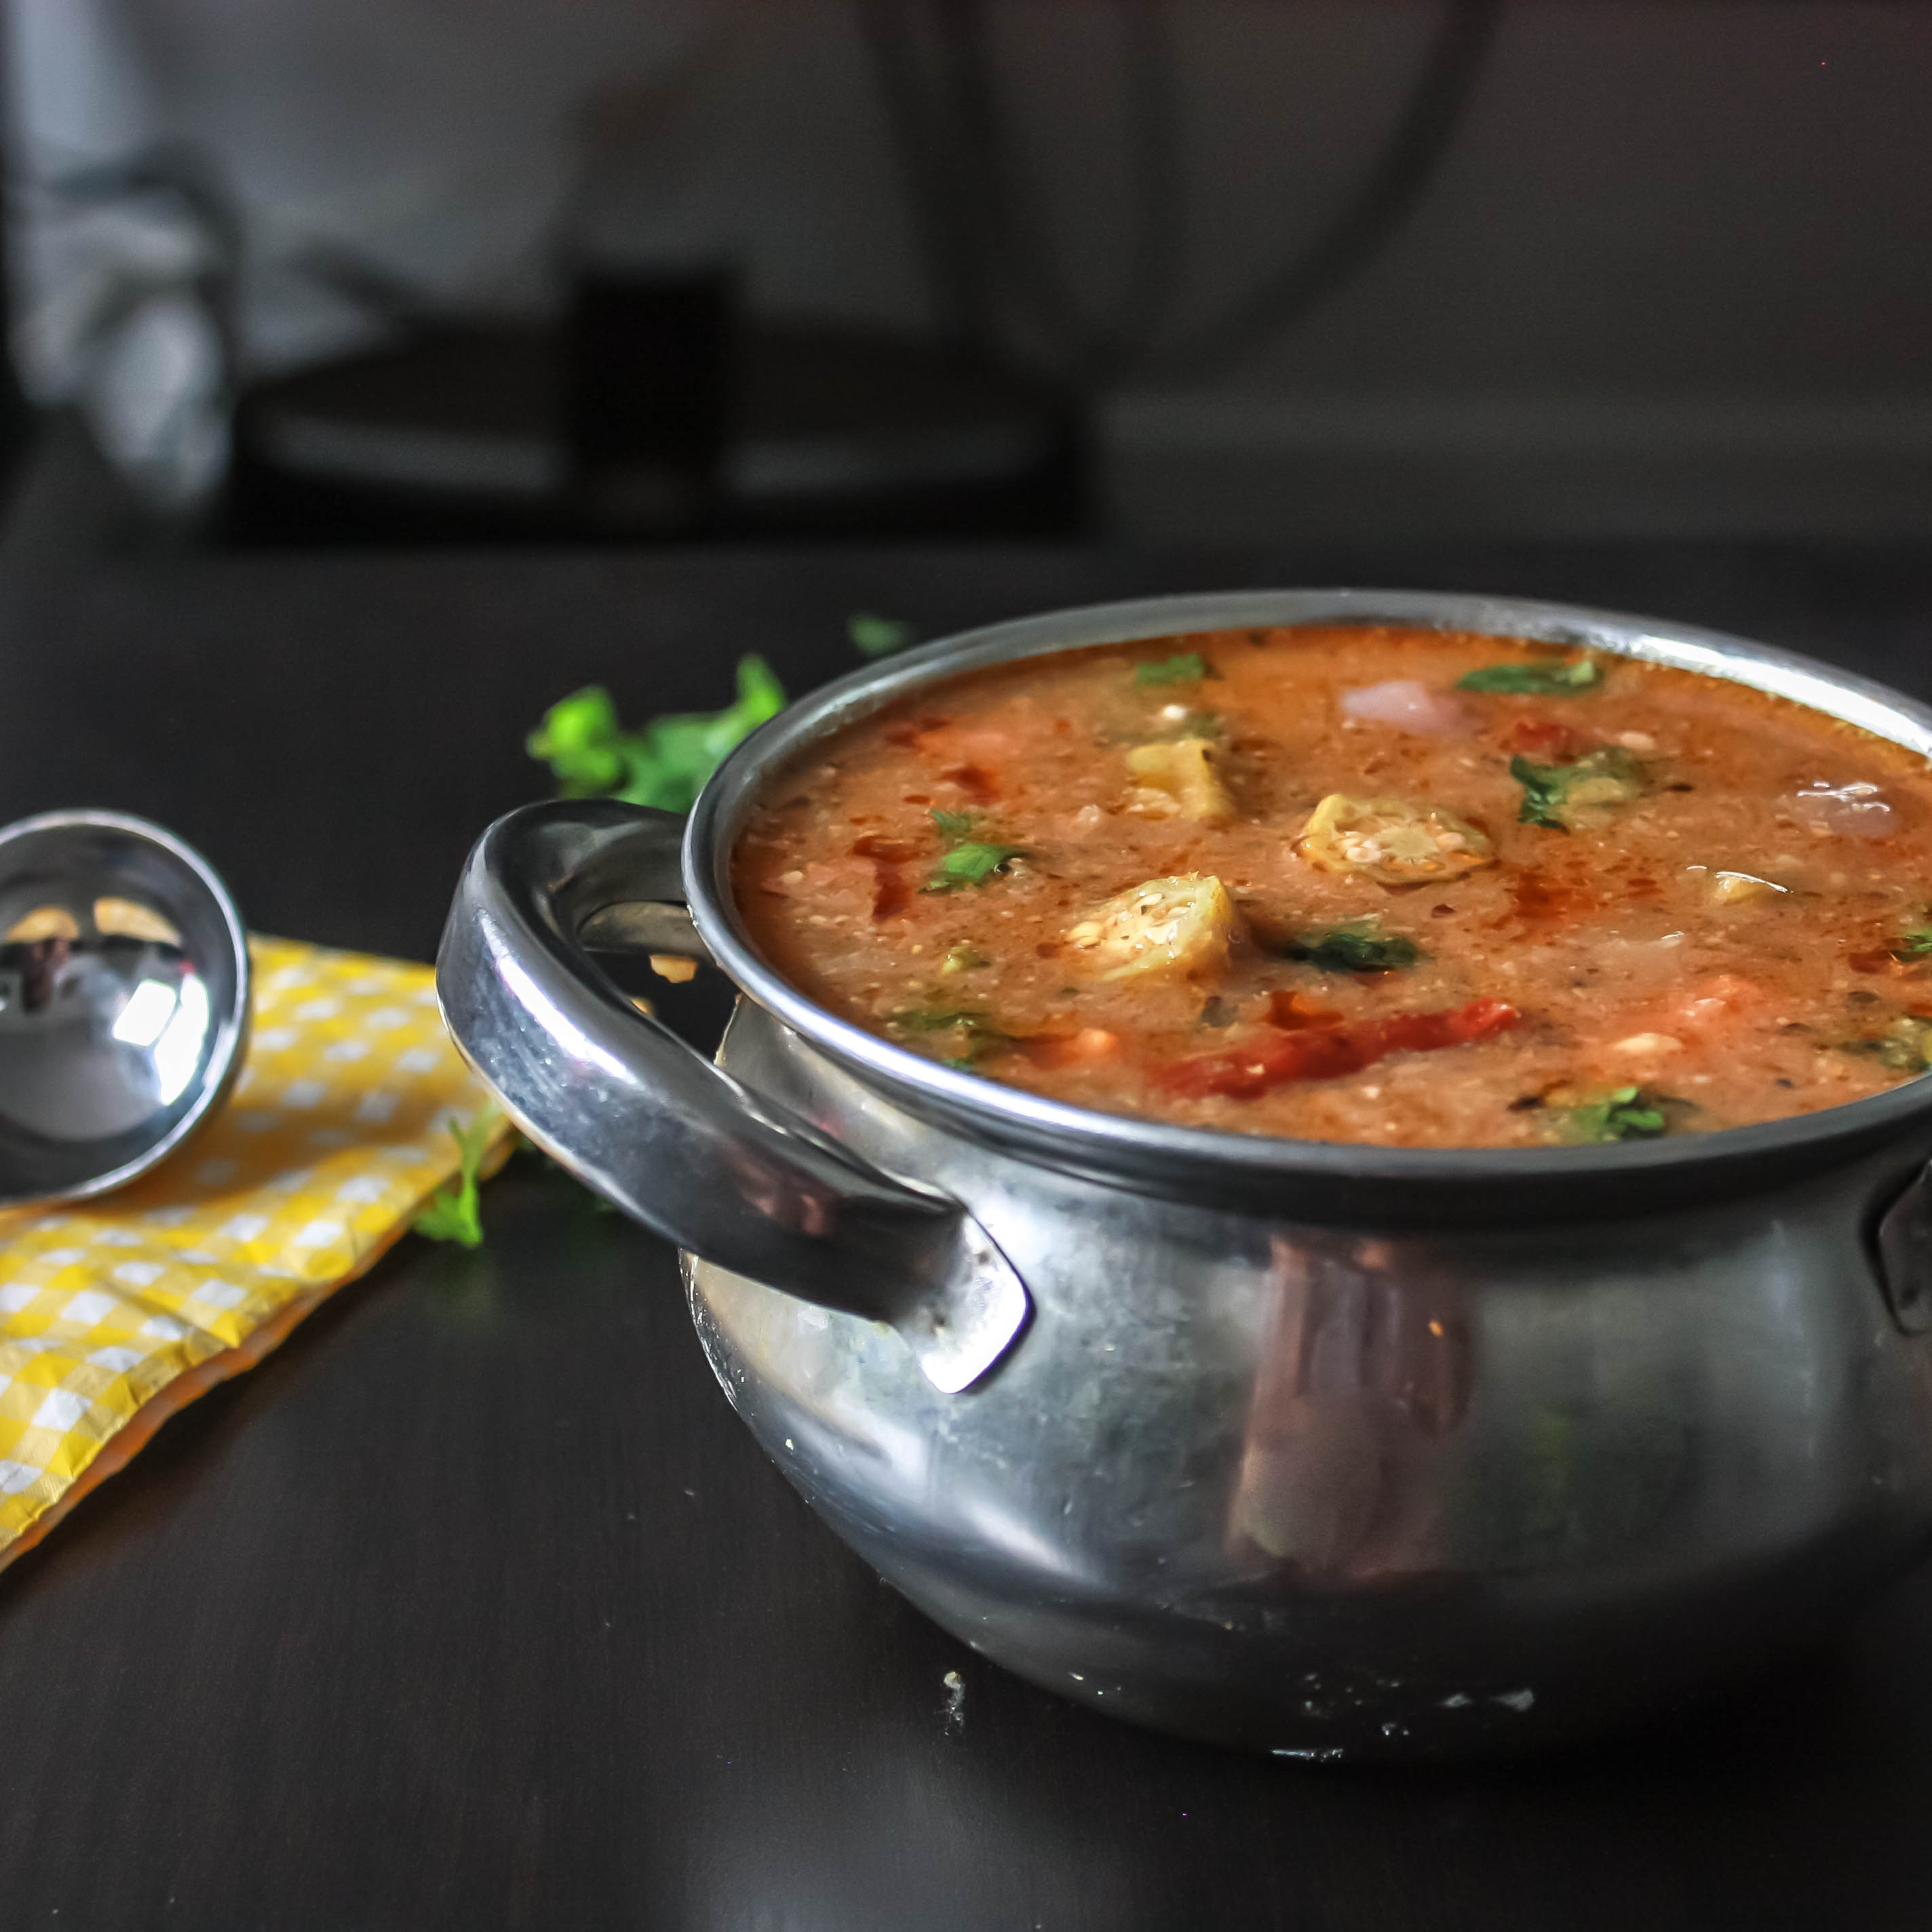
  7. You can garnish with a tsp of sesame oil and coriander leaves if you like.
Notes
1. You can replace shallots with just sliced big onions. But shallots give better taste.
2. Frying sambar powder is a must step I would say. It gives great aroma to this recipe.
Wordpress Recipe Plugin by EasyRecipe
3.3.3077

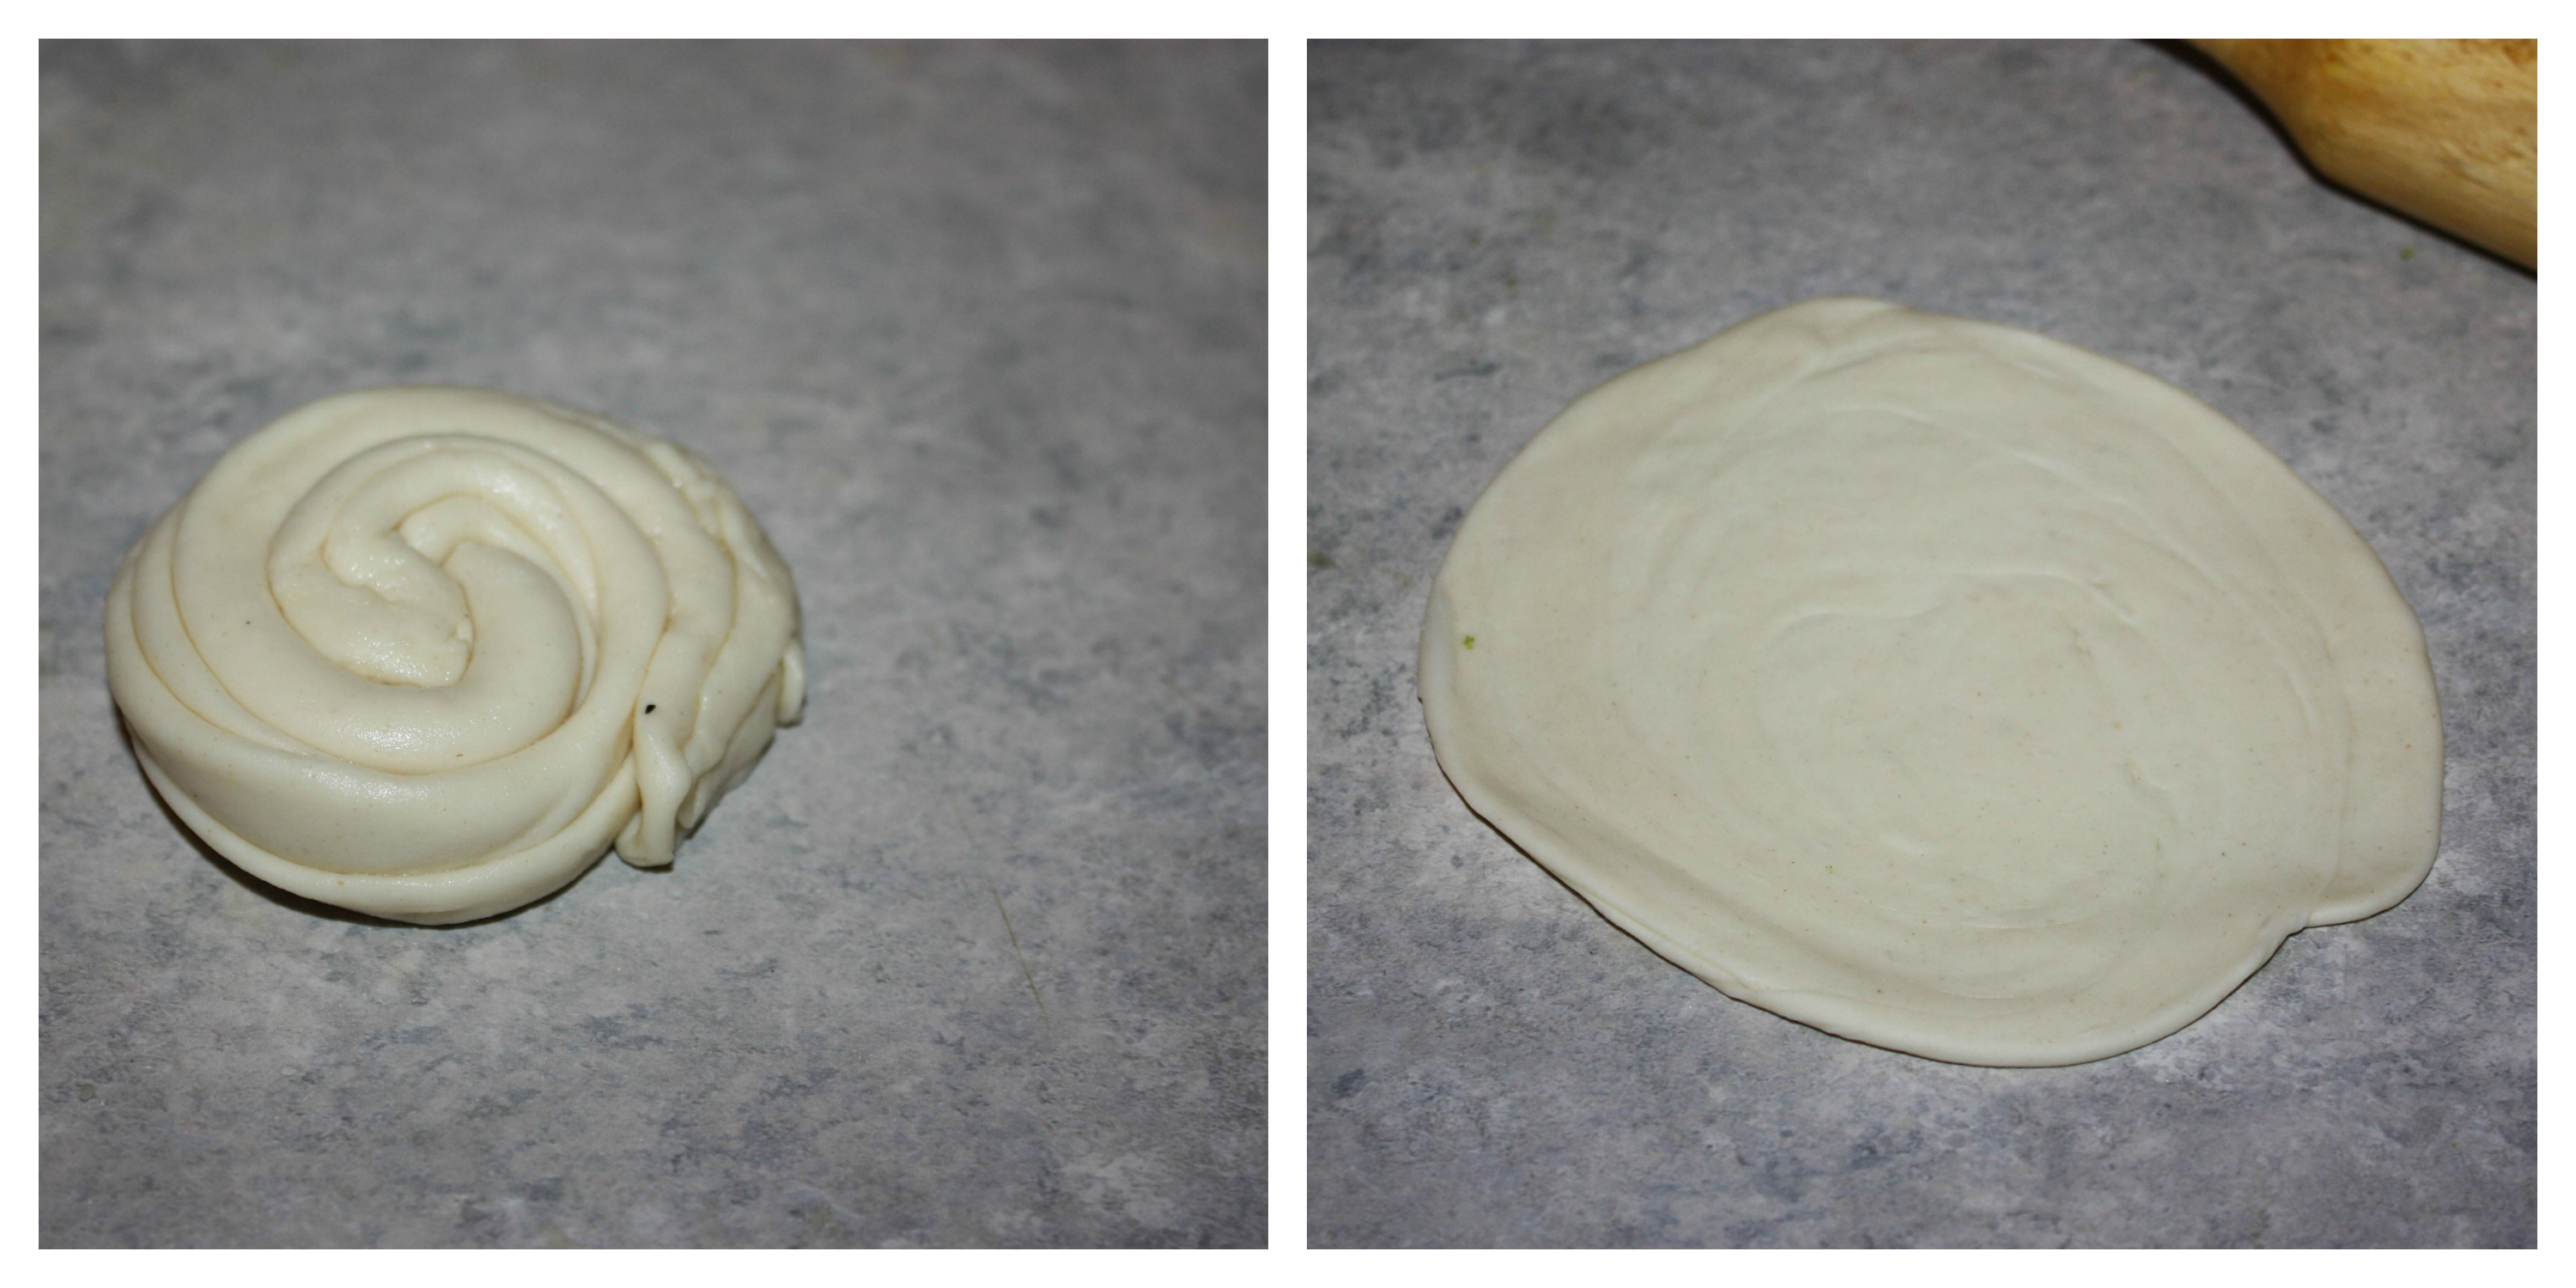
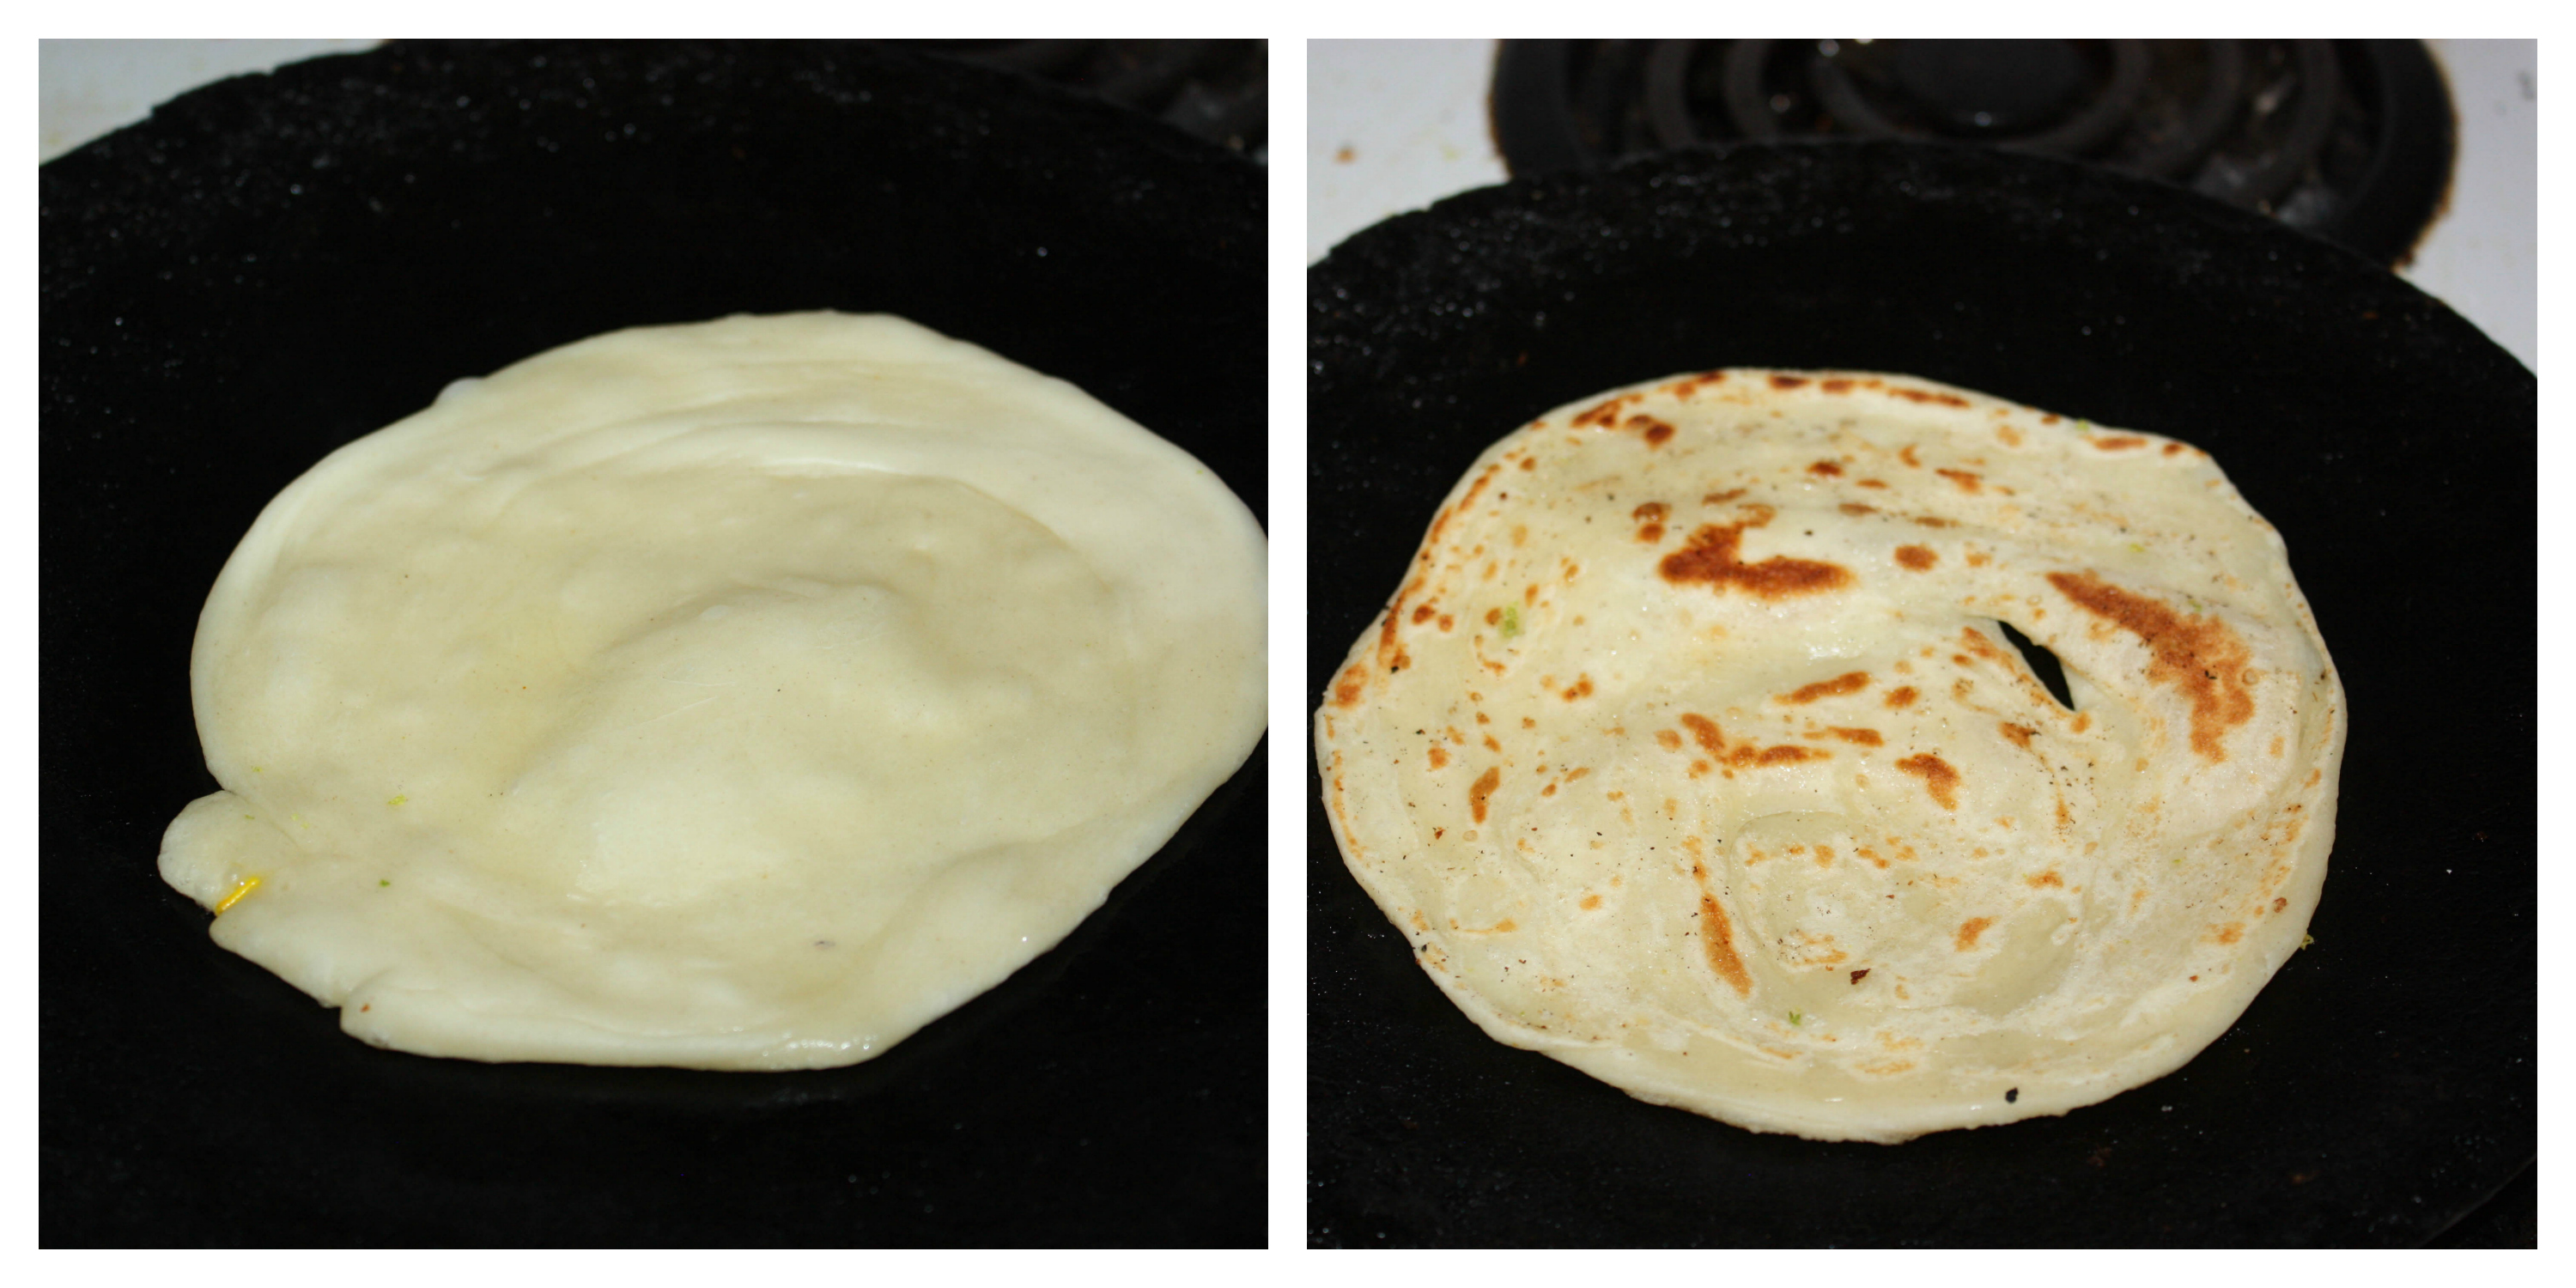
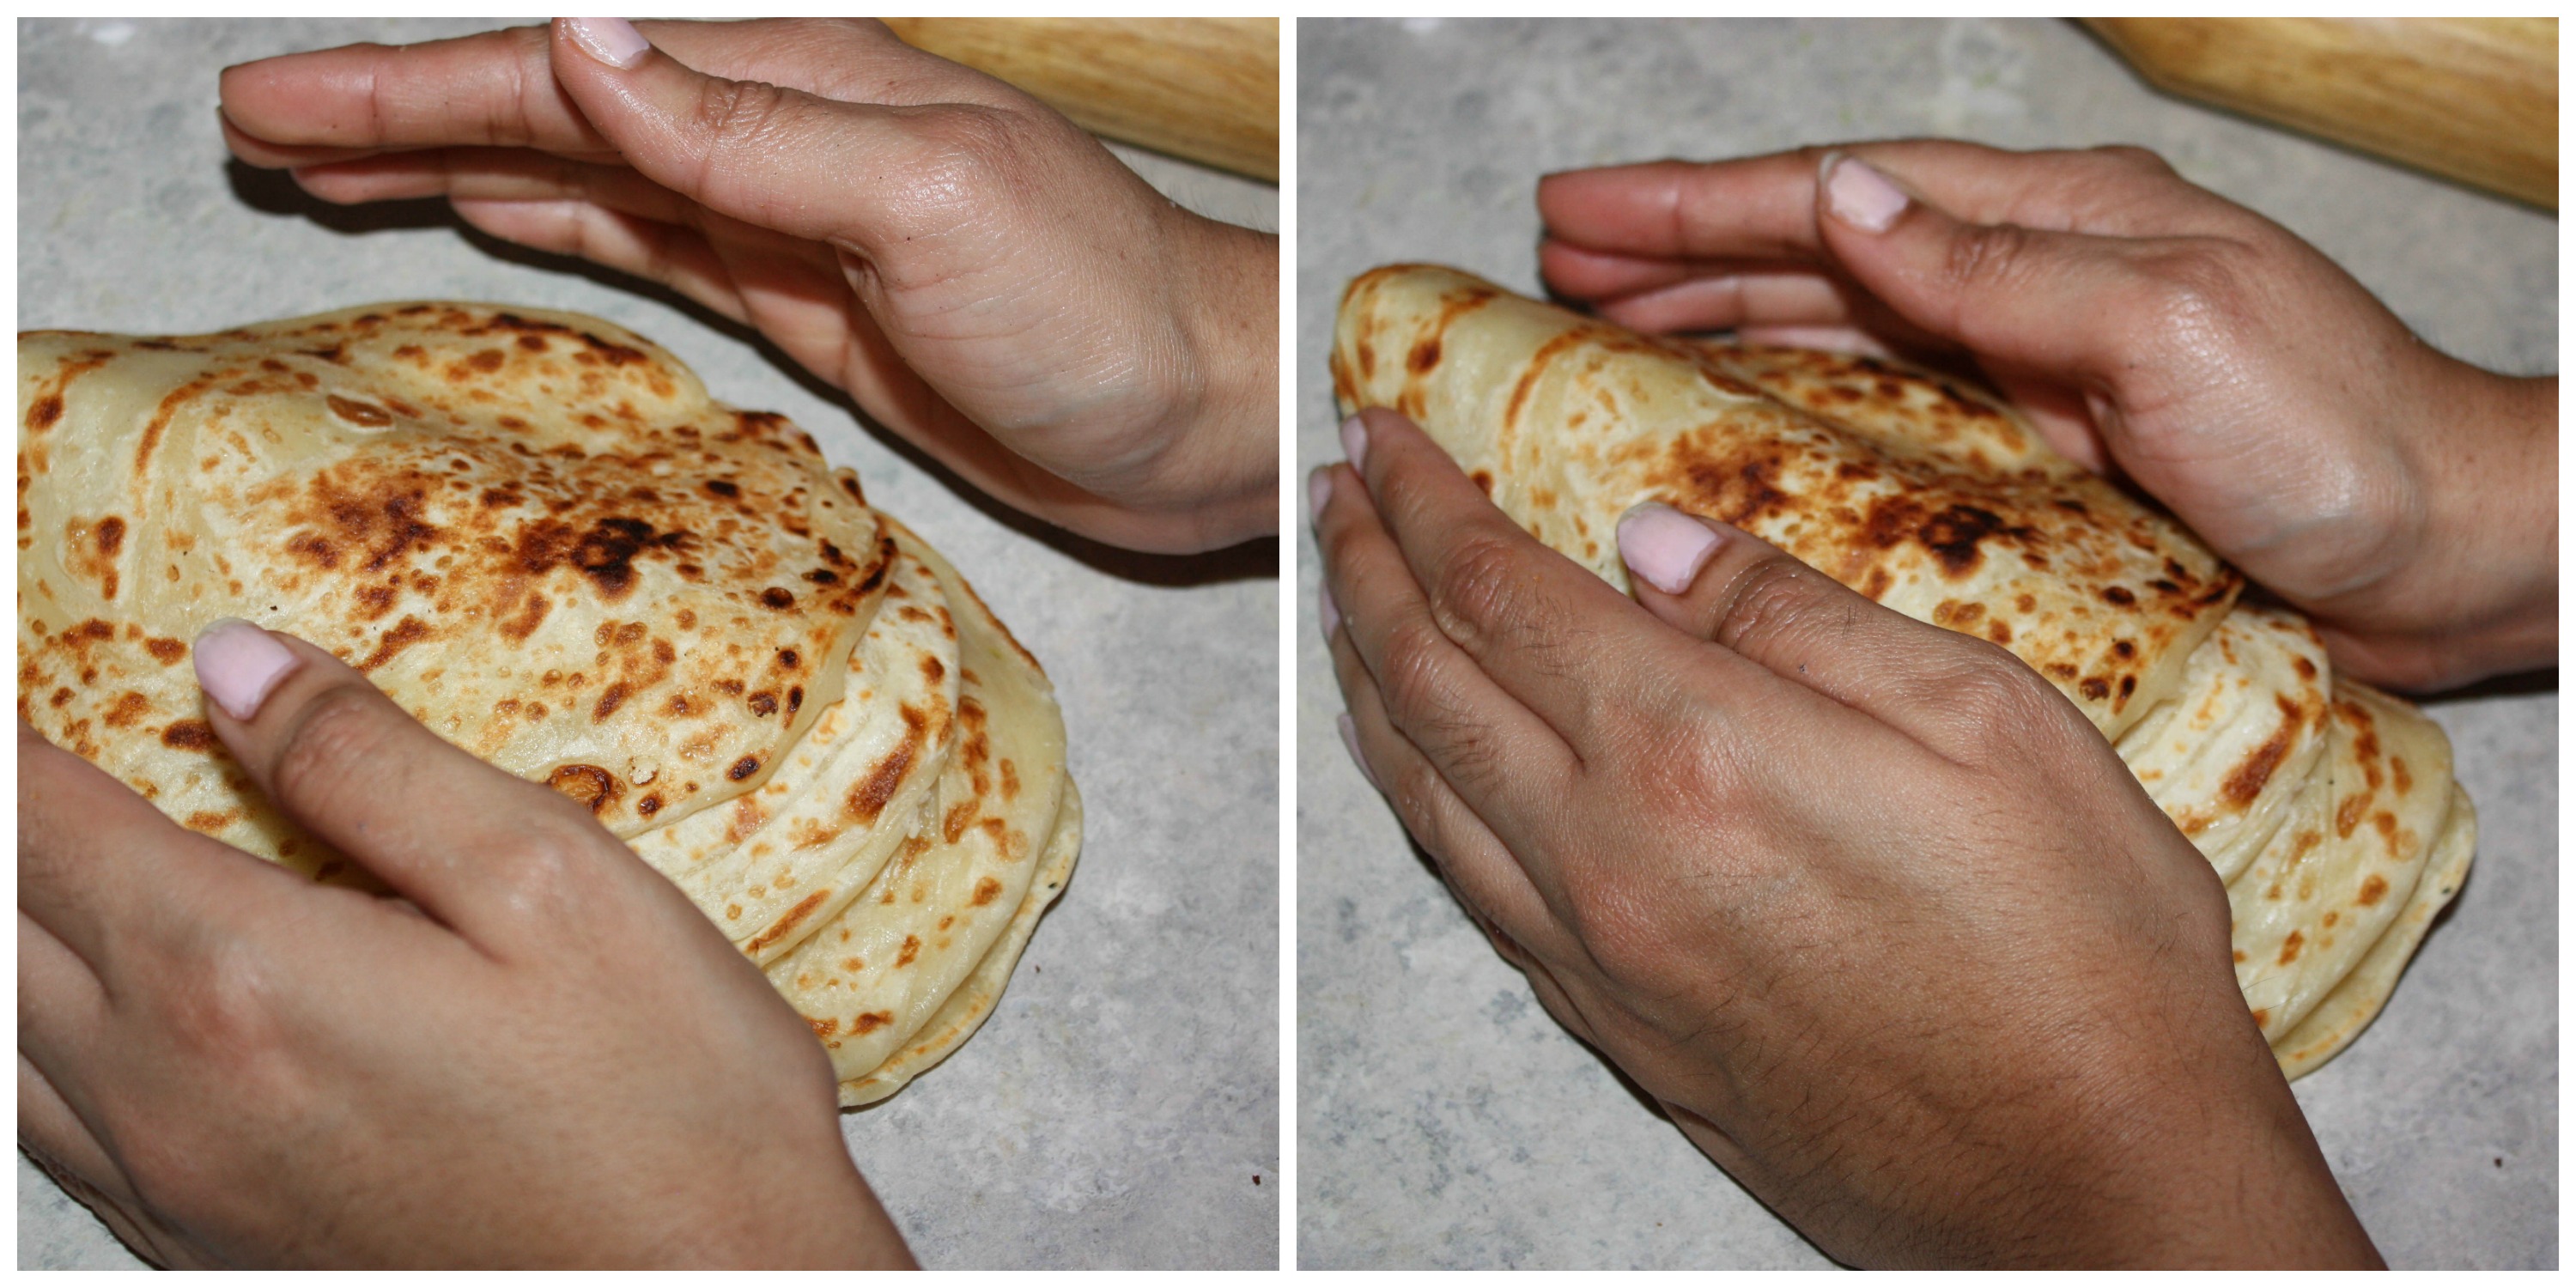
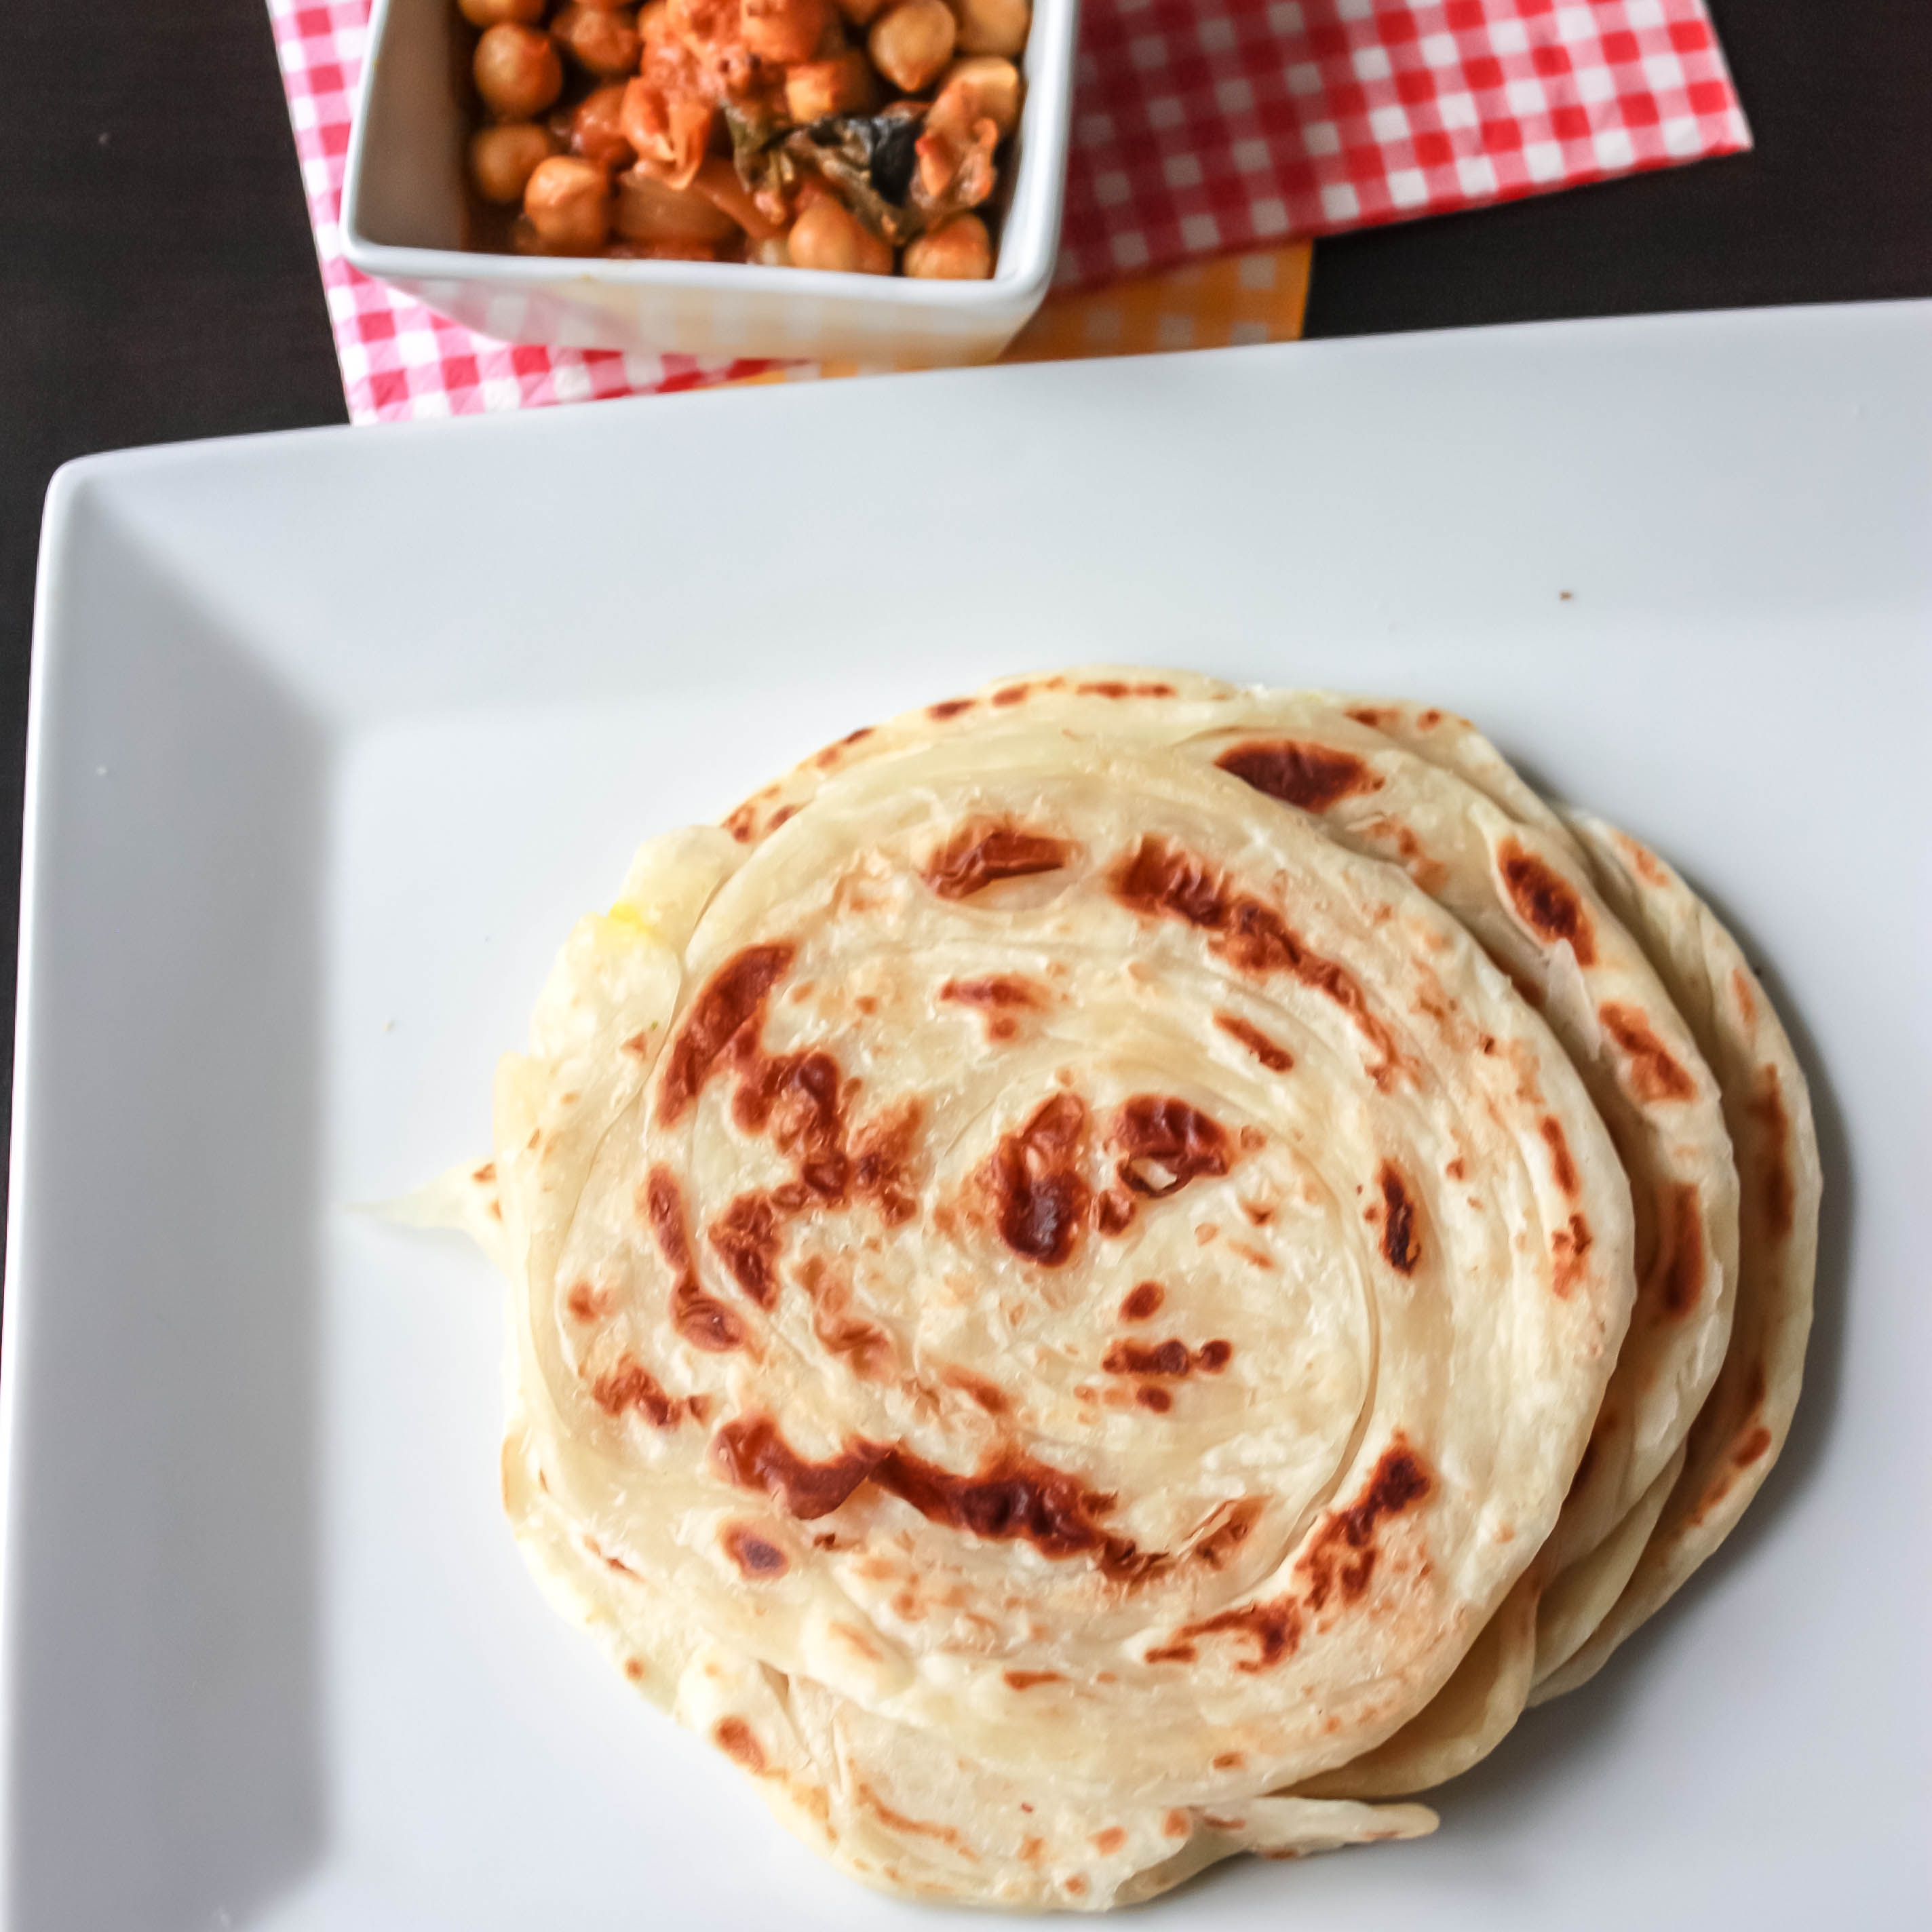
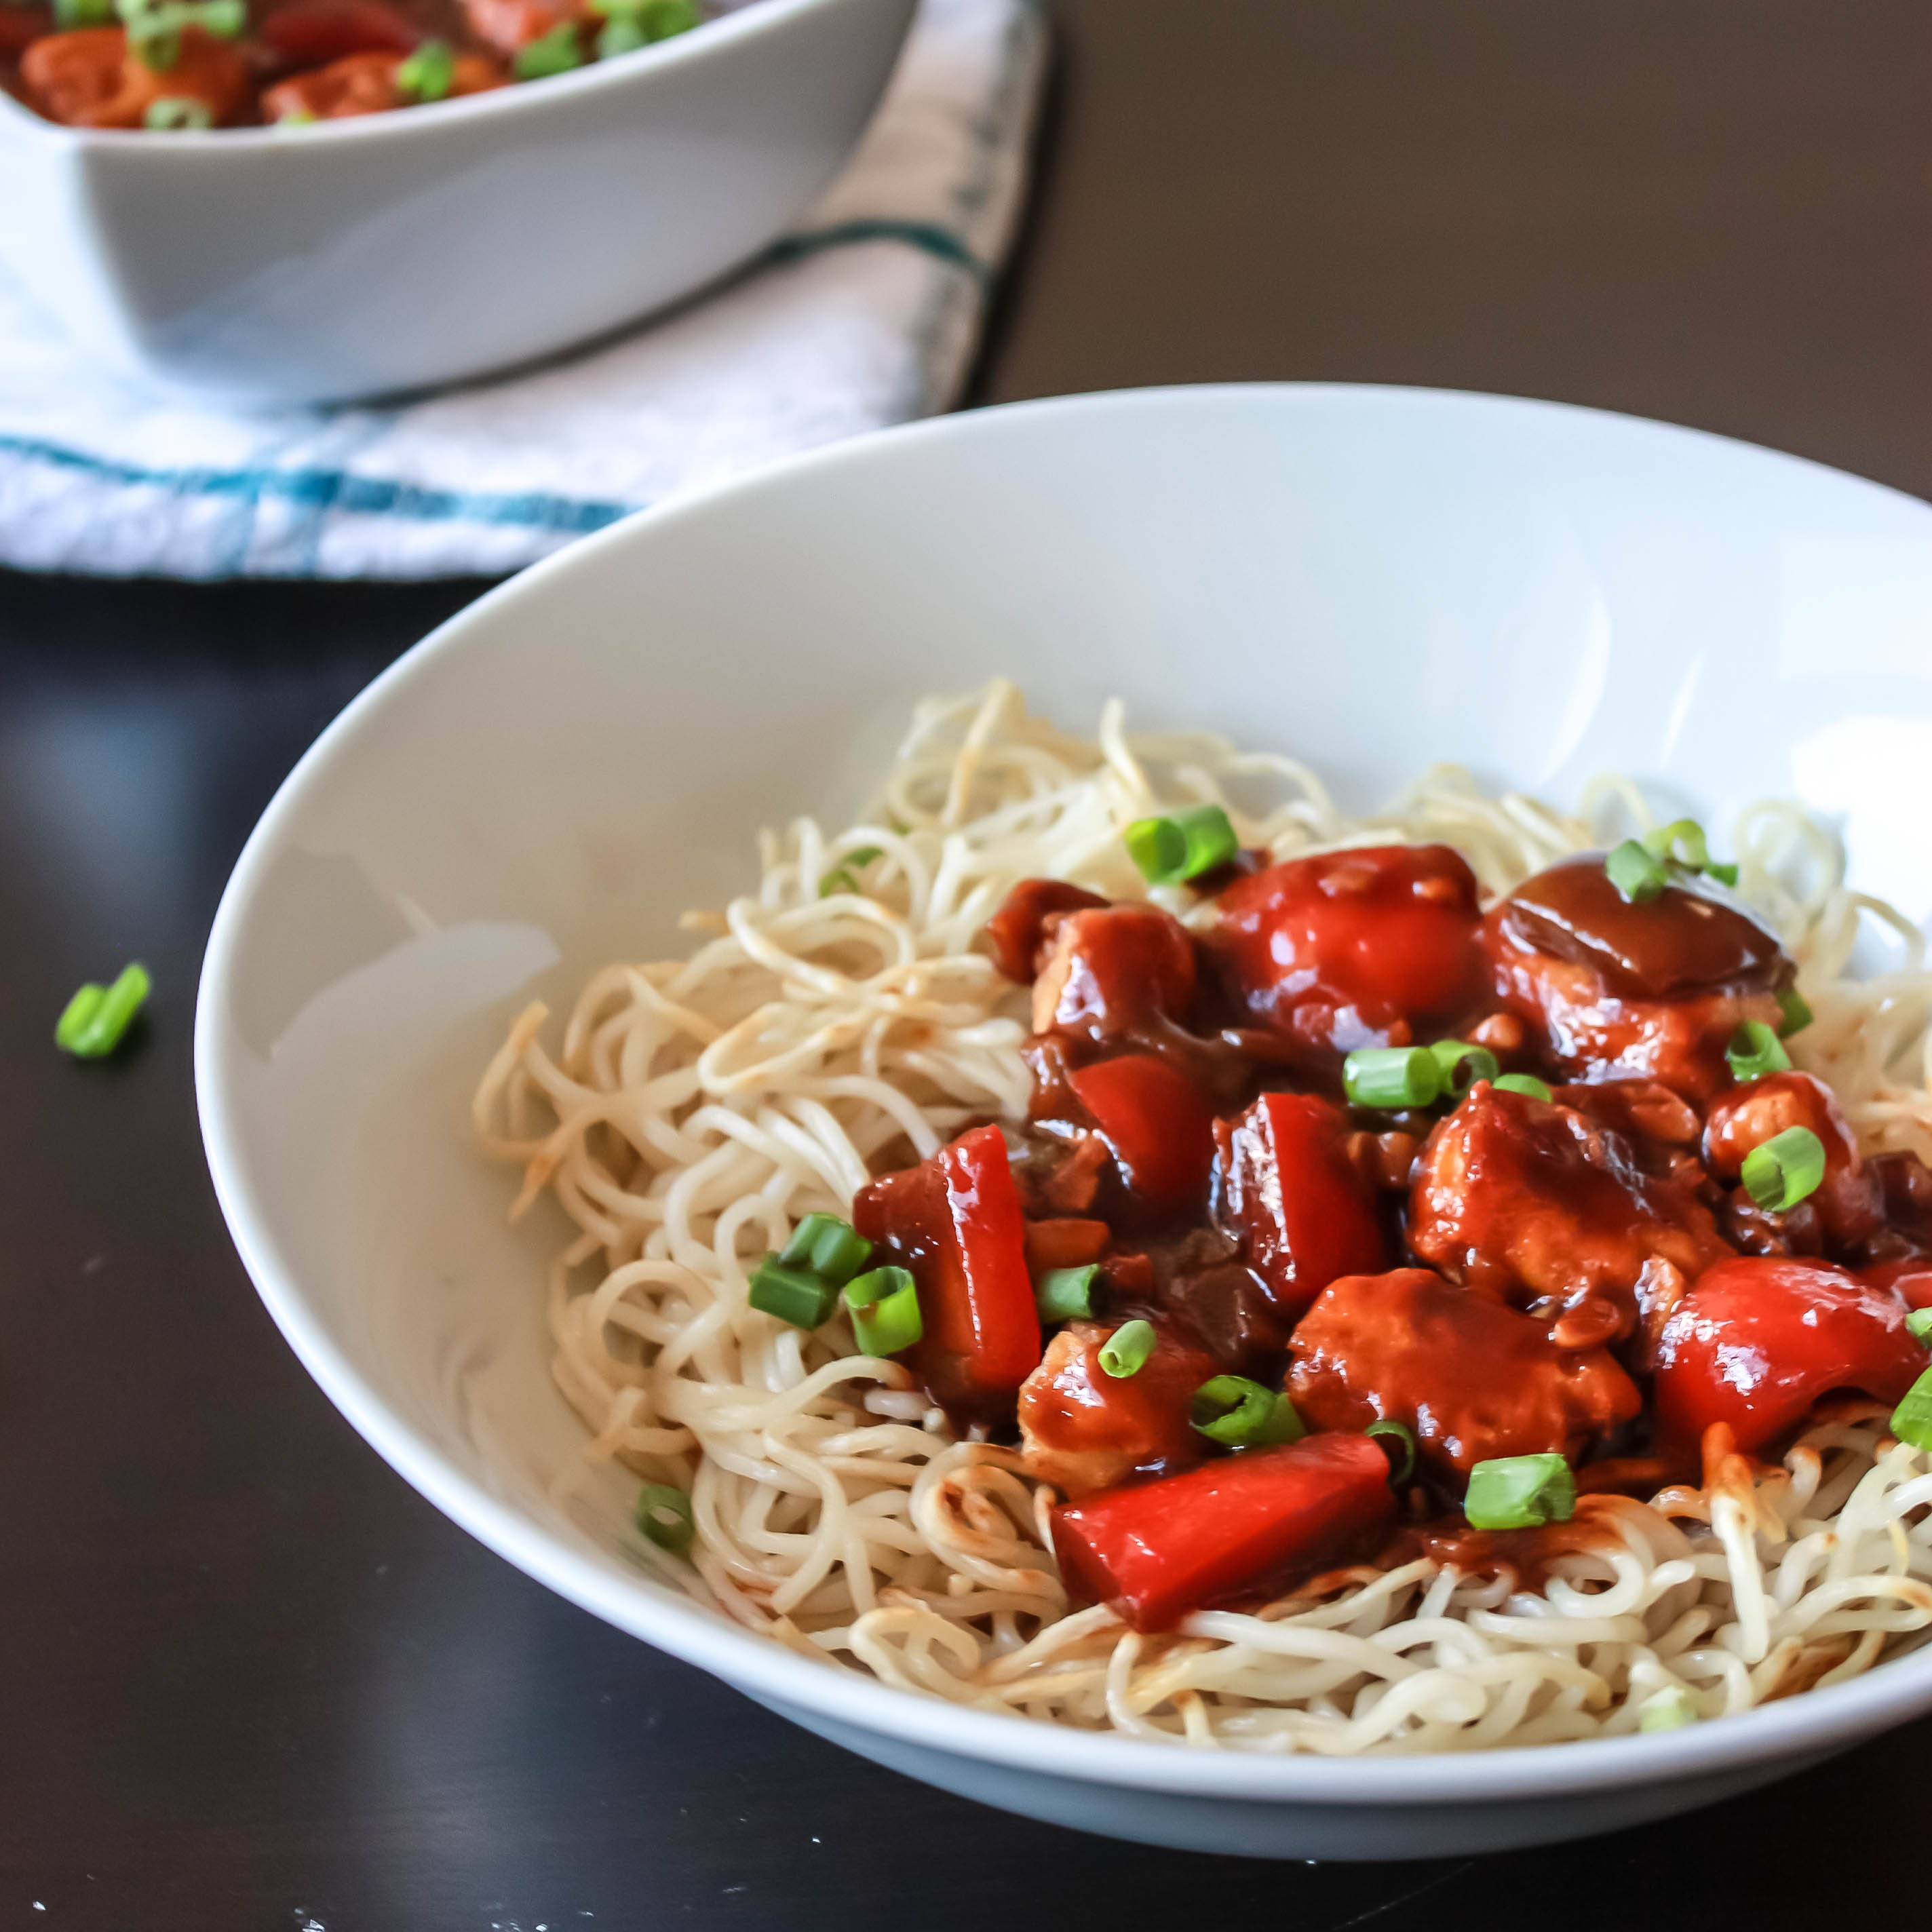
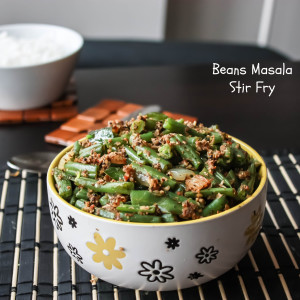
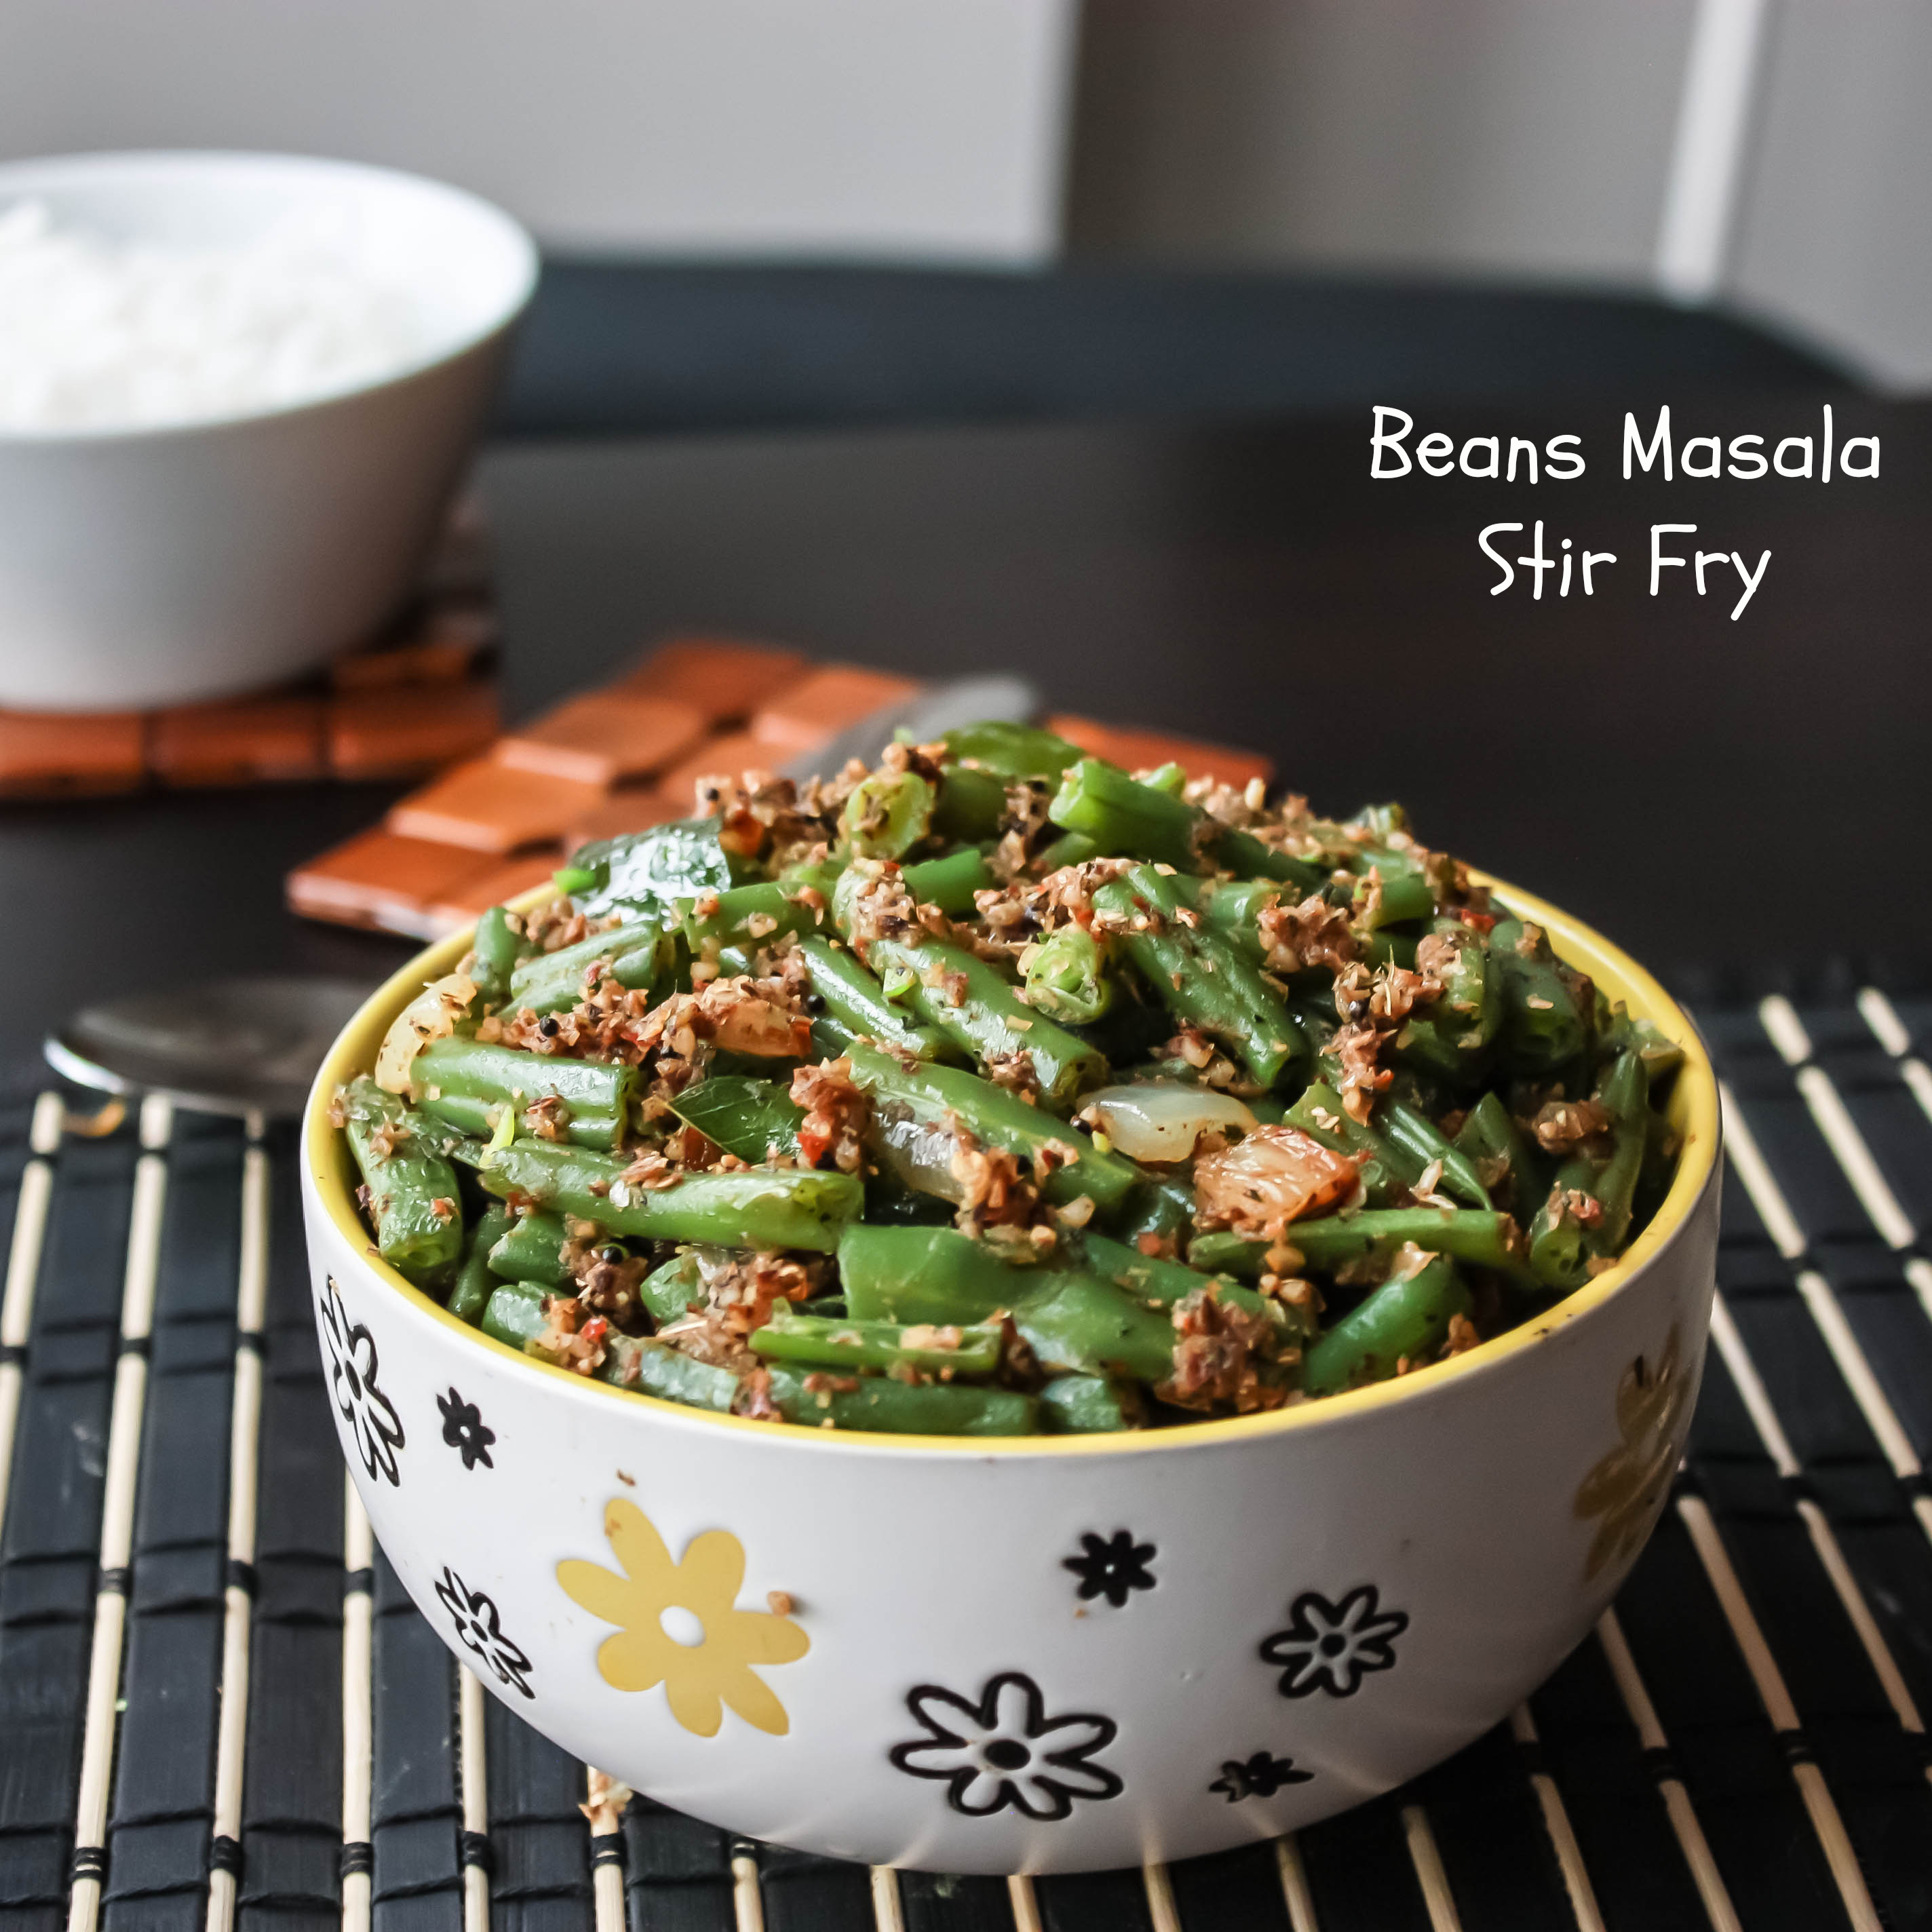
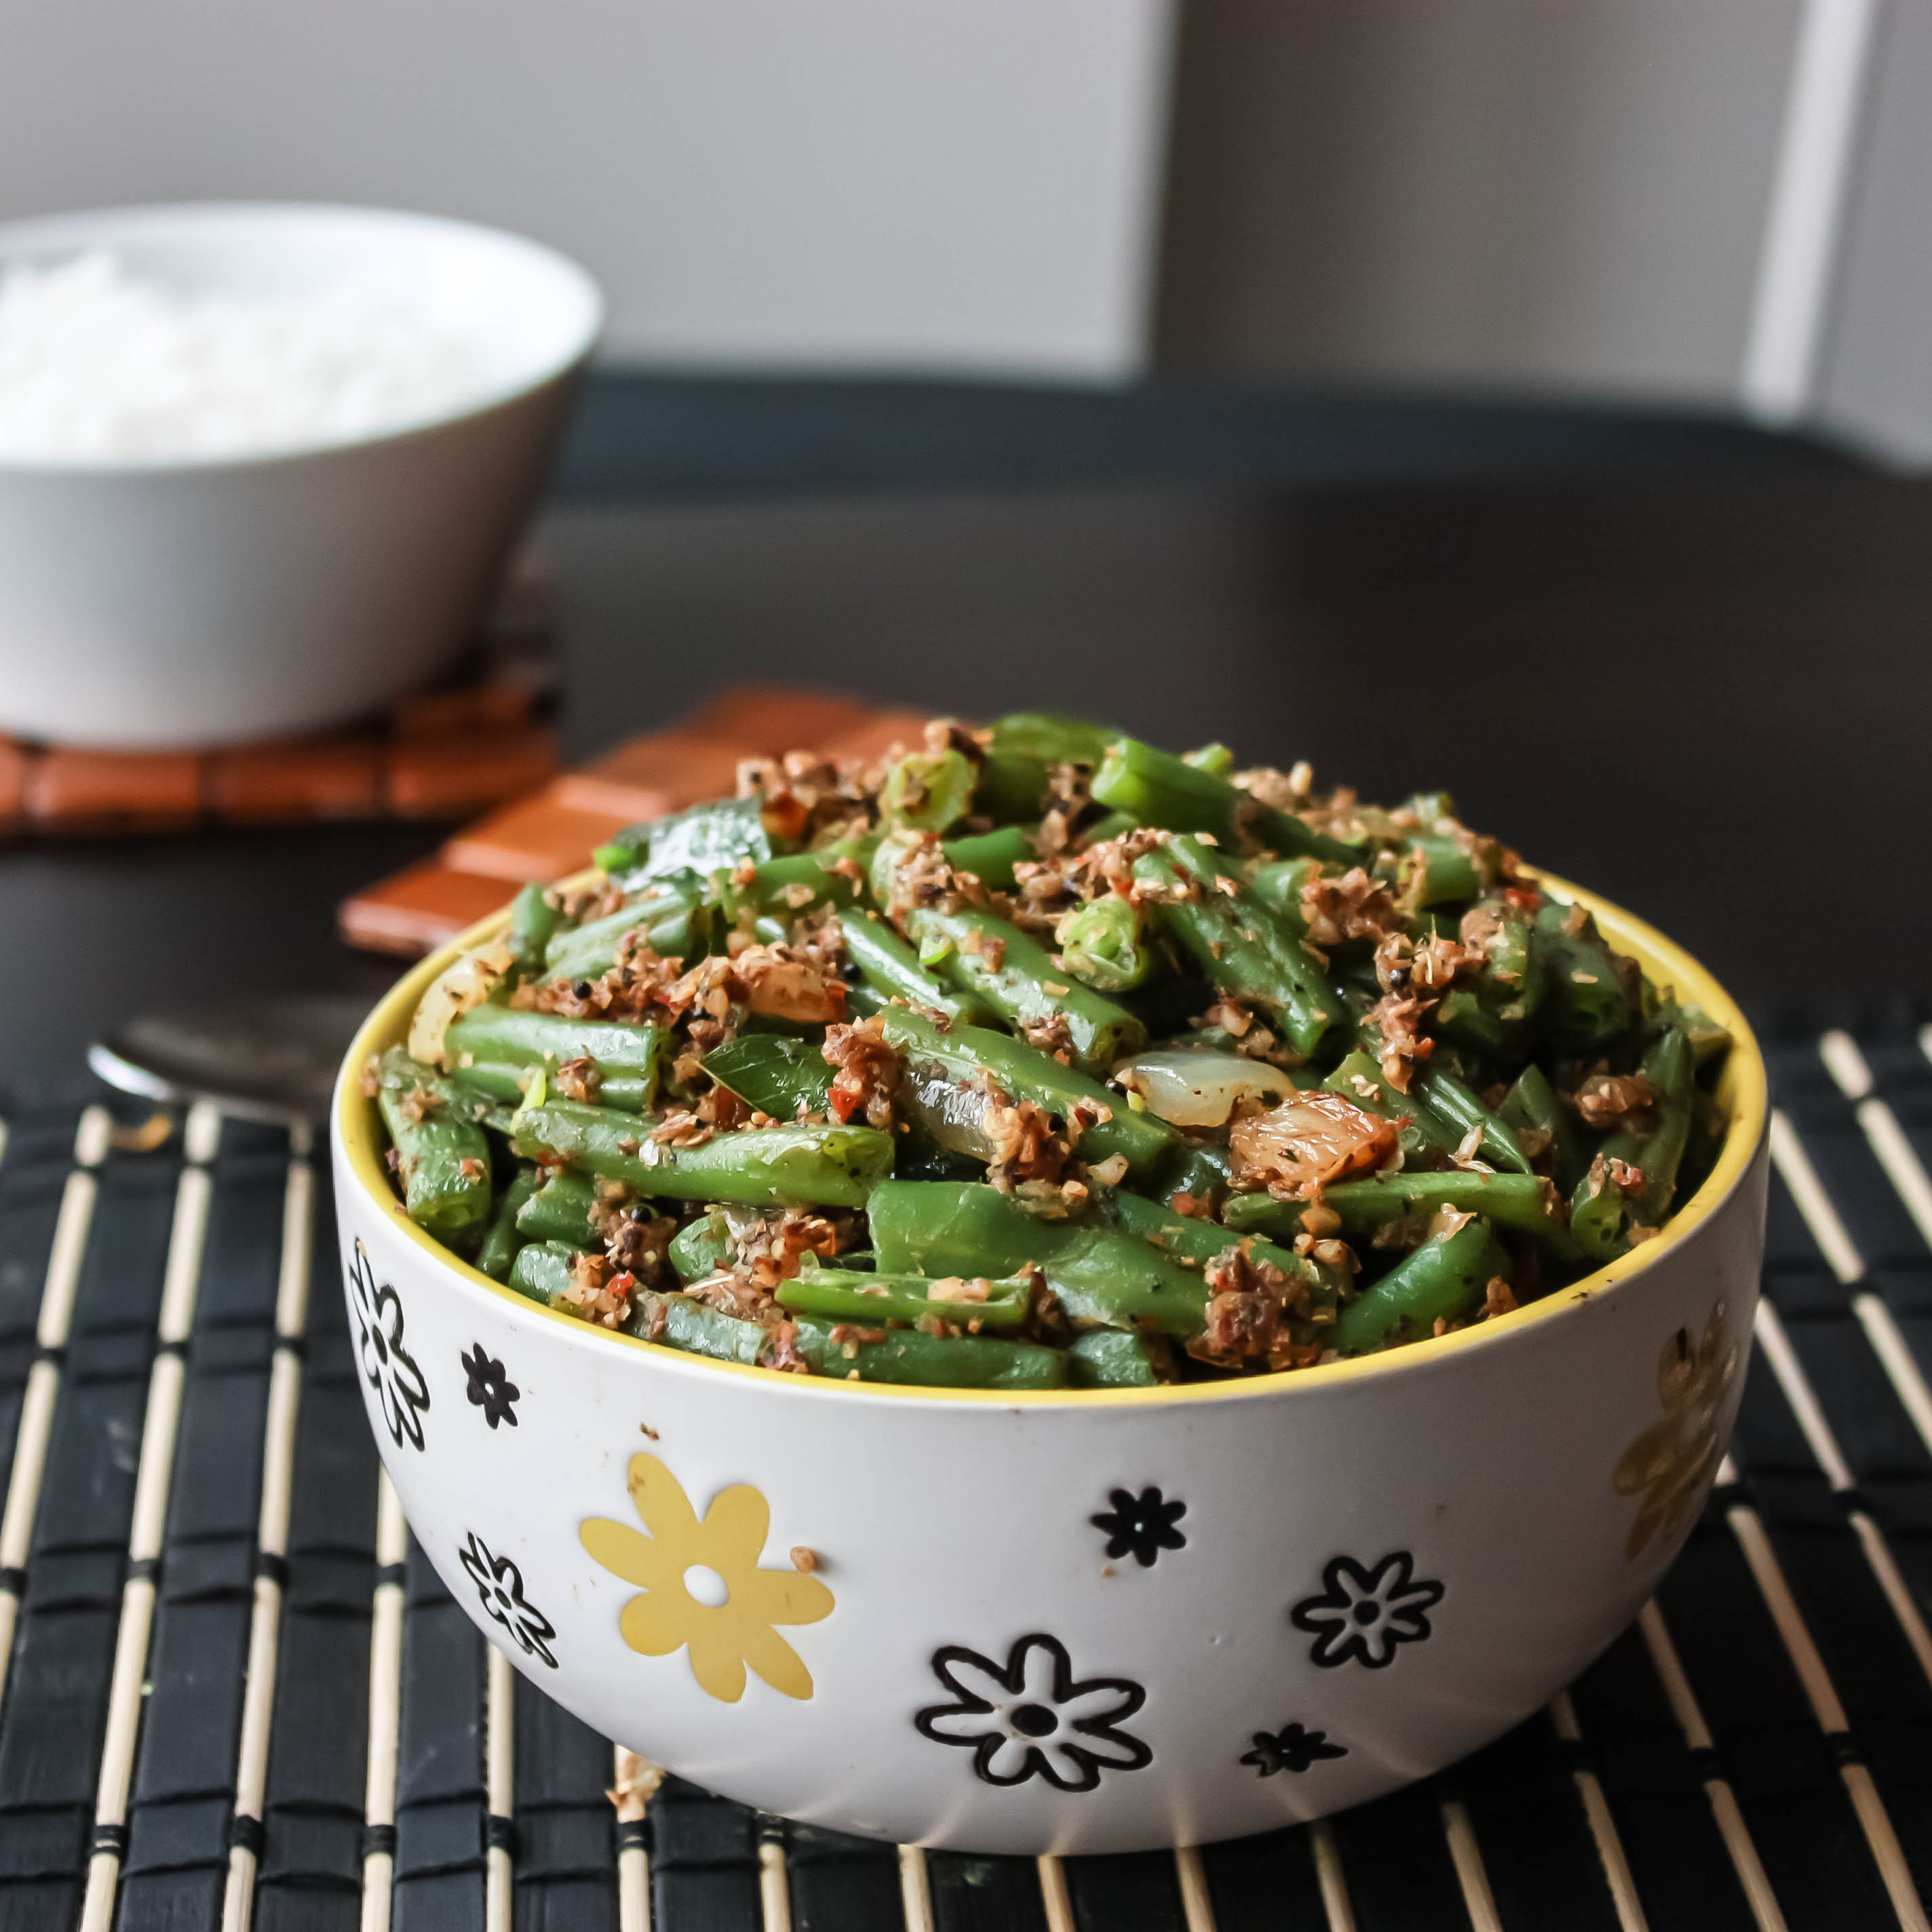
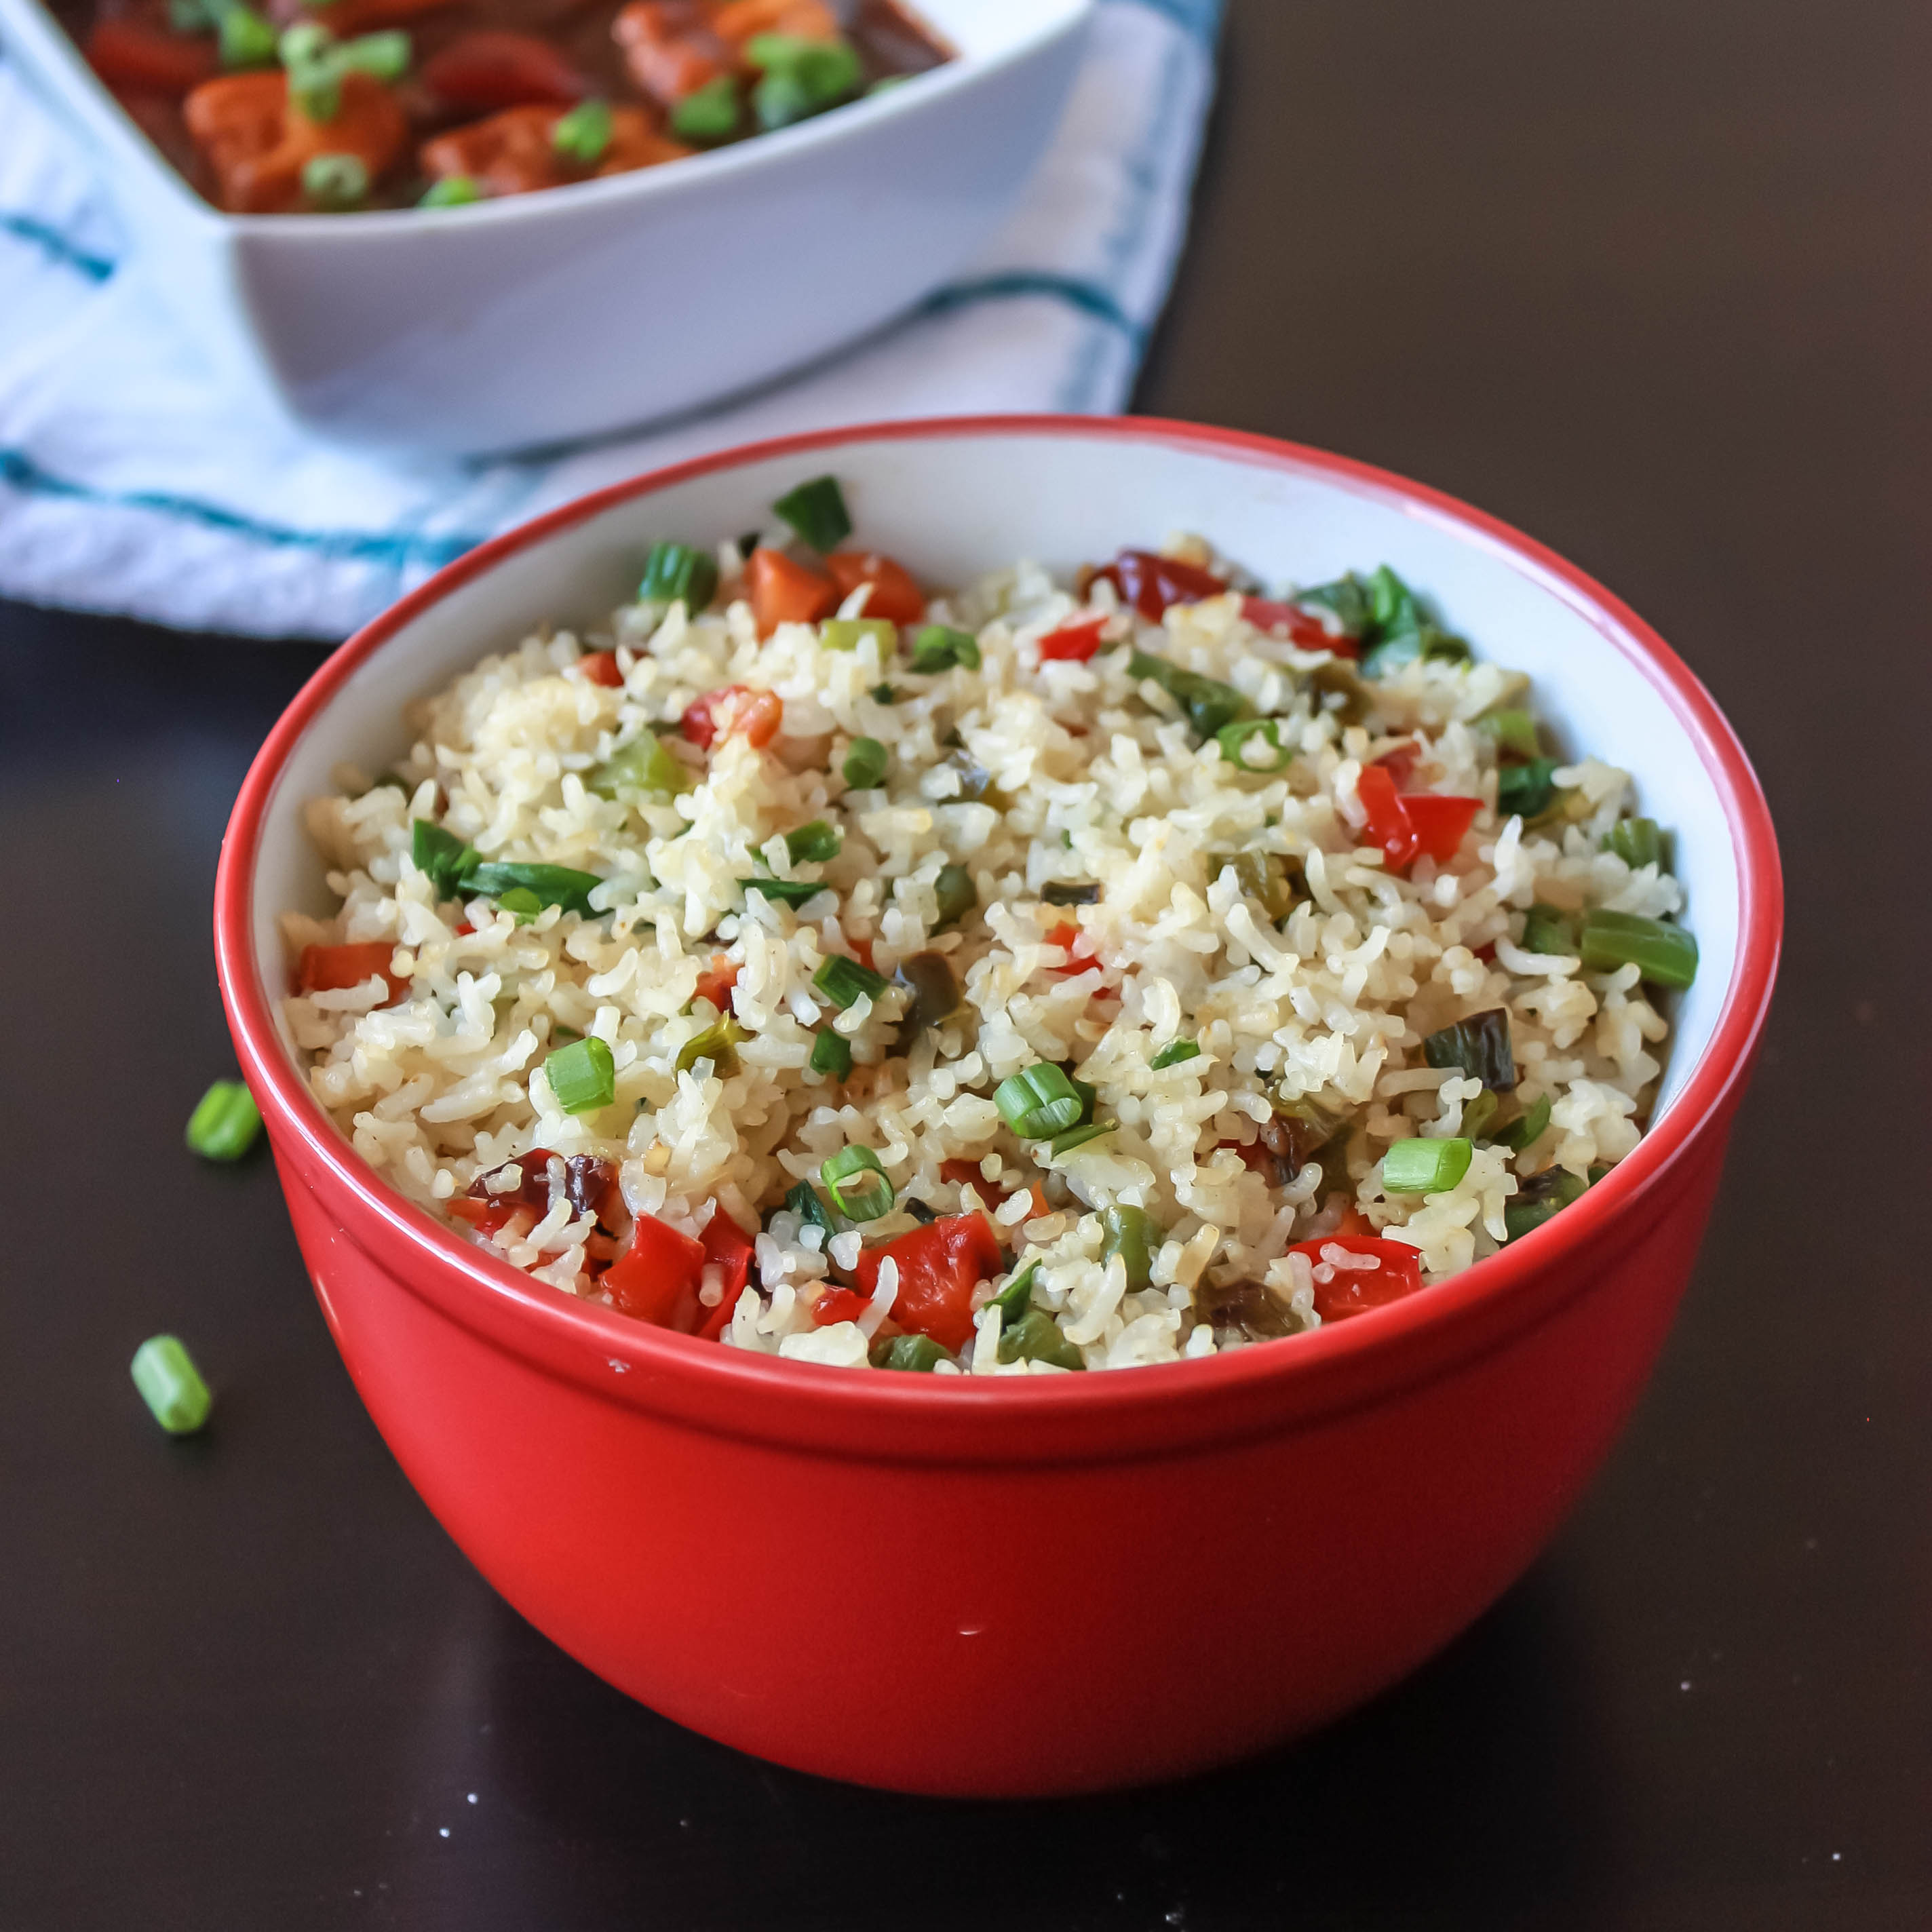
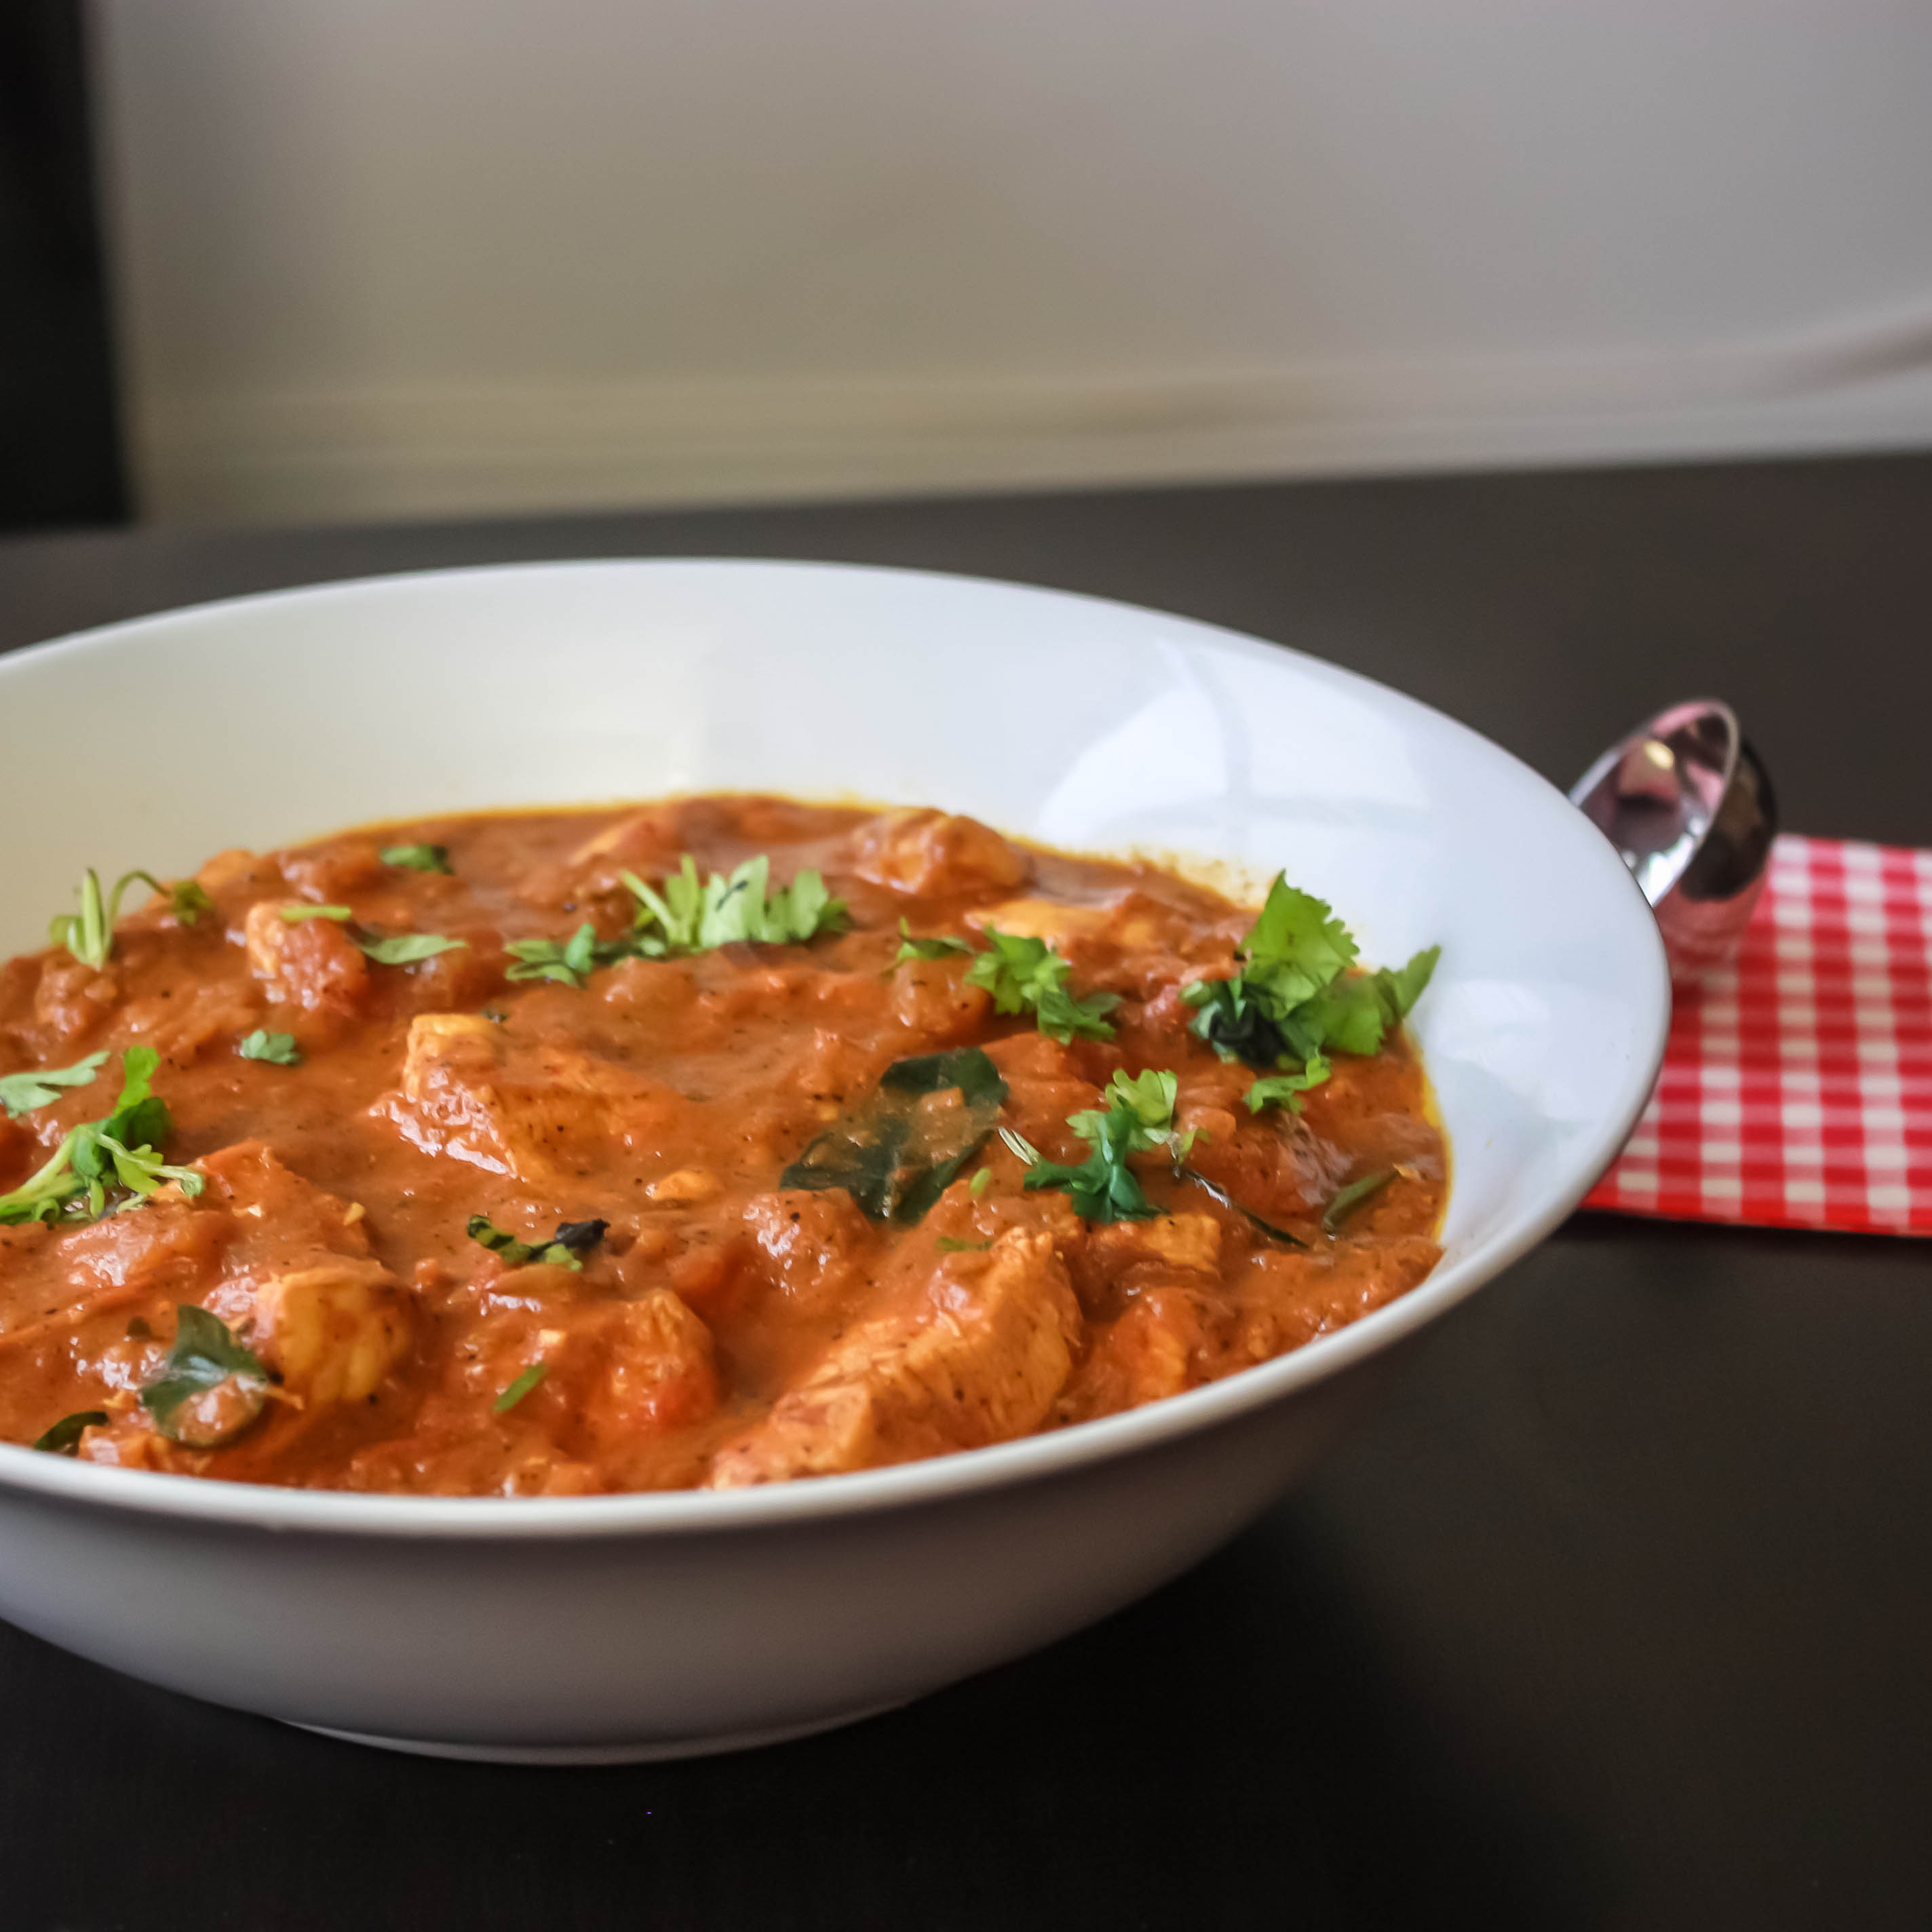
Serve this delicious kuzhambu with rice, papad and carrot poriyal/beans stir fry.

Kuzhambu-12

Filed Under: SOUTH INDIAN GRAVIES/DAL/CURRY/KUZHAMBU, VEGAN Tagged With: curry recipe, iyengar kzuhambu recipe, iyer kuzhambu, Kuzhambu recipe, onion garlic curry recipe, Onion kuzhambu recipe, quick curry recipes, quick kuzhambu recipes, south indian kuzhambu recipes, vatha kuzhambu recip[e, vathal kuzhambu recipe, vegan curry recipe, vegetarian curry recipe, vegtarian curry, vengaya kuzhambu recipe, vengaya vatha kuzhambu recipes, vetha kuzhambu recipes

Banana Crepe with Chocolate Hazelnut drizzle

November 27, 2014 by Suki 4 Comments

Crepe-14These delicious home made crepes are thin, light and absolutely irresistible. Crepes can be served for breakfast or as a dessert. 🙂

Do you know how to make crepes ? :)They have a fancy French name but easier to make then pancakes. I recently developed a craving for crepes after having the best crepe in Montreal at juliette et chocolat. I had the chocolate madness crepe and it was really good.

I never thought it is so easy to make at home before I tried it. It tasted so good and it was thin, light and absolute heaven. I made the nutella whipped cream filling crepes when I made the first time. It was simple and light. But I wanted to try this one with a hazelnut and white chocolate. I started loving hazelnuts from the day i tasted ferrero rocher chocolate. Now I am crazy about them even after 15 years. And white chocolate is another favorite. I would have mentioned it in my other post too. So i made this with laura secord white chocolate chips. Their white chocolate is really good :). White chocolate and hazelnuts! Great combo!!!

Crepe

These crepes are easy to make, it is classy and sure you will be loved by your family for this 😉 It is much and lot cheaper to make these at home. Each crepe cost 8$ and above.  It is less to wash and the batter comes together quickly and lumps free. Each time I wanted to have these crepes with different toppings, nutella one time, chocolates, fruits, maple syrup, jelly, peanut butter, bacon, eggs, ricotta cheese and savory one.

Crepe-12

The beauty of these crepes is that they can fold and bend and shape to however you want them to look.  The trick for making the best crepes is to rest them for a day in the refrigerator. I make the batter on a Saturday and use it on a Sunday. Resting period is necessary to make it tender and smooth. Worst case you can make them after 30 minutes. It’s still good 🙂 People say the first crepe doesn’t come very good 😉 but it does for me always 😉 so I am not sure. If it happens so, don’t worry. You always have next time!!! The tip I would say is pour the batter when the pan is hot.

You can have these for breakfast or as a dessert. You can refrigerate them after making it for two days. Or Store the refrigerated batter for 5 days and make as you want. Just be sure to reheat the crepes right before everyone is about to serve themselves.

Print
Banana Crepe with Chocolate Hazelnut drizzle
Author: Suganya Hariharan
Recipe type: Breakfast
Cuisine: French
Prep time:  24 hours
Cook time:  30 mins
Total time:  24 hours 30 mins
Serves: 8
 
Ingredients
  • All purpose flour – 1 cup
  • Coarse salt – ¼ tsp
  • Whole milk – ½ cups
  • Eggs – 3
  • Unsalted butter – 3 tbsp
  • Sugar – 1 tbs

    Topping(for 1 crepe):
  • White chocolate chips/ white chocolate – 2 tbsp., melted
  • Milk chocolate chips/ milk chocolate – 1 tbsp. , melted
  • Hazelnut – 1 tbsp broken
  • Fruits – ¼ cup
Instructions
  1. Melt 3 tbsp of butter in a pan. And keep it aside.
  2. Take your blender; add the milk, eggs, flour, sugar and salt. Blend it and add the butter (make sure it is not hot) and puree until mixture is smooth and bubbles form on top, may be about 30-40 seconds.
  3. Let batter sit at least 30 minutes at room temperature. I refrigerate them in an airtight container up to one day and whisked them before using.
  4. Heat a Nonstick pan, when it is hot, lightly coat with butter and add the batter and swirl it up nicely.
  5. Cook until underside of crepe is golden brown for two minutes. You know if it’s ready when the center is set and the edges get slightly brown.
  6. Loosen the edge of crepe with rubber spatula and then with finger tips, quickly flip it. Cook for one more minute on this side. Slide the crepe out of skillet.
  7. Repeat with remaining batter.
  8. Place the crepe in a plate, open the crepe and add the chocolate and broken hazelnuts. Top with fruits, hazelnuts and drizzle some white and milk chocolate.
Wordpress Recipe Plugin by EasyRecipe
3.2.1311

Crepe-13

Filed Under: BREAKFAST, DESSERTS Tagged With: chocolate crepe recipe, crepe french recipe, crepe pancake recipe, Crepe recipe, hazenut recipes, quick breakfast recipe, quick brunch recipe, restaurant style breakfast recipe, sweet batter recipe, sweet dosa recipe, white chocolate recipes

Arachuvitta Sambar/ Indian Lentil Stew

November 26, 2014 by Suki 2 Comments

Sambar-12

Sambar-12Healthy and traditional south Indian style lentil stew made with freshly ground spices.

It is a traditional south Indian recipe made with freshly ground spices, very common in many households as a part of everyday cooking. Whenever we have guests at home for lunch or for many festival days, my mom will prepare this sambhar but with different veggie which we have at home that day. My mom makes this recipe so well, and she will make sure she does vada for me that day and in the evening she will prepare sambhar vada for me with some chopped onions and coriander leaves on top. OMG! Memories 🙂

Sambar-13

The secret to make this sambhar perfect is by grinding these masalas fresh and use them. This sambhar recipe is a bit tedious compared to normal sambhar recipe because of the “roasting & grinding” part. But it’s worth doing on a special day :). I have made this sambhar many times and I have never met anyone who doesn’t love this sambhar.

Print
Arachuvitta Sambar/ Indian Lentil Stew
Author: Suganya Hariharan
Recipe type: Main
Cuisine: Indian
Prep time:  10 mins
Cook time:  20 mins
Total time:  30 mins
Serves: 4
 
Ingredients
  • Mustard seeds - 1 tsp
  • Urad dal - ½ tsp
  • Fenugreek seeds - ¼ tsp
  • Hung - a pinch
  • Curry leaves - few
  • Red Chilli - 1
  • Shallots - 7
  • Onion - ¼ cup , chopped finely
  • Tomato -1
  • Okra / Ladys finger - ¾ cup, chopped 1 inch size
  • Carrot - ½ cup, chopped 1 inch size
  • Tamarind - 1 lemon sized ball
  • Toor dal - 1 cup
  • jaggery - a pinch
  • Coriander leaves - 2 tbsp chopped

    To Roast and Grind:
  • Chana Dal / kadala paruppu - 1 tsp
  • Fenugreek/ Vendhayam - ¼ tsp
  • Dry red chilli - 2
  • Grated coconut – 2 tbsp
  • Coriander seeds / Dhania - 1 tsp
  • Ginger – ½ inch
  • Green chilli – 1
  • Shallots - 4
  • Rice – 1 tsp
Instructions
  1. Soak tamarind in one cup of water.
  2. Pressure cook toor dal with turmeric powder and enough water for 4-5 whistles till its cooked, mash it with a ladle and keep it aside.
  3. Dry roasts the ingredients under 'to roast and grind' until golden brown and grind it to a semi fine powder. Not coarse or smooth. Keep it aside.
  4. Heat a pan, add oil, when it is hot, and add mustard seeds, urad dal, fenugreek, red chillies, hing and few curry leaves. Now add the onions and shallots, sauté them are cooked half.
  5. Add chopped tomato and sauté it well. Add the veggie of your choice, i used okra and carrot. Sauté till raw smell leaves.
  6. Then add the tamarind and allow it to boil for 3-5 minutes till the okras are cooked and are soft.

  7. Add the freshly ground powder and mashed dal, salt and mix well. Add some water and boil for 5-8 minutes till the sambhar is thick and of desired consistency. Add a pinch of jaggery and Add chopped coriander leaves and switch it off.
Notes
1. If you pan fry okra with little oil before adding in sambhar, it gives more taste.
2. You can replace with any veggie you want. I used okra.
Wordpress Recipe Plugin by EasyRecipe
3.2.1311

It taste great with potato sukka/fry or beans masala stir fry or Carrot stir fry or mutton roast and rice.

Sambar-14

Filed Under: SOUTH INDIAN GRAVIES/DAL/CURRY/KUZHAMBU, VEGAN Tagged With: arachuvitta sambhar recipe, best festival sambhar recipe, grounded spices masala, indian lentil recipes, lentil recipes, lentil stew recipes, masala sambhar recipe, sambhar recipe, south indian best recipes

Coconut Chocolate Cookies

November 24, 2014 by Suki 2 Comments

CoconutCookies-10These cookies are intense with buttery centres, crispy edges and loaded with coconut and chocolates – so Good!!!

The combination and varieties of cookies are endless. So, whenever you want to make one, you can just bake with anything and any coalition in your pantry. We can take a classic cookie and throw whatever our little heart desires in there, and I am sure it is still going to be good. I usually drop coconut, chocolate chips, chocolates, oats, cranberries, walnuts, pecans, berries and so on.thumbsup The list is endless!

CoconutCookies-7

I really don’t make a lot of cookies at home, that’s the reason for only very few cookie recipes. I tend to have snacks only in the evening after work. During that moment, I don’t feel like baking one. I will be tired after the long day and will be so hungry.wondering 
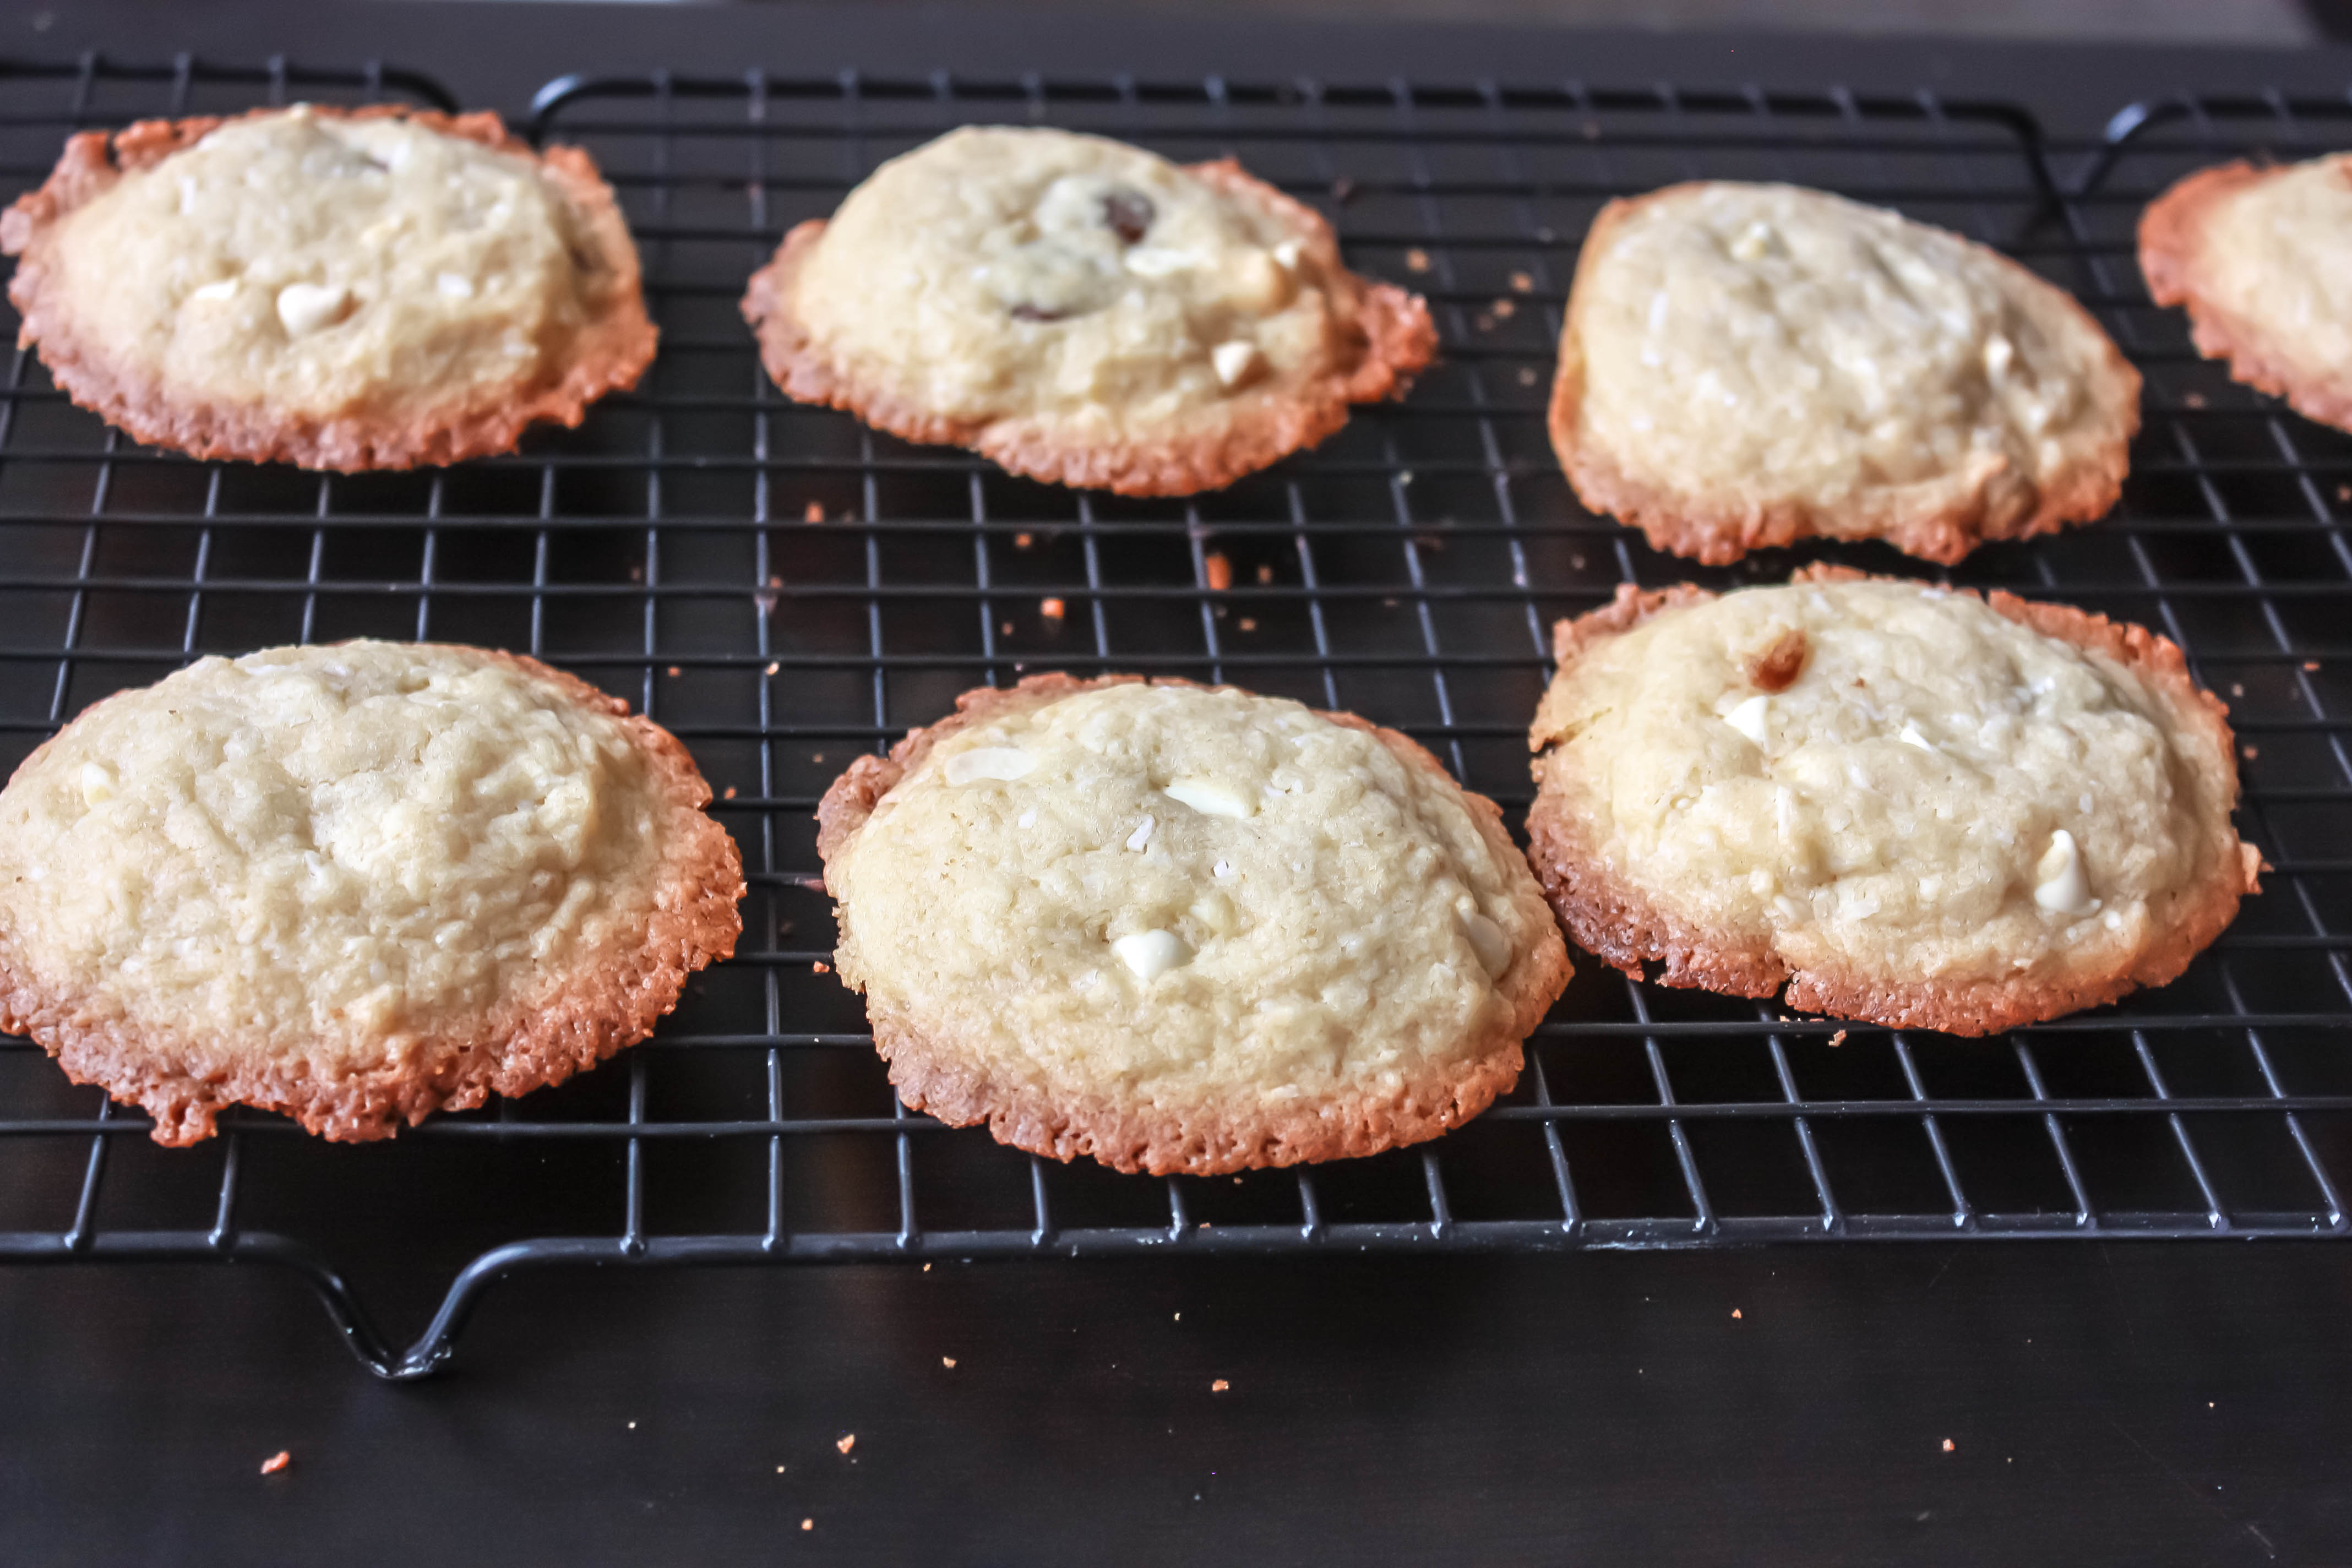
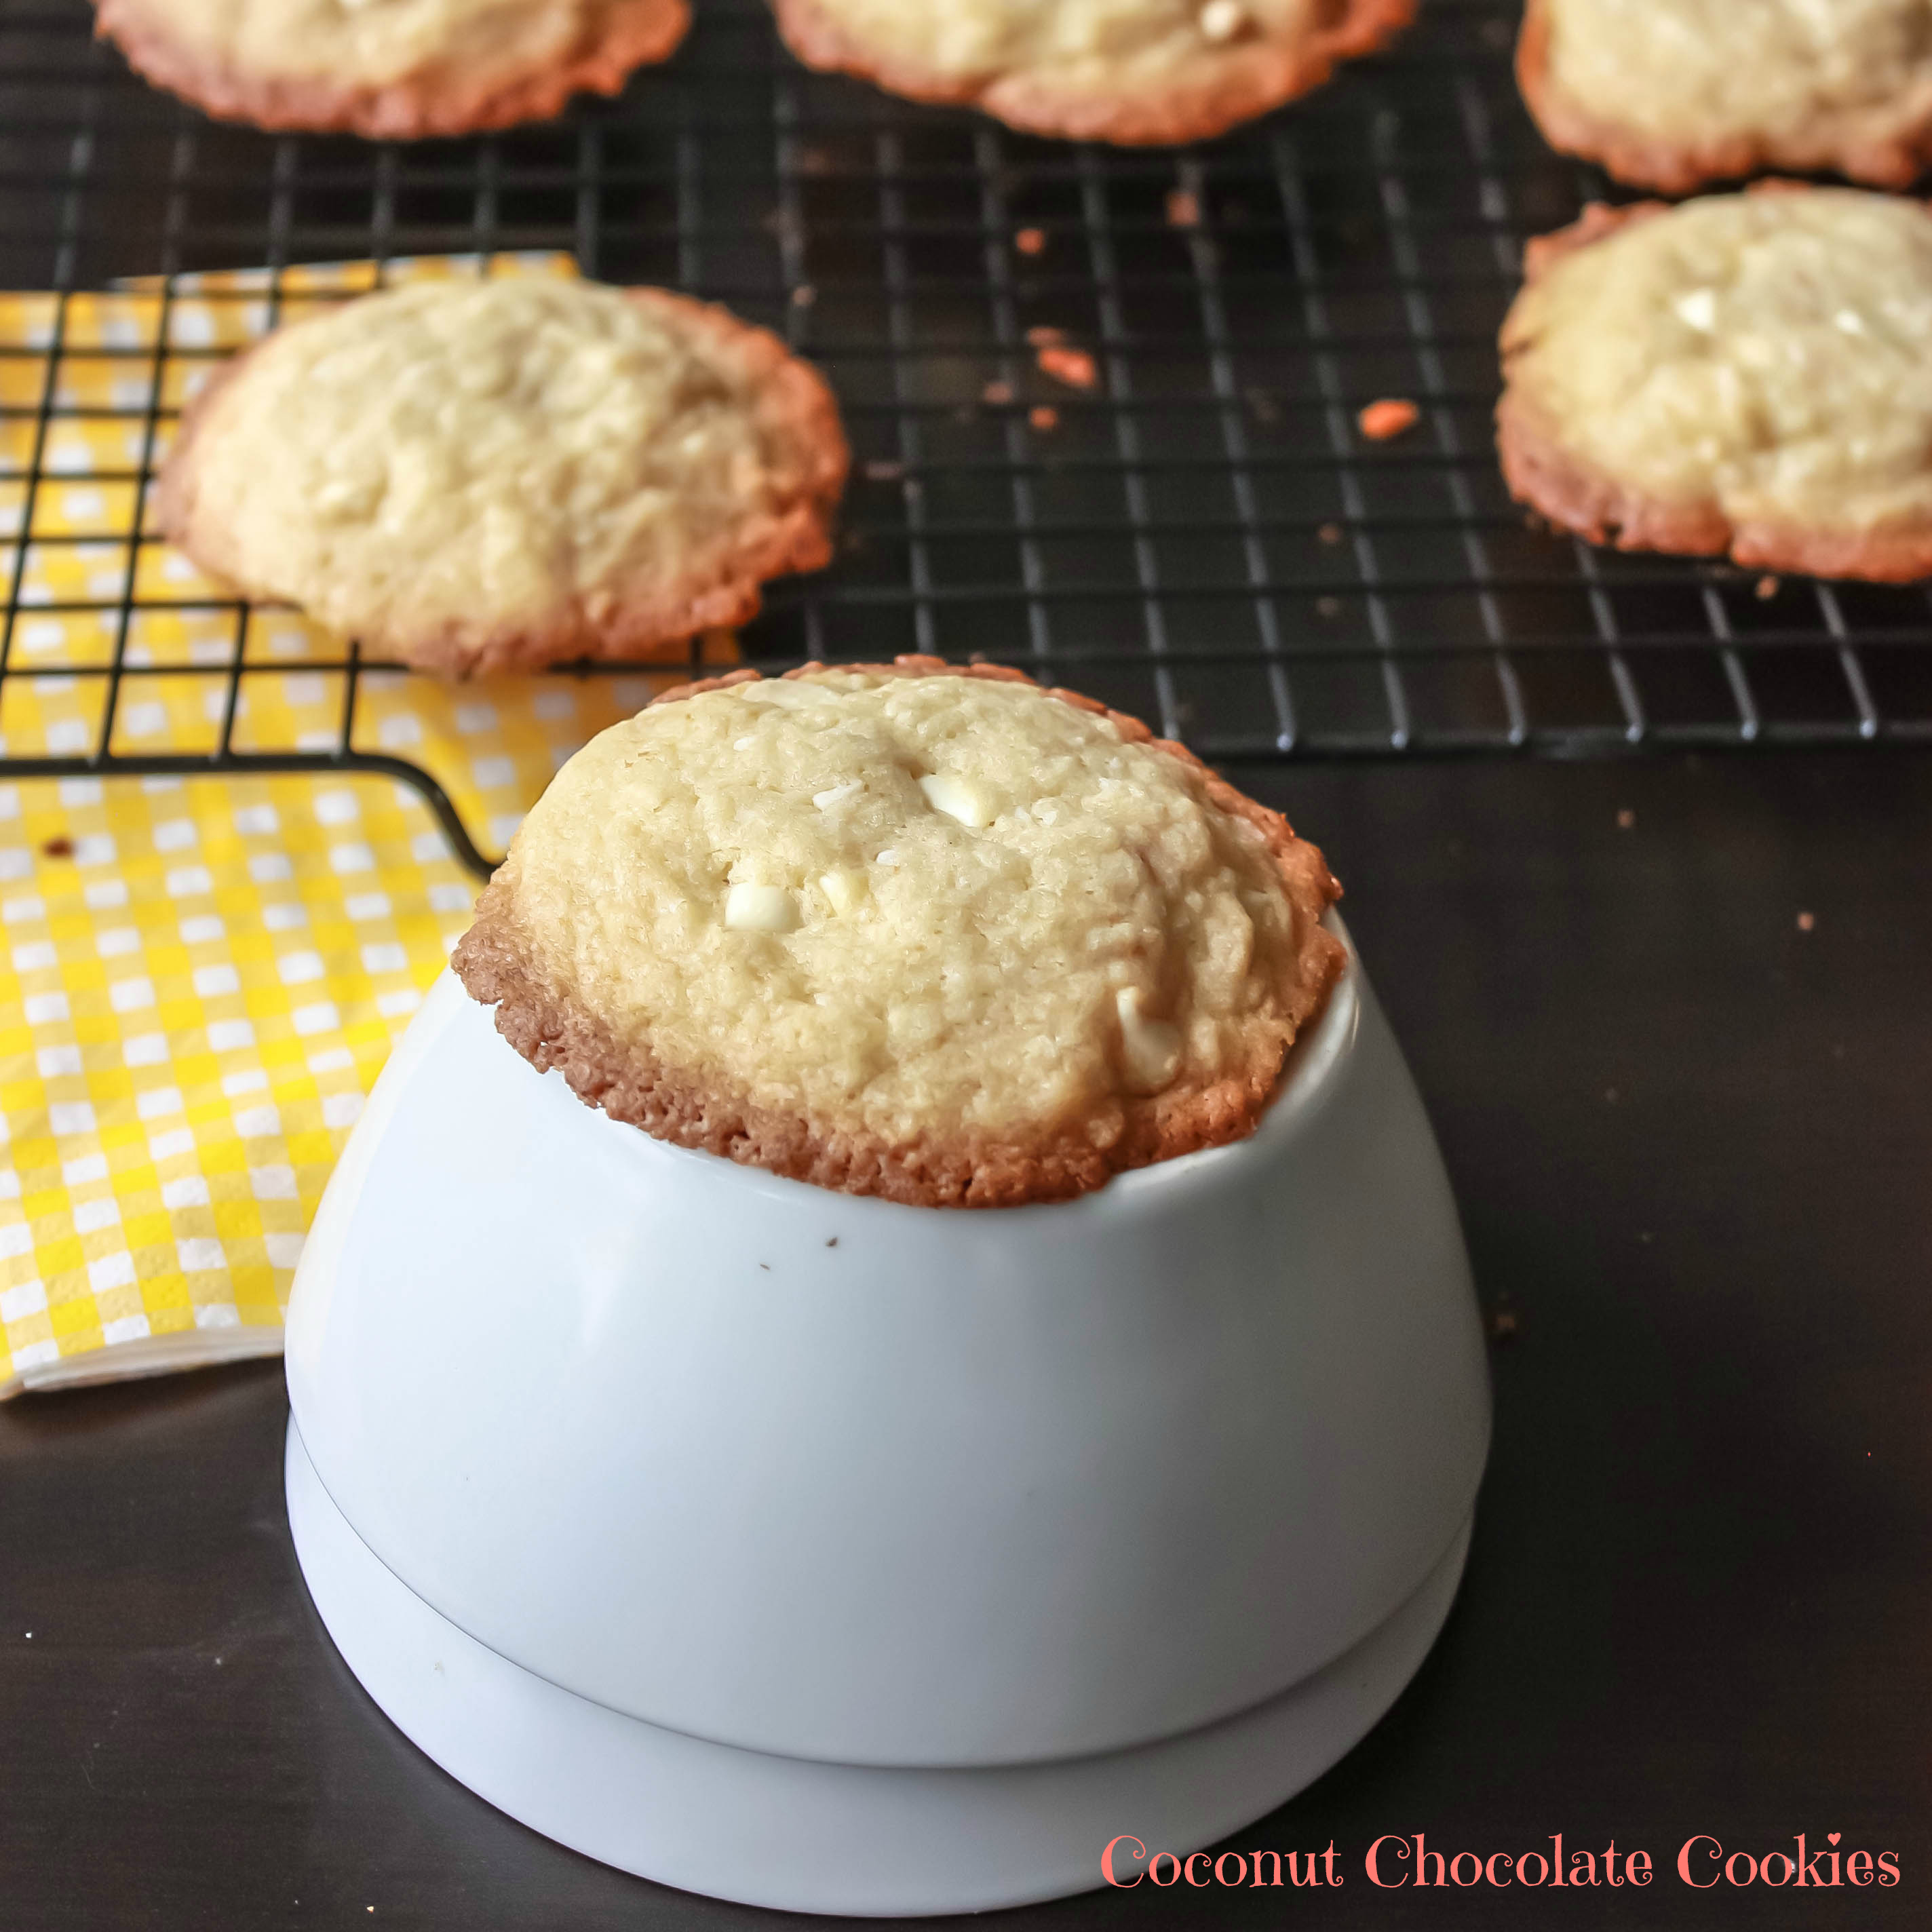
So I just grab the store bought one when I come back from work. I am sure many have this problem 😉 That is why I don’t just have lot of cookie recipes. You can replace the butter with some coconut oil as well. I can promise you that even with less butter the cookies are just going to be as good. And you won’t taste the coconut oil in them. I have tried that once.

CoconutCookies-8

This is a quick and easy snack perfect for the holidays or any time.baloon 
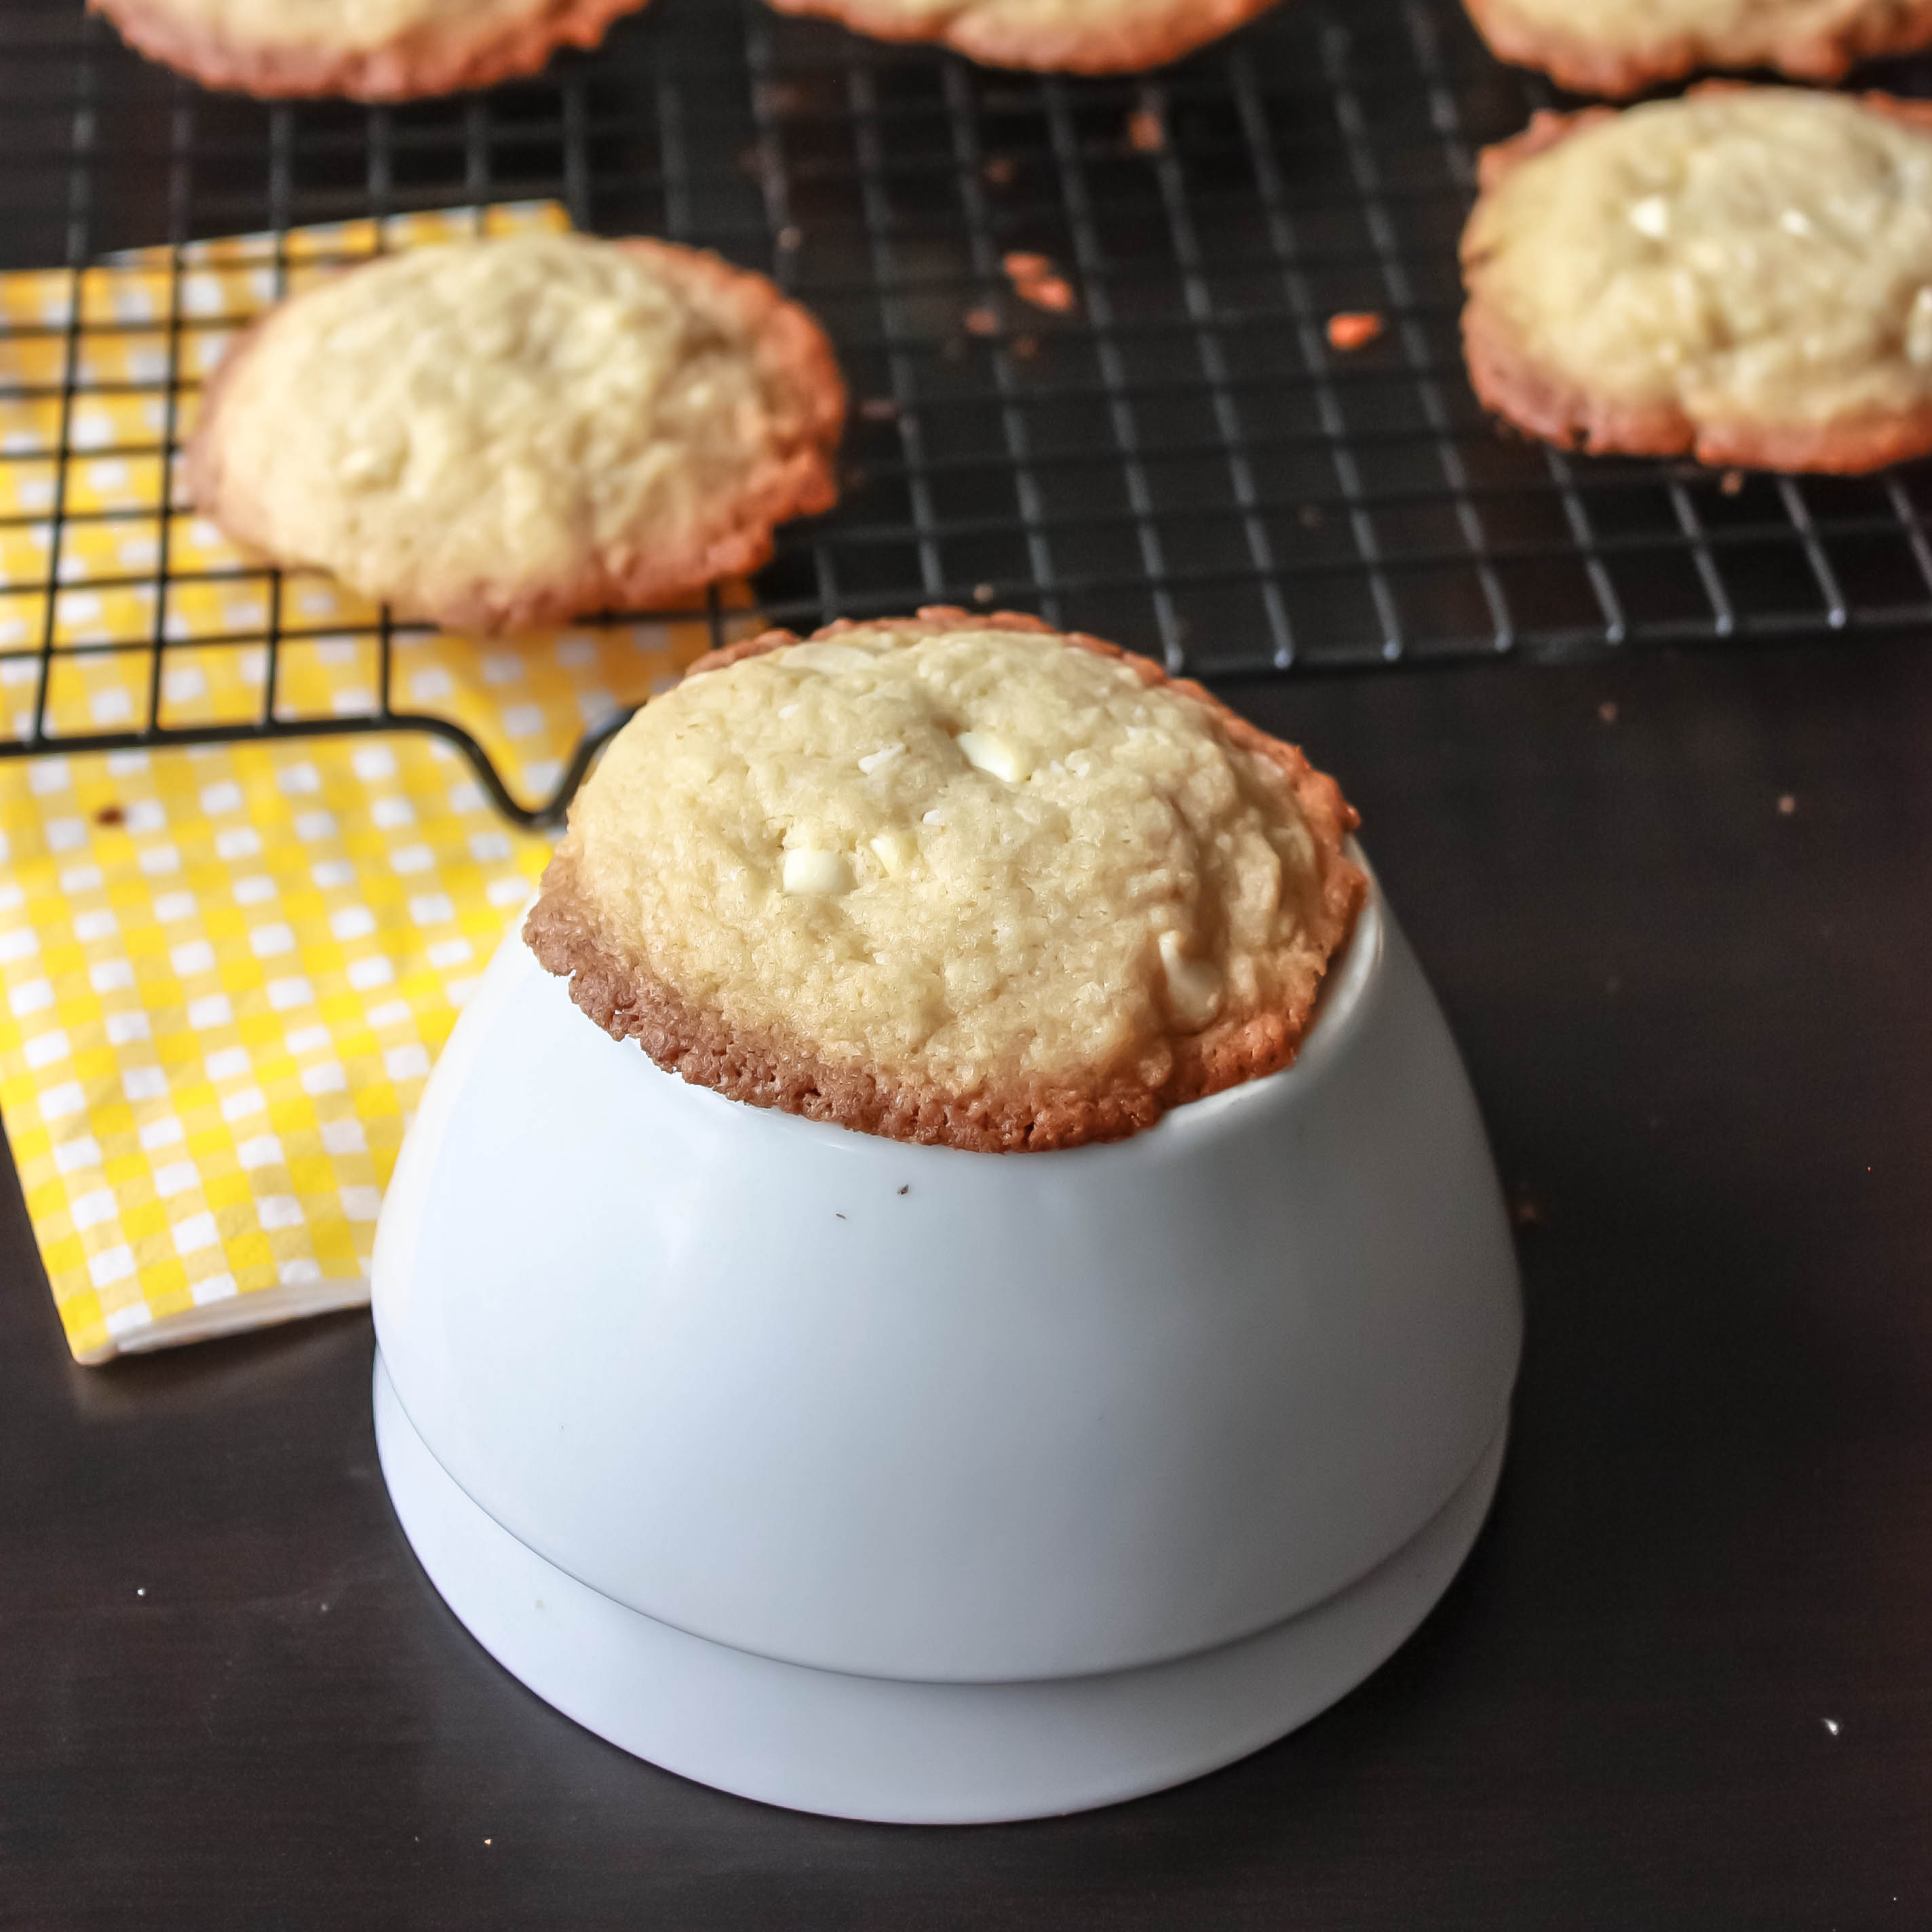
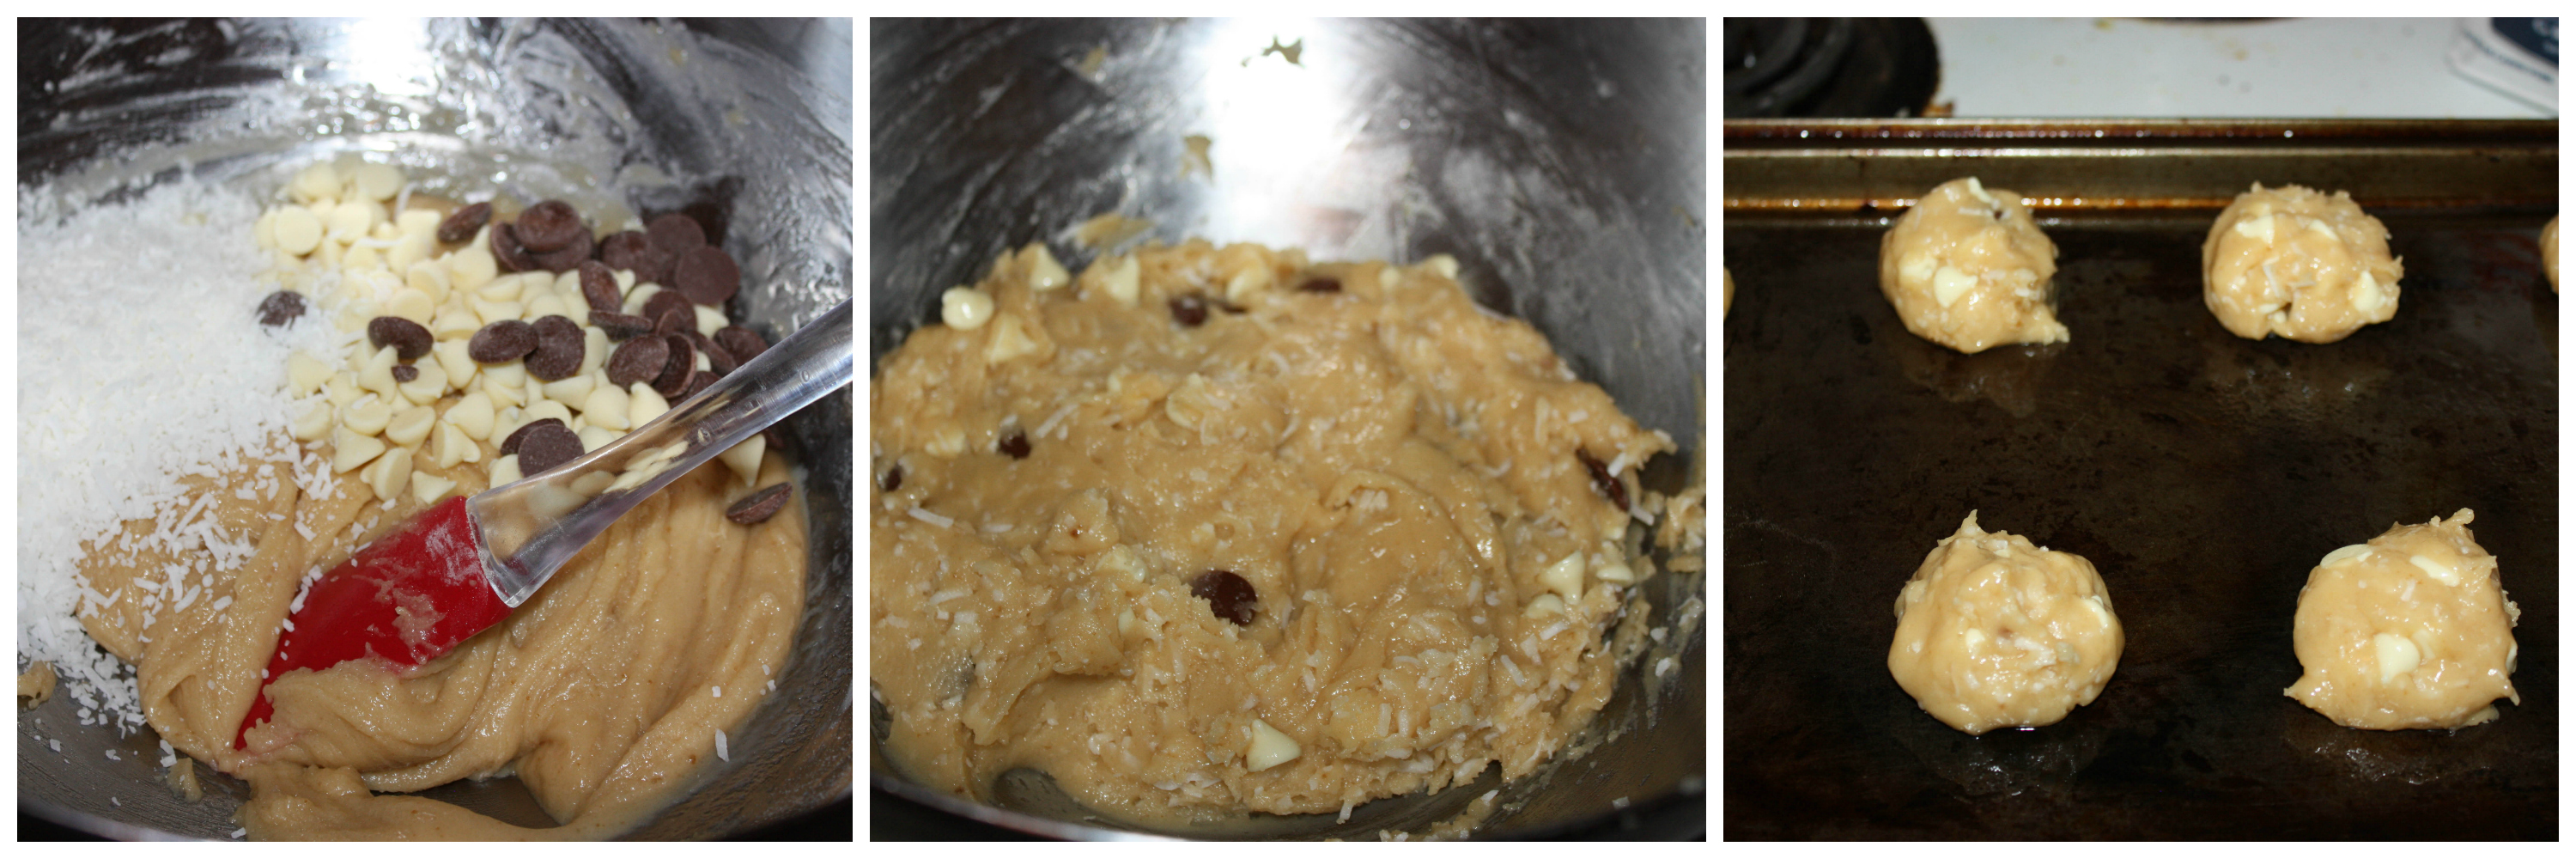
Everybody loves chocolates and when it is combined with coconut, it is love at first bite. They are so easy to make and easy to disappear.  This is my all-time favourite cookie recipe. I have used more white chocolates 😉 as I love white chocolate more than milk or dark chocolate. The order I like chocolates is white, dark and then milk. The coconut adds the most amazing sweet nuttiness to this traditional cookie. I am very sure that you can’t stop with just one.

Print
Coconut Chocolate Cookies
Author: Suganya Hariharan
Recipe type: Dessert
Prep time:  10 mins
Cook time:  12 mins
Total time:  22 mins
Serves: 2 dozens
 
Ingredients
  • Unsalted butter – ¾ cup
  • Vegetable shortening – 1 tbsp
  • Granulated sugar – ½ cup
  • Brown sugar – ½ cup
  • Salt – ¼ tsp
  • Baking soda – ½ tsp
  • Baking powder – 1 tsp
  • All-purpose flour – 1 ½ cup
  • Vanila extract – 1 tsp
  • Semisweet chocolate chips – ¾ cup
  • Sweetened shredded coconut – 1 cup
Instructions
  1. Preheat the oven to 375 degrees. Line a few baking shheets with parchment paper if you don’t want to scrub your baking sheet hard. And set aside.
  2. In a bowl, cream together the butter,shortening, sugar, egg, vanilla and mix until combined.
  3. In a small bowl, mix together the flour, baking soda and baking powder. Add this to the butter mixture and mix everything just until combined.
  4. Try to use a small ice cream scoop which Is almost 1 tbsp measure and scoop out the cookie dough onto your baking sheets. Do make sure to place them a few inches apart from each other.
  5. Bake the cookies for 10 to 12 minutes. Edges with a golden color are the sign I would say. Allow cooling completely.
Wordpress Recipe Plugin by EasyRecipe
3.2.1311

CoconutCookies-12name

Filed Under: BAKED RECIPES, DESSERTS, SWEETS/DESSERTS Tagged With: best christmas cookie recipe, chocolate recipes, Coconut Chocolate Cookies, coconut cookies, coconut recipes, dessert, dessert recipes, quick cookie recipe, thanksgiving recipes

Pan Fried Noodles with Baby Corn Manchurian

November 21, 2014 by Suki 4 Comments

manchurian-27

A nest of noodles are fried in a pan until golden brown and topped with baby corn manchurian.

I don’t remember if I have had pan fried noodles in India. But after coming here, once I had them in a Vietnamese place. And it was really amazing. And surprisingly, my friends who ordered meat liked my veg pan fried noodles. And I am sure the reason was the pan fried noodles than the sauce on the top. That is when I got the craze for the pan fried noodles. Then I had again at my restaurant down my house, it was again good. So, my mind got fixed that pan fried noodles are awesome. That was the reason for this post. I am not sure if these are the right noodles for pan fried. But I can assure you that any noodles should do the job. The thick gravy like sauce on the thin noodles will make them perfect. I need to work on the noodle presentation but the taste was amazing. And the gravy or sauce on the top can be just non spicy pan fried veggies. But I wanted to give it a kick by adding baby corn spicy sweet garlic sauce. Sounds great? Right!

manchurian-30

You can do variations and make it your own. It is great to rummage around in the fridge and add them to your recipe and make it your own with that twist. You can stir fry veggies, honey, hoisin sauce, soy sauce, garlic and top with sesame.  🙂  That not my imagination 😉 I tried it once. And it was so good.

 Pan frying noodles is very easy. You just have to fry one side in the pan/wok, then slide it onto a plate, then flip it back into the wok to crisp the other side. You have to flip it into the pan, as there is no binding agent, you can’t flip the noodles without the help of the plate. And make sure you serve it soon as it comes off the stove because it would be such a shame if the noodles went soggy!  no
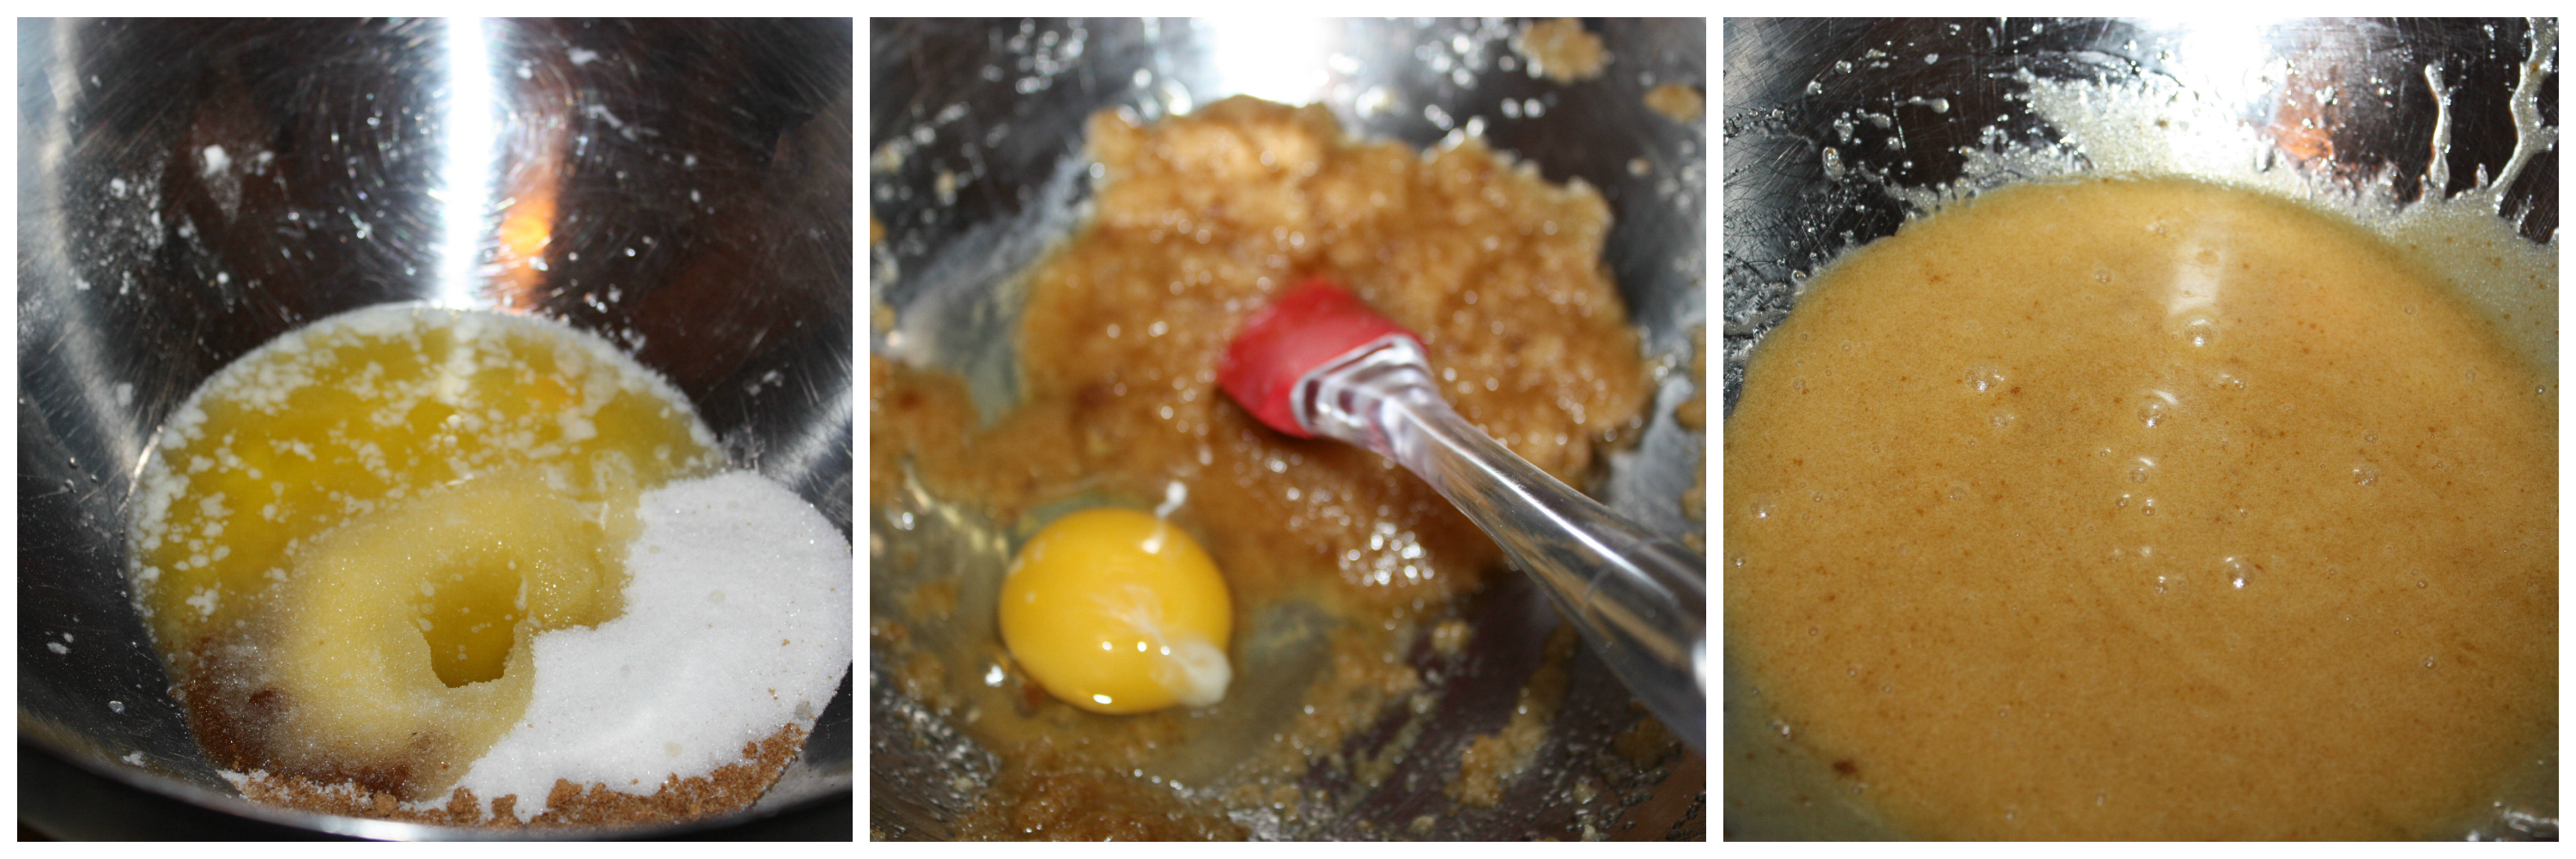
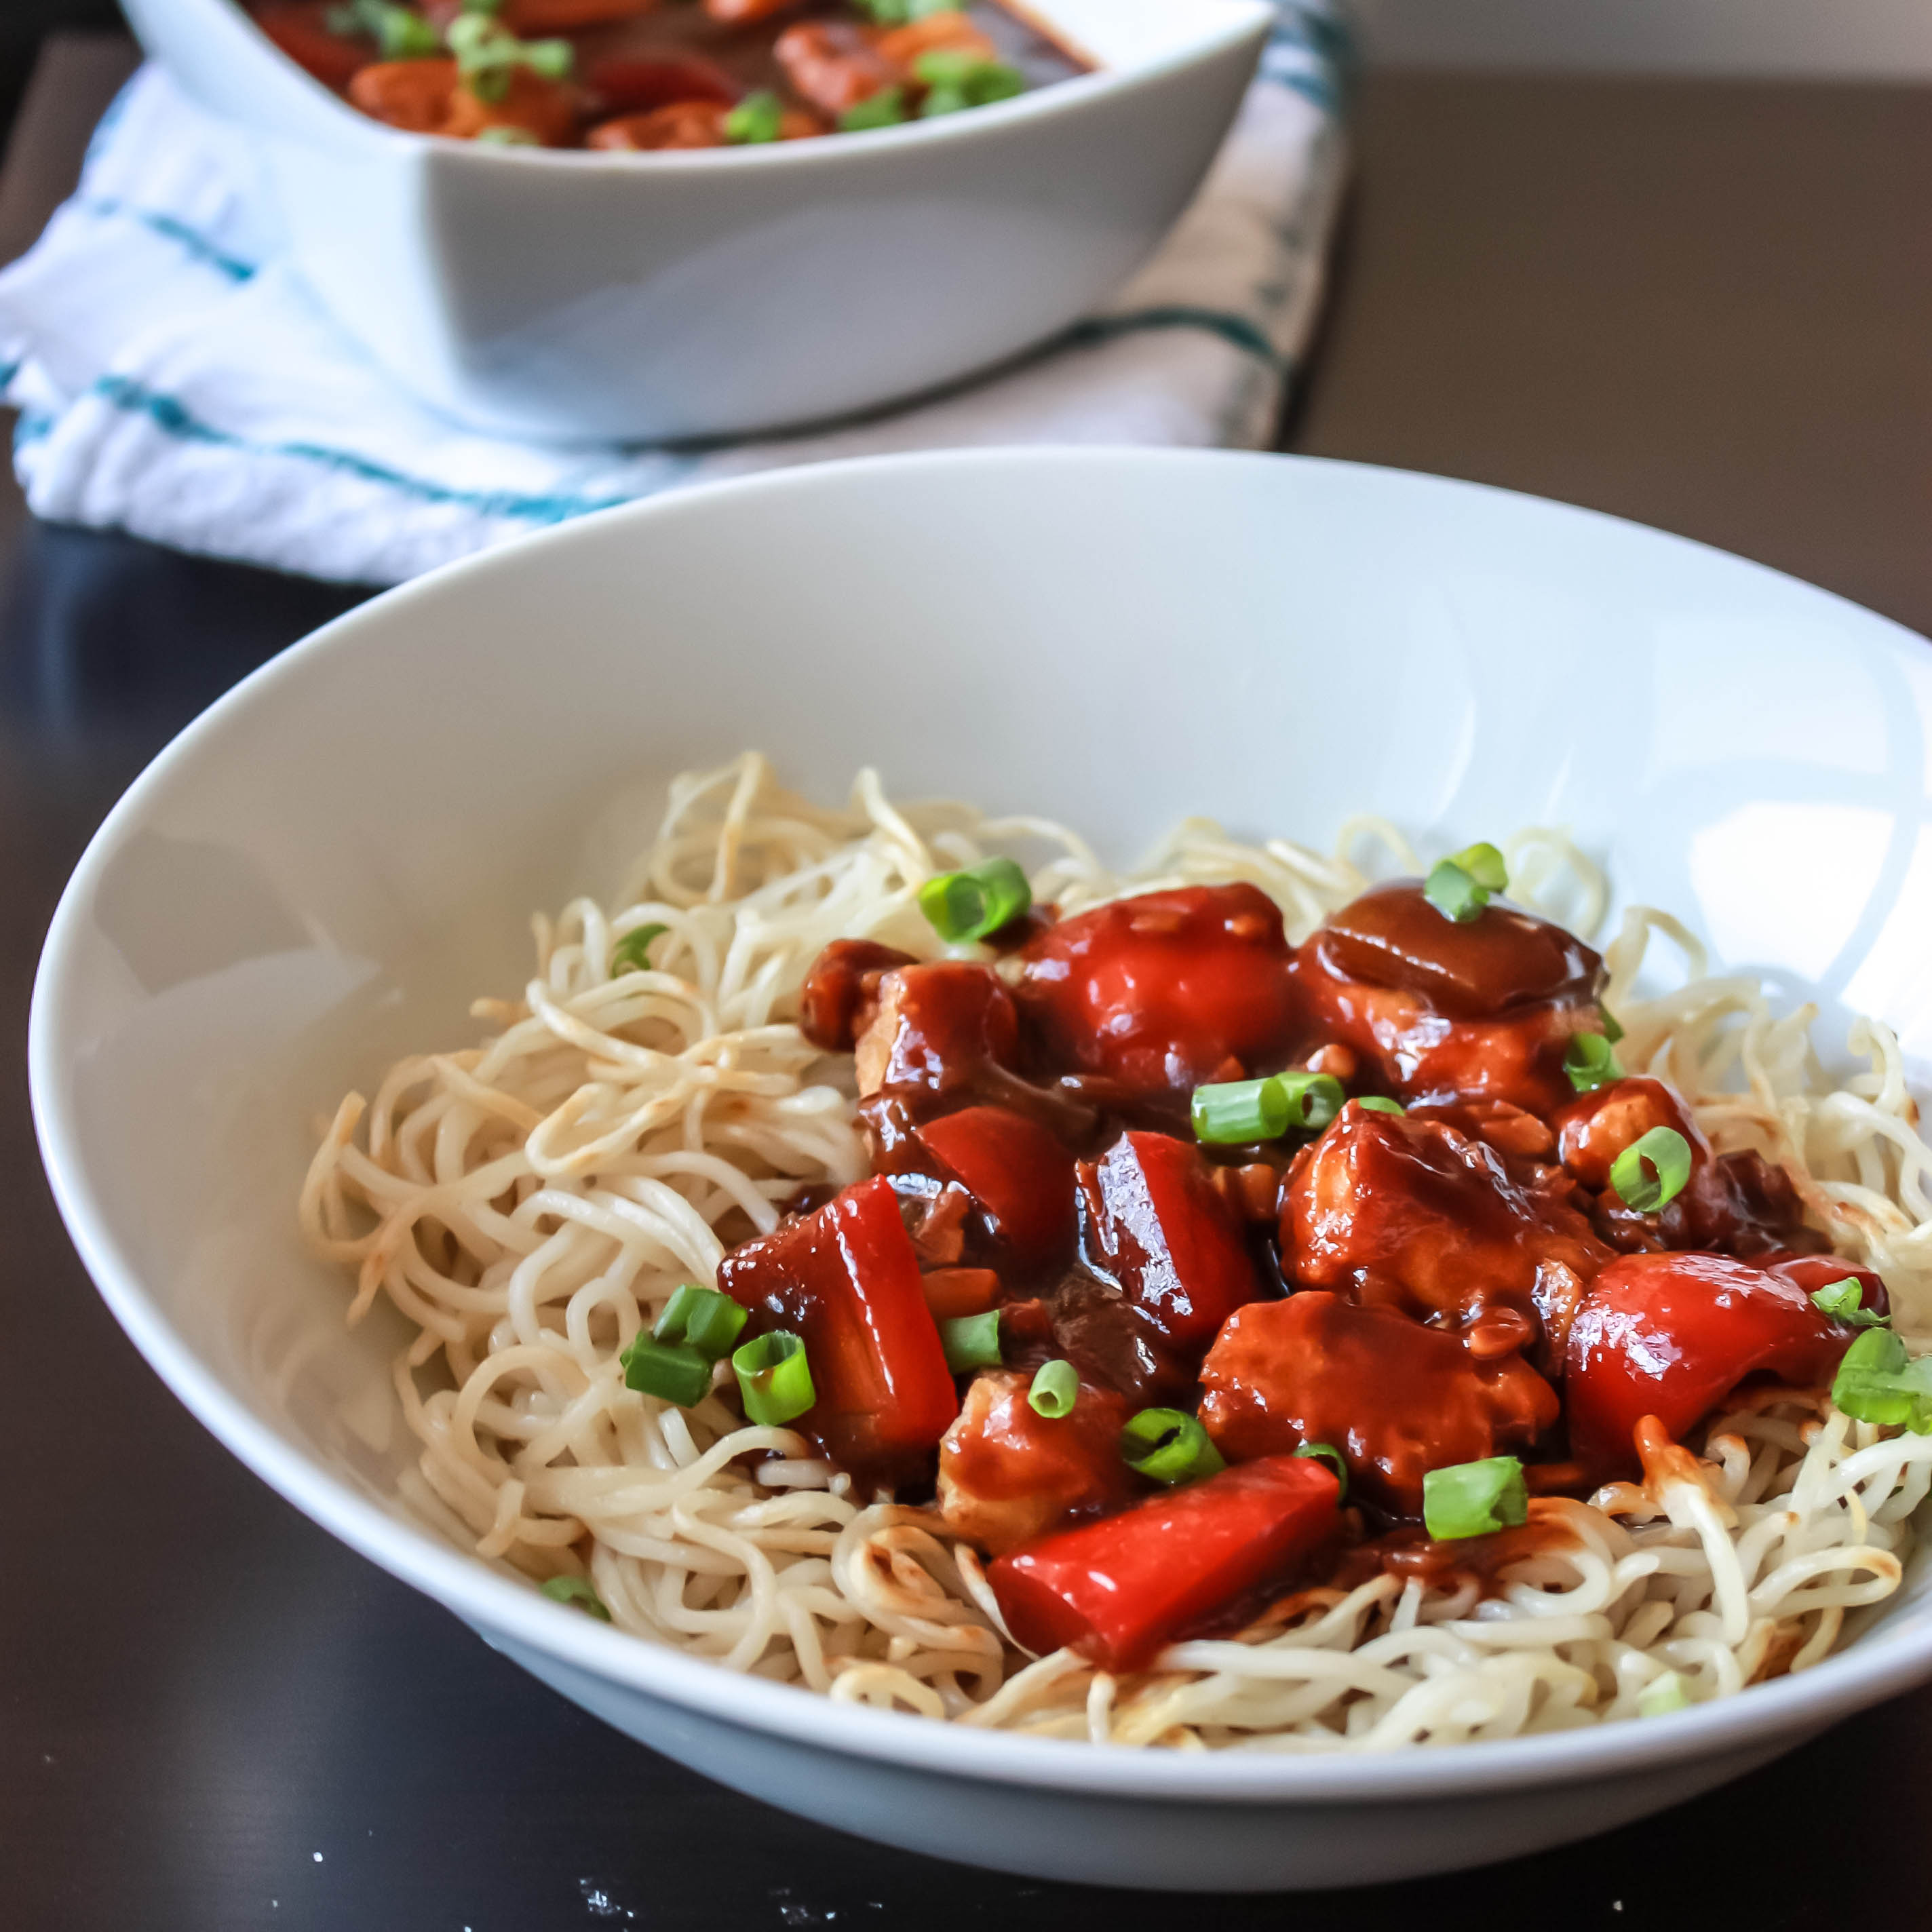
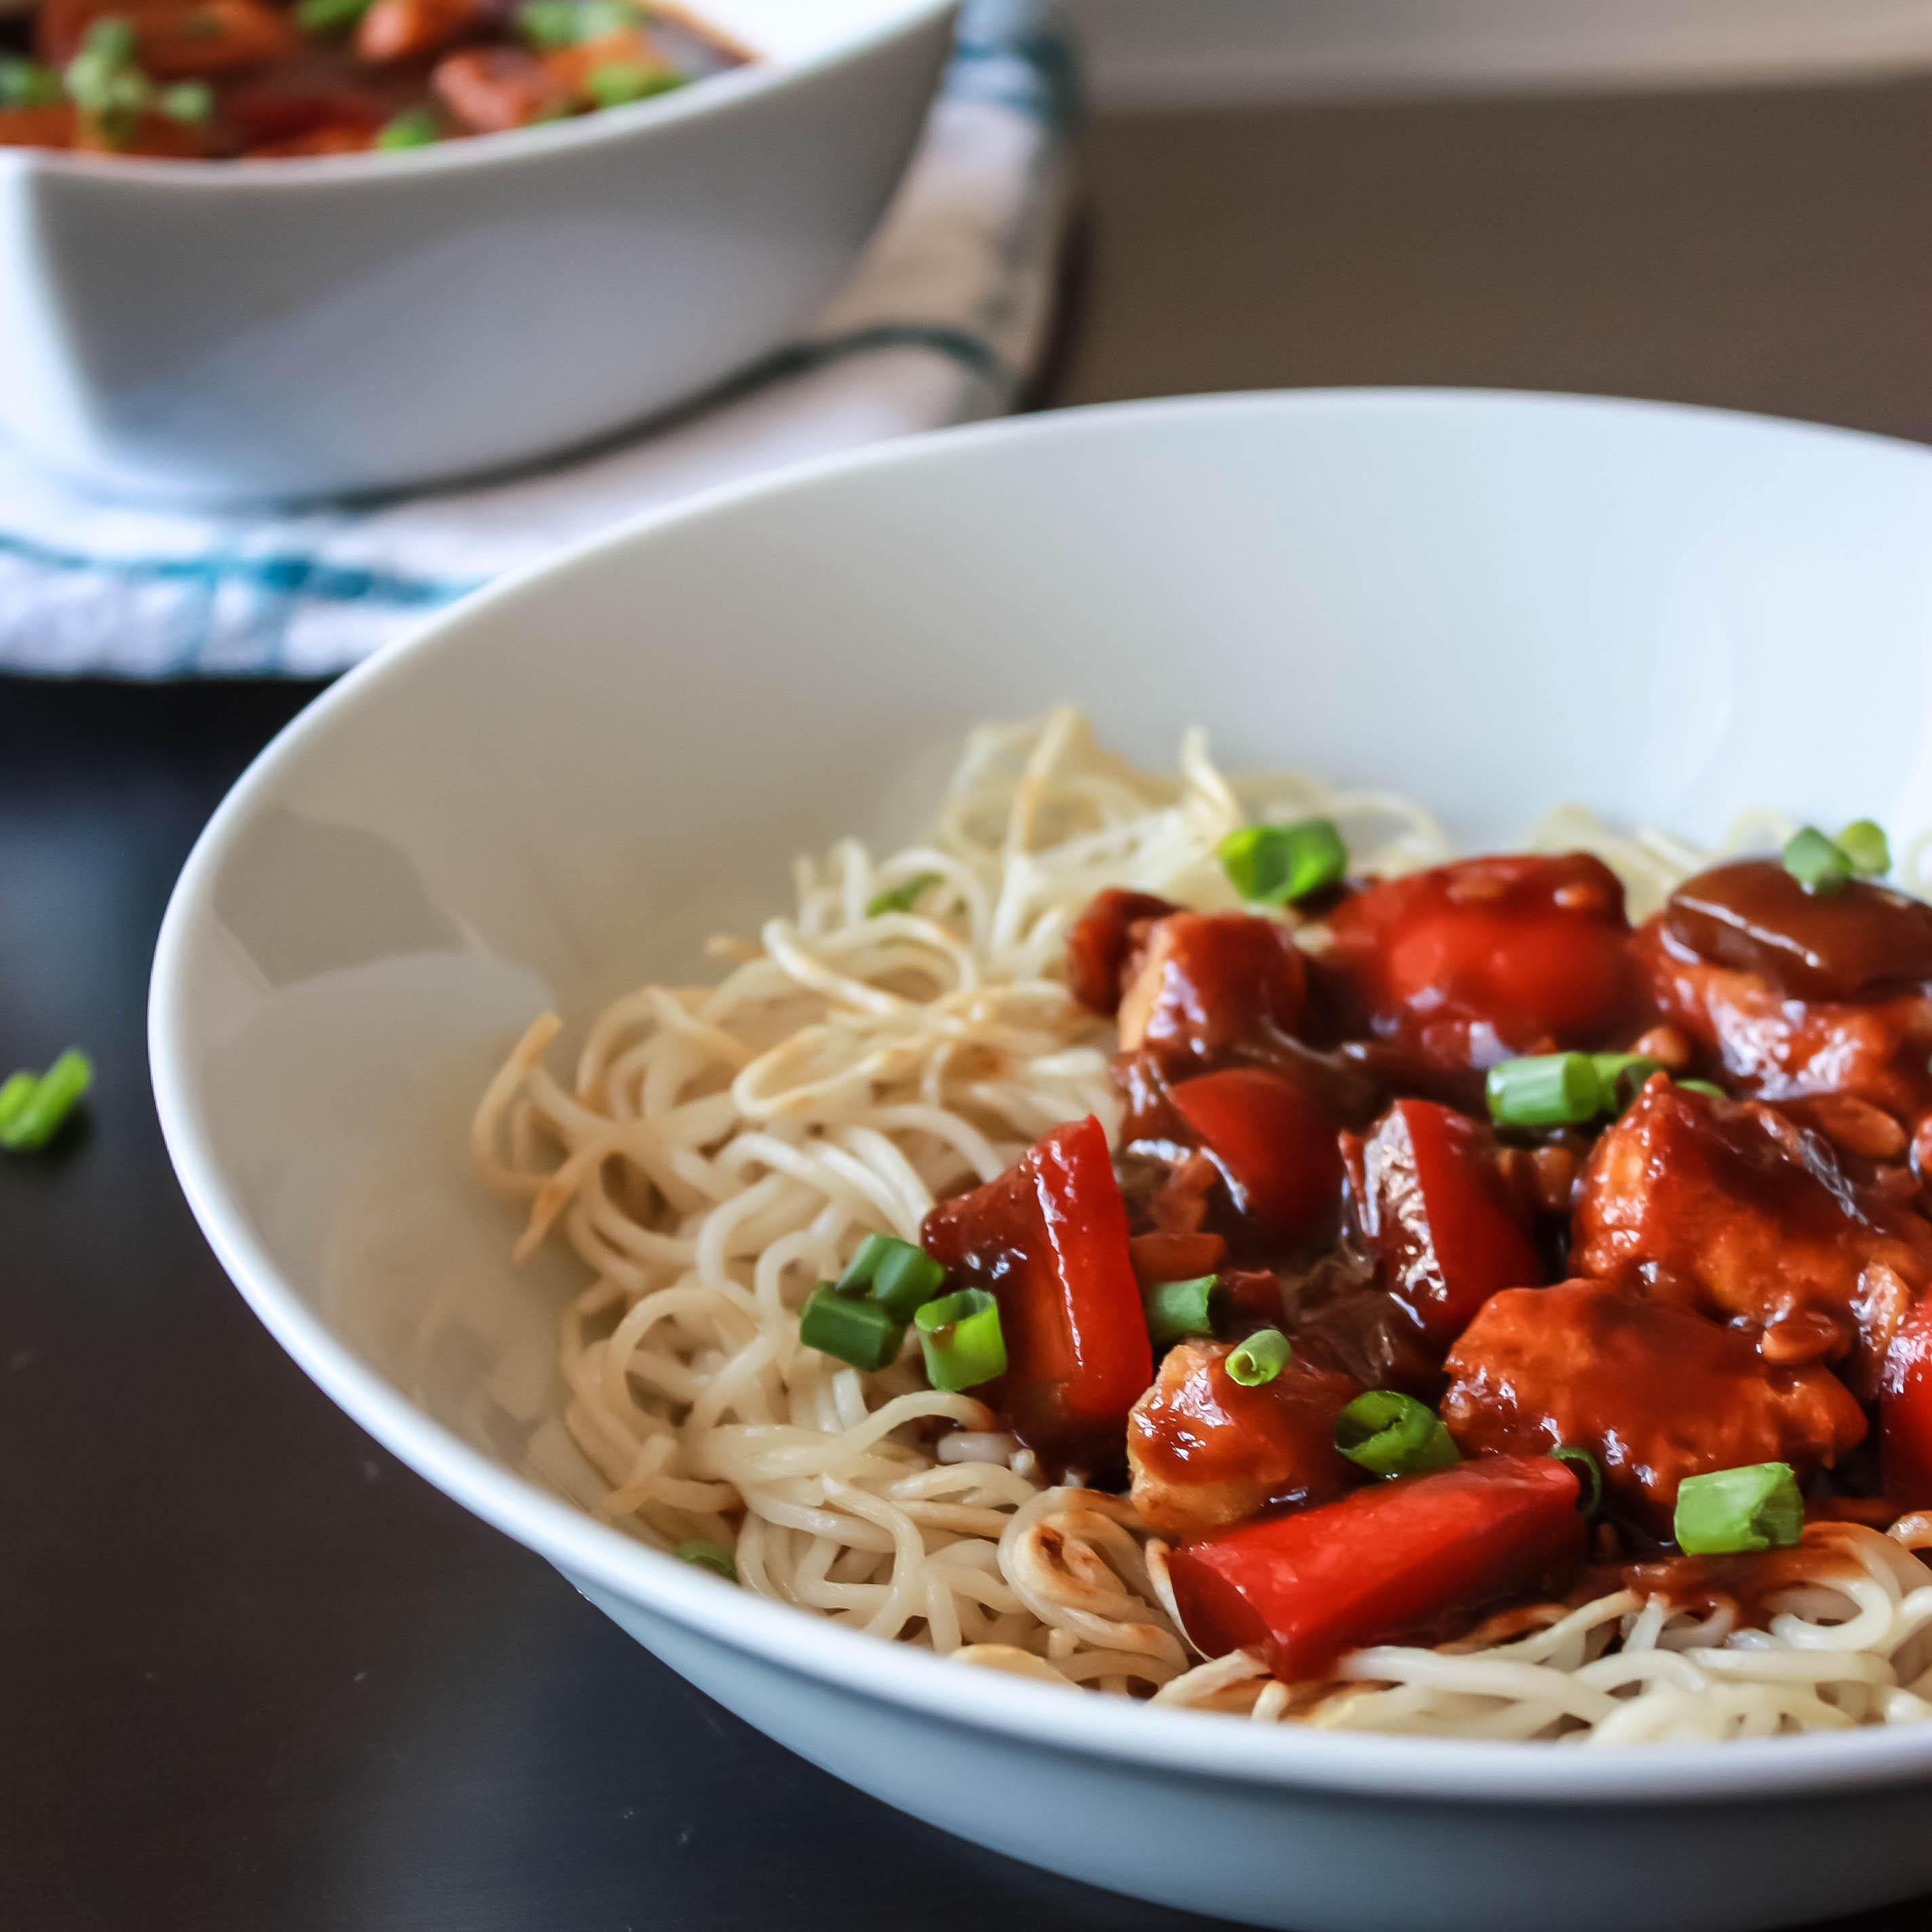
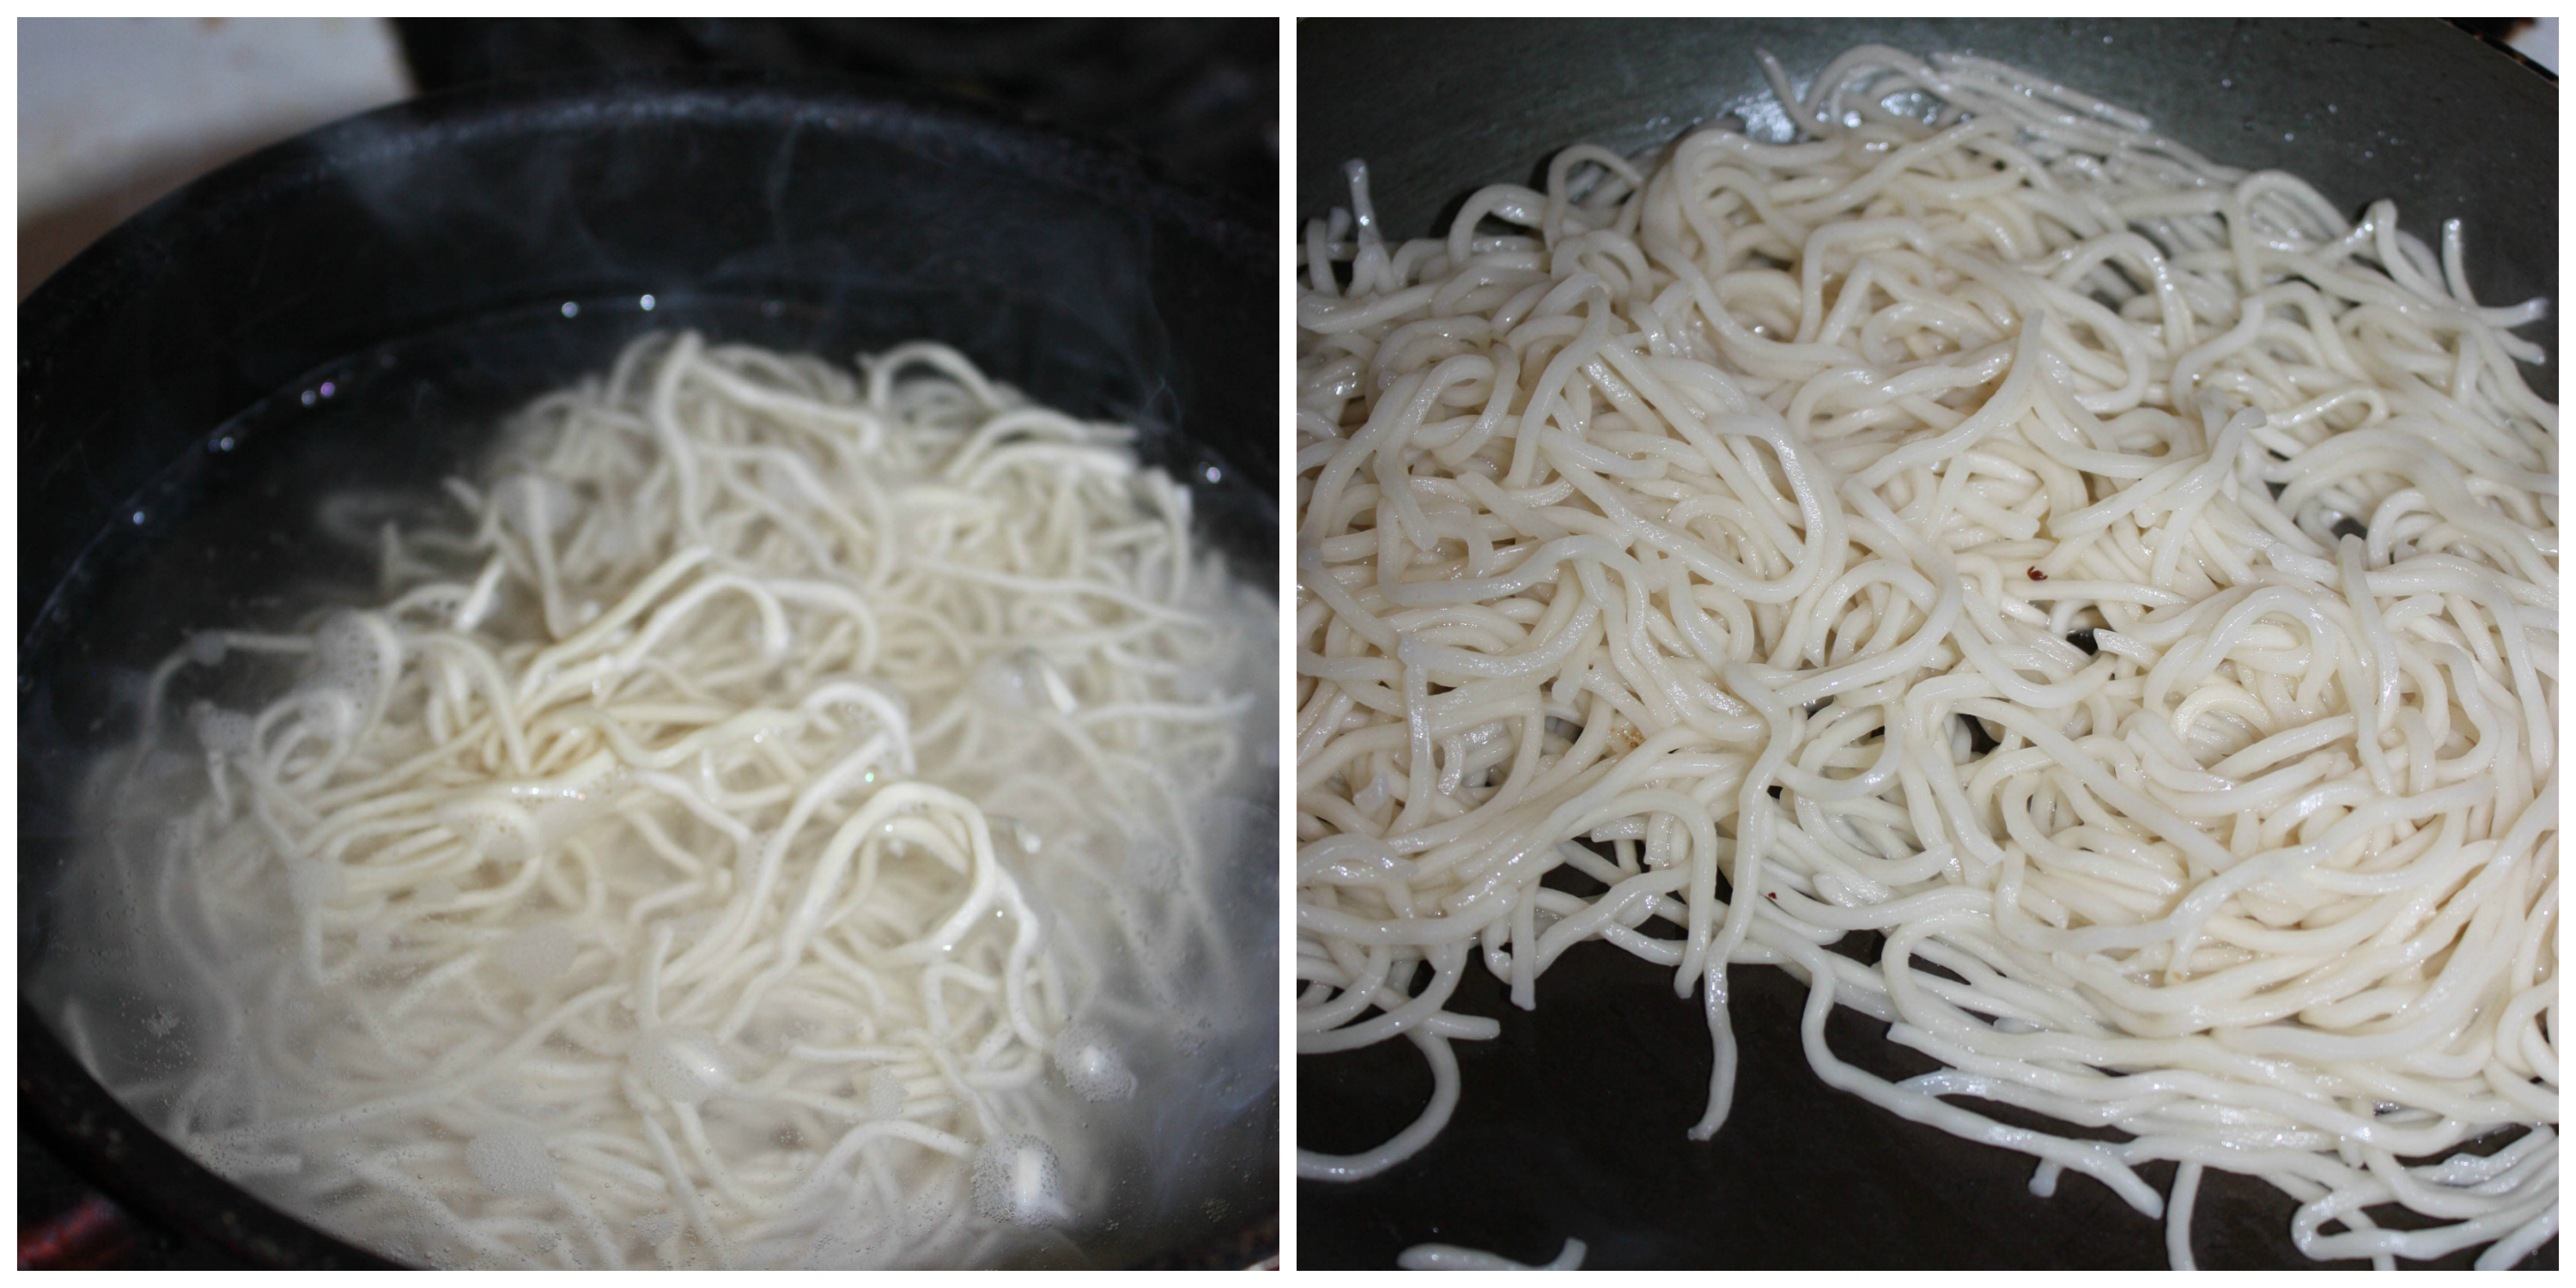
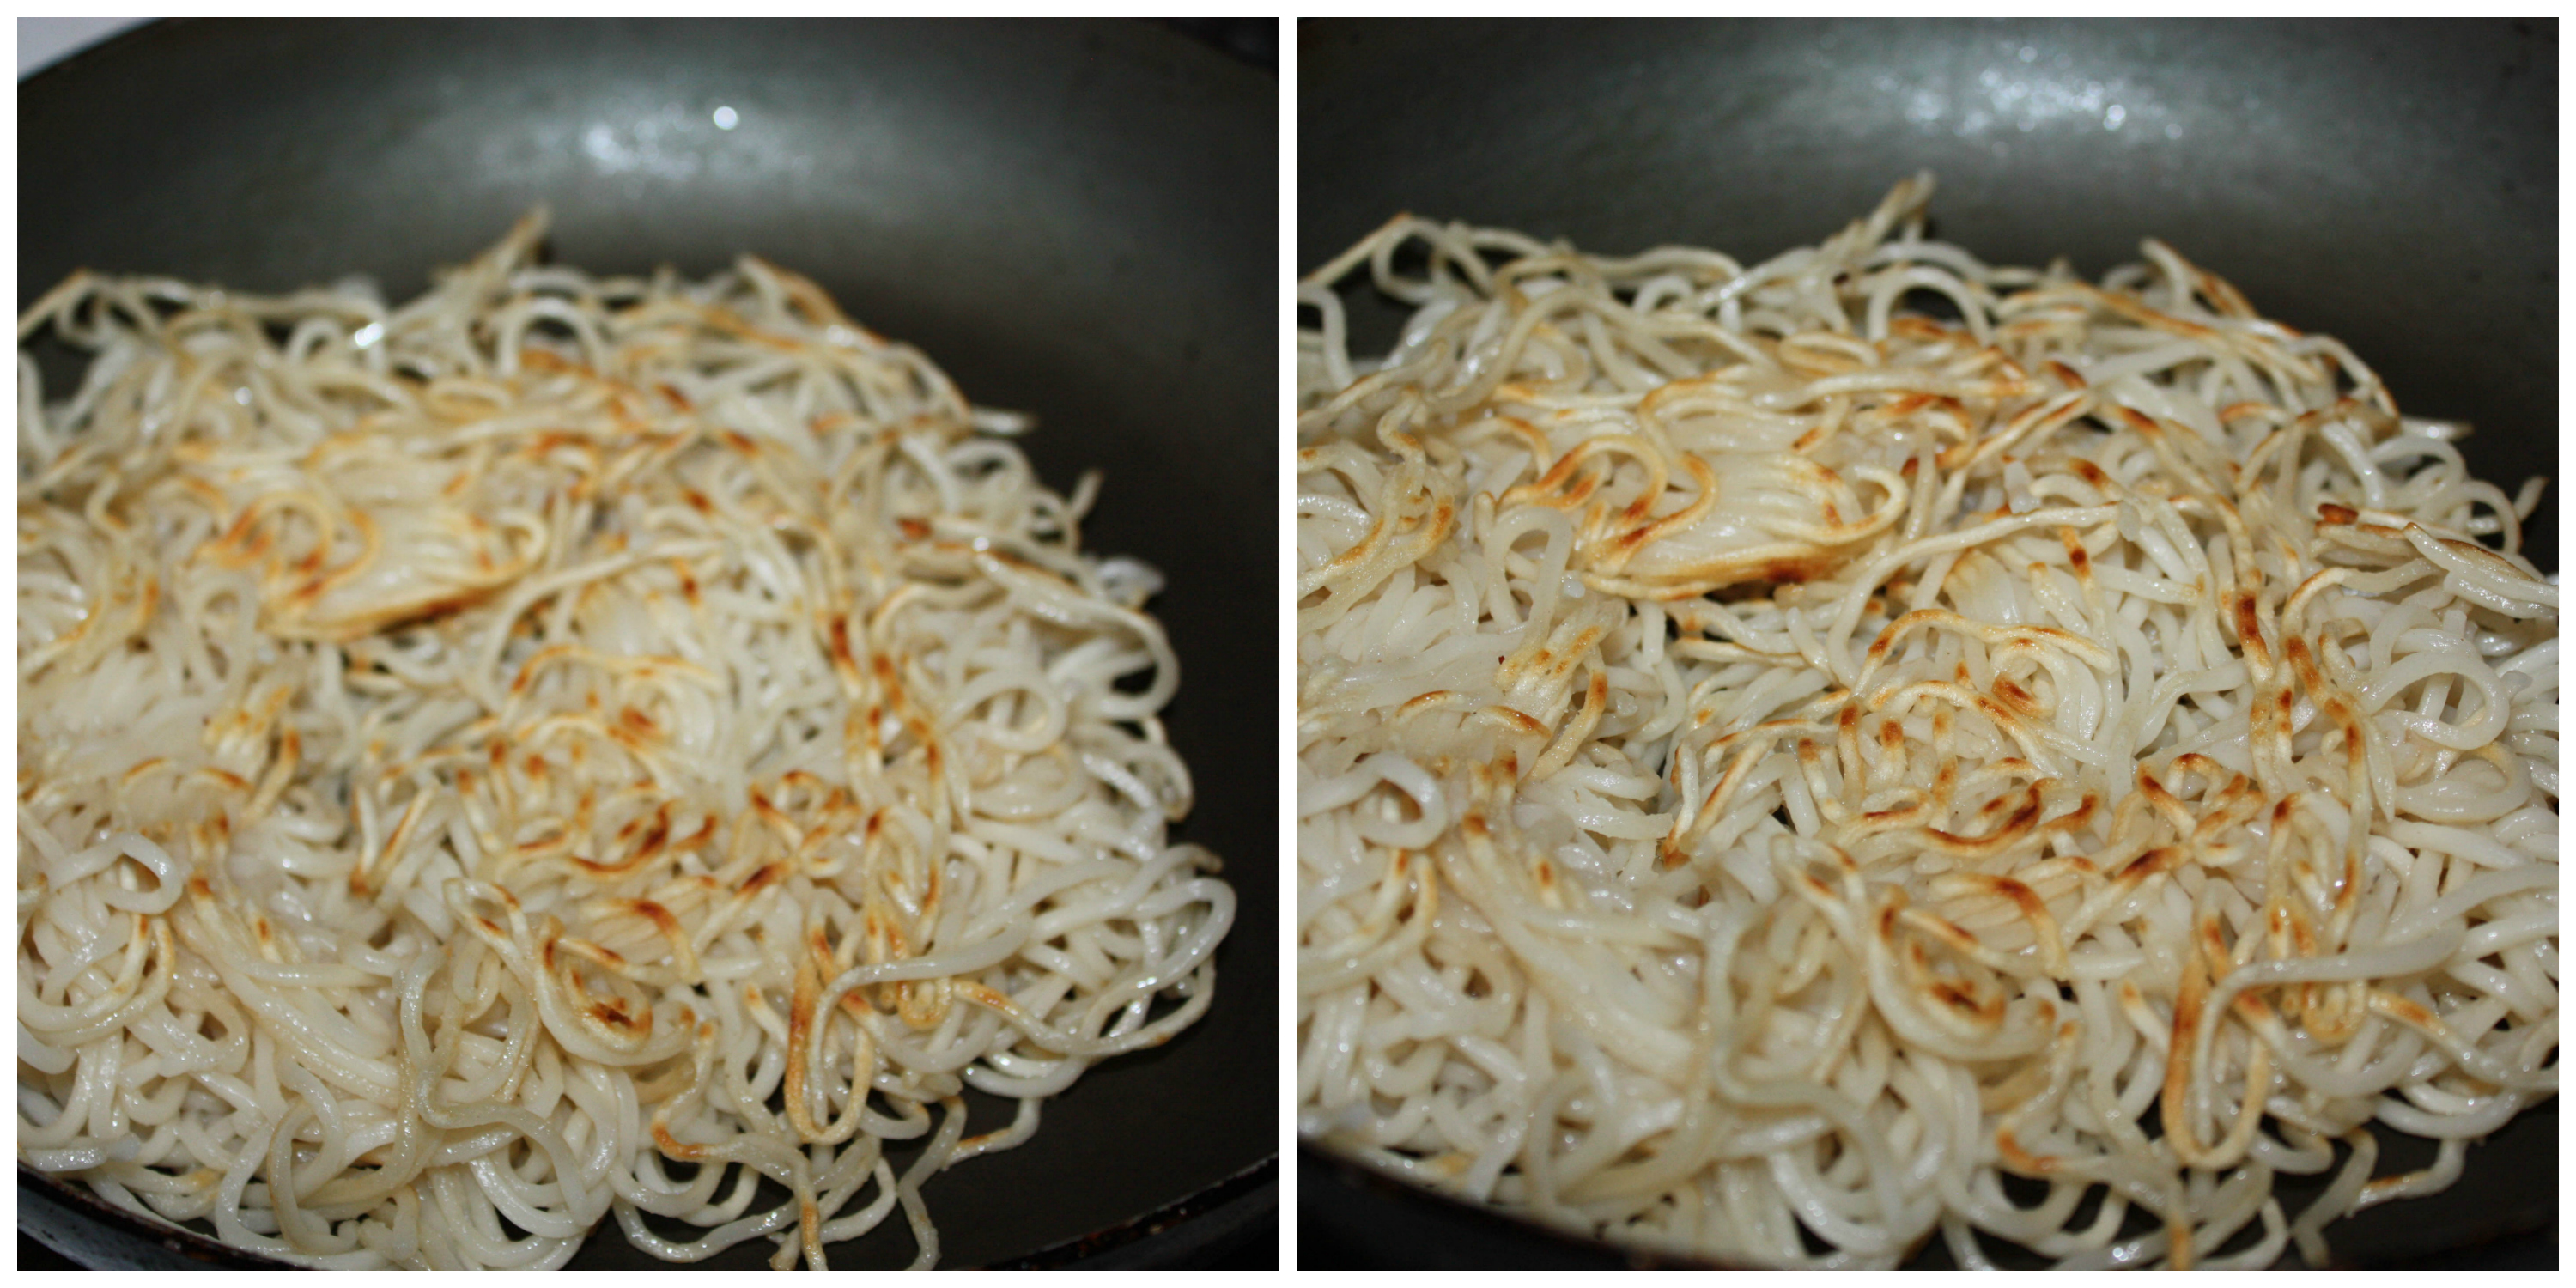
No deep frying needed. You need to get the noodles crispy, which you can do by cooking them in pan.

You can also serve these noodles with any Manchurian or Red Thai Tofu Curry.

manchurianFInal1

With no delay, let’s go to the recipe:

Print
Pan Fried Noodles with Baby Corn Manchurian
Author: Suganya Hariharan
Recipe type: Main
Cuisine: Chinese
Cook time:  45 mins
Total time:  45 mins
Serves: 4
 
Ingredients
  • Noodles – 2 packs
  • Ginger – 1 inch, finely chopped
  • Garlic – 6, finely chopped
  • Red chilli –1, broken finely
  • Capsicum/ bell pepper – 1 cup, chopped cubed size
  • Spring onion/scallion whites – ½ cup, chopped
  • Soy sauce – 1 tbsp
  • Tomato sauce – 2 tbsp
  • White vinegar – 1 tsp
  • Black pepper – 1 tsp
  • Sugar – ½ tsp
  • Veg stock or Water – 1 ½ Cups
  • Salt – as required
  • Oil – for frying the paneer (about 6 tbsp of oil)
  • Scallion greens/ spring onions – for garnish

    for baby corn marinade:
  • Baby corn – 200 gms
  • Corn flour – 2 tbsp
  • Ginger garlic paste – 1 tsp
  • Salt and pepper as required

    for the corn flour paste:
  • Corn flour – 2 tbsp
  • Water – ½ cup
Instructions
  1. Cook noodles according to package directions. Most probably it would be to be boiling the noodles in hot water for 2-3 minutes. Drain and keep aside.
  2. Heat 1 tbsp oil in a pan over high heat. When it is hot, add cooked noodles and cook by swirling gently for 1 minute in medium heat. Gently peak under noodles by lifting the edges with a spatula and pushing the edges in towards the centre. Continue cooking, swirling until golden brown underneath. Then slide it onto a plate, and then flip it back into the wok to crisp the other side. Takes about 3-4 minutes.
  3. Mix the corn flour mixture under “for the corn flour paste” and keep aside.
  4. Mix all the ingredients under “for baby corn Marinade”. Mix it well so that the baby corn is coated with the marinade.
  5. Now shallow fry the baby corn cubes in hot oil. Drain and keep aside.
  6. Now take a pan, add the chilli flakes and scallion whites and stir fry the onions on medium heat. Make sure they do not burn.
  7. Add the capsicum and sauté for a minute. Add the soy sauce and tomato sauce, veg stock or water. Stir and simmer. After a minute or so, add the corn flour paste and let the sauce thicken.
  8. When it thickens, add vinegar, sugar, pepper and salt. Simmer for a minute. Add the fried baby corn cubes and switch off.
  9. Garnish with spring onion green.
Notes
1. If you want the Manchurian recipe dry, then do not add any water at any step.
2. When you add the cornflour paste, add it slowly as it easily tends to make lumps.
3. If you think the gravy is too thick for you, then thin it by adding little water. If you think you need more gravy, add the cornflour paste and water proportionally to it.
Wordpress Recipe Plugin by EasyRecipe
3.2.1311


Place the noodles in a plate or bowl and top with the Manchurian sauce and serve it hot!

Or serve the baby corn manchurian with fried rice.

manchurian-28

Filed Under: CHINESE ASIAN INSPIRED, NOODLES, VEGAN Tagged With: baby corn in garlic sauce recipe, baby corn manchurian recipe, baby corn recipe, capsicum recipe, Chinese noodles recipe, indo chinese baby corn recipe, indo chinese manchurian recipe, manchurian recipe, noodles with sauce recipe, pan fried noodles recipe, pan fried noodles stir fry recipe, pan fried noodles with sauce recipe, quick noodles recipe, spring onion recipe, sweet spicy garlic sauce

Beans Masala Stir Fry

November 19, 2014 by Suki 16 Comments

BeansStirFryFinal

BeansStirFryFinalThis crunchy 30 minute beans stir fry is simple and flavor-packed.

Green beans are very healthy and one can make quick dishes with them. You can also add them in pulavs, biryani, salads, Chinese recipes, kurma and also some beans rice. Green beans are very healthy I should say. They give good antioxidant support and cardiovascular benefits. If possible, purchase green beans at a store or farmer’s market that sells them loose so that you can sort through them to choose the beans of best quality. They should have a firm texture and “snap” when broken. Purchase them if they have vibrant green color and smooth feel and also free from brown spots.

BeansStirFryFinal1

I always tend to cook potato, okra, brinjal. I somehow don’t make beans, carrot or cabbage much. But when I make them, I cook them special by entertaining myself with some alteration each time to make it tasty and inviting for me to eat. It’s not I don’t like them, it’s just I am sooper lazy to chop carrots and beans. That’s the reason for this masala beans. It tasted really good and very out of ordinary. 🙂

This is a steamed vegetable dish made with coconut. This is called poriyal in tamil. Generally at home we make poriyal with French beans, cauliflower, caroor, cabbage, cluster beans and so on. I have already posted carrot poriyal. Whenever I add lots of spices like this, I add a bit of sugar. But this recipe already has a subtle sweet taste coming from beans, onions and coconut. I make this one, normal coconut (thoran) recipe with this beans and also one nice punjabi aloo beans curry. I will surely share that one day. Its one drooling beans recipe I have in mind to share for quite a long time. I have chopped them little long, you can chop anyways. But this looks attractive 😉 what do you think? 😉

5.0 from 3 reviews
Print
Beans Masala Stir Fry
Author: Suganya Hariharan
Recipe type: Main
Cuisine: Indian
Prep time:  10 mins
Cook time:  20 mins
Total time:  30 mins
Serves: 4
 
Ingredients
  • Mustard – 1 tsp
  • Urad dal – 2 tsp
  • Curry leaves – 1 sprig
  • French Beans – 2 cup
  • Onion – ½ cup
  • Turmeric – ⅛ tsp
  • Salt – as needed
  • Oil – 1 tbsp

    To grind:
  • Shallots – 5
  • Garlic – 4
  • Coriander seeds – 1 tbsp
  • Coconut – 3 tbsp
  • Red chillies – 5
  • urad dal- 2 tsp
  • Black pepper whole – 2 tsp
  • Jeera – 1 tsp
  • Coriander leaves - 2 tbsp
Instructions
  1. Cut the beans diagonally to 1 inch piece. And keep it aside.
  2. Dry roast the ingredients under the “to grind” table. And Grind the ingredients , without adding water.
  3. Heat oil in kadai and add mustard, urad dal and then add curry leaves and onion, fry till onion turns out golden brown.
  4. Then add the beans, salt and turmeric and fry in medium flame for 2 minutes.
  5. Now add enough water to the beans to get cooked.Mix well and cook cover with a lid in a medium flame, till the beans gets cooked.
  6. Add the ground masala powder and add two tbsp of water. Keep turning in between to avoid burning.
  7. After beans get cooked, fry till water evaporates completely and curry should be dry.
Notes
If desired, add coconut oil at the end.
Wordpress Recipe Plugin by EasyRecipe
3.2.1311

Serve this with rasam and rice or roti.

BeansStirFry-10r

Filed Under: DRY CURRY SIDE DISH/ STIR-FRY, VEGAN Tagged With: Beans Masala Stir Fry recipe, beans poriyal, beans thoran recipe, best side dish for roti, Healthy indian recipes, healthy recipe, indian stir fry recipe, side dish for rice, south indian poriyal recipe, Spicy masala recipe, vegan beans recipe

How to make Paneer or Cottage Cheese at home / Homemade Paneer Recipe

November 17, 2014 by Suki Leave a Comment

 Homemade Paneer1

 Paneer is a type of fresh cheese that can be made easily at home.  Paneer has a milky flavor on its own, so it taste best when paired with strong spicy flavor like curries or tikka. This is a cheese that won’t melt like mozzarella or cheddar will. We can add them on any curry, or crumble them into flat breads like roti. Or even add them to kebabs and the cheese will keep its shape and chewy texture.

Homemade Paneer3

I like making paneer at home. But sometimes i do buy them outside if I am very indolent. But I am sure home-made paneer is more hygienic and it saves a lot of money as well.  Paneer is the star ingredient in some of my favourite north Indian dishes. Sometimes when i pan fry them in butter, i grab them and eat 🙂 I Love paneer 🙂 You need very few ingredients to make paneer at home. if you have milk, lemon juice, pan, strainer and some cheesecloth/normal cloth, you can have fresh paneer cheese at home.

I have made this using 2% milk, but i would say avoid skim or non-fat milk as there isn’t enough milk fat left to actually separate into curds.Place them in a zip lock and store in the freezer section for a week or so. But if you don’t use it right away, please make sure you have plans for it within a few days at least.

To see what you can make with paneer, here are some of my paneer recipes : Paneer Makhanwala, Malai Methi Paneer , Paneer peas masala,rasgulla and rasmalai.

Print
How to make Paneer or Cottage Cheese at home / Homemade Paneer Recipe
Author: Suganya Hariharan
Recipe type: Main
Cuisine: Indian
Prep time:  60 mins
Cook time:  10 mins
Total time:  1 hour 10 mins
Serves: 250gms paneer
 
Ingredients
  • Ingredients:
  • Milk – 6 cups
  • Lemon Juice – 2 tsp or yogurt - 1 tbsp or vinegar- 2 tsp
  • Ice cubes – 6
Instructions
  1. Mix lemon juice in half a cup of warm water and keep aside.
  2. Add 5 cups milk to a large pan over medium high heat. Constantly stir the milk at regular intervals to make sure the milk does not stick to the bottom.
  3. When it is boiling nicely, add the lemon juice/water mixture to the boiling milk. The milk will curdle in about a minute and most of the milk protein coagulates into lumps leaving very thin, slight cloudy water behind. When the water is clear, stop curdling by adding ice.
  4. Drain out the liquid using a muslin cloth or any clean thin cloth. Guess what you have in the cloth? Its cottage cheese! Squeeze out the excess water and hang the cloth with paneer for about 30-40minutes.
  5. Now rub the cloth that contains the paneer with another cloth. This removes the remaining water and helps us form the dough. Now remove the paneer from the cloth, knead it well.
  6. Cut them into desired shapes and store in freezer. Use it when you need it.
Wordpress Recipe Plugin by EasyRecipe
3.2.1311

 Homemade Paneer2

Filed Under: HOMEMADE Tagged With: Homemade paneer recipe, paneer at home recipe, paneer recipes

Veg Fried Rice (Indian Style)

November 15, 2014 by Suki 4 Comments

Friedrice-4

Friedrice-4

 I never used to like fried rice before coming to Canada. I remember my Mom used to order this for her always. And I never used to touch it. Then after coming here, I continued that by avoiding it till I tasted this one when my best friend Vincy cooked this for me for one of my birthday with paneer gravy. I loved it! And she is the one who makes it for me always after that in our home. We all used to enjoy it. She is very quick in cooking and she used to cut the veggies overnight , store it in the refrigerator and make it the next day in a jiff after coming from church visit on a Sunday. I miss that! After she left to India, all three of us learnt from her and we used to make it for special days 🙂 and all of us rocked in this recipe. It is so simple and it never lets anyone down. That is all you want when you are cooking lot of recipes on a special day. Right? 😉

It is very important to make the rice grainy for fried rice. If the rice turns sticky, we won’t get it perfectly. You can use different color capsicum to add more color to the rice. It is very simple, only thing to do is chop the veggies finely. Make sure to use nice good quality basmati rice, as it’s the star ingredient here. Even though the key ingredient is rice here, capsicum and spring onions elevates this recipe to a different level.  I made this before two weeks with paneer Manchurian and drafted the recipe to share. Thought of sharing it today and here it goes ! 🙂

To cook basmati rice perfectly, check the titbits ! 🙂

Print
Easy Fried Rice recipe (Indian Style)
Author: Suganya Hariharan
Recipe type: Main
Cuisine: Indian
Prep time:  20 mins
Cook time:  15 mins
Total time:  35 mins
Serves: 4
 
Ingredients
  • Cloves - 3
  • Beans - ½ cup, chopped finely
  • Carrots - ½ cup, chopped finely
  • Capsicum - ½ cup, chopped finely (used green and red capsicum)
  • Spring onions - ½ cup
  • Oil - 2 tbsp
  • Pepper powder - 1 tsp
  • Aginomoto - a pinch (optional)
  • Sugar - ½ tsp
  • Cooked rice – 2 cups
  • Salt - as required
Instructions
  1. Cook basmati rice perfectly and fluffy. And keep it aside. Cut the veggies very finely so that it will cook easily in short period of time.
  2. Heat a pan with oil, and when hot, add the clove and veggies with sugar and fry for two minutes or until its cooked. Make sure it is still crunchy. You don’t want mushy veggies.
  3. Add pepper and aginomoto, spring onions and fry for a minute. Add the cooked rice and stir well and switch off.
Notes
1. You can try the same with left over rice by keeping it overnight in the fridge.
2. I had only black pepper handy, but you can use white pepper, it gives, more flavor.
3. You are adding sugar to retain its color.
Wordpress Recipe Plugin by EasyRecipe
3.2.1311

Serve it with paneer gravy or manchurian or any gravy! 🙂

Vegfriedrice2name

Filed Under: RICE/BIRYANI VARIETIES, VEGAN Tagged With: basmati rice recipes, best fried rice recipe i tasted, easy veg fried rice recipe, fried rice recipe, quick dinner recipe, quick fried rice, quick rice recipe, veg fried rice recipe

Kozhi Milagu curry / Pepper Chicken Curry

November 13, 2014 by Suki 11 Comments

Chickencurry-11

Chickencurry-11Made with freshly grounded whole black pepper and Fennel seeds with a hand full of curry leaves.

This is a famous south Indian recipe. I made this pepper chicken curry with mutton roast on one fine evening just like that. My whole house smelled with flavors. You can use chicken with bone or boneless too. It’s always good when the meat dishes are spicy. You will start liking it that way if you start having it that way. But if you are making it for the first time, try to taste as you make to adjust to your spice level. I would say do not skip any ingredient in this, each of it adds unique taste to this. I usually don’t insist so because I usually advise to cook with whatever we have at our house. But pepper, fennel seeds and curry leaves are star ingredients in this. So, if you skip any one of it, it will make a great difference.

Chickencurry1

Chickencurry-9

Pepper and chicken is a deadly combination. And also pepper helps to cure stomach related problems. Pepper should be dry roasted to remove moisture content. And also note that you don’t want to dry roast and store this powder. If you want good flavors, I am sure you want to! If so grind it fresh each time you make this recipe. This is a spicy curry. If you want it dry, leave it for another five to ten minutes to make it a roast.

Chickencurry-12


4.5 from 4 reviews
Print
Kozhi Milagu curry / Pepper Chicken Curry
Author: Suganya Hariharan
Recipe type: Main
Cuisine: Indian
Prep time:  5 mins
Cook time:  25 mins
Total time:  30 mins
Serves: 4
 
Ingredients
  • Chicken - 400gm
  • Cinnamon stick - ¼ inch piece
  • Onion - 1 cup, 1 finely chopped
  • Tomato - 1 cup, 1 finely chopped
  • Ginger garlic paste - 2tbsp
  • Turmeric powder - 2 tsp
  • Chili powder - 1 tbsp
  • Coriander powder - 1 tbsp
  • Oil - 3 tbsp
  • Salt - as needed
  • Curry leaves – 10

    To Roast and grind:
  • Pepper - 1 tbsp
  • Fennel seeds - 1 tbsp
Instructions
  1. Dry roast the ingredient under "to roast & grind" each one of it separately. i.e, Pepper separately and fennel seeds separately. Grind them together and keep it aside.
  2. In a pan, heat oil and add cinnamon stick and add onion and salt and sauté till golden brown. And then add ginger garlic paste and sauté for a minute.
  3. Now add tomato and fry till its mushy and raw smell leaves. Add the turmeric, red chili powder, coriander powder and sauté well.
  4. Now add chicken and stir well till the chicken is well blended with the spices.
  5. Now add water till immersing level say 1 cup along with salt and close the lid. It will take around ten minutes for it to cook well. Don’t add more water, it may make it rubbery. And Chicken will ooze some water already.
  6. Now add the powdered pepper fennel powder and saute for two minutes. Add curry leaves, taste and adjust salt and spice level. (Check spice level as you add it, your spice level may differ)
  7. Add chopped coriander leaves and switch it off.
Notes
1. This is a spicy curry. If you want it dry, leave it for another 5-10 minutes to make it a roast.
Wordpress Recipe Plugin by EasyRecipe
3.2.1311


Serve it with some rice and lamb roast.

Or Serve it with roti or parotta.

Chickencurry2name

Filed Under: NON-VEG RECIPES Tagged With: chicken curry, chicken gravy recipe, chicken kuzhambu recipe, indian chciken curry recipe, Kozhi milagu curry recipe, pepper chicken gravy recipe, pepper chicken recipe, quick indian chicken recipe, south indian chicken recipe

Sweet Corn Soup

November 11, 2014 by Suki 6 Comments

Sweetcornsoup-2-2

Sweetcornsoup-2-2

A healthy and easy to make Sweet corn soup with carrot, green beans & spring onion.

This is a healthy comfort food that takes just twenty minutes to prepare. This is a very easy and flavorful soup. I am not a big fan of soups and I always prefer creamier version. But this one is healthy and if you wanted to make a healthy meal, you can have this one. I never used to have soups before coming here to Canada, and then I started liking it. In India, I used to have soups only as an appetizer but here I have them as main meal sometimes 😉 I always like to have them with some wheat crackers on the side. If I am planning a big meal, I would like to have a clear soup as an appetizer to complete the meal and to make it light.

Sweetcornsoup-3-2

You can use tinned sweet corn or corn kernels to make this. Whenever I see sweet corn, it reminds me of having it steamed with some masala as masala corn. Will post that recipe sometime. I love the natural sweetness and the crunch it gives. I like creamier version of the soup but its not that healthy. So will make it only once in a while. This soup is a clear soup which is light and easy to drink, and is usually found as part of a Chinese meal.


Print
Sweet Corn Soup
Author: Suganya Hariharan
Recipe type: Main
Cook time:  20 mins
Total time:  20 mins
Serves: 2
 
Ingredients
  • Onion – 1 tbsp, finely chopped
  • Carrot - ¼ cup, finely chopped
  • Beans – ¼ cup, finely chopped
  • Corn - ½ cup
  • Pepper powder – 1 tsp
  • Corn flour – 2 tsp
  • Spring onion – 2 tbsp
  • Sugar – ½ tsp
  • Oregano – ¼ tsp
  • Basil leaves – ¼ tsp
  • Salt – to taste
Instructions
  1. In 1 tsp of oil, first sauté onion, carrot and beans till raw smell leave (forgot to take this step picture). Boil water in a container when it starts boiling add all the vegetables.
  2. Boil for around ten minutes, allow the vegetables to get cooked. Cook it till it is soft but yet crunchy enough to bite.
  3. Meanwhile when they are boiling, mix 2 tsp corn flour in 2tsp of water without any lumps and keep it ready.
  4. Once the water is reduced a little and veggies have turned soft and crunchy, add the corn flour mixture and stir well. The soup will get thicken, and now add pepper powder, sugar and stir. Let it simmer for five mins.
  5. Then add oregano, basil leaves and mix well.
  6. Garnish with spring onions and switch off. Serve hot.
Notes
1. Add corn flour according to the consistency you desire.
2. You can add cabbage and celery also. Sautéing the veggies is optional
3. You can also frozen veggies and boil less.
4. Add white pepper, it gives better taste.
Wordpress Recipe Plugin by EasyRecipe
3.3.3077


Sweetcornsoup-7

Filed Under: SOUPS, VEGAN Tagged With: clear soup recipe, healthy soup recipes, soup recipes, sweet corn recipe, Sweet corn soup

Kerala Parotta / Layered Bread

November 8, 2014 by Suki 10 Comments

Parotta-15-2

Parotta-15-2It is a layered soft and flaky bread made out of plain flour and oil. It is a popular Indian street food.

It is popular in the southern states of India – Kerala, Karnataka and Tamilnadu. It is a best seller of thattu kada(road side eatery) and also called as malabar parathas. Usually the parottas include egg. But I am making the eggless one and it surely taste good.

When I was in Chennai, I always used to see the guys working in the roadside small eatery places waving dough around till it gets stretched into what resembles mini flying saucers :D. seriously! You would understand only if you have seen it, you can even browse in youtube, there are so many videos showing that. This requires a lot of practice to master. I tried few times and yet to master it. 😉

Parotta-4-2

Whenever I go near a parotta place in Chennai, the smell of making them is just so good. I have heard it taste best with the salna. But I have never tried them at a road side shop sadly. My dad always stops me from having them at a road side shop. But I always wanted to have it once there ;)! He feels it’s not healthy 😉 I agree 😉 But just once just to taste them. My Boyfriend always used to say , the road side shops taste really good 😉 but also mentions that I would not have them if I get to see the way they make it there peek
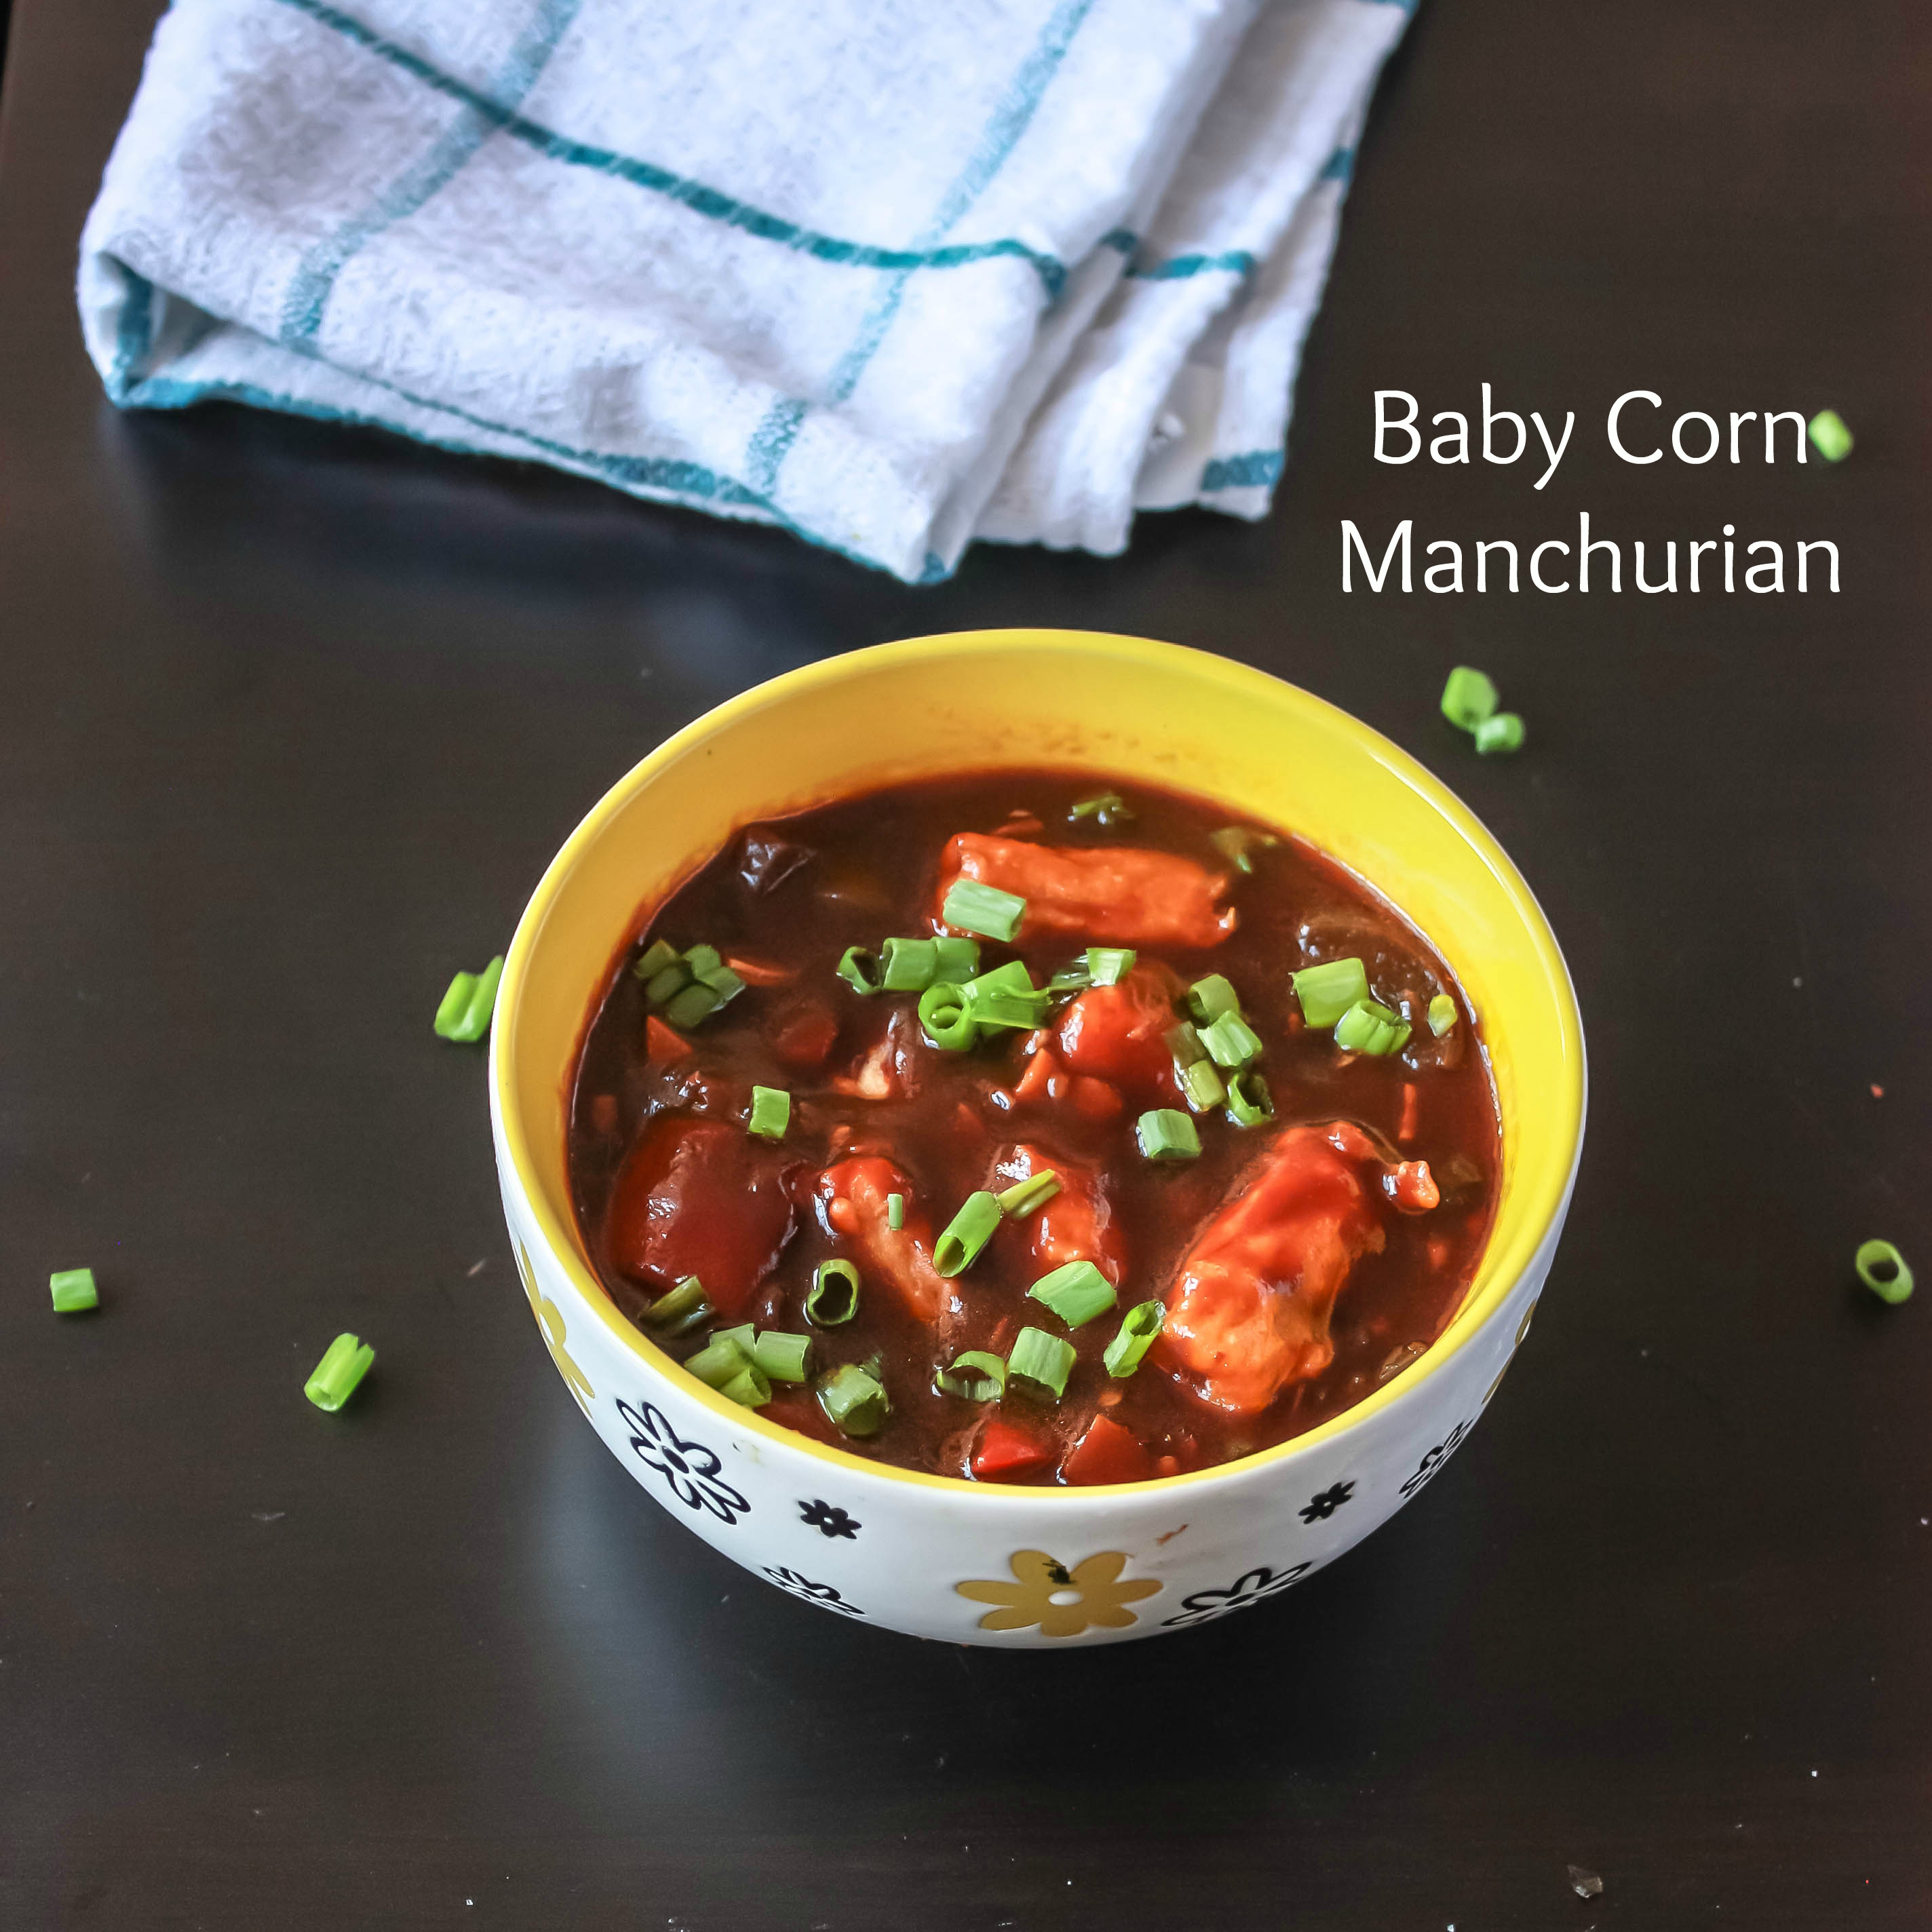
. May be I will still like it.. May be not 😀

You can make this using wheat flour instead of all-purpose flour considering the health values, though the all-purpose version tastes and looks a lot better. Wheat version is simply the lacha paratha. And for lacha paratha you just need less oil. But the texture of this parotta is lot more different and even taste differs. Trust me, it looks complex but it is very easy to make once you start making it. The tip is to roll the dough as thin as possible and then the layers would come nicely.

If you think this is going to taste like the frozen ones, NOno, it is not! It tastes lots better than the frozen ones. 🙂

5.0 from 1 reviews
Print
Kerala Parotta / layered Bread
Author: Suganya Hariharan
Recipe type: Main
Cuisine: Indian
Cook time:  60 mins
Total time:  1 hour
Serves: 10
 
Ingredients
  • All purpose flour / Maida – 2 cups
  • Baking soda - ¼ tsp
  • Hot water – ½ cup
  • Milk – ½ cup
  • Sugar – 2 tsp
  • Salt – 1 tsp
  • Oil
Instructions
  1. In a bowl or a clean surface, add all-purpose flour, salt, baking soda and sugar and mix well. Make a well in the middle and slowly add the water and milk and make soft dough. Add a tbsp. of oil and mix into the dough.
  2. Cover the dough with a lid or a damp cloth and allow to rest for fifteen minutes.
  3. Apply some oil in your hand and also grease your work surface with oil and pinch dough to make smooth round tennis sized balls. Rest it again for ten minutes covered.
  4. Take each ball and roll it thin. Thin here means it should be so thin that it’s almost transparent. You can also use palms and fingers to stretch out into a thin sheet. Shape is not important here. Even if there are very few tears its fine at this step. (as you work with each portion of dough, be sure to keep the rest covered so it doesn’t dry out)
  5. Slowly lift up one end of the sheet using fingers. And make pleats (like saree) moving towards the other end. (It’s like folding each fold on another).
  6. When this step is done, hold one end of the long strip and roll it towards the other end to create spiral balls something like a rosette. Roll the other ones similar way and grease them and cover it again for ten minutes.
  7. On a greased surface, place each spiral balls and roll into a thick parotta. Grease them again.
  8. Heat a non-stick pan on medium-high heat. When the pan is hot, place the thick parotta on the pan and cook on both sides till golden brown. You can drizzle oil as you roast them on the hot pan.
  9. Prepare other parottas similar way. Now arrange all parottas placing each one on top of another on the work surface. Now using both your hands, crush them together similar to clapping action and pull back. This helps to open up the layers of the parotta.
  10. Serve it hot with nice gravy.
Notes
1. Allow to rest for at least ten minutes at each stage of the parotta making process.
2. Crushing clapping process of the parottas after taking off from the hot stove is the essential step. But be careful.
3. You can add egg to the flour which will make the parottas even more rich and soft. But I wanted to do eggless.
4. You can use one cup of all-purpose flour and one cup wheat flour also.
Wordpress Recipe Plugin by EasyRecipe
3.2.1311


Serve parotta with any vegetable curry or chicken salna or even simple raita.

Parotta-22

Filed Under: BREAD/PARATHA Tagged With: best indian bread recipe, kerala parotta recipe, Malabar parotta recipe, paratha recipe, parotta recipe, Quick indian bread recipe, rich parotta recipe, simple parotta recipe, step by step parotta recipe

Pudina Chaas / Mint Spiced Buttermilk

November 4, 2014 by Suki 5 Comments

Pudinachaas-6

Pudinachaas-6A refreshing drink made with yogurt, bursting punch of mint leaves and roasted cumin seeds.

Chaas is nothing but buttermilk.  It is very popular thirst quencher in summer in India. It is mostly had during summers and also many times after meals. When I was younger I have seen in many Indian cities vendors selling this spiced buttermilk, especially in hot summers. It is not only summer, I always crave for thirst quenching drinks to keep my body hydrated and cool.

Both yogurt and mint are body coolants. Mint calms stomach when there is stomach pain and indigestion. It also helps headaches. And buttermilk is good to have if you have acidity problem. So, if you are having more junk oily spicy foods, always good to have buttermilk. My parents mostly make buttermilk for me thrice in a week as it is a great coolant and helps to glow the skin away staying away from heat acnes. Sometime I just make with coriander and no mint. If I have some leftover mint from biryani, I surely make buttermilk with mint. It is low in fat and high in calcium and probiotics.

When heat becomes unbearable in India, we always try to beat the heat by having this buttermilk, fresh lime soda and so on. There are lots of ways to prepare this, some don’t like to make it without mint and have it as masala chaas, some with sugar as sweet lassi and some add fruits or vegetables to make it tastier like mango lassi. I wanted to show the simple version.lookdown

I remember my Mom never fails to leave anyone from home without giving them something to eat when they come to visit us. Let it be anyone. She will do it. She says it is a custom in India. “Tamizhar panpadu!” to be more specific.  I try to follow that till now. Those days there won’t be food always or even snacks like these days. So, she will make sure to at least make some quick buttermilk and give. It’s great for all ages. 🙂

Print
Pudina Chaas / Mint Spiced Buttermilk
Author: Suganya Hariharan
Recipe type: Drinks
Cuisine: Indian
Cook time:  5 mins
Total time:  5 mins
Serves: 2 glasses
 
Ingredients
  • Yogurt – 1 cup
  • Fresh mint leaves – 7-8, chopped
  • Cumin seeds – 1 tbsp
  • Coriander leaves – Few, chopped
  • Hing – 1 pinch
  • Water – 1.5 cups
  • Salt – as needed
Instructions
  1. Dry roast jeera until it turns slightly browned. It gives nice aroma. Then powder it using mortar and pestle or just grind it in a blender. I roasted more and saved them in a box.
  2. In a blender add all the ingredients including the mint leaves and blend till smooth.
  3. Serve mint chaas in glasses with some ice cubes. You can also chill and serve later.
Notes
1. You can double or triple easily.
2. You can add dry mint leaves instead of fresh mint leaves.
3. You can also add black salt instead of normal salt.( if you did not know 😉 black salt looks pink in color)
4. You can also add ginger when grinding.
Wordpress Recipe Plugin by EasyRecipe
3.2.1311

Pudinachaas-5

Filed Under: DRINKS & BEVERAGES Tagged With: Buttermilk recipe, chaas recipe, healthy drink recipe, Home remedies for digestion, Home remedies for stomach pain, home remedies to cool body, masala neermor recipe, mint chaas recipe, neermor recipe, pudina chaas recipe, summer drinks

Page 1 of 2
1 2 Next »
  1. Pages:
  2. 1
  3. 2
  4. »
  • 1
  • 2
  • Next Page »
  • Facebook
  • Google+
  • Instagram
  • Pinterest
  • Twitter

LOOKING FOR SOMETHING?

logo
Food Advertisements by
logo
Food Advertisements by

Categories

STAY CONNECTED

  • Facebook
  • Google+
  • Instagram
  • Pinterest
  • Twitter

SUBSCRIBE BY EMAIL

SEARCH RELISH THE BITE

logo
Food Advertisements by

Copyright © 2025 · Lifestyle Pro Theme on Genesis Framework · WordPress · Log in