• Home
  • Page Layouts
  • Page Templates
  • Theme Colors
    • Lifestyle Pro Blue
    • Lifestyle Pro Green
    • Lifestyle Pro Mustard
    • Lifestyle Pro Purple
    • Lifestyle Pro Red
    • Lifestyle Pro Teal

Relish The Bite

Taste of happiness

  • HOME
  • ABOUT
  • RECIPE INDEX
    • SNACKS & APPETIZERS
    • BREAKFAST
    • BAKED RECIPES
    • LUNCH & DINNER
      • RICE/BIRYANI VARIETIES
      • SIDES
        • DRY CURRY/STIR-FRY
        • SOUTH INDIAN CURRY/KUZHAMBU
        • NORTH INDIAN CURRY/DAL
        • RAITA/DIPS/CHUTNEY
        • Soups/Salads
      • PASTA PIZZA & TACOS
      • BREAD
      • CHINESE ASIAN INSPIRED
    • NON-VEG RECIPES
    • DESSERTS
    • BEVERAGES
  • SNACKS
  • BREAKFAST
  • NON-VEG RECIPES
  • RICE/BIRYANI VARIETIES
  • LAMB
  • SOUTH INDIAN CURRY/KUZHAMBU
  • VEGAN
  • NORTH INDIAN CURRY/DAL
  • DRY CURRY/STIR-FRY
  • PASTA & TACOS
  • CHINESE ASIAN INSPIRED
  • BAKED RECIPES
  • COLLECTIONS
  • BREAD
  • BEVERAGES
  • DESSERTS
  • FESTIVAL RECIPES
    • SNACKS & APPETIZERS
    • SWEETS/DESSERTS
  • RESOURCES
    • HOW TO START A BLOG
    • TITBITS
    • PRESS
  • CONTACT
You are here: Home / Archives for 2014

Archives for 2014

Ribbon Pakoda (Nada Thenkuzhal)

October 18, 2014 by Suki 2 Comments

Ribbonpakoda-8name
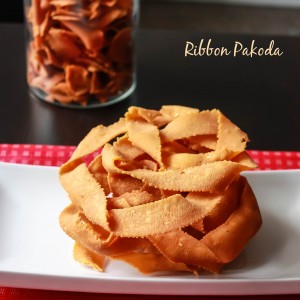
Chickpea flour spirals for non-stop munching.

It is an easy, addictive spicy and flavorful snack. Diwali is round the corner and I wanted to start making some snacks and sweets. I had a big list to make. Thought of making the savories on one day and sweets on another. I am not sure how many I am going to post here. But wanted to start posting with this one as I got some request for this. And one of my personal favorite. These are made especially during diwali days. It is also a perfect teatime snack. Many add garlic in this recipe but this time I made it with no garlic 😉 and I like it this way.

Diwali or deepavali is known as festival of lights 🙂 and is usually around autumn every year. The festival preparations usually extend over more than 5 days. And the main diwali night coincides with the darkest new moon light, karthiga. It is believed that on this day Rama returned to his people after 14 years of exile during which he fought and won a battle against the demons and the demon king, Ravana. People celebrate this day by lighting candles for his victory over evil (darkness). Some link it with the celebration of Lakshmi, the goddess of wealth and prosperity. The five day festival begins on the day lakhmi was born during the war between the forces of good and forces of evil. That’s a lot of information 😀 lets go to the fun part! Recipe time :)!
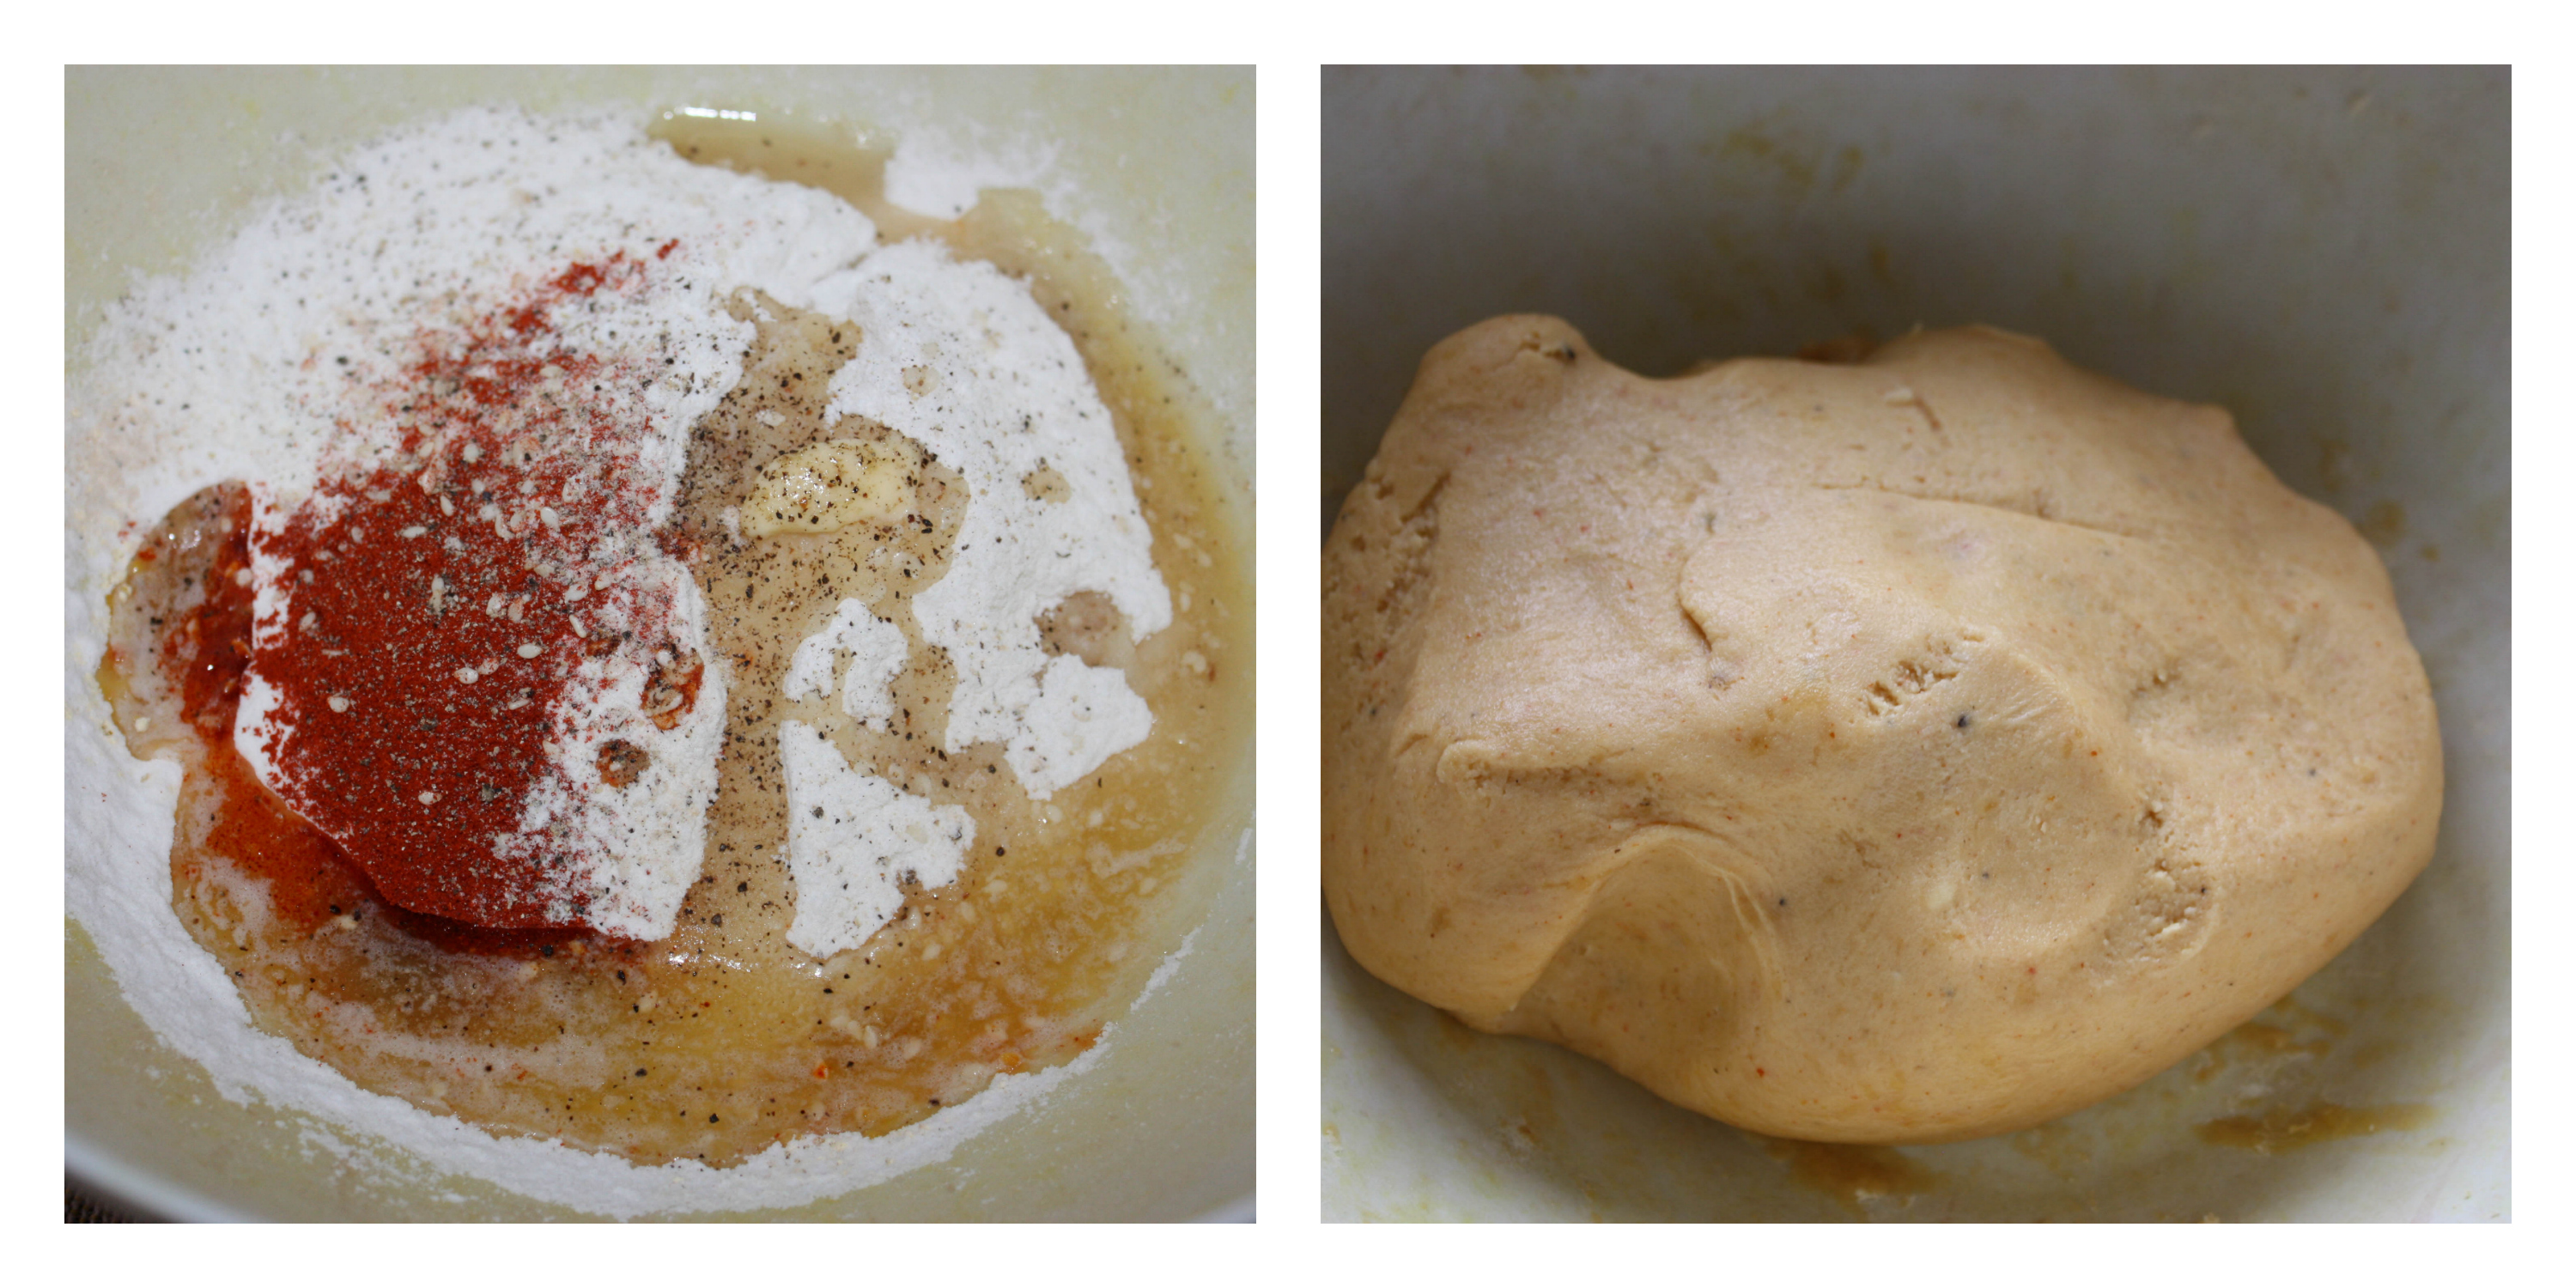
Print
Ribbon Pakoda (Nada Thenkuzhal)
Author: Suganya Hariharan
Recipe type: Snacks
Cuisine: Indian
Prep time:  5 mins
Cook time:  25 mins
Total time:  30 mins
Serves: 2-3 cups
 
Ingredients
  • Rice flour – 2 cups
  • Besan (Benjal Gram Flour) - 1cup
  • Red Chilli Powder - 2tsp
  • Pepper powder – ½ tsp
  • Asafetida – 2 pinches
  • Sesame seeds – 1 tsp
  • Melted Butter – 2 tbsp
  • Hot oil – 2 tbsp
  • Salt – To taste
  • Oil – For Deep Frying
Instructions
  1. Heat oil for deep-frying in a pan.
  2. In a wide bowl, add all the ingredients. Add water little by little to form soft stiff dough.
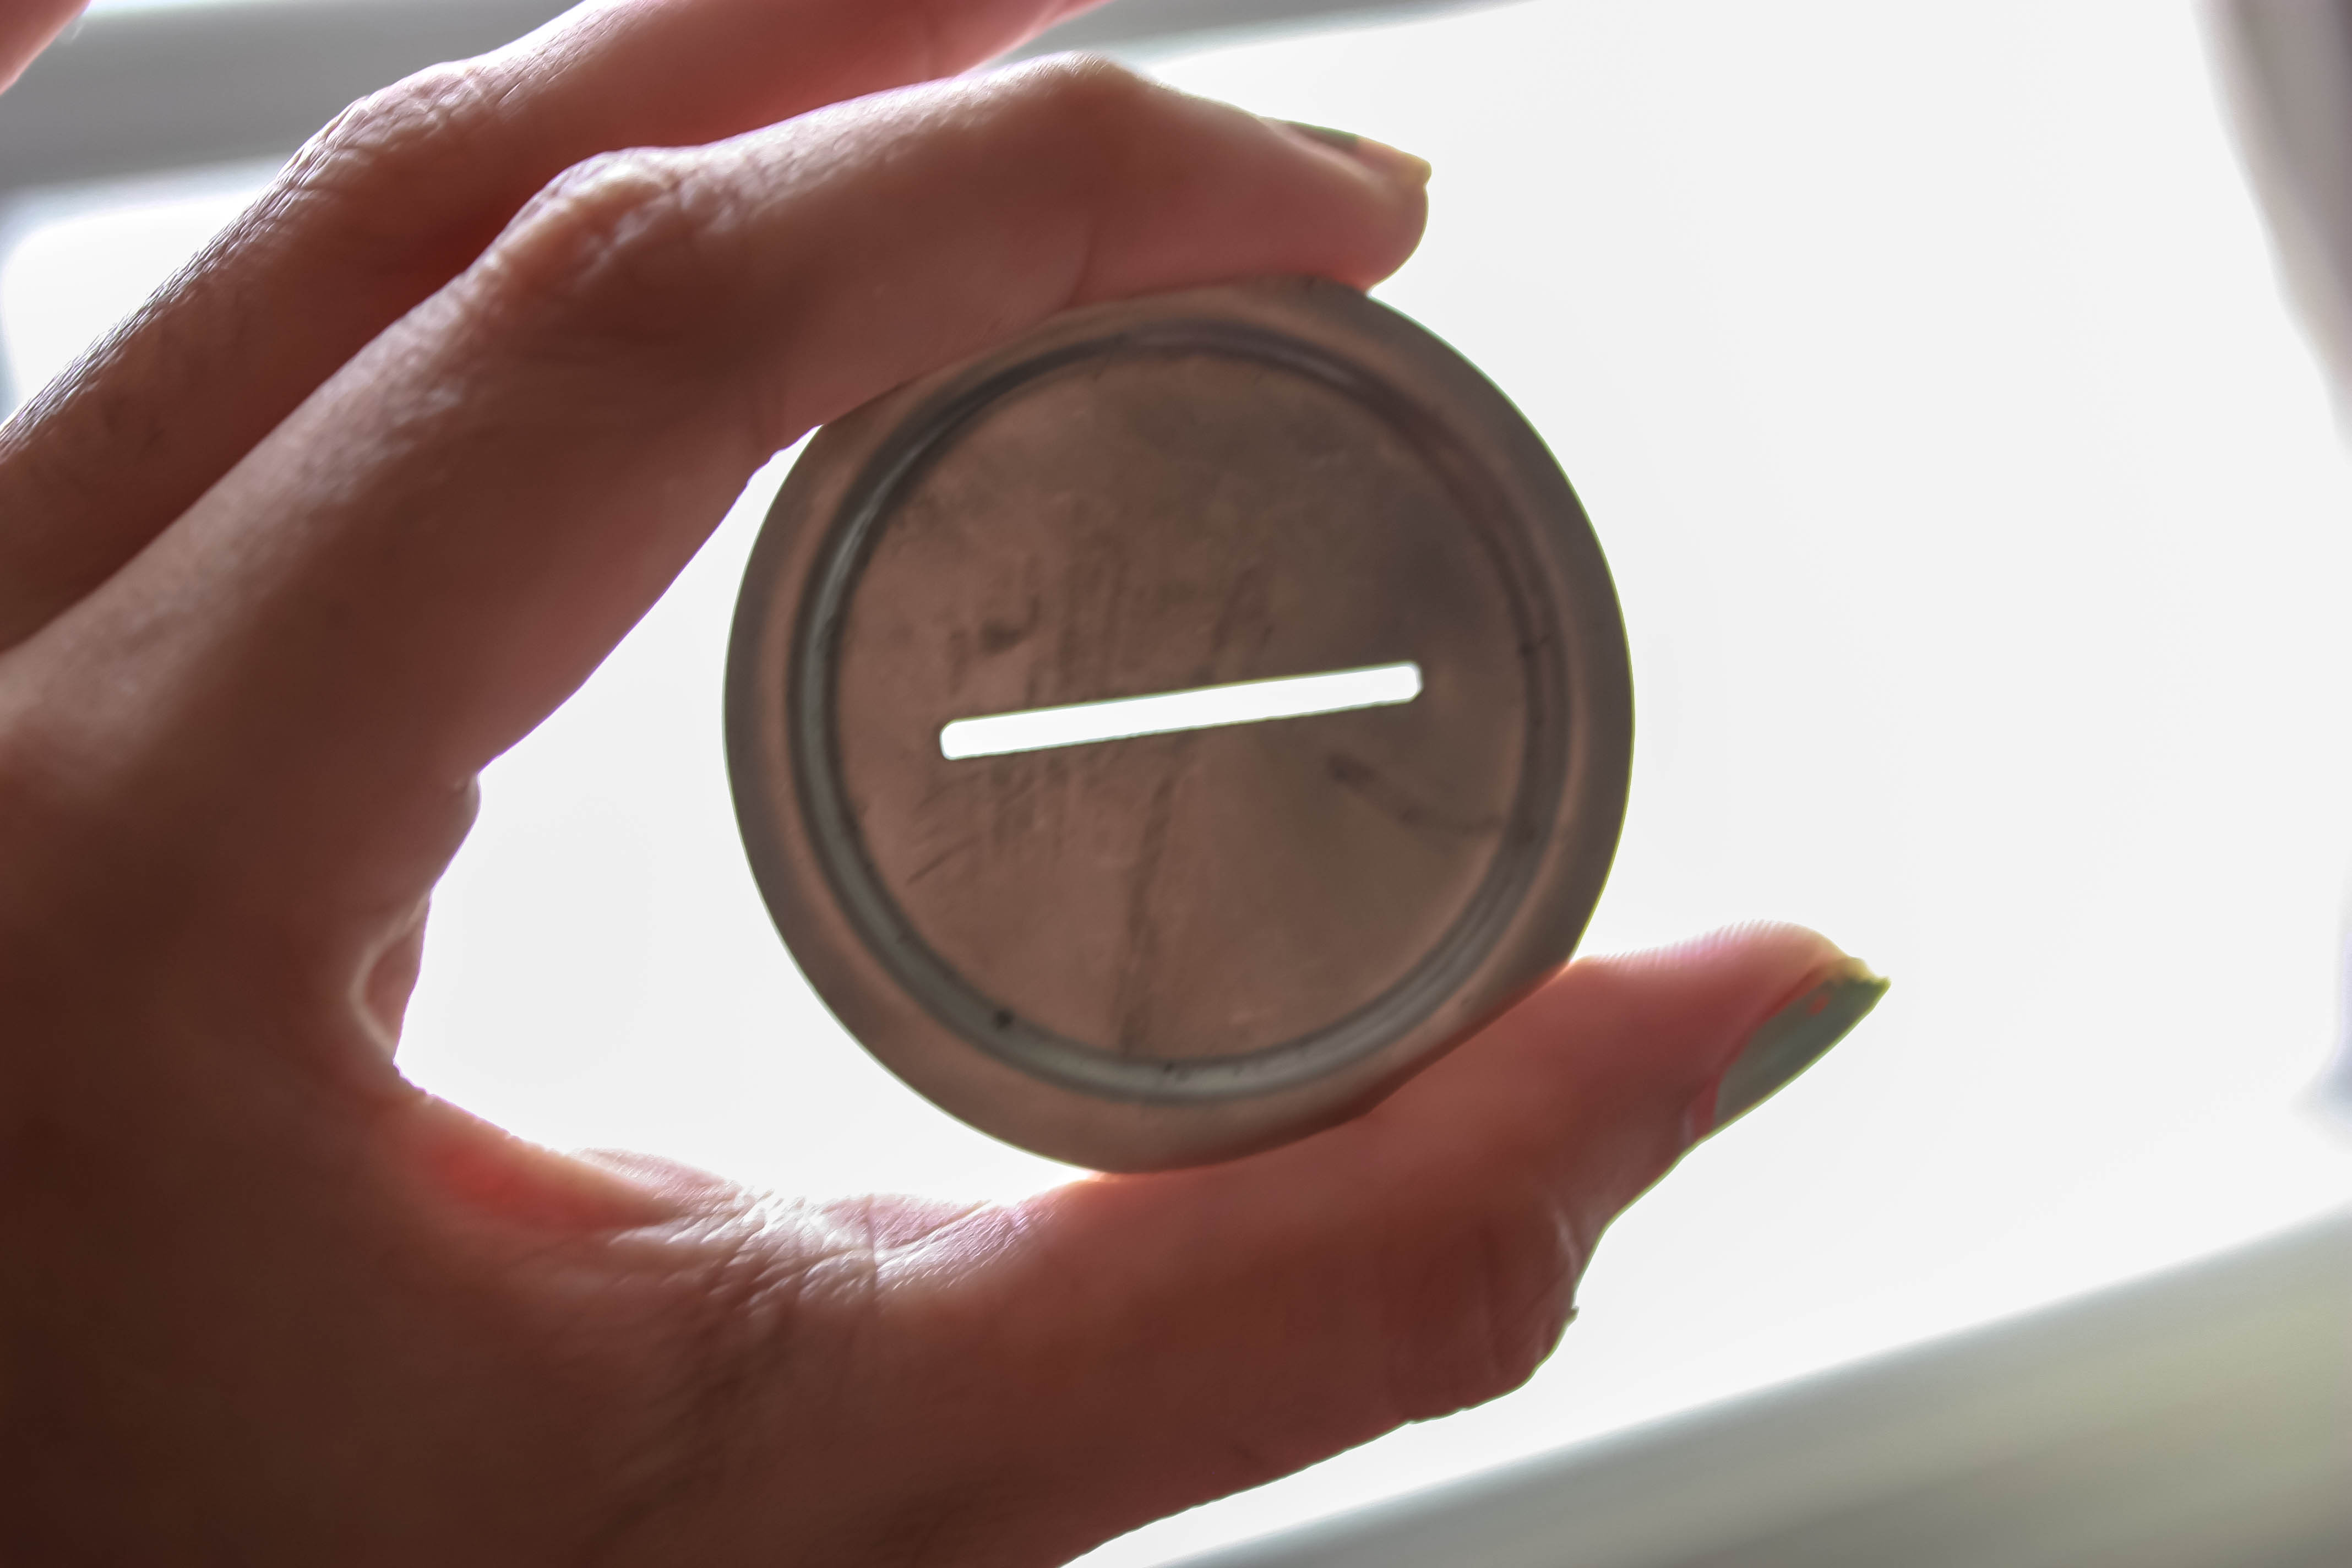
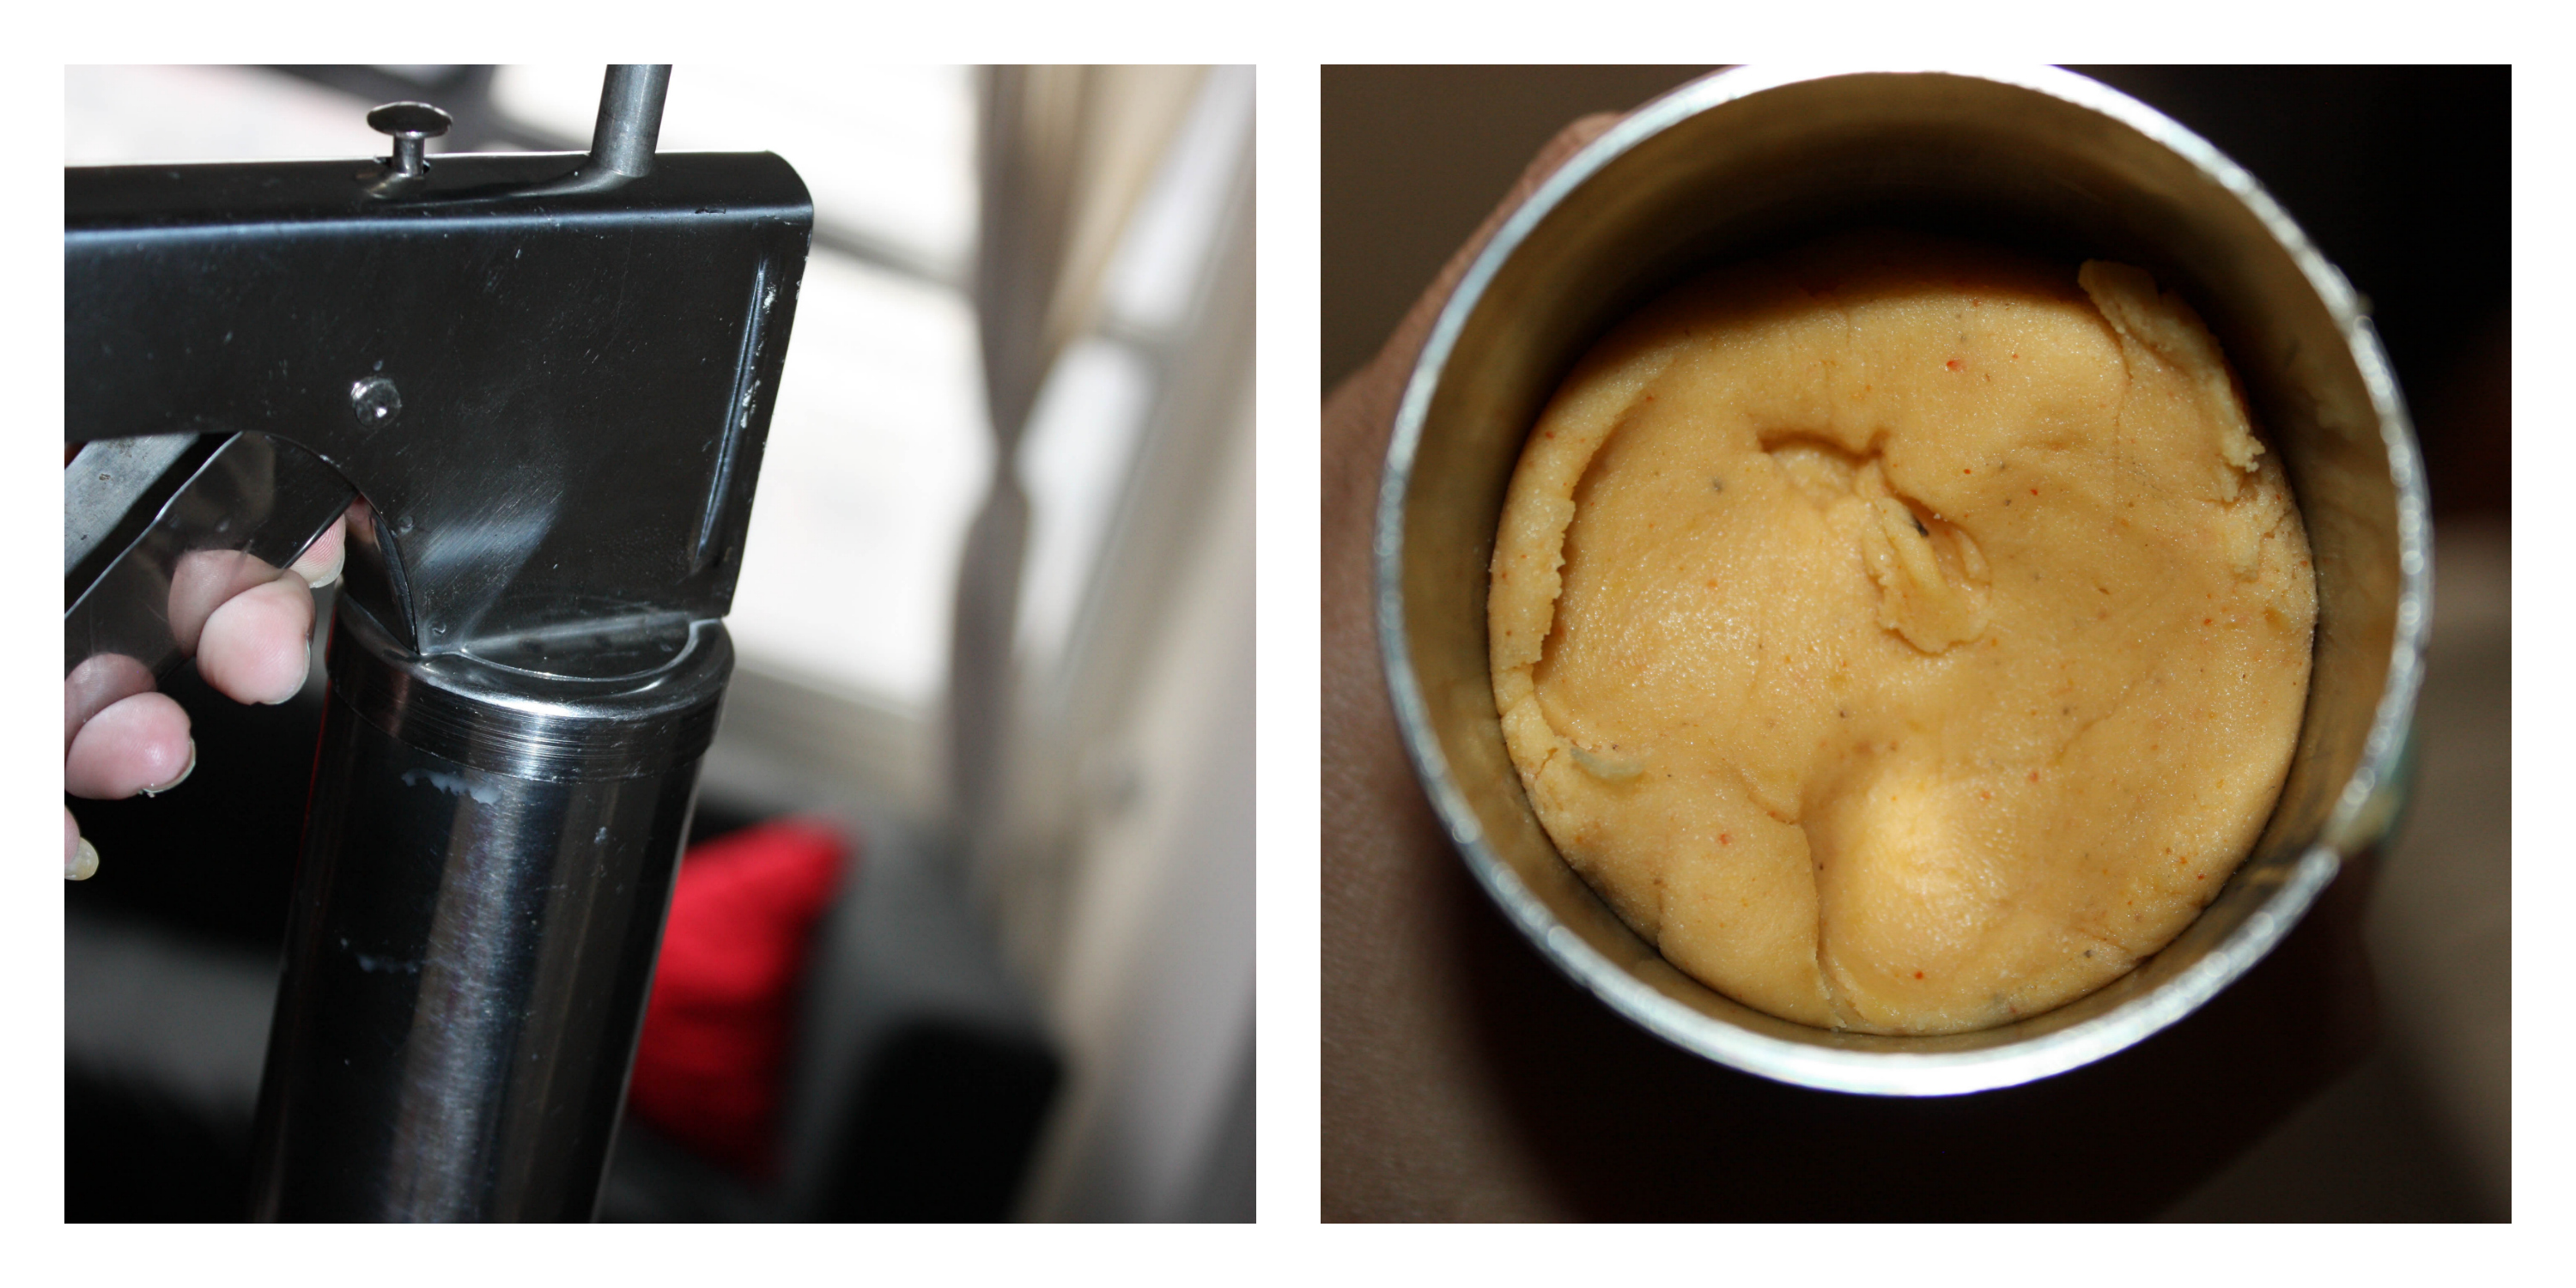
  3. Fix the ribbon pakoda achu (mould) into the murukku press. Add a portion of dough in the murukku press and close it.

  4. When the oil is hot, in medium high heat, make a round layer in hot oil. Do not add more layers to form even cooking.br]
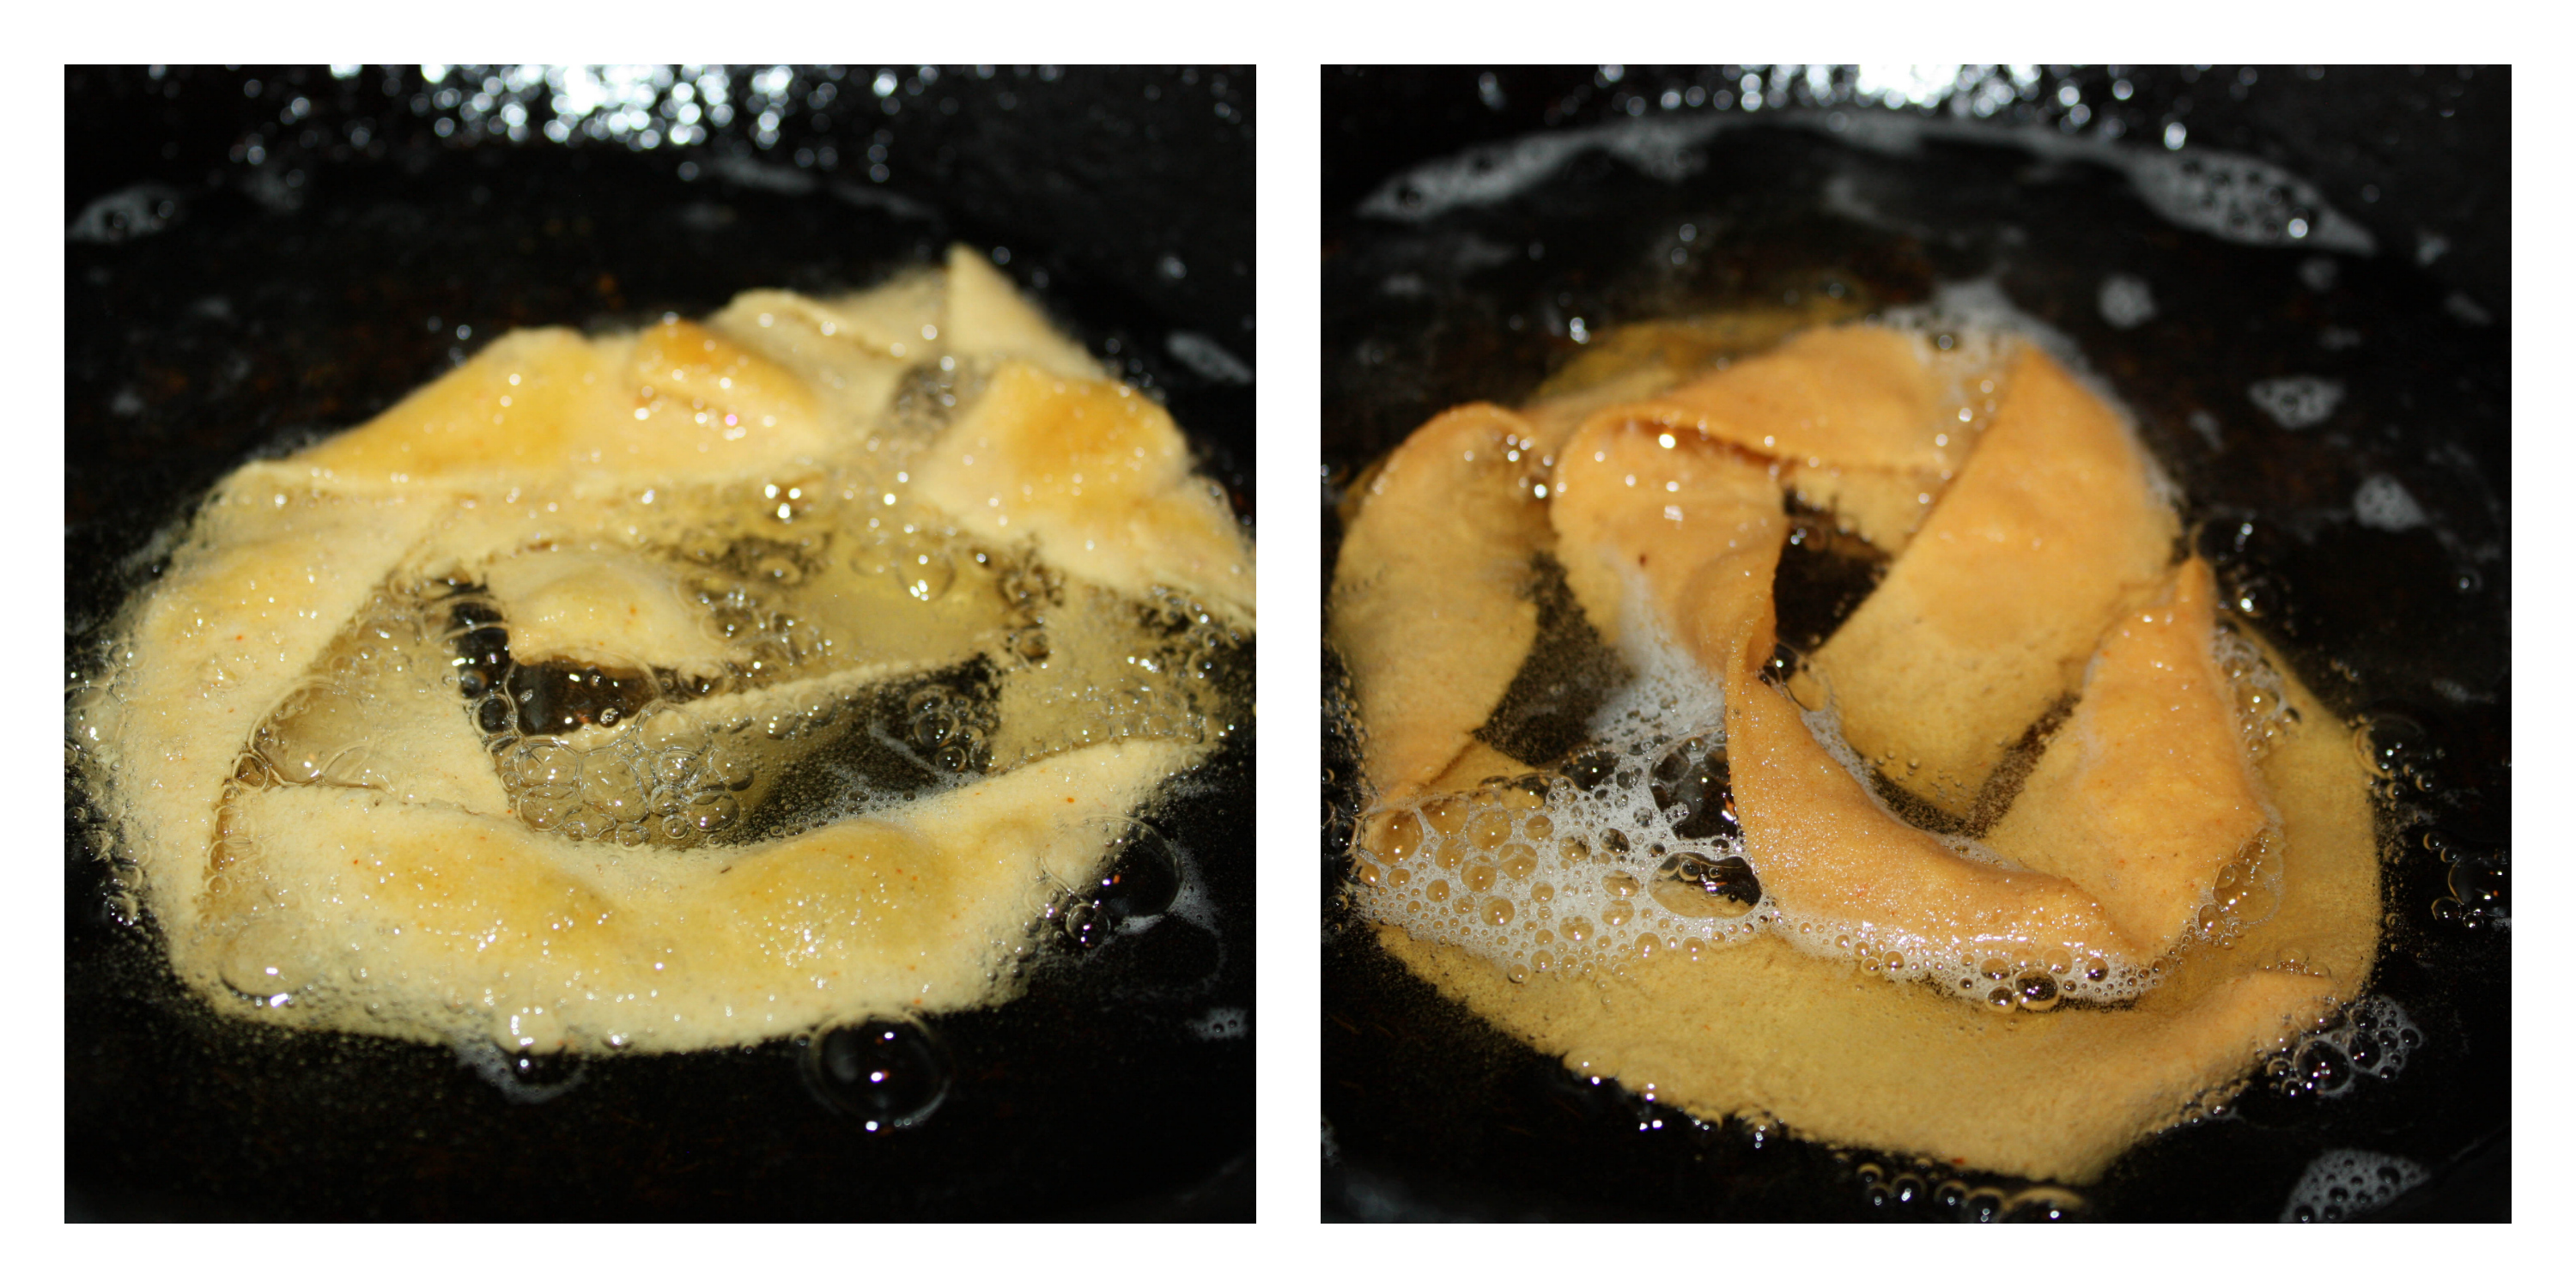
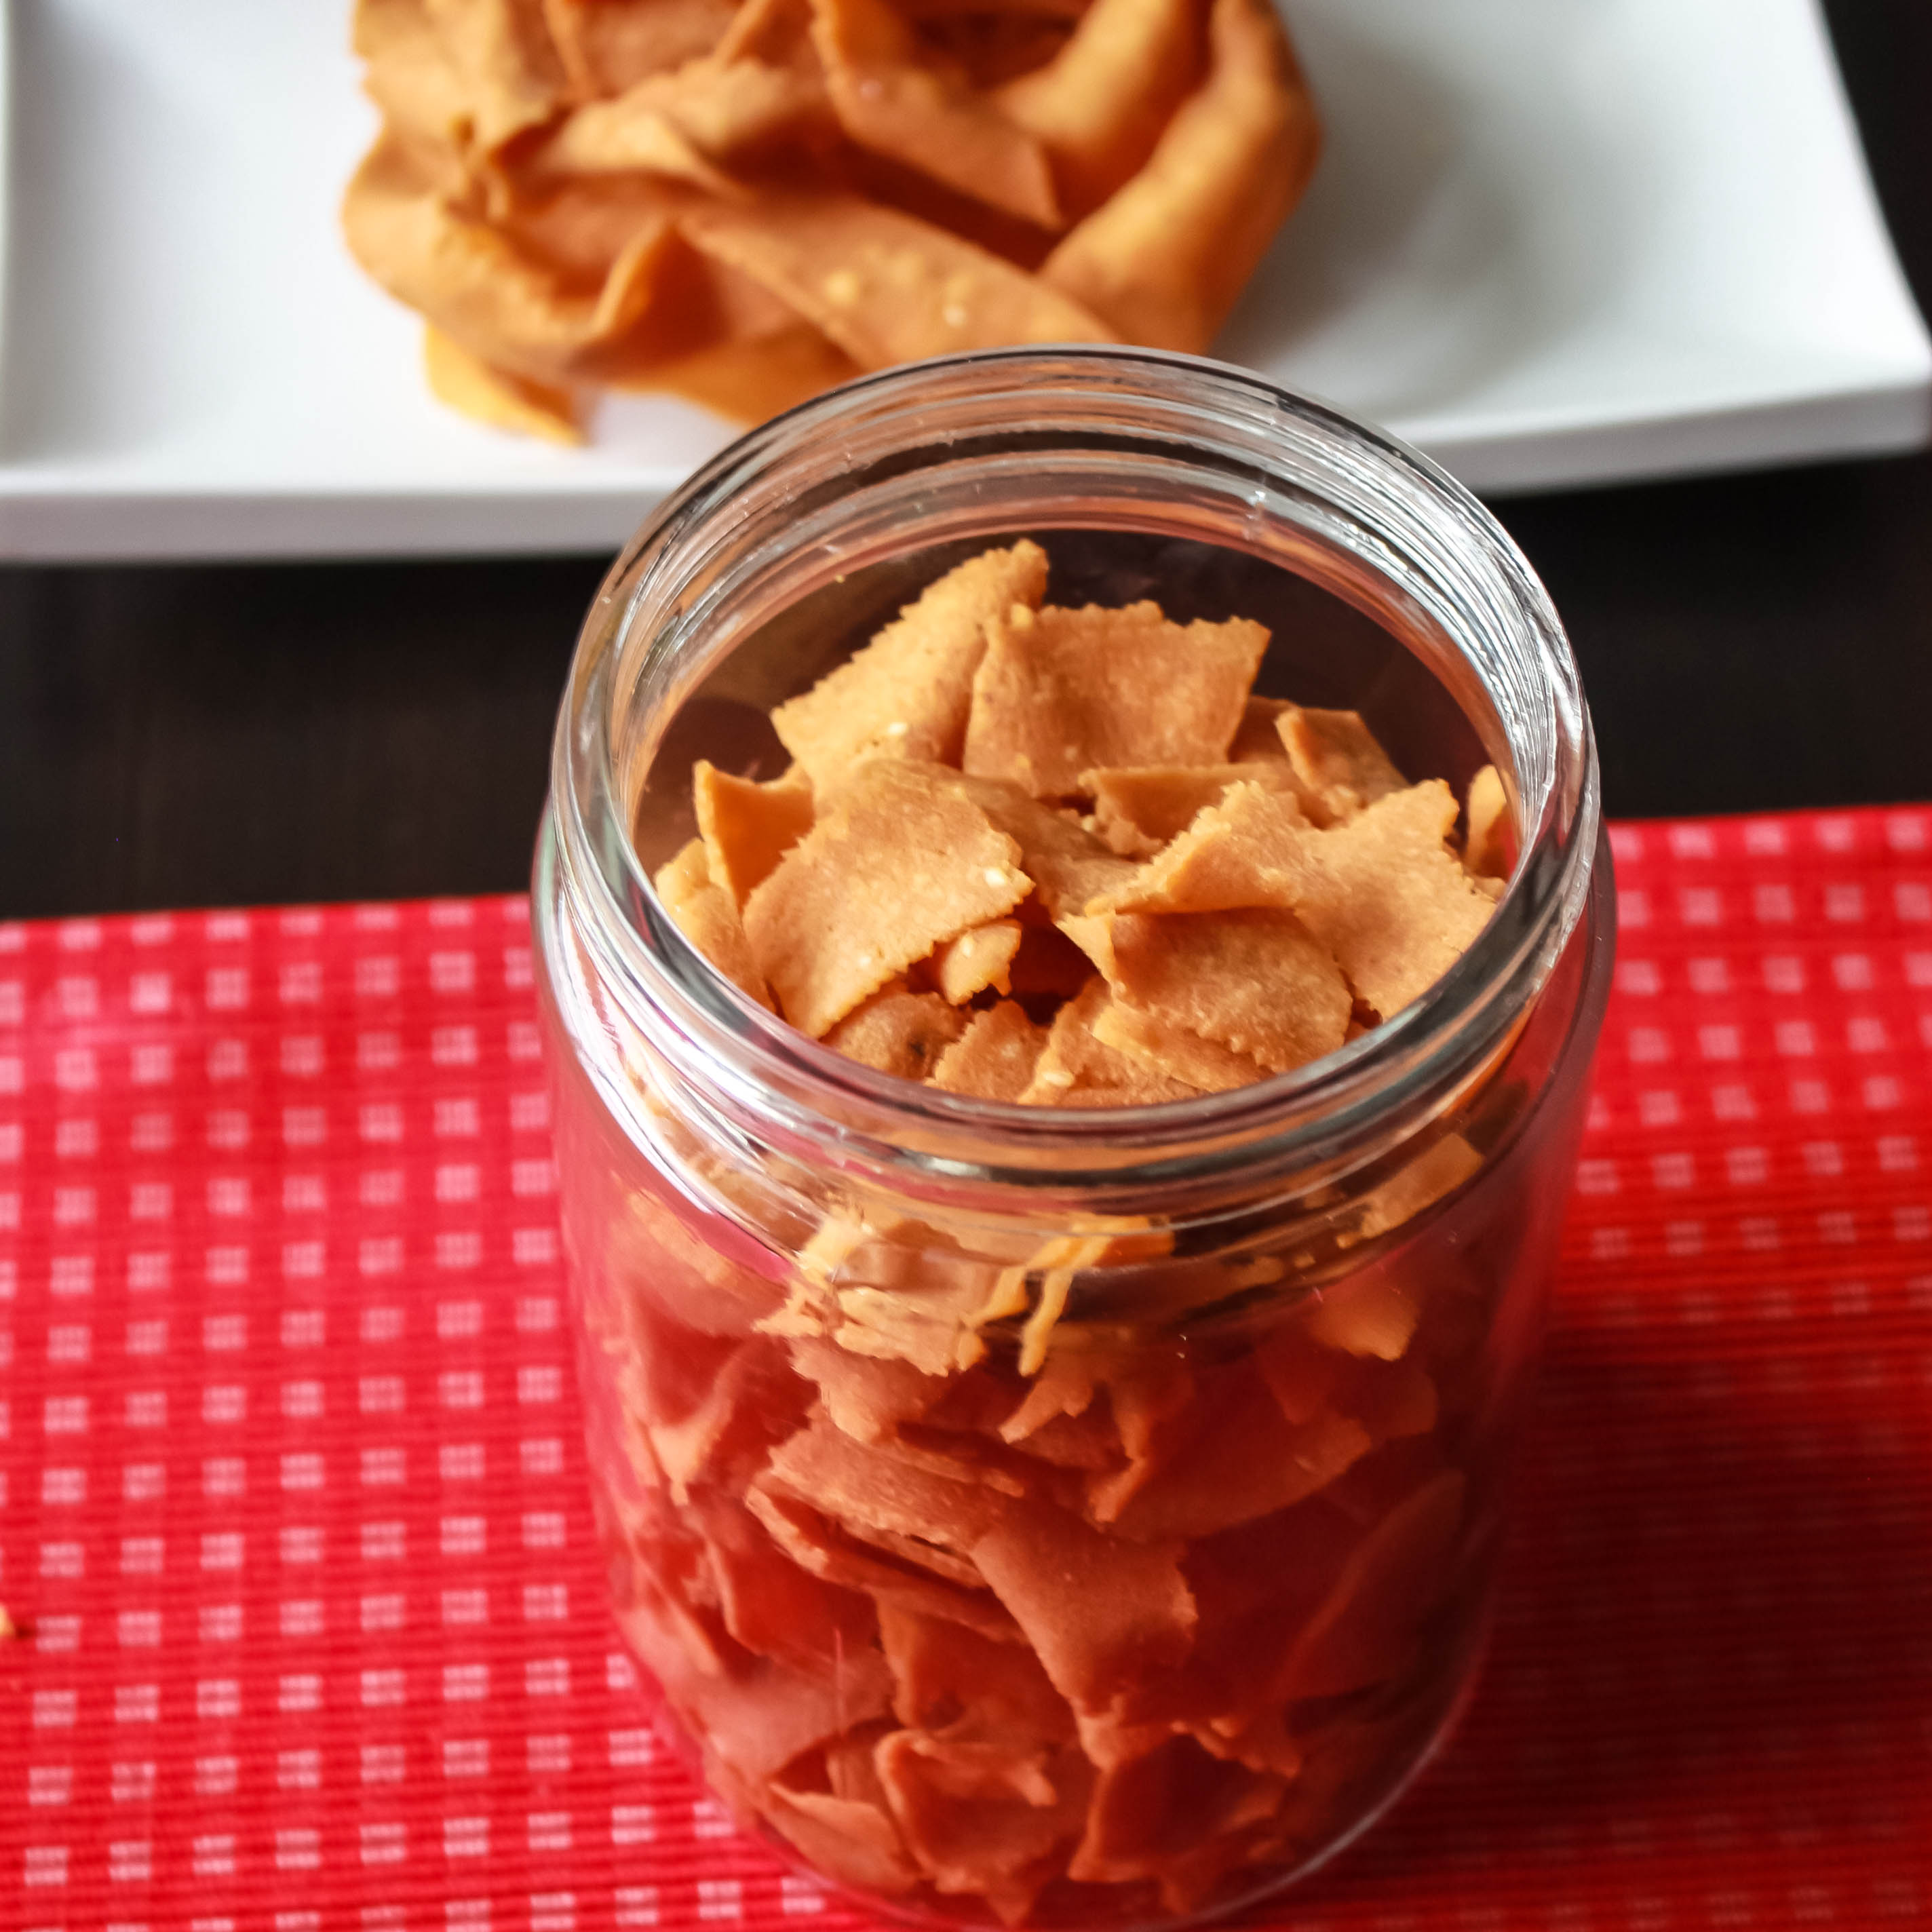
  5. When it turns into crispy golden brown color on one side and also when bubbles ceases, flip this carefully using the ladle to other side and cook till the bubble ceases. Drain it in tissue paper, cool down completely and store in airtight container.
Notes
Make sure you fry them in hot oil. If you make it in low flame, the pakodas will drink up lot of oil.
Wordpress Recipe Plugin by EasyRecipe
3.2.1311

Store in an airtight container and use for two weeks. 

Ribbonpakoda-9

Filed Under: SNACKS & APPETIZERS, SNACKS & APPETIZERS FESTIVAL Tagged With: Diwali snacks, diwali snacks recipes, festival snacks, nada thenkuzhal recipe, ribbpn pakoda recipe

Malai Pepper Mushroom

October 15, 2014 by Suki 5 Comments

Malai Capsicum Mushroom-14

Malai Capsicum Mushroom-name


Roasted peppers and mushroom pieces simmered in rich and creamy gravy, with a subdued amount of spice.

I have never had a glimpse of this recipe nor tasted it anywhere. I just made this yesterday in my kitchen with whatever I had but it came out so well that I wanted to share it with you right away. I made this with simple rotis for dinner and I am sure it tastes great with even rice. I always like to experiment with gravies when I am having it with rotis, because I know that I can have anything with rotis 😉 mostly. But rice.. Na na na..NO. Everything does not taste the best with rice. I will have it if I have no choice. Food is always FOOD. I am learning and making sure I don’t waste food. I guess I am growing..Getting my sense.. 😀 Getting matured! 😀 Ok don’t imagine me to be too bad, I don’t havoc loads of food before but once in a while, I get up from the table without finishing the plate. Now NO 🙂 isn’t that a good habit? 😉

Replace the butter with oil

& replace cream& milk with coconut milk to make the recipe vegan!

Malai Capsicum Mushroom-15

 We had a really nice weather yesterday. In October around 29°C in Montreal is just rare, luckily we got one, it’s usually cold around this time. So came from work, I made this 40 minutes. It was quick and easy to make, clicked pictures and went for walk to the beautiful Mount Royal and relaxed myself. And when I entered back home, the whole house had this beautiful aroma from capsicum and I loved it.

Malai Capsicum Mushroom

I usually have a soft spot for spicy foods, actually it’s hard for me to devour if the food is even little bland. But this one is not spicy at all and also tasty. Due to the presence of cream, onions and cashews, it is not spicy. You could see a tint of brown shade because of the onion I used. You can use yellow onion if you have one and also I need to say the different color peppers made the gravy even more appetizing.

Print
Malai Pepper Mushroom
Author: Suganya Hariharan
Recipe type: Side dish
Cuisine: Indian
Prep time:  5 mins
Cook time:  35 mins
Total time:  40 mins
Serves: 4
 
Ingredients
  • Bell Pepper – 5 small , 2 cups, diced
  • Mushroom – ½ cup, chopped
  • Cream – ¼ cup
  • Milk – ½ cup
  • Garam Masala – ½ tsp
  • Butter – 1 tbsp
  • Kasoori methi (dry methi leaves) – 2 pinches
  • Sugar – 1 tsp
  • Salt – 1tsp


    To sauté & grind:

  • Onion – 1
  • Cashews – 8
  • Green Chilli – 5
  • Ginger – 1 small piece
  • Cardamom – 1
  • Garlic – 4
  • Poppy seeds – 1tsp
Instructions
  1. Soak 1 tsp of poppy seeds in a tablespoon of water. Keep it aside.
  2. In a kadai, heat butter, add cardamom, onion, green chili, ginger and garlic, Fry until onions are transparent. Cool down and add cashews.

  3. Blend it with the soaked poppy seeds (with water) and make a smooth paste. Do not add more water.
    ["https://www.relishthebite.com/wp-content/uploads/2014/10/malaicapsicum2.jpg"]
  4. Heat butter in a pan or kadai. Add the diced capsicum, mushroom and dry methi leaves. Keep sautéing for two minutes, till it becomes little soft.
  5. Now add the blended paste to it. Keep frying the masalas for a minute or two till the raw smell goes off without changing color.
  6. Then add 1 cup of milk, salt needed and ½ cup of water. Simmer for 5 minutes till it gets thick.
  7. Add the cream and simmer for some more minutes.
  8. Add 1 tsp of sugar and simmer for a minute and switch off.
  9. Garnish with coriander leaves.
Notes
1. After adding cream or milk, never put the flame to high.
2. Do not skip the cashews, it’s a binding agent.
Wordpress Recipe Plugin by EasyRecipe
3.2.1311

Malai Capsicum Mushroom-14

Filed Under: NORTH INDIAN GRAVIES/DAL/CURRY Tagged With: colorful curry, colorful subzi, malai capsicum maslaa, malai capsicum mushroom curry, malai masala, malai recipe, rice and pulao, sidedish for totti

Carrot Stir Fry / Carrot Poriyal

October 14, 2014 by Suki 4 Comments

carrot poriyal-2-2Name

carrot poriyal-2-2NameSteamed carrots is seasoned with mustard seeds, urad dal and curry leaves and finally garnished with fresh coconut in this classic south Indian stir fry.

Today I wanted to post a comfort food from my home. You can make this in few minutes. This stir fry is healthy and goes well with plain rice or any gravy. I always prefer individual veggies stir fry than the combination of few veggies.  I love carrots and this stir-fry is my favorite, I even like to eat this with plain rice or sometimes add plain rice it and enjoy as carrot rice. You can very well combine with beans and make it as carrot beans stir fry. I do that when I have only few portions of each veggie in the refrigerator. I mix all the veggies like beans, carrot and peas and make a stir fry using everything.

I have been thinking of posting this recipe for a long time, then thought it’s too simple to post. But now I thought it can surely help beginners or bachelors. You can substitute this with any veggie you fancy and make this same stir-fry. You can even use frozen veggies, then you have to just 1 tbsp. of water, add the coconut and switch off. There is no need of boiling and the whole recipe just takes 5 minutes to do. It tastes best with rasam, dal or sambhar. You can also have this with roti or just with plain rice.

Print
Carrot Stir Fry / Carrot Poriyal
Author: Suganya Hariharan
Recipe type: Side dish
Cuisine: Indian
Prep time:  5 mins
Cook time:  15 mins
Total time:  20 mins
Serves: 4
 
Ingredients
  • Mustard seeds – ½ tsp.
  • Urad dal – 1 tsp
  • Asafetida – ¼ tsp
  • Onions – 1 small / ½ cup, chopped
  • Green chilli – 1, chopped
  • Curry leaves – 1 spring
  • Carrots – 2 cups, chopped
  • Turmeric powder – ¼ tsp
  • Sambhar powder – ½ tbsp
  • Salt – to taste
  • Fresh coconut – 1 tbsp
  • Coriander – 1tbsp, chopped
  • Oil - ½ tbsp
  • Coconut oil – 1 tsp
Instructions
  1. Heat oil in a pan, add mustard seeds, urad dal and let it splutter. Add curry leaves and fry for a min. Now add chopped onions and green chillies and salt and sauté well till onions gets slightly browned.
  2. Now add the chopped carrots, sauté for a minute. Add the turmeric powder and sambhar powder. Mix it well. Add water till it is almost covered. Close the lid and let it turn soft and raw smell leaves.
  3. Once all the water gets evaporated, add dry coconut and chopped coriander and give a quick stir fry. Finish off by adding 1 tsp of coconut oil and switch off.
Notes
1. You can mix few more veggies to the same recipe and use it.
2. You can substitute this with any veggie you fancy and make this same stir-fry.
3. You can use 1 tsp of coconut oil to garnish. It gives extra flavor.
4. You can use frozen veggies also, then you have to just 1 tbsp of water, add the coconut and switch off.
Wordpress Recipe Plugin by EasyRecipe
3.2.1311

Filed Under: DRY CURRY SIDE DISH/ STIR-FRY, VEGAN Tagged With: carrot coconut recipe, Carrot Poriyal, carrot recipes, carrot stir fry, healthy carrot recipe, vegetarian carrot stir fry recipe, vegetarian stor fry recipe

Herb & Garlic Oven Roasted Potatoes

October 12, 2014 by Suki 8 Comments

Oven-Roasted-Potatoes-name1

Oven-Roasted-Potatoes-name1Cheesy, Garlicky, crispy roasted potatoes hot from the oven – completes the perfect brunch!

A great roasted potato side dish made with herbs and garlic.  They are baked in a hot oven for 30 minutes or so until lightly browned, crisp on the outside and tender inside, almost like a potato chip, and I know how you all like potato chips 😀  The seasoning is simple too but works wonders. Do you know how to get them perfectly crisp, every time? 😉 ! Here it is!

I made this for my brunch today with chocolate hazelnut crepe and tea. These were my favorite part of the meal. I could seriously eat the entire batch. Actually when I came to Montreal before 6 years, I was not a brunch person at all.  But for the past one year, I am starting to love it.  The only problem is I have very less places to go for brunch 😉 because I am a vegetarian. Otherwise there are so many brunch places here and I always love going there somehow. The best parts I love in my brunch meal are the Potatoes and the milkshakes! 😀 Whenever I order some pancakes, crepes, waffle or anything sweet, I need my Potatoes as my side. I love to have potatoes in the morning. I am planning to make brunch menu ideas from now on. I realized that I have very less brunch ideas.

Potatoes! Baked potatoes, Mashed potatoes, potato casseroles, hash browns and so on! Seriously, I have not tried a potato recipe that I didn’t like. The least I like are the French fries. These yummy roasted finger-licking potatoes are crispy, spicy and healthy too. Over roasted potatoes are much healthier than French fries. There are lots of ways to make oven-roasted potatoes. This is my personal favourite. 🙂

Vegan Note: avoid parmesan cheese! 🙂

Print
Herb & Garlic Oven Roasted Potatoes
Author: Suganya Hariharan
Recipe type: Brunch
Cuisine: French
Prep time:  45 mins
Cook time:  45 mins
Total time:  1 hour 30 mins
Serves: 4
 
Ingredients
  • Potatoes – 5
  • Red Onion – ½
  • Sea salt – ¼ cup
  • Garlic powder – ¼ tsp
  • Dried basil – ¼ tsp
  • Paprika/Chilli powder – ¼ tsp
  • Black pepper – ¼ tsp
  • sugar – 1 tsp
  • Oil – 2 tbsp
  • Coriander – 2 tbsp, chopped
  • Parmesan Cheese – ¼ cup
Instructions
  1. Preheat oven to 450˚F
  2. Wash & cut potatoes into circles. And slice the onions.
  3. Place the potatoes in a bowl of water with two cups of cold water. Let them stand for 30 mins. Then pat dry with paper towels.
  4. In a bowl, mix the salt, garlic powder, chilli powder, pepper powder, sugar, dried basil and 1 tbsp of oil. Take a little and toss with onions. And toss the rest of the mixture with the dry potatoes in it.
  5. Take a baking sheet and place the tossed potatoes and onions separately. Bake at 450˚F.
  6. I removed the onions after 15 mins and the potatoes after 35 mins until the potatoes are cooked through, browned and crispy.
  7. Toss the potatoes and onions with the chopped coriander and grated Parmesan.
Notes
1. Onions cook faster, so remember to remove them in fifteen mins when they are crispy.
2. You can use the parchment paper to line in the baking sheet.
3. Parsley can be used instead of coriander to garnish
Wordpress Recipe Plugin by EasyRecipe
3.2.1311

Oven-Roasted-Potatoes-2-3

Filed Under: BAKED RECIPES, BREAKFAST, VEGAN Tagged With: baked potatoes recipes, brekfast potatoes, Brunch ideas, Brunch recipes, brunch sides recipes, brunch vegetarian recipe, herb and garlic oven roasted potatoes

Baby Corn Makhani

October 10, 2014 by Suki 5 Comments

BabycornMakhani-name

BabycornMakhani-nameCrunchy baby corn in creamy makhani gravy.

Baby Corn Makhani is a great side dish for rotis and mild pulao or jeera rice. Baby corn is a wonderful crunchy vegetable and easily gets blended with any masala. I usually make baby corn Manchurian or baby corn fry. But this time I wanted to make baby corn gravy with no frying.  Makhani gravy is usally made up of pureed tomatoes, ginger, garlic, red chilli powder and cream.

I made this with a simple roti, jeera rice and cucumber raita. Generally, baby corn is cooked or par boiled before using in any dish. But I used a can one, eve n otherwise I just wash and cook it without boiling. That crunchy texture gives great taste to the dish. If you prefer your baby corn more cooked and softer, I’d recommend cooking it in a pot of boiling water until soft before adding to the gravy.

I usually love baby corn in my pizza. And baby corn is a good source of folate or folic acid. It is rich in proteins, vitamins and iron. I used to make baby corn capsicum masala or baby corn peas masala. But after doing my paneer makhanwala, I got inspired and did this recipe.

You can always taste the ingredients a bit if you don’t have that specific ingredient at home. You can do this recipe with tofu,chicken,potato instead of baby corn. Never be afraid to try new flavors in your cooking. I always believe in that.

Vegan Note: Avoid cream and butter. 🙂 we have cashew paste inside already.

Print
Baby Corn Makhani
Author: Suganya Hariharan
Recipe type: Side Dish
Cuisine: Indian
Prep time:  5 mins
Cook time:  25 mins
Total time:  30 mins
Serves: 4
 
Ingredients
  • For the gravy:
  • Onion - 1 Chopped
  • Tomato - 2 Chopped
  • Garlic - 5 Chopped
  • Ginger - ½ inch Chopped
  • Cinnamon - 1
  • Cardomon - 2 whole
  • Cashews - 7 whole
  • Almond - 7 whole
  • Jeera - 1 Tbsp
  • Salt - As needed
  • Water - 2 cups

    [other]
  • Unsalted Butter - 2 Tbsp
  • Baby corn – 10 , slit.
  • Chilli Powder - 1 Tbsp
  • Green Chilli - 1 Slit
  • Kasturi Methi - 1 tbsp
  • Garam Masala Powder - 1 tsp
  • Sugar - ½ tsp
  • Water - 1½ cups
  • Cream - 1 tbsp

    [Garnish]
  • Coriander - 1 tbsp, chopped finely
  • Cream - 1 Tbsp
  • Salt - As needed
Instructions
  1. Mix the chopped onions, tomatoes, cashews, almonds, garlic, ginger, cinnamon, cardomon, jeera, salt and water in a pan.
  2. Cook for about 15- 20 minutes on a medium flame till everything gets cooked. Allow this to cool.
  3. Then add everything in a blender. Blend them into a smooth paste with not even small pieces of cashews on it.
  4. Heat butter in the same pan.
  5. Add the jeera, blended makhani paste and stir well.
  6. Add chilli powder. (If you want rich color, you can add kashmiri chilli powder. I used normal one)
  7. Stir well &sauté the masala on a medium flame till the butter ooze out. It has to be sautéed really well till butter ooze out.
  8. Add washed baby corn, methi leaves, chilli powder,cream,water and boil for ten minutes.
  9. Switch off the flame. Garnish with coriander, ginger and cream.
Notes
1. You can use julienne ginger to garnish as well.
2. Close the lid when you add baby corn and water at the end as it will splash out some gravy outside as it boils.
3. You can also fry baby corn in butter/oil before you add them.
Wordpress Recipe Plugin by EasyRecipe
3.2.1311


 BabycornMakhani-name2

Filed Under: NORTH INDIAN GRAVIES/DAL/CURRY, VEGAN Tagged With: baby corn best recipes, Baby corn curry, baby corn makhani, Baby corn makhani restaurant style, baby corn masala, baby corn recipe indian, Corn recipes, Indian side dish fro roti, Makhani recipe, side dish for roti and rice, Vegan recipes, vegetarian curry

Kid’s Lunch Box recipes – Indus Ladies E-Book

October 10, 2014 by Suki 1 Comment

IL-100KidsLunchboxRecipes-Banner

Looking for Kid’s Lunch Box recipes?

“Indus Ladies” has released 100 Kid’s Lunch Box recipes.

” Indusladies.com is the largest online community for Indian women in the world. It is a safe, friendly and helpful place for you to explore, share and belong. You can have a conversation, find answers, get advice, showcase your talent, learn new things, have fun and make friends there!”

I am feeling very proud and happy about my recipe “Mushroom Pepper Mini Quesadilla” being one of those 100 unique, simple and easy recipes in the book. I saw a lot of fun recipes there.

Recipe Book – http://www.indusladies.com/food/kids-lunch-box-recipes/

It’s free to download. 🙂 


IL-100KidsLunchboxRecipes-Banner

Filed Under: Uncategorized Tagged With: free recipe book download, freebies, indusladies kids lunch box dieas, recipe book

Pavakkai Fry/ Bitter Gourd Stir Fry

October 8, 2014 by Suki 7 Comments

Pavakkai-name1

Pavakkai-name1Healthy & Tasty Bitter Gourd stir fry made with few ingredients.

Bitter gourd is one of the healthy veggie that most kids fend off because of it bitterness. But by the method I prepare, you will not taste the bitterness at all. Even I started to have this veggie after going to college. But now this is one of favorite vegetable. It is really good for health and has natural power to kill worms and germs present in the stomach and intestine. It is very good for diabetic patient’s .People having a low sugar level should try to avoid this veggie.

We can also make stuffed bitter gourd. To be frank, somehow I did not like that much. We can make deep fry this veggie which is really tasty too, but I wanted to use lesser oil and stir fry so it’s healthier and also saves time. It goes well with any rice.

4.0 from 1 reviews
Print
Pavakkai Fry/ Bitter Gourd Stir Fry
Author: Suganya Hariharan
Recipe type: Side dish
Cuisine: Indian
Prep time:  20 mins
Cook time:  20 mins
Total time:  40 mins
Serves: 4
 
Ingredients
  • Bitter gourd - 2 cups, thinly sliced into circles
  • Salt - 1 tbsp for marination
  • Curd - ½ cup
  • Turmeric powder - 2 tsp
  • Onion - ½ cup, thinly sliced
  • Sambhar powder - 1 tbsp
  • Chilli Powder - 1 tbsp
  • Oil - 2 tbsp
  • Mustard seeds - ¾ tbsp
  • Cumin seeds (Jeera) - 1 tsp
  • Urad dal - 2 tsp
  • Curry leaves - 5
  • Sugar - 1 tsp
Instructions
  1. Wash bitter gourd and thinly slice them into circles. Discard any seeds. Soak the bitter gourd in curd, turmeric and 1 tbsp of salt for 20 minutes.
  2. Heat 1 tbsp of oil in a pan, add mustard, after it crackles, add urad dal and jeera. Add sliced onion and fry till golden brown, make sure not to burn the onion.
  3. Take the bitter gourd squeezed out from curd mixture.
  4. Add the bitter gourd to the pan which has the onion frying. Add sambhar powder, chilli powder, and little more salt, mix well and keep the flame in medium. Sprinkle 1 tbsp of water and cook for 5 minutes.
  5. Add 1 tbsp of oil and 1 tsp of sugar and keep frying until the bitter gourd turns into nice deep brown in color. Switch off the flame.
Notes
1. Adding sugar makes it caramelize and turns it crispy.
2. Sour curd and turmeric takes out the bitterness.
Wordpress Recipe Plugin by EasyRecipe
3.2.1311

Serve with rice and rasam or dal fry.


Pavakkai-name2

Filed Under: DRY CURRY SIDE DISH/ STIR-FRY, VEGAN Tagged With: bitter gourd recipe, healthy bitter gourd recipe, healthy pavakkai recipe, indian side dish recipes, Pavakkai Fry, Pavakkai stir fry, Pavakkai varuvala, quick and easy pavakkai recipe

Honey Garlic Eggplant

October 4, 2014 by Suki 6 Comments

HoneyGarlicEggplant-name

HoneyGarlicEggplant-nameFried Chinese eggplant coated in honey garlic sauce, topped with sesame seeds and served with rice. Fragrant and delicious!

When I went to market this week, I saw this Chinese eggplant, which was staring at me and asking me to take it home. I am truly an eggplant lover and I found these delicious. So, when I reached home I wanted to do something quick and easy from it.

I decided to slice the eggplant into sticks and shallow fry. The benefits of shallow fry:

1. Easy to make.

2. Ensures that the eggplant doesn’t absorb too much oil.

3. Cooks it quickly

4. Crispy exterior

5. Creamy interior!

You can even grill eggplant but I find this beautifully browned when fried. When I tossed them in sauce and I eagerly took a first taste. It has sweet, spicy, garlicky and smoky flavor in the same bundle. It is not mushy at all! It is quick to make and tasty to eat.

Print
HONEY GARLIC EGGPLANT
Author: Suganya Hariharan
Recipe type: Main
Cuisine: Asian
Cook time:  20 mins
Total time:  20 mins
Serves: 4
 
Ingredients
  • Japanese Eggplant – 2
  • Capsicum/Bell pepper - 2 tbsp, chopped
  • Oil – to fry
  • Garlic – 5 cloves, minced
  • Ginger – ½ inch, minced
  • Red chili – 3
  • Sesame oil – 1 tsp
  • Honey – 2 tbsp
  • Soy sauce – 2 tbsp
  • Ground pepper – 1 tsp
  • Sesame seeds – for garnish
  • Green onions/coriander - garnish
  • Fluffy white rice – to serve
Instructions
  1. Cut the eggplant into ¾ inch sticks.
  2. Heat oil in a deep-sided skillet to 360F. Fry the eggplant in small batches. Flip it if needed. Fry it for about two minutes until lightly golden brown. Don’t soak it in oil for long time. Remove from oil and drain on a cooling rack, or a tissue.
  3. In a small cup, mix honey, ground pepper and soy sauce and keep it aside.
  4. In a pan, heat up 1 tsp of sesame oil and cook the garlic and chilli on medium heat until slightly golden, but make sure it is not browned. Add the honey soy sauce mixture.
  5. Turn the heat to medium high so that the mixture bubbles, thickens and turns into sticky texture.
  6. Toss the fried eggplant with the sauce and garnish with sesame seeds, scallions and coriander.
  7. Serve immediately with rice or grain of your choice.
Wordpress Recipe Plugin by EasyRecipe
3.3.3077

HoneyGarlicEggplant-8

Filed Under: CHINESE ASIAN INSPIRED, VEGAN Tagged With: asian recipe, chinese eggplant recipe, honey garlic eggplant with sesame seeds recipe, honey garlic recipe

Rasgulla

October 1, 2014 by Suki 2 Comments

Rasgullafinal-2name

Rasgullafinal-2nameOne of the most popular Indian sweet made of homemade cottage cheese. These cottage cheese dumplings are fluffy and spongy, soaked in sugar syrup. With every bite you would have the sugar syrup oozing into your mouth.

“Ras” means juice and “gulla” means “round” or “ball”, describing round cheese balls soaked in soft juicy sugar. If you are not sure what Rasgullas are, then let me tell you, they are Cheeseeeee 😀 balls. For others who knows what is rasgulla, do you need any more introduction ? 😉 I don’t think so. It is originated in Orissa and was introduced to Bengal by a sweet seller (that’s the story I heard and I believe it J). Rasgullas were sold in small clay pots to keep them cooler but they don’t do it anymore as we have refrigerators everywhere. But still if you go to smaller towns in India, you would see that. I don’t remember my mom making them at home so I always believed that it was a tedious process. But the list of sweets she used to make when I come from school each day.. Uhhh!! I can never make them so quick and nice! But after making these Rasgullas at home, I always prefer them doing at home now. You need very few ingredients to make Rasgulla, but it takes some time to make it. It’s more preparation time than cooking time.

Some get frustrated because their Rasgullas break. Don’t worry, do not make it big in size, it will make it hard and not spongy. This was my second time trying  Rasgullas, it did not let me down both times. So , you can also do it 😀 Confidence :D.I always make Rasmalai (another popular Indian dessert). That is my favorite. So I made Rasmalai, homemade paneer and Rasgullas on the same day as they all involve same process except the final steps.

Indians are known all over the world for their spicy food 😉 and sweets. And if you have visited India, you would be amazed to see the variety of sweets at a local sweet shop. You have so many sweets and snacks available all over the places. So, when I came here, I missed that snacks and sweets. Actually snacks more 😉 we have lots of desserts in Montreal 🙂 Montreal is known for their French cakes 😀 I should say!

Rasgullafinal-3

The secret to make spongy Rasgullas is in the kneading of the cheese. It has to be kneaded really well until it is smooth and has a slightly “oil” feel. Diwali is around the corner. And it is Navrathri season. You should make them even if it is a normal day 😉 It will make the day special! 😀

5.0 from 1 reviews
Print
RASGULLA
Author: Suganya Hariharan
Recipe type: Dessert
Cuisine: Indian
Prep time:  60 mins
Cook time:  25 mins
Total time:  1 hour 25 mins
Serves: 20
 
Ingredients
  • Ingredients:
  • For Paneer:
  • Milk – 6 cups
  • Lemon Juice – 1⁄4 cup
  • Sugar – 1 cup
  • Ice cubes – 6
  • For sugar syrup:
  • Sugar – 1 cup
  • Water – 6 cups
  • Cardomon - 2
Instructions
  1. For Paneer:
  2. Mix lemon juice in half a cup of warm water and keep aside.
  3. Add 5 cups milk to a large pan over medium high heat. Constantly stir the milk at regular intervals to make sure the milk does not stick to the bottom.
  4. When it is boiling nicely, add the lemon juice/water mixture to the boiling milk. The milk will curdle in about a minute and most of the milk protein coagulates into lumps leaving very thin, slight cloudy water behind. When the water is clear, stop curdling by adding ice.
  5. Drain out the liquid using a muslin cloth or any clean thin cloth. Guess what you have in the cloth? Its cottage cheese! Squeeze out the excess water and hang the cloth with paneer for about 30-40minutes.
  6. Now rub the cloth that contains the paneer with another cloth. This removes the remaining water and helps us form the dough. Now remove the paneer from the cloth, knead it and make smooth small balls. Press them to resemble a bulging nugget.

    For sugar Syrup:
  7. Boil 6 cups of water in a large bottom pot and add one cup of sugar to it. Once the sugar dissolves, take one cup from it in a separate vessel and keep it aside.
  8. Now add the paneer balls in the boiling water. Cover and cook for about 7 minutes.
  9. Take the paneer balls and add to the sugar syrup that you kept aside before.
  10. Let the water boil and reach a one thread consistency, or little thicker consitency. Thats the syrup!
  11. After ten minutes, squeeze it lightly, remove the water and add them to the syrup.
  12. Garnish with sliced almonds/pistachios.
Wordpress Recipe Plugin by EasyRecipe
3.2.1311

 Rasgullafinal

Filed Under: DESSERTS, SWEETS/DESSERTS Tagged With: diwali recipe, indian sweet recipe, milk paneer cheese sweet recipe, paneer recipe, popular indan sweet, rasgulla home made recipe, rasgulla recipe, sugar syrup recipe

Roasted Eggplant Mozzarella Pasta

September 30, 2014 by Suki 8 Comments

RoastedEggplantMozarella

RoastedEggplantMozarella

A combination of flavorful homemade tomato sauce, roasted eggplant and fresh mozzarella makes this pasta scrumptious.  Eggplants or aubergines, whether fried, baked sautéed or grilled – each cooking method brings out a different quality of the veggie. Eggplants are the star of this simple dish. The final and most essential touch to this dish is cubed mozzarella.

I tried an eggplant pasta dish in a restaurant few months back. After experiencing the eggplant in pasta, I always go with this combo with no fear when I go out or when I cook at home. I knew that it was a simple dish that could be re-created at home, if done correctly. Eggplants when cooked give a wonderful texture. But, because they are spongy, they can soak up too much moisture or oil and become soggy if not cooked properly. Baking this eggplant requires a lot less oil and is much easier than frying in a pan. It is certainly a simple dish, but it’s very satisfying.

The way to season everything perfect is by seasoning everything along the way. Season your eggplant with salt and pepper before baking it, season your tomato sauce with salt and pepper, and also your pasta water with salt. Be careful not to season them more as we are adding cheese at the end which will give some additional salt. So, when we bake them with salt, it removes some of the moisture in the dish. This method helps to retain the texture of the eggplant.

I cut the eggplants pretty big because if you cut them too small, they won’t hold the shape when you roast them. I am placing them in a aluminum foil when baking because it’s easy to clean up 😉  no other reason! When it gets roasted, it gets caramelized at the edges and that gives great flavor.

You can refer on how to boil pasta perfectly page for a perfect pasta.

Print
ROASTED EGGPLANT MOZZARELLA ZITI PASTA
Author: Suganya Hariharan
Recipe type: Main
Cuisine: Italian
Prep time:  10 mins
Cook time:  40 mins
Total time:  50 mins
Serves: 5
 
Ingredients
  • Pasta: ½ lb (Ziti)
  • Eggplant –1 large, Skin peeled and cut into large cubes.
  • Olive oil – 2 tbsp.
  • Red Chilli flakes – 1 tsp.
  • Onion – 1 cup, chopped
  • Garlic – 2 cloves, minced
  • Italian Peeled crushed tomatoes – 1 can – 28oz
  • Parmiggiano Reggiano – ¼ cup
  • Fresh Basil – Chopped
  • Mozzarella – 1 cup, cubed
  • Salt and pepper – as needed
Instructions
  1. Preheat your oven to 350 degrees, line a baking sheet with aluminum foil and set aside.
  2. Fill a large pot of water, sprinkle some salt and bring to a boil.
  3. Add the cubed eggplant to a baking sheet and drizzle some olive oil, season with salt and pepper. Toss them well. Bake for 30 minutes.
  4. Heat the oil in a large frying pan. Add the chilli flakes, onion, garlic and cook over medium heat for 5 minutes till the onions have turned golden brown.
  5. Add the tomatoes and season with salt and pepper. Simmer for 20 minutes until the sauce thickens.
  6. Now add the eggplant and simmer for ten minutes.
  7. This is the right point where you add the pasta to the boiling salted water and cook according to the packet instructions. I cooked for 8 minutes. Drain well.
  8. Add the pasta to the sauce and garnish with parmiggiano and basil. Toss them all together nicely.
  9. Now add the cubed mozzarella when it is hot (important!), toss it well, this will melt the cheese from the heat of pasta.
  10. Serve right away or reheat and serve to feel the mozzarella melting in mouth.
Notes
1. you can use fresh tomatoes too instead of canned tomato.
2. I used ziti, you can use any like penne, rigatoni.
Wordpress Recipe Plugin by EasyRecipe
3.2.1311

RoastedEggplantMozarella1

Filed Under: BAKED RECIPES, PASTA PIZZA & TACOS Tagged With: eggplant recipe, mozarella pasta, pasta eggplant tomato suace, pasta recipe, pasta siciliana, quickandeasy pasta, roasted eggplant recipe, tomato sauce pasta

Ginger Rice

September 28, 2014 by Suki 5 Comments

gingerricename

gingerricenameGinger rice is quick and aromatic, cooked with ginger, cumin and onion.

This recipe is very simple & humble. It goes well with any north Indian curries or gongara curry. Even it taste great with asian gravies. Ginger rice is a relatively easy dish to prepare. I have cooked the rice in a kadai/pan, but you can also cook in pressure cooker. Ginger has lot of healthy benefits so its good to have ginger rice once in while! Trust me, it does not give a strong ginger flavor. It gives the right taste.

5.0 from 1 reviews
Print
GINGER RICE
Author: Suganya Hariharan
Recipe type: Main
Cuisine: Indian
Prep time:  5 mins
Cook time:  30 mins
Total time:  35 mins
Serves: 5
 
Ingredients
  • Basmati rice – 2 cups
  • Ginger – 2 inch
  • Garlic – 2, whole
  • Ghee – 2 tbsp
  • Cumin.jeera – 2 tsp
  • Cardomom – 2
  • Bay leaf – 1
  • Onion – 1, sliced
  • Cashews – 3, chopped - garnish
  • Green chillies – 2, slit
  • Mint – ¼ cup chopped car
  • Water – 4 cups
  • Coriander leaves – Garnish
  • Salt – as required
Instructions
  1. Soak the basmati rice in water for 20 minutes. Drain the rice and keep aside.
  2. Grind the ginger and garlic together, add one cup of water and blend again. Drain the ginger and save the juice. Keep it aside.
  3. Heat a pan, and add oil or ghee.
    ]
  4. On a low or medium flame when the oil becomes hot, add the cumin, bay leaf and cardamom.
  5. Let the cumin get browned, now add the onions and fry till they are golden brown.
  6. Add the mint, cashews, salt and green chillies. Sauté for a minute.
  7. Add the ginger juice, boil for a minute. Now add the rice and stir well. Taste the water for salt. And add salt if needed now.
  8. Close the lid and cook the rice. The way I cook the rice is I cook the rice in medium flame for ten minutes, and low flame for ten minutes, and switch off.
  9. Garnish with coriander leaves.
Notes
You can use cinnamon, cloves or mace/javitri when you add cardomom.
The rice or water gets the nice light brown color because of the caramelized onions.
Adjust the water quantity according to the quality of your rice.
Wordpress Recipe Plugin by EasyRecipe
3.2.1311

Taste great with any gravies. (paneer makhanwala, malai methi paneer)

gingerrice-3

Filed Under: RICE/BIRYANI VARIETIES, VEGAN Tagged With: basmathi rice, garlic rice, ginger juice, Ginger rice, healthy rice, onion rice, quick and easy rice, quick rice, rice flavoured ginger

Coconut Barfi/Coconut Fudge

September 28, 2014 by Suki 8 Comments

Coconutbarfiname

CoconutbarfinameYou will love this dish if you love coconut. It’s made with just coconut and sweetened condensed milk. Isn’t that simple ;). It is usually made during diwali time.  Or you can make it for any festival. You can make them even if there is no festival, no harm :). Kids love coconut a lot. 

Coconutbarfifinal-2

I made them with desiccated coconut. Generally freshly grated coconut makes better barfi. But I used desiccated coconut and found this simple and delicious. There are different ways to make this. But this is my personal way to do a quick coconut barfi. I just wanted to add color to it and try, so added saffron. You can even color powder, but I would say NO. Adding color is not good for health. So I would always prefer saffron.

For cardamon powder, I always grind cardamon and sugar together.

Now the recipe:

5.0 from 1 reviews
Print
COCONUT BARFI/COCONUT SAFFRON SWEET
Author: Suganya Hariharan
Recipe type: Dessert
Cuisine: Indian
Prep time:  60 mins
Cook time:  15 mins
Total time:  1 hour 15 mins
Serves: 6
 
Ingredients
  • Sweetened Condensed milk – 1 cup
  • Desiccated coconut – 1½ cup
  • Ghee/Butter – 1 tsp
  • Milk – 2 tbsp
  • Cardamon – 2, crushed
  • Sugar – 1 tsp
  • Almonds/pistachios – 5, chopped
  • Desiccated coconut – ¼ cup for rolling
Instructions
  1. Dissolve saffron powder in hot water and set aside.
  2. Heat the ghee and toast the almonds/pistachios till it turns golden. Drain and keep it aside.
  3. To the same pan, add the 1-cup of desiccated coconut. Toast for a minute.
  4. To the same pan, pour the condensed milk on it. Mix well and cook on low flame.
  5. Crush the cardomon and sugar. Add it to the pan and add the two tbsp of milk.
  6. Cook it until the mixture gets quite thick. It will take around 6 mins. If you have doubt to when you can switch off the heat, it is when the spatula will refuse to get stir any more and mixture will almost stick to your spatula.br]
  7. Divide the mixture into two equal parts, and keep one part aside. And add saffron water to the other and stir it till the water gets evaporated. Switch off the mixture when it is in right consistency.
  8. On a butter-greased plate, add the saffron mixture, tap it with a ghee-coated spatula to flatten it. Top with the plan coconut mixture and flatten top.
  9. Place it in fridge to cool for an hour. Then cut the mixture into square shaped or desire shape.
  10. Season with some desiccated coconut and toasted almonds/pistachios.
  11. You can store them in airtight container up to four days. I refrigerate them as it is coconut based dish.
Notes
1. If you have doubt to when you can switch off the heat, it is when the spatula will refuse to get stir any more and mixture will almost stick to your spatula.
2. You can also use fresh coconut but you can’t store it for long time. So I prefer to use desiccated coconut. And also you have to cook the fresh coconut for a longer time since fresh coconut can be moister.
3. Use ghee/ butter greased spatula to flatten it. Even use a ghee coated knife to cut it easily.
Wordpress Recipe Plugin by EasyRecipe
3.2.1311

Coconutbarfifinal-3

Filed Under: DESSERTS, SWEETS/DESSERTS Tagged With: barfi sweet, coconut sweet, dessert recipes, indian dessert recipes, indian diwali sweets, indian sweet, navrathri recipe

Page 4 of 7
« Previous 1 2 3 4 5 6 7 Next »
  1. Pages:
  2. «
  3. 1
  4. 2
  5. 3
  6. 4
  7. 5
  8. 6
  9. 7
  10. »
  • « Previous Page
  • 1
  • 2
  • 3
  • 4
  • 5
  • 6
  • 7
  • Next Page »
  • Facebook
  • Google+
  • Instagram
  • Pinterest
  • Twitter

LOOKING FOR SOMETHING?

logo
Food Advertisements by
logo
Food Advertisements by

Categories

STAY CONNECTED

  • Facebook
  • Google+
  • Instagram
  • Pinterest
  • Twitter

SUBSCRIBE BY EMAIL

SEARCH RELISH THE BITE

logo
Food Advertisements by

Copyright © 2025 · Lifestyle Pro Theme on Genesis Framework · WordPress · Log in