• Home
  • Page Layouts
  • Page Templates
  • Theme Colors
    • Lifestyle Pro Blue
    • Lifestyle Pro Green
    • Lifestyle Pro Mustard
    • Lifestyle Pro Purple
    • Lifestyle Pro Red
    • Lifestyle Pro Teal

Relish The Bite

Taste of happiness

  • HOME
  • ABOUT
  • RECIPE INDEX
    • SNACKS & APPETIZERS
    • BREAKFAST
    • BAKED RECIPES
    • LUNCH & DINNER
      • RICE/BIRYANI VARIETIES
      • SIDES
        • DRY CURRY/STIR-FRY
        • SOUTH INDIAN CURRY/KUZHAMBU
        • NORTH INDIAN CURRY/DAL
        • RAITA/DIPS/CHUTNEY
        • Soups/Salads
      • PASTA PIZZA & TACOS
      • BREAD
      • CHINESE ASIAN INSPIRED
    • NON-VEG RECIPES
    • DESSERTS
    • BEVERAGES
  • SNACKS
  • BREAKFAST
  • NON-VEG RECIPES
  • RICE/BIRYANI VARIETIES
  • LAMB
  • SOUTH INDIAN CURRY/KUZHAMBU
  • VEGAN
  • NORTH INDIAN CURRY/DAL
  • DRY CURRY/STIR-FRY
  • PASTA & TACOS
  • CHINESE ASIAN INSPIRED
  • BAKED RECIPES
  • COLLECTIONS
  • BREAD
  • BEVERAGES
  • DESSERTS
  • FESTIVAL RECIPES
    • SNACKS & APPETIZERS
    • SWEETS/DESSERTS
  • RESOURCES
    • HOW TO START A BLOG
    • TITBITS
    • PRESS
  • CONTACT
You are here: Home / Archives for 2015

Archives for 2015

Healthy Mexican Corn quinoa Casserole + Corning Ware Giveaway

October 9, 2015 by Suki 48 Comments

Casserole-9-2

Casserole-9-2It has all of the flavors you love in traditional Mexican food, but is much healthier! And I have a giveaway this time for you :)!

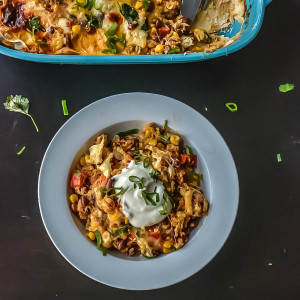
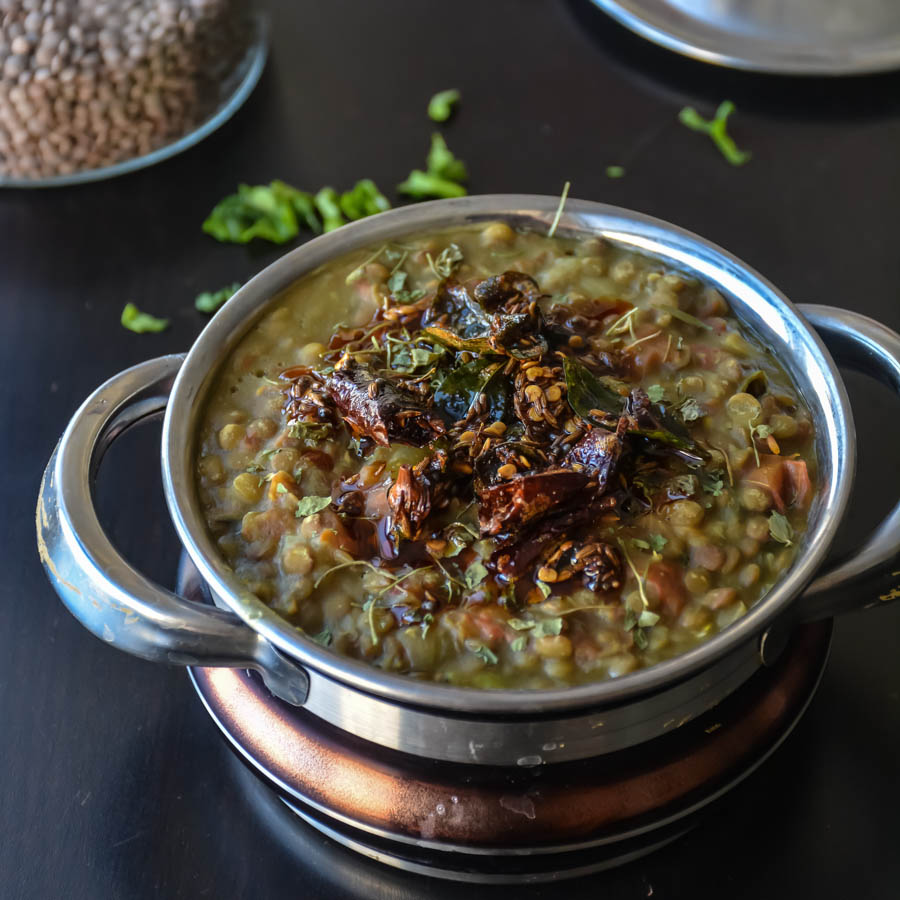
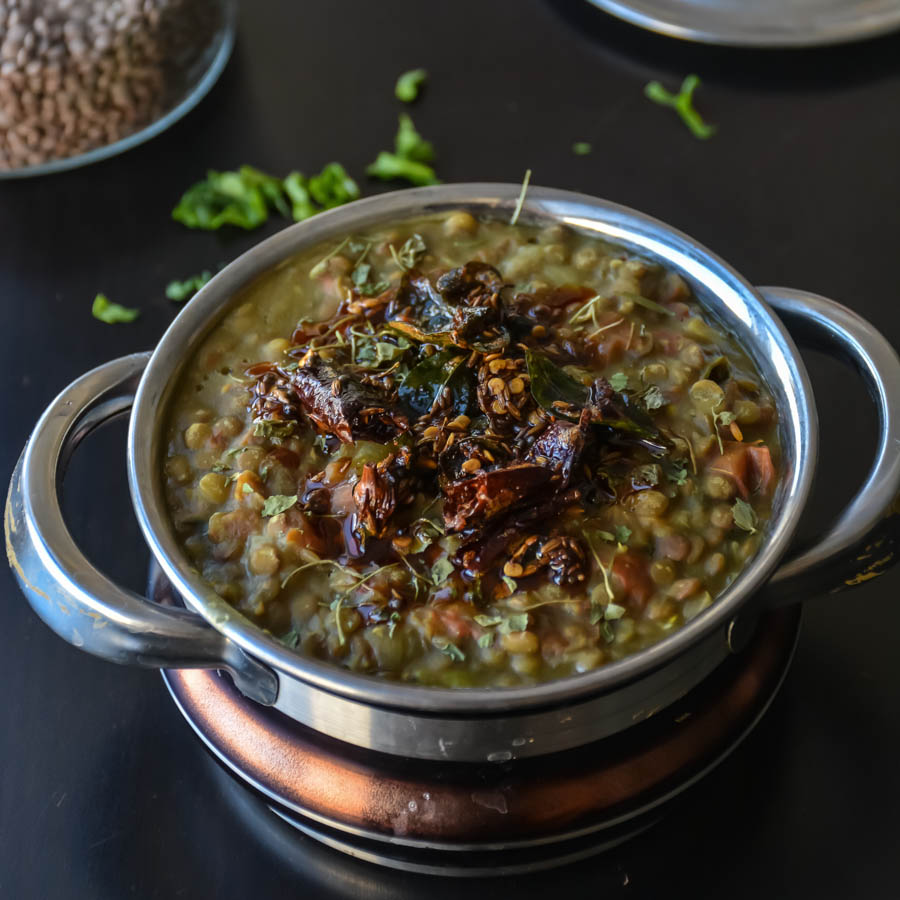
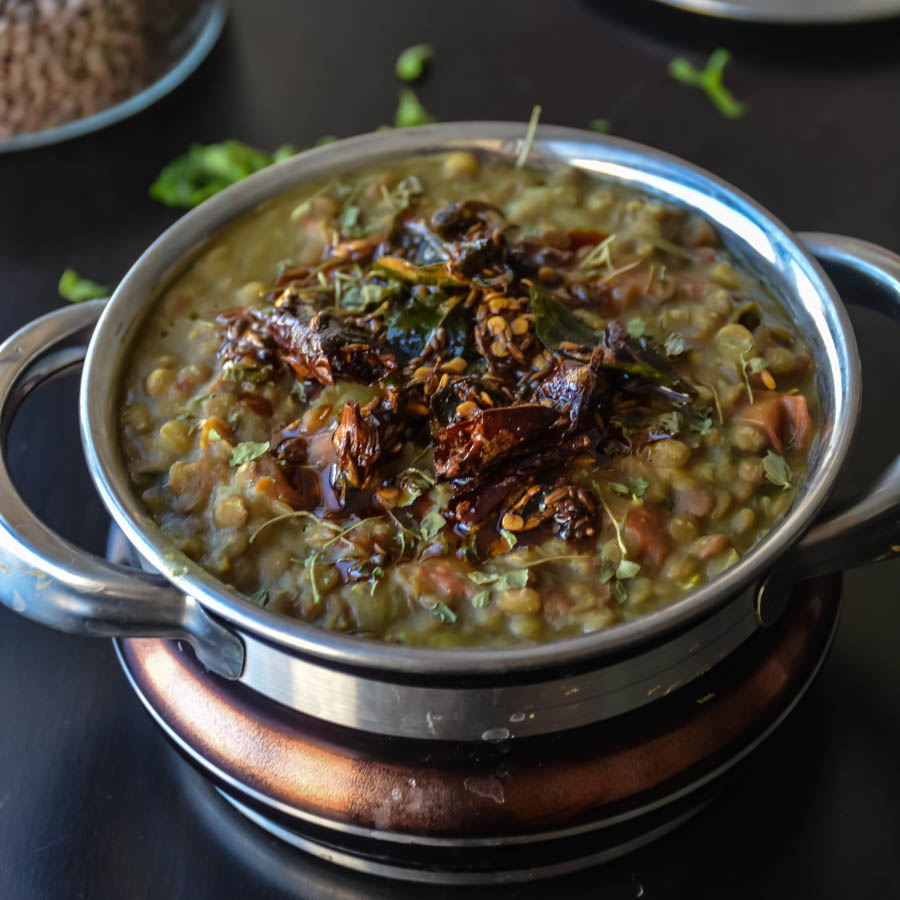
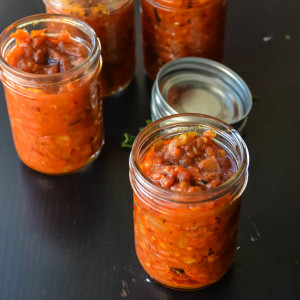
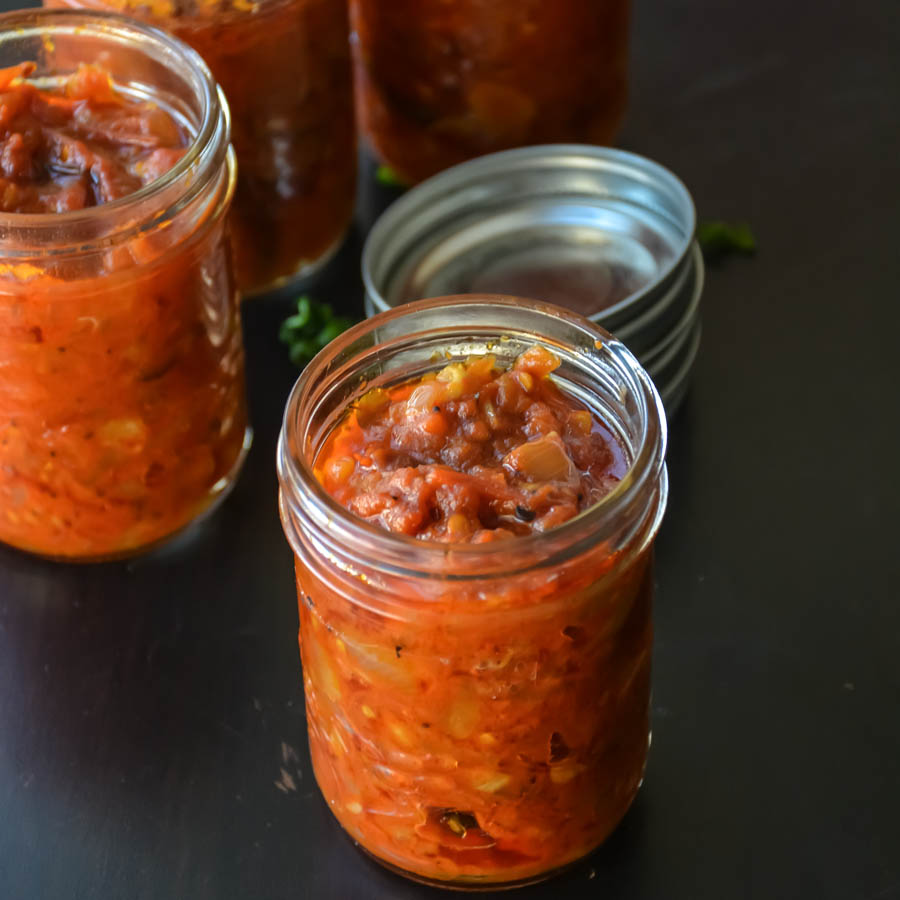
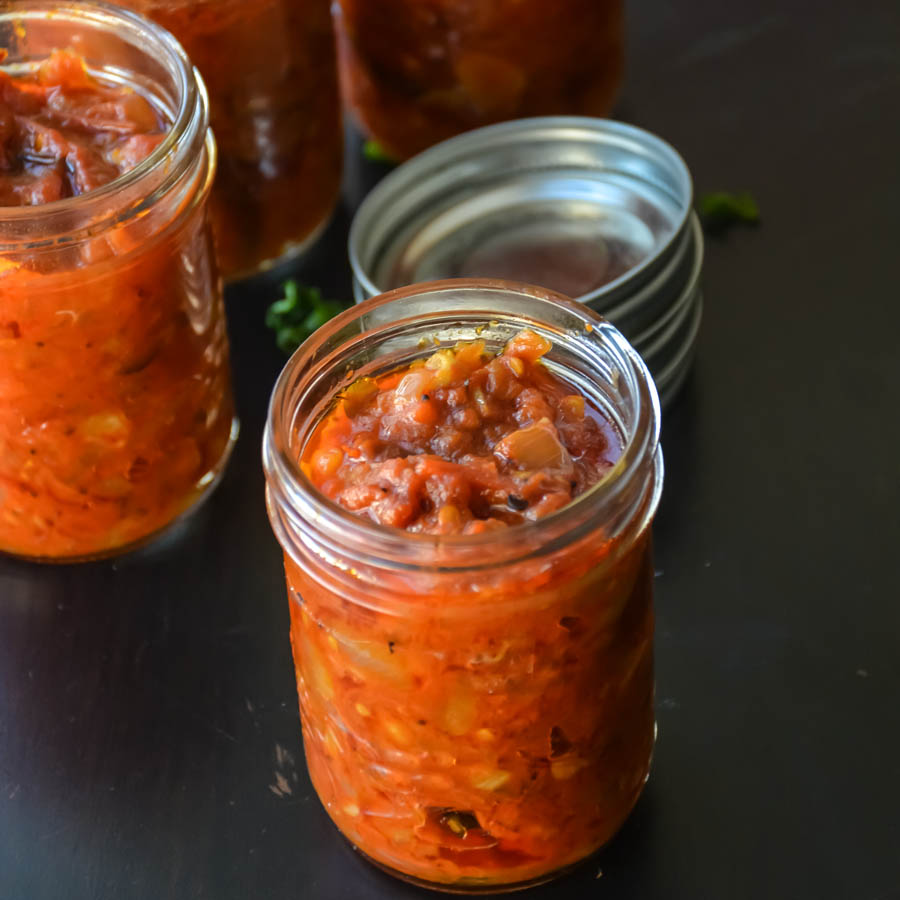
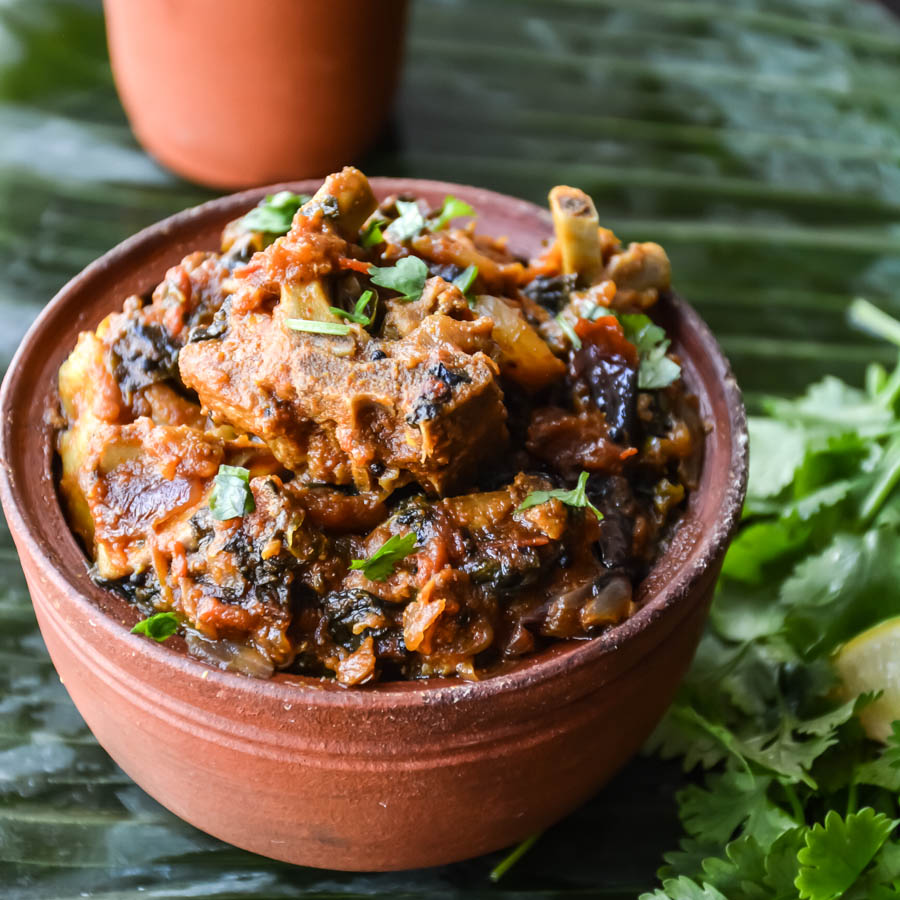
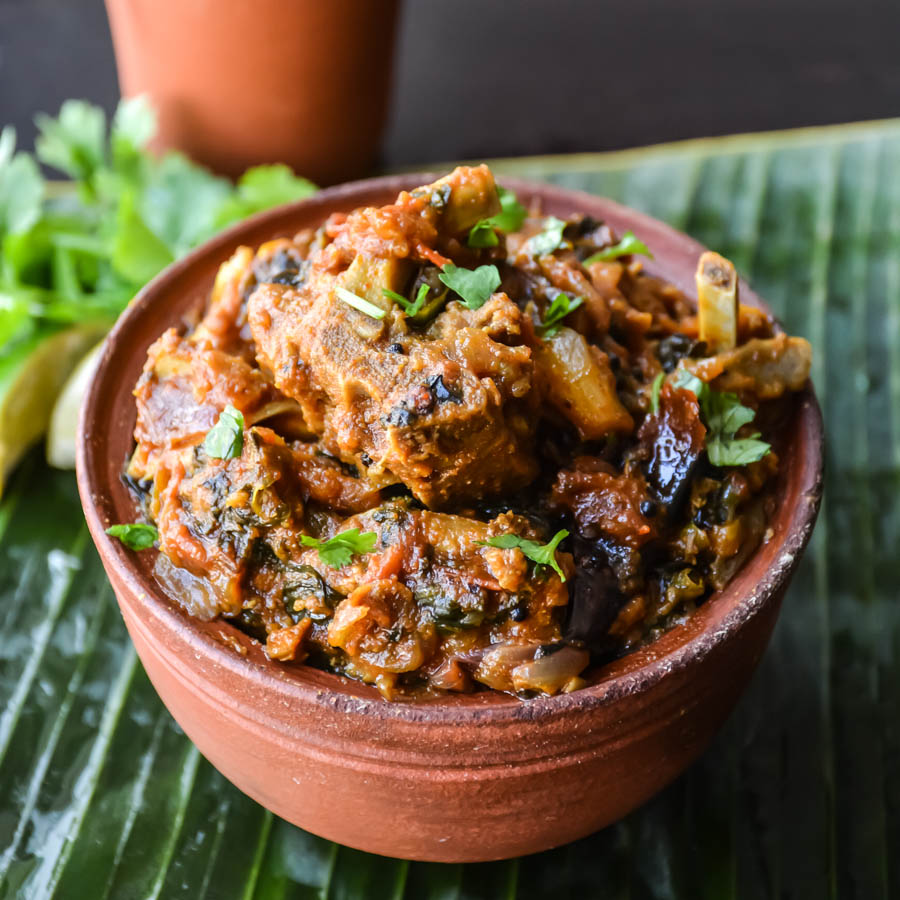
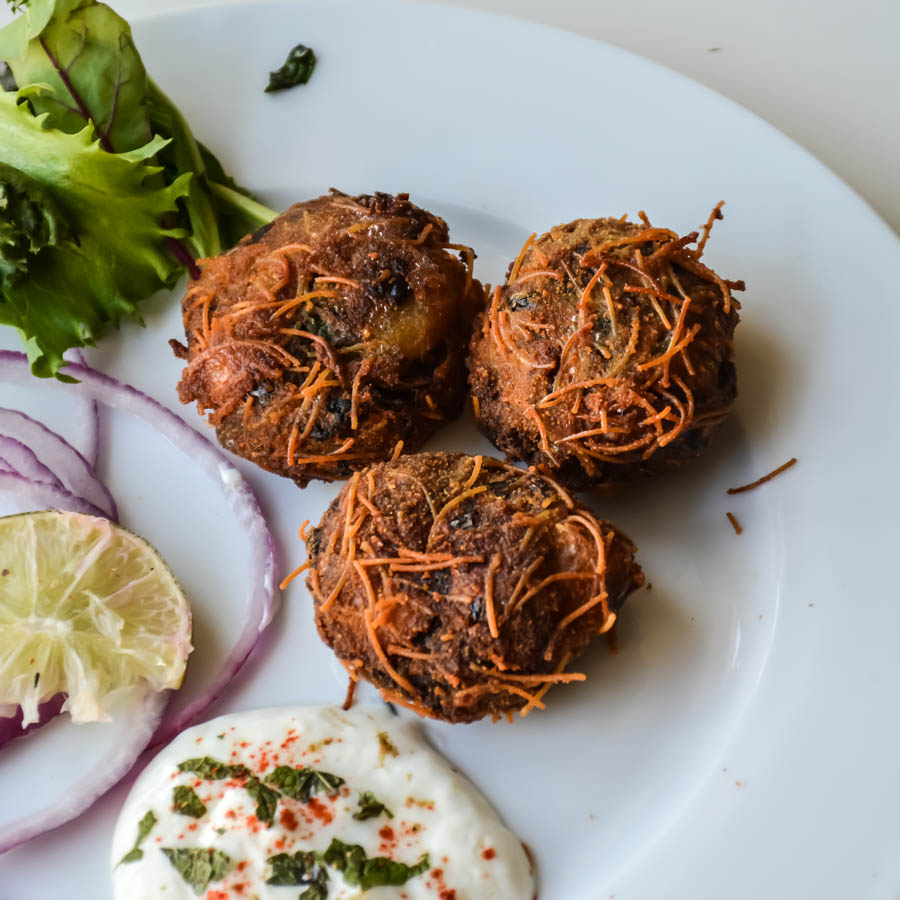
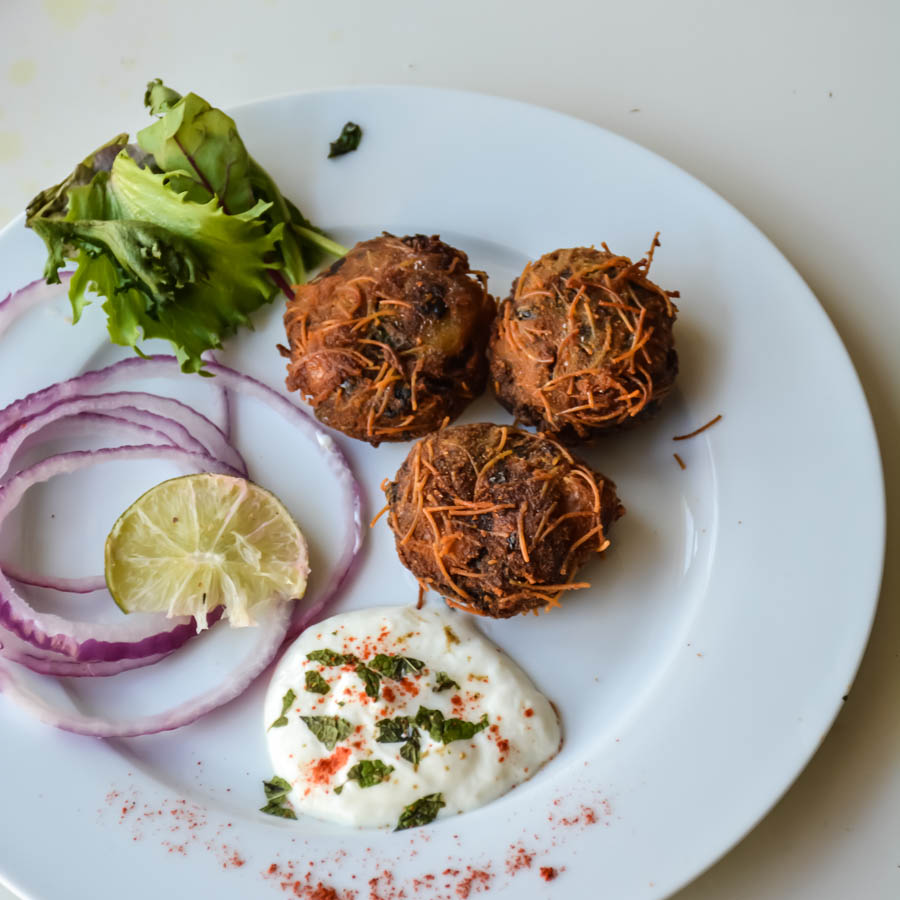
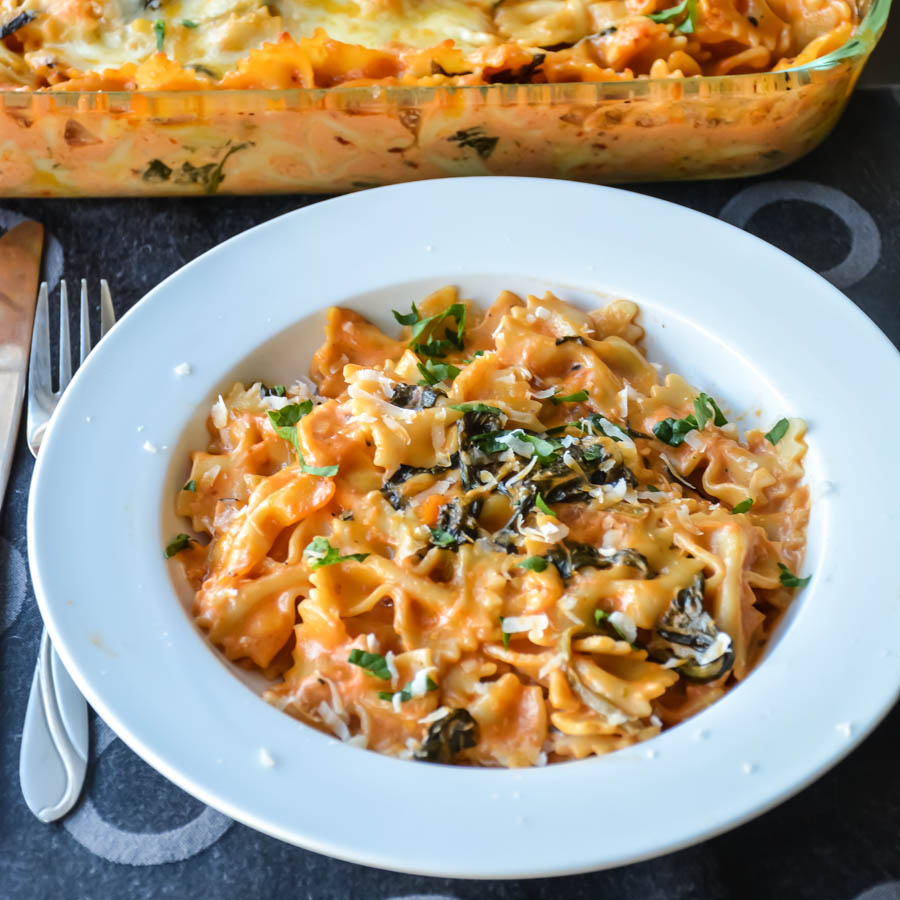
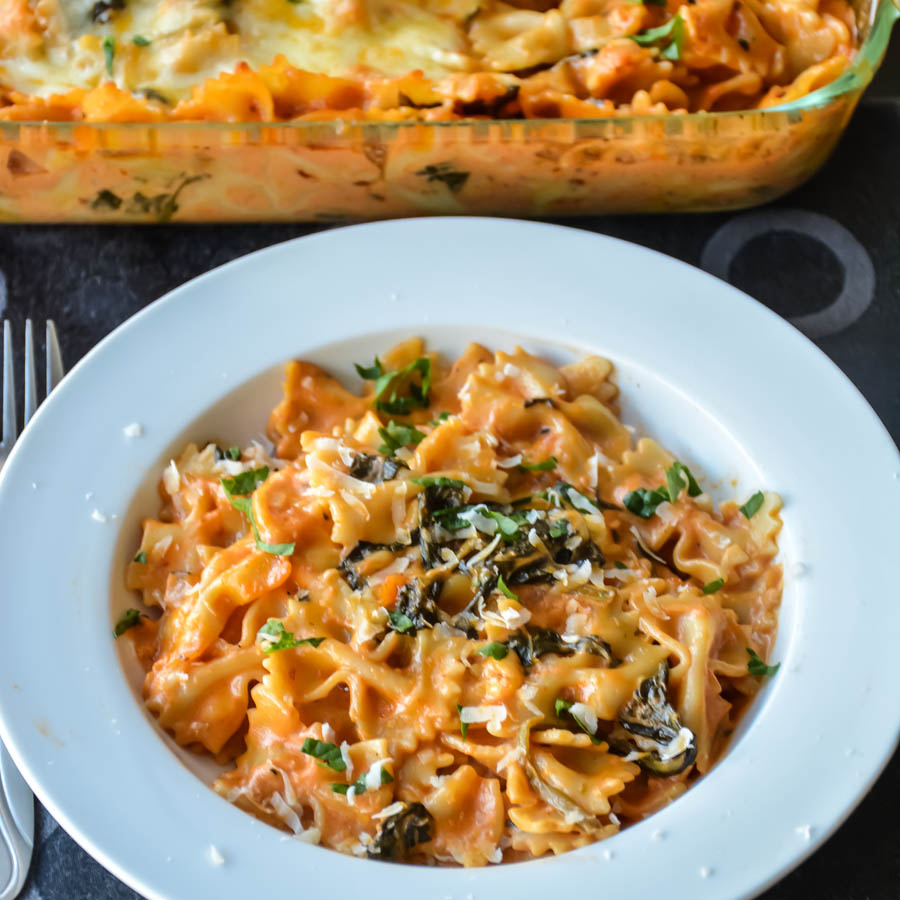
A very healthy comfort food to satisfy your craving.This combination makes the dish juicy and crunchy. This dish is very healthy and also palatable. They look beautiful when you plate them. I always love Mexican food. Burritos, tostadas, taco ..enchiladas. You can always do your own taco plate with the veggies/meat you have at home. Just top it with some spices and colourful veggies to make it vibrant. Becaise I love Mexican food, this casserole hits all of the right spot for me. The spice level wzas perfect to me, if you think it is more, just reduce!

Casserole-2-2

This delicious casserole is purely vegetarian and healthy! You can layer this in the pan like the way you want, avoid quinoa or avoid tacos. You can have them without tacos or just place over tacos after its cooked, garnish and enjoy it as for Tuesday tacos.I wanted to make this totally a healthy vegetarian guilt free food!  I just mixed everything together and bake it, how simple it is  right. You can even avoid the onion sauté and just mix everything in a bowl and bake it straight!

My other favorite mexican recipes : Roasted Cauliflower tacos with cilantro lime creama, Mexican mini mushroom quesadilla.

Casserole-7

GIVEAWAY: 

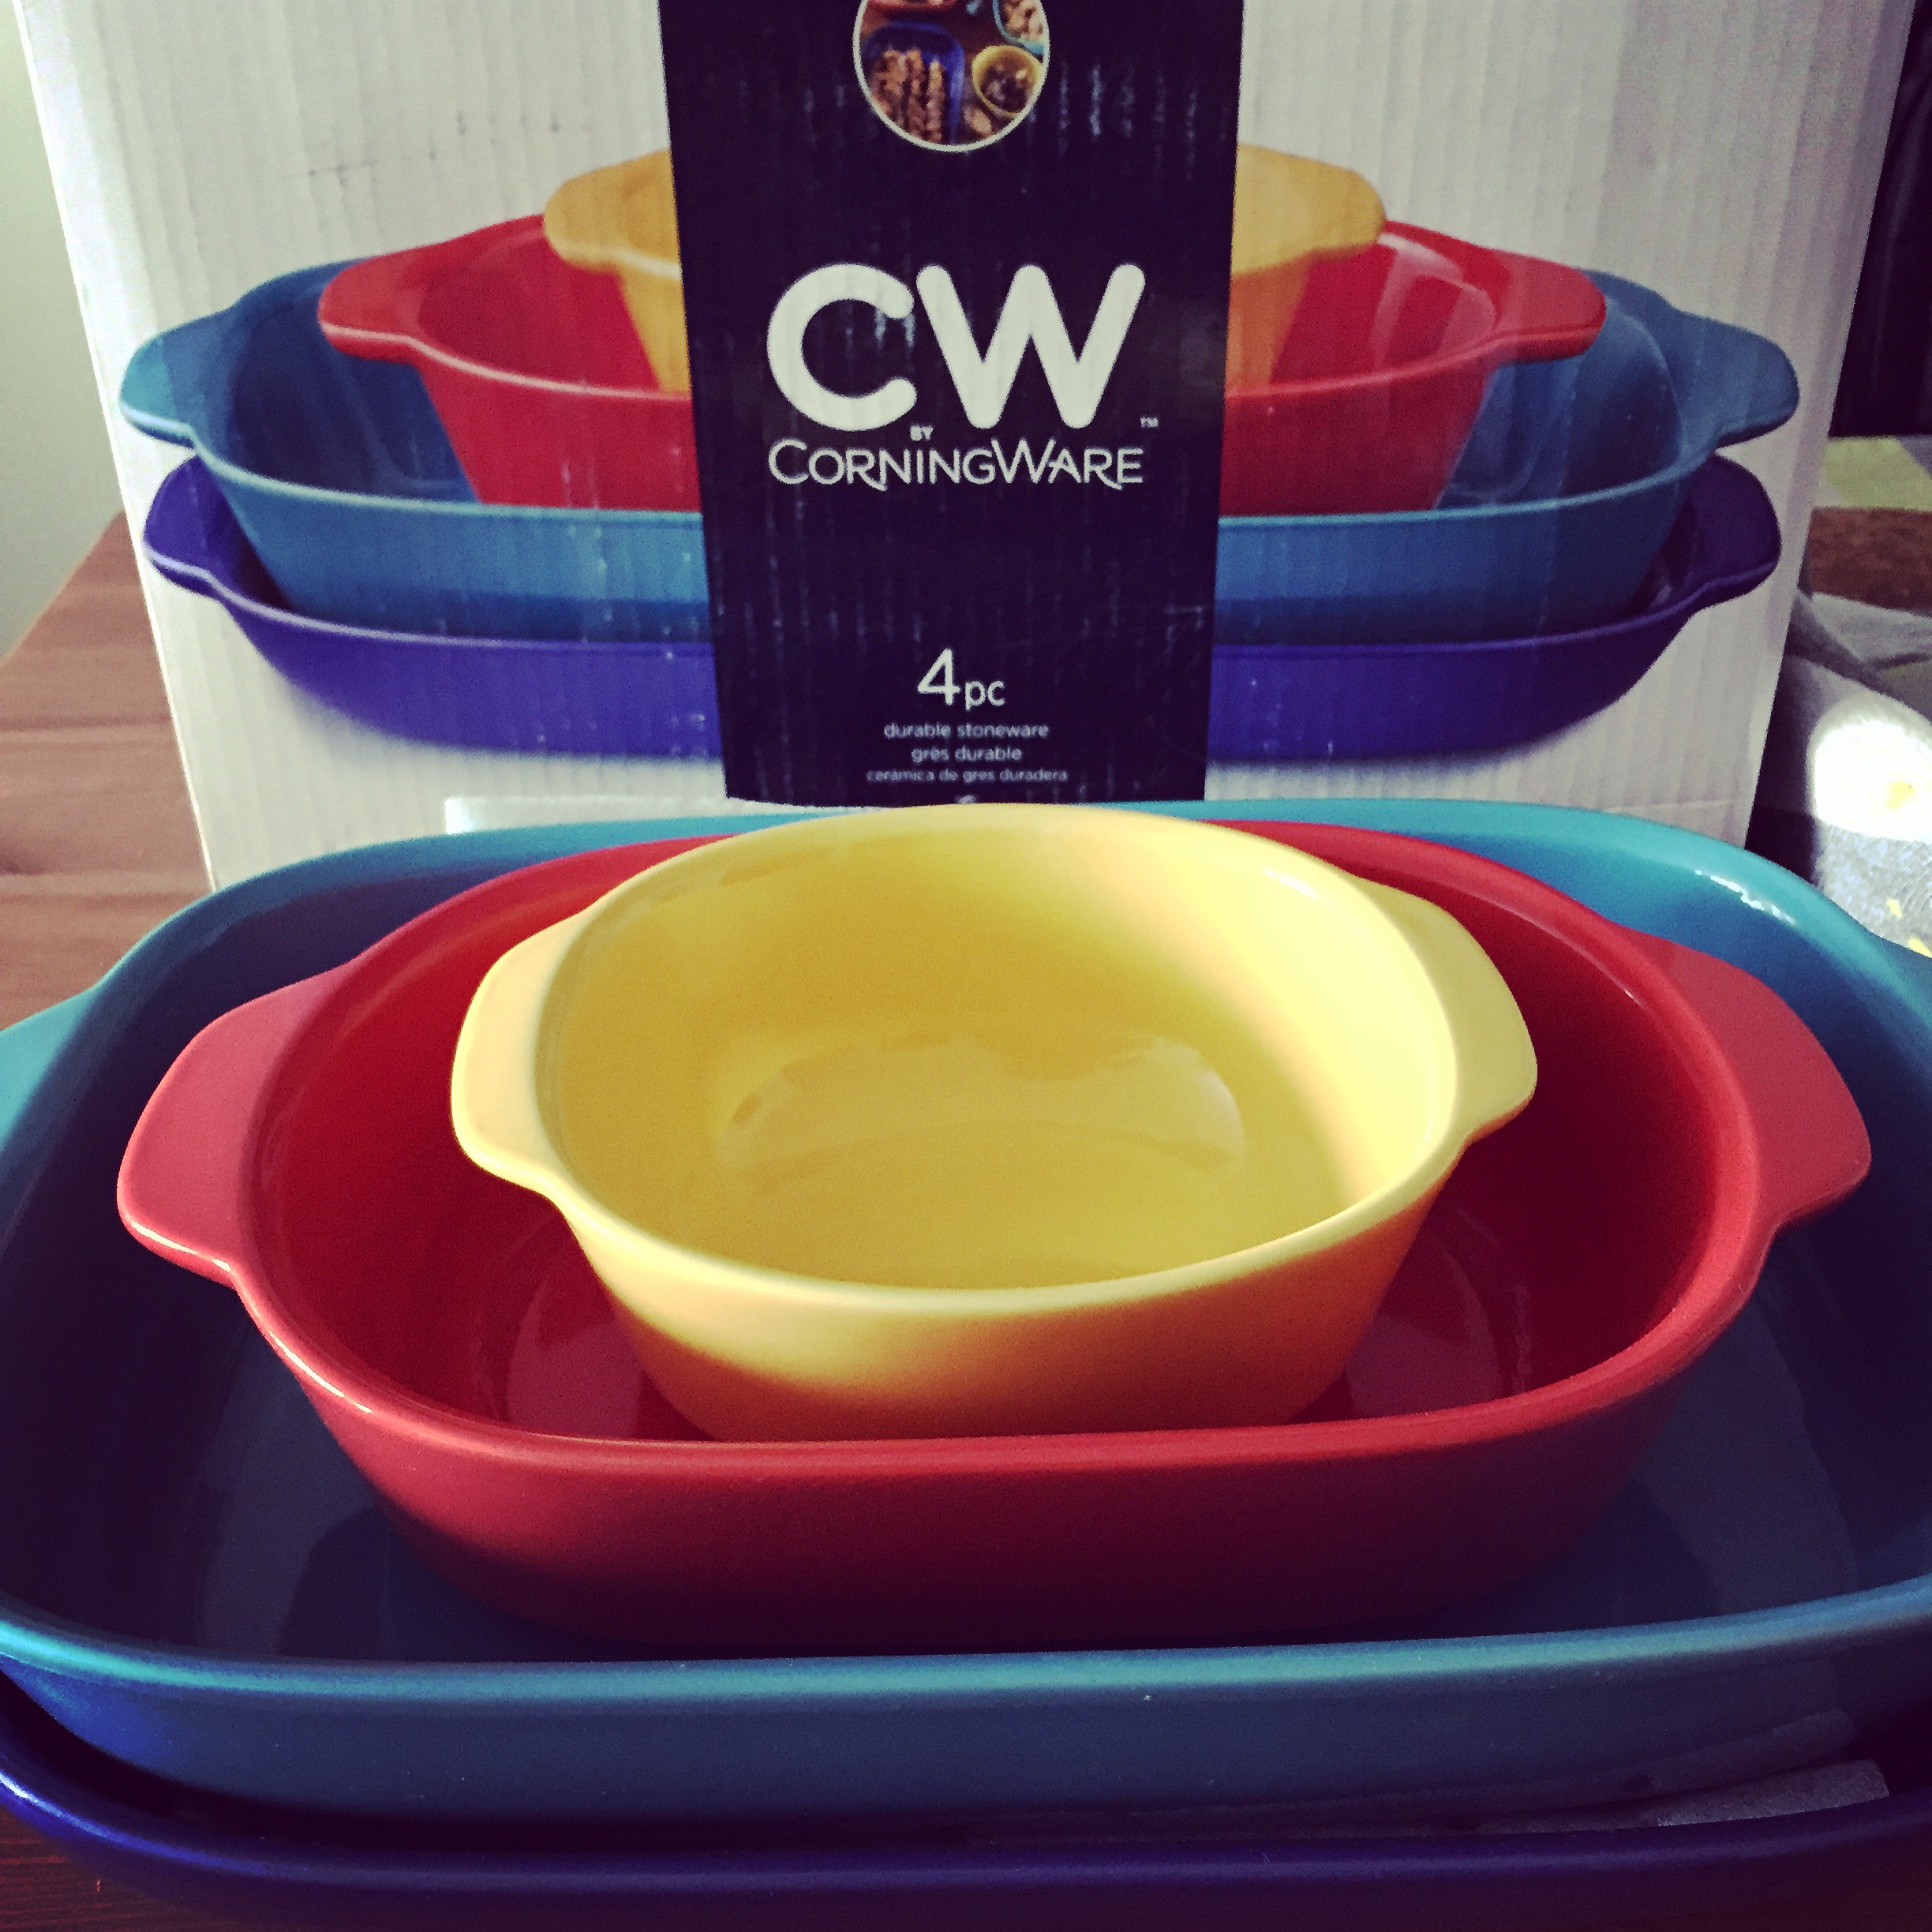
The great news today is that CW by Corningware is offering readers of Relishthebite the chance to win a 2.5 Quart Vermillion Baker (Similar to Red one in the four piece picture- Retail Value $21.99). The giveaway is open to all residents of Canada (Including Quebec) only. ( sorry to my other country readers)

  1. To enter, just leave a comment below, answering the question: What is the recipe you would love to make in this 2.5 Quart Baker?
  2. Visit Relishthebite Facebook page, like it 🙂 also!
  3. Follow Relishthebite on Twitter page.

The giveaway closes at 23:59 October 20th, 2015

The lucky winner will be chosen by Raffle copter and I will notify that person by email. The winner will have 48 hours to respond and provide me their mailing address and phone number (No post office box numbers, please, for delivery purposes).

Also please note, by entering the giveaway and should you win, you are providing consent for me to give your mailing address and phone number to Corningware.

a Rafflecopter giveaway

IMG_1582

5.0 from 6 reviews
Print
Healthy Mexican Corn quinoa Casserole + Corning Ware Giveaway
Author: Suganya Hariharan
Recipe type: Main
Cuisine: Mexican
Prep time:  10 mins
Cook time:  30 mins
Total time:  40 mins
Serves: 6 servings
 
Ingredients
  • Bell Pepper – 2 , chopped
  • Garlic – 4, finely chopped
  • Jalepeno – 1, chopped finely
  • Onion – 1, chopped finely
  • Frozen corn – 2 cups
  • Chilli powder – 2 tsp
  • Cumin powder – 2 tsp
  • Cheese – 2 cups, grated (Mexican blend or some mozzarella & cheddar mix)
  • Wheat / corn tortilla – 6
  • Quinoa – 2 cups, cooked
  • Refried beans (I used small red kidney beans ) – 1 can ( which means cooked)
  • Red Enchilada sauce – 1 cup
  • Oil – 2 tsp
  • Salt to taste
  • Cilantro/Guacamole/ Avacado/sour cream/ green onions – for garnish
  • Lime juice – 1 tbsp
Instructions
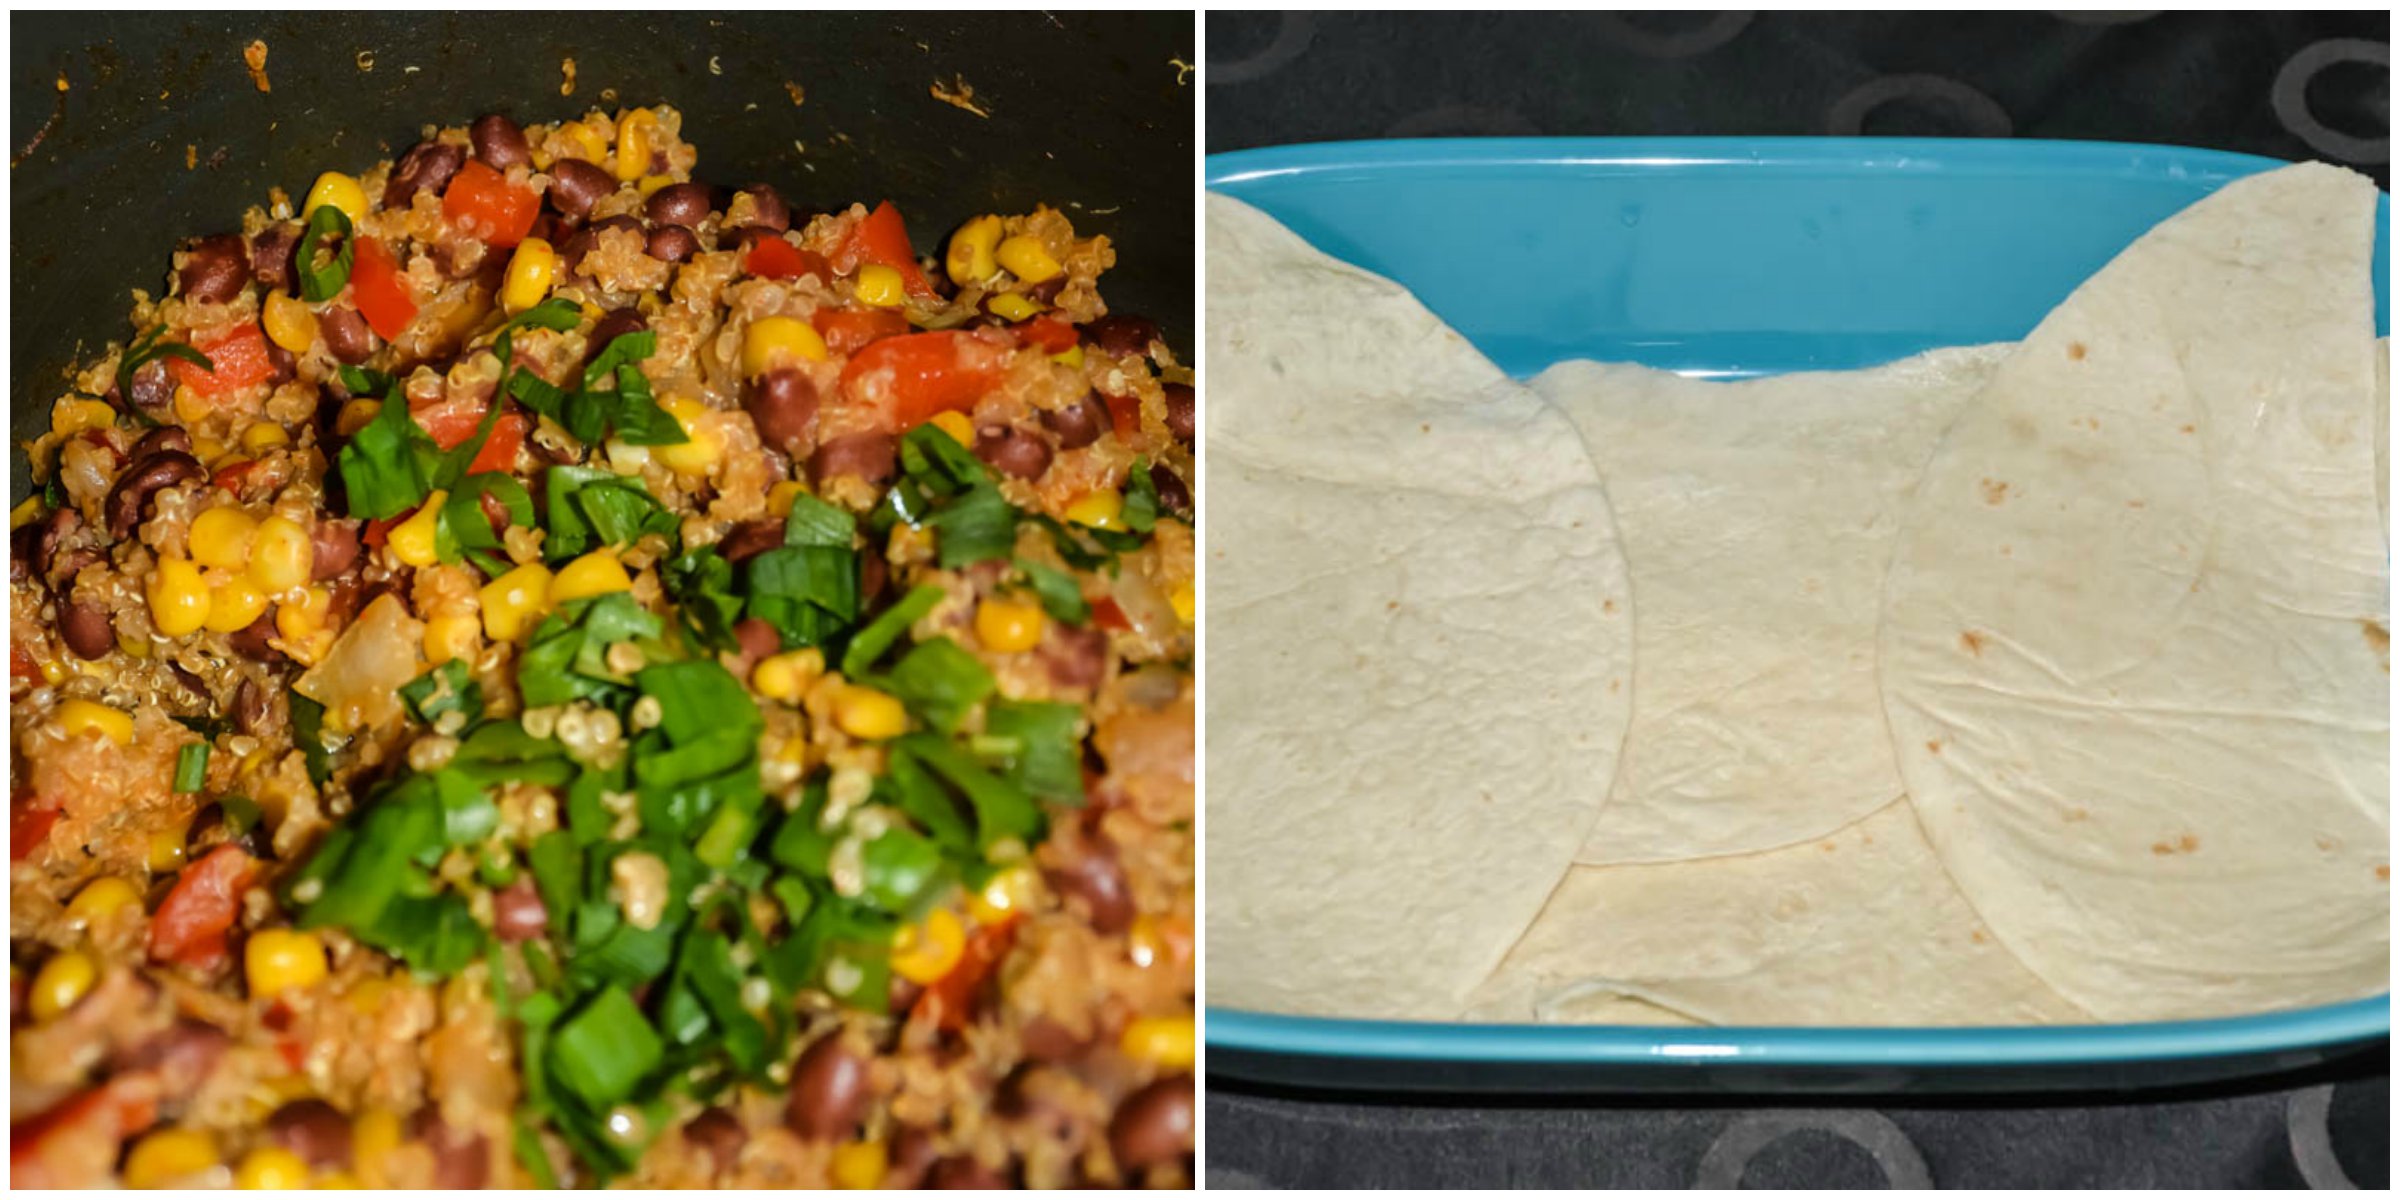
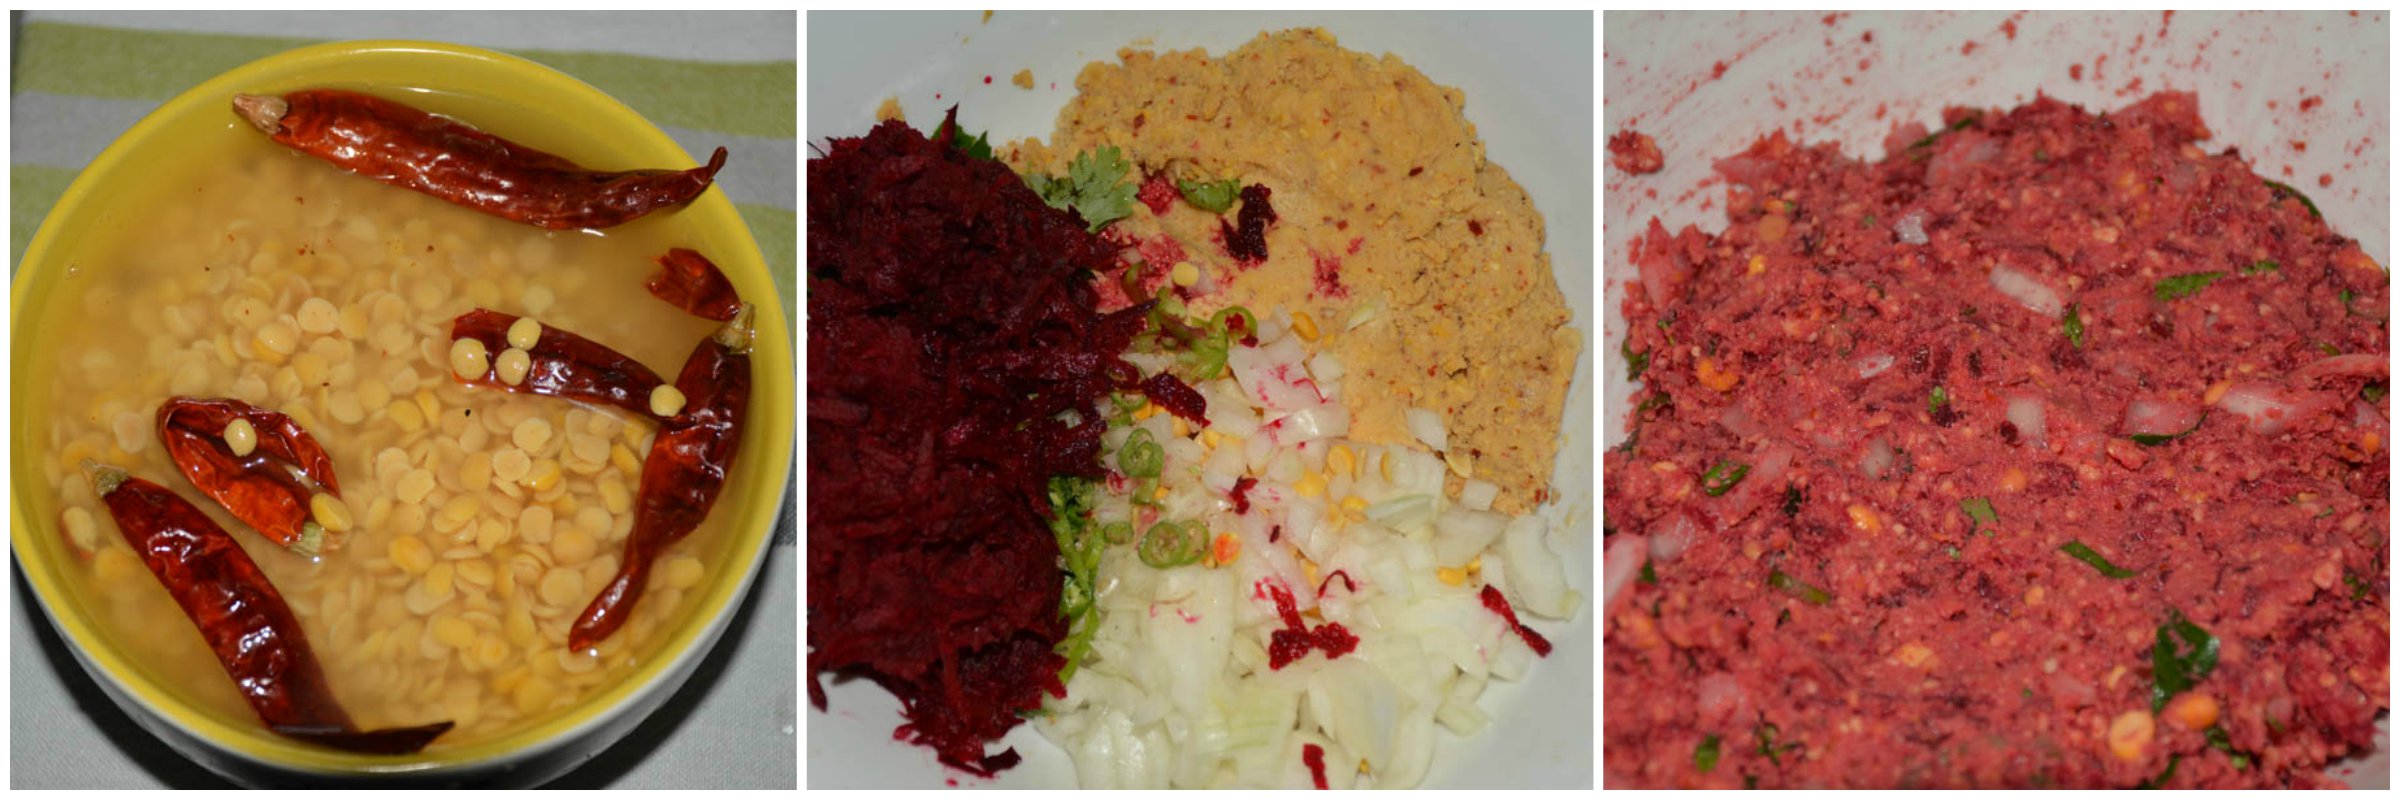
  1. Preparations: Cook 1 cup of quinoa in 3 cups of water according to package instructions, set aside. Lightly oil the baking dish.
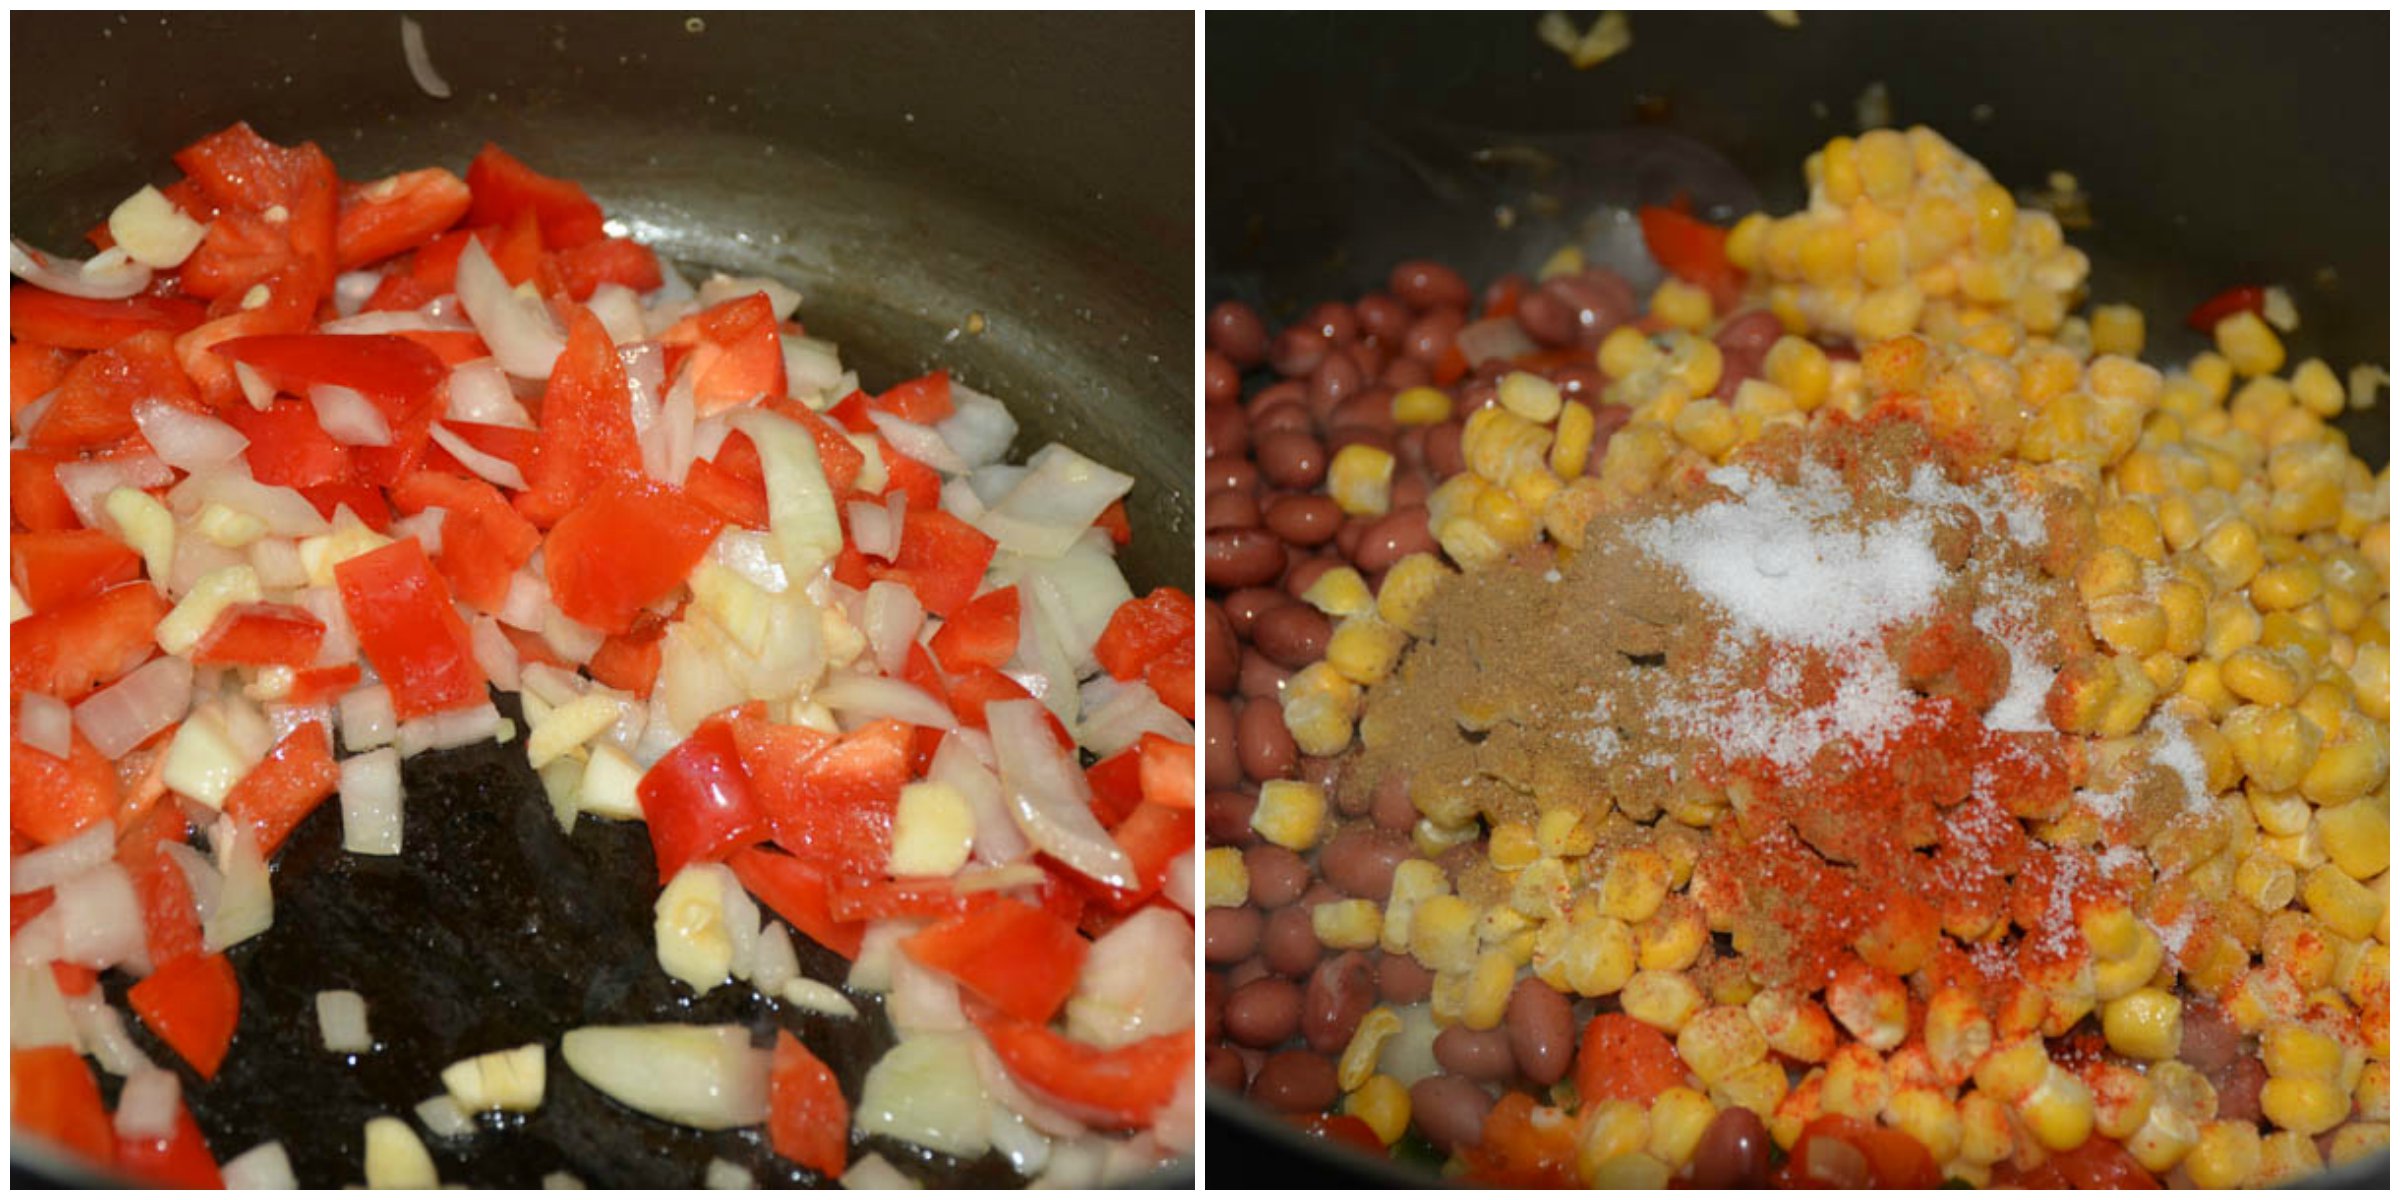
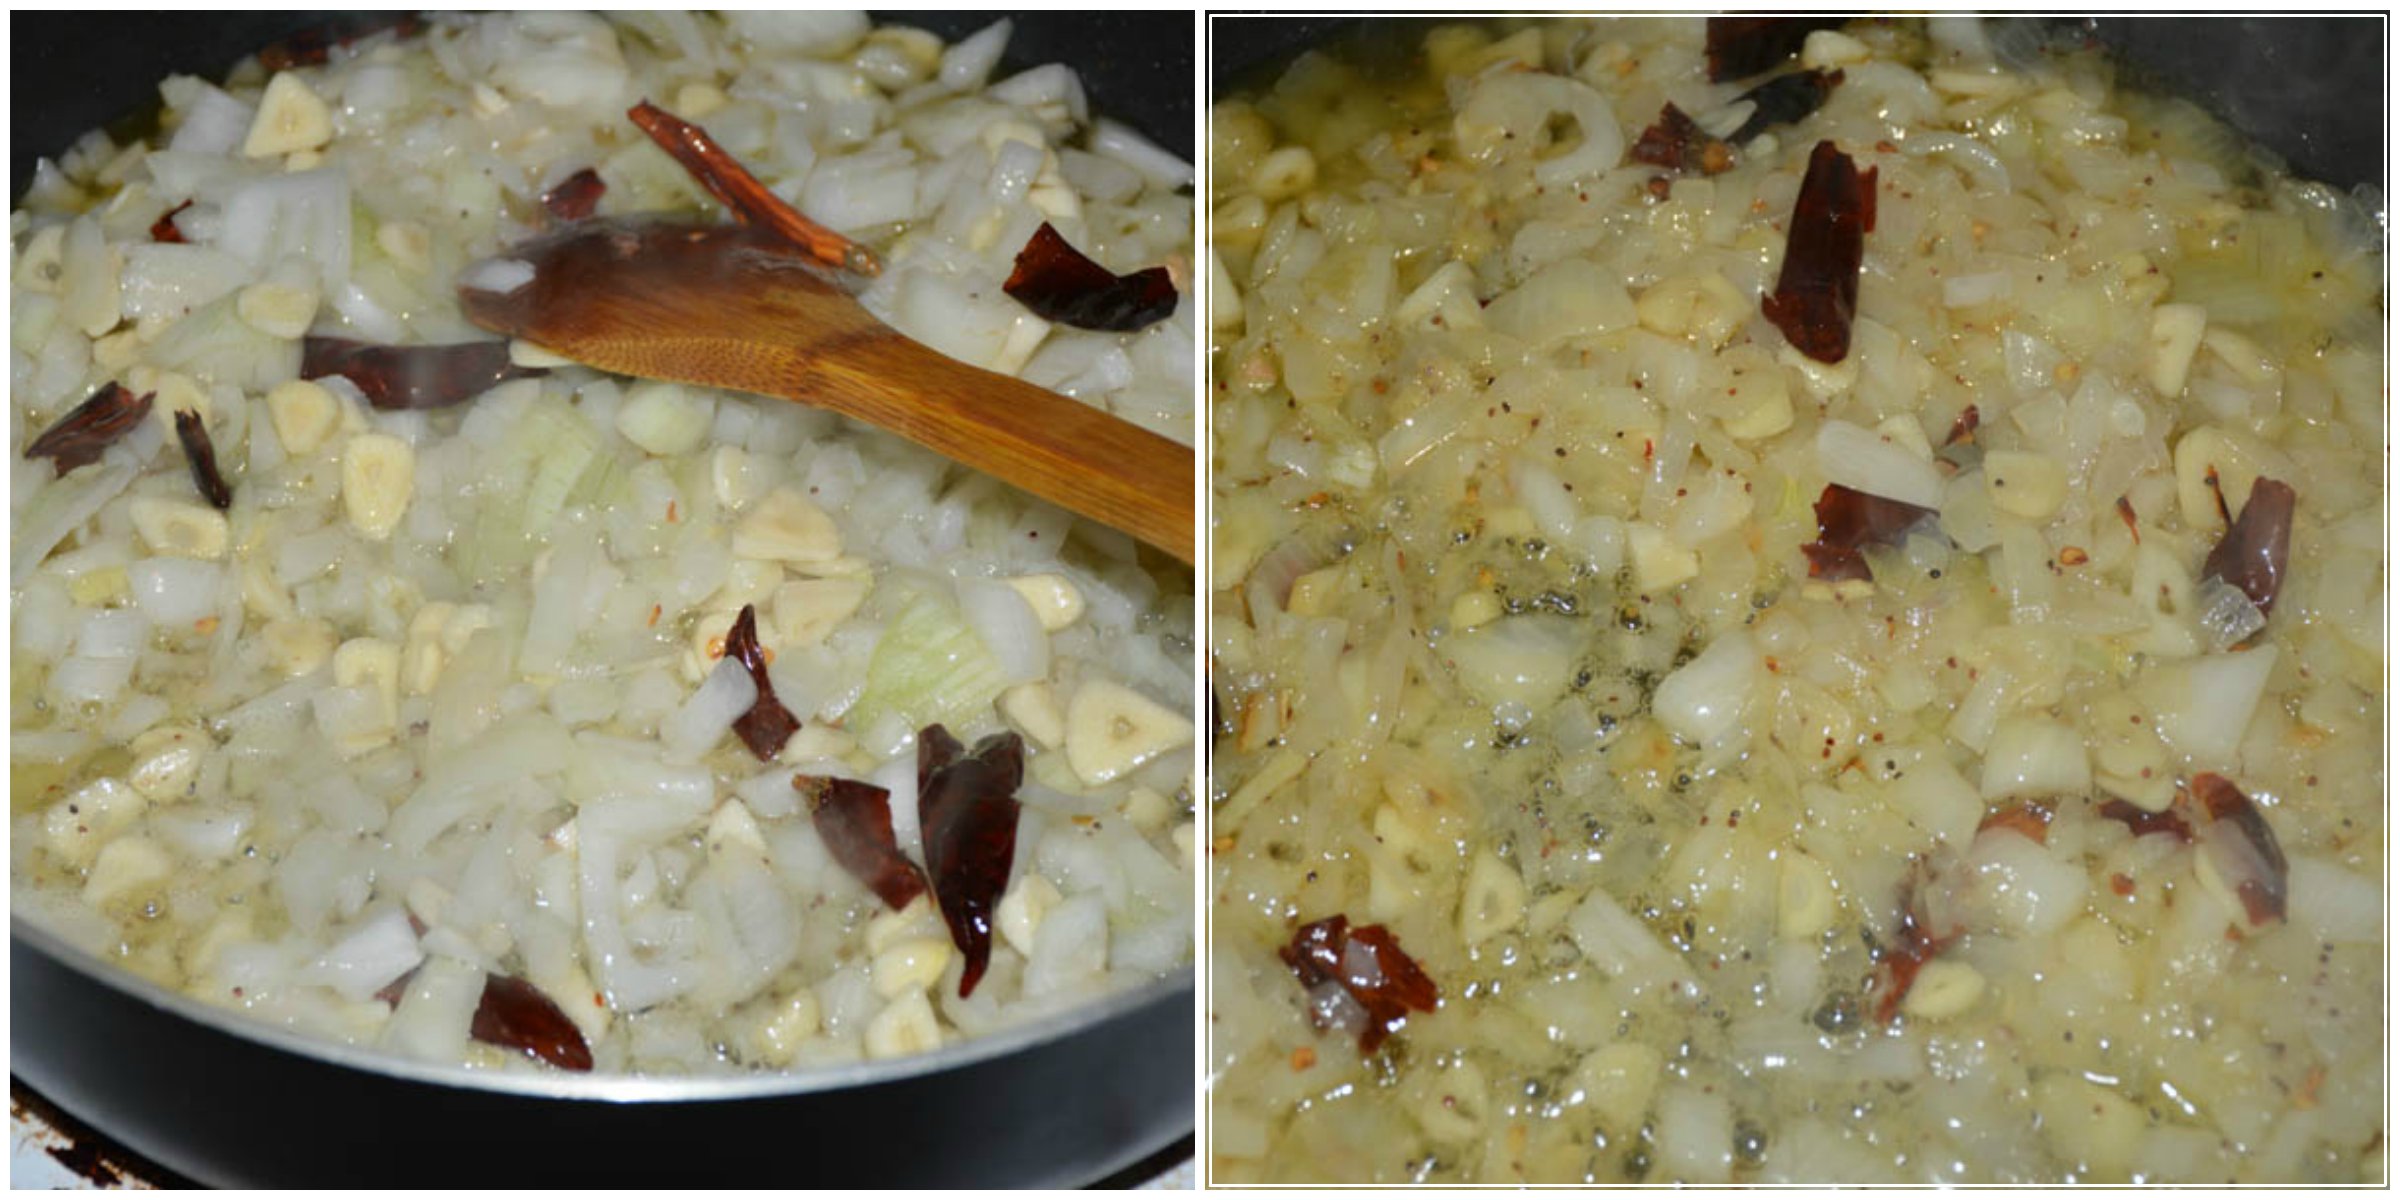
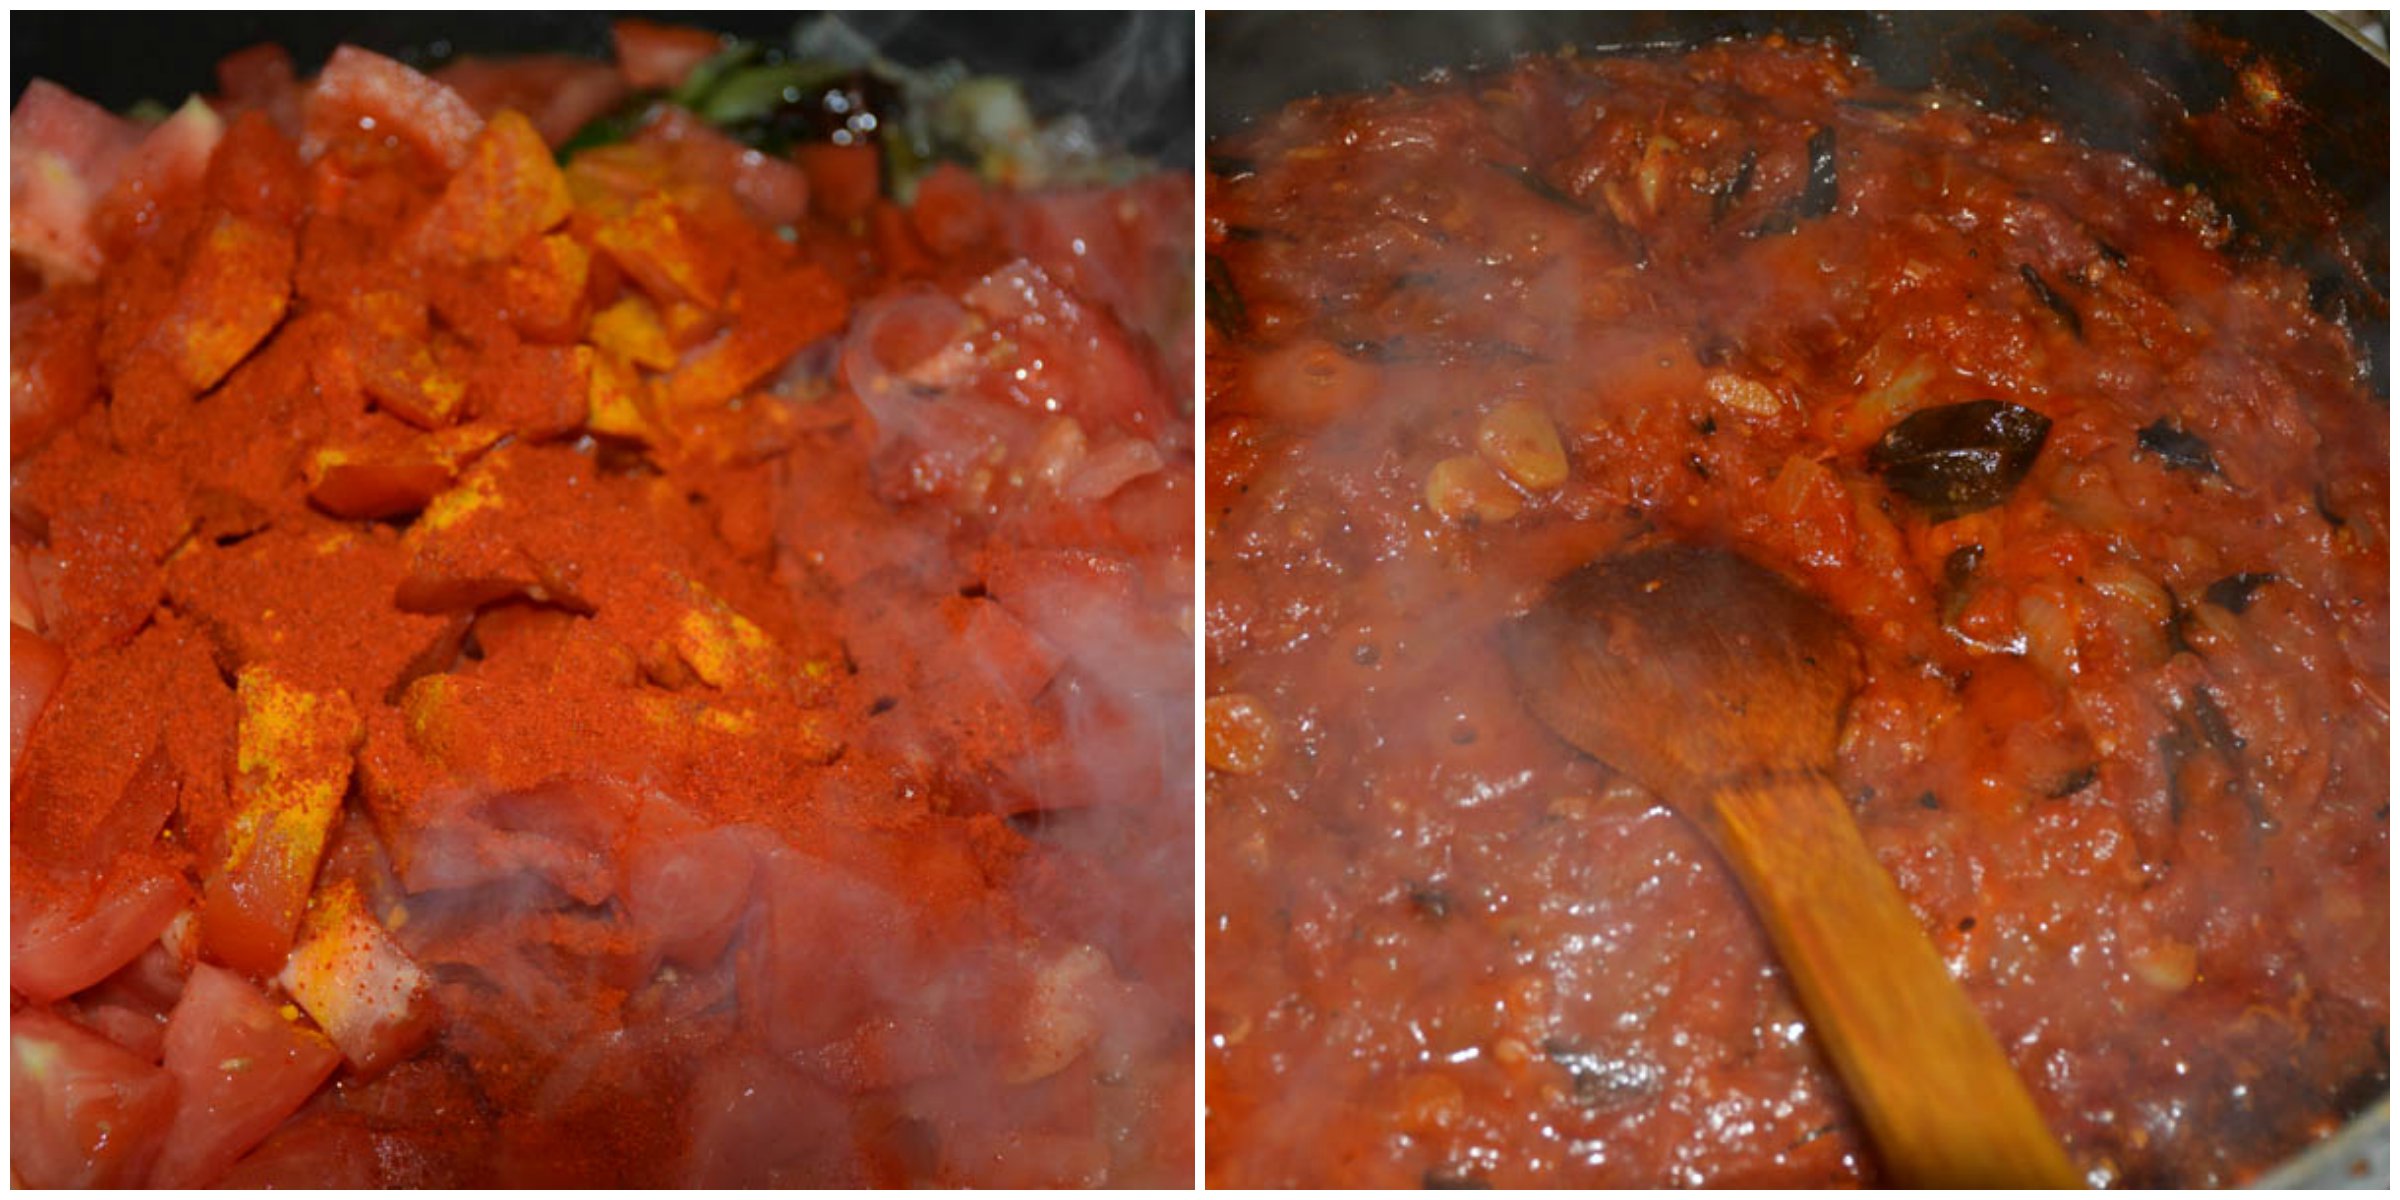
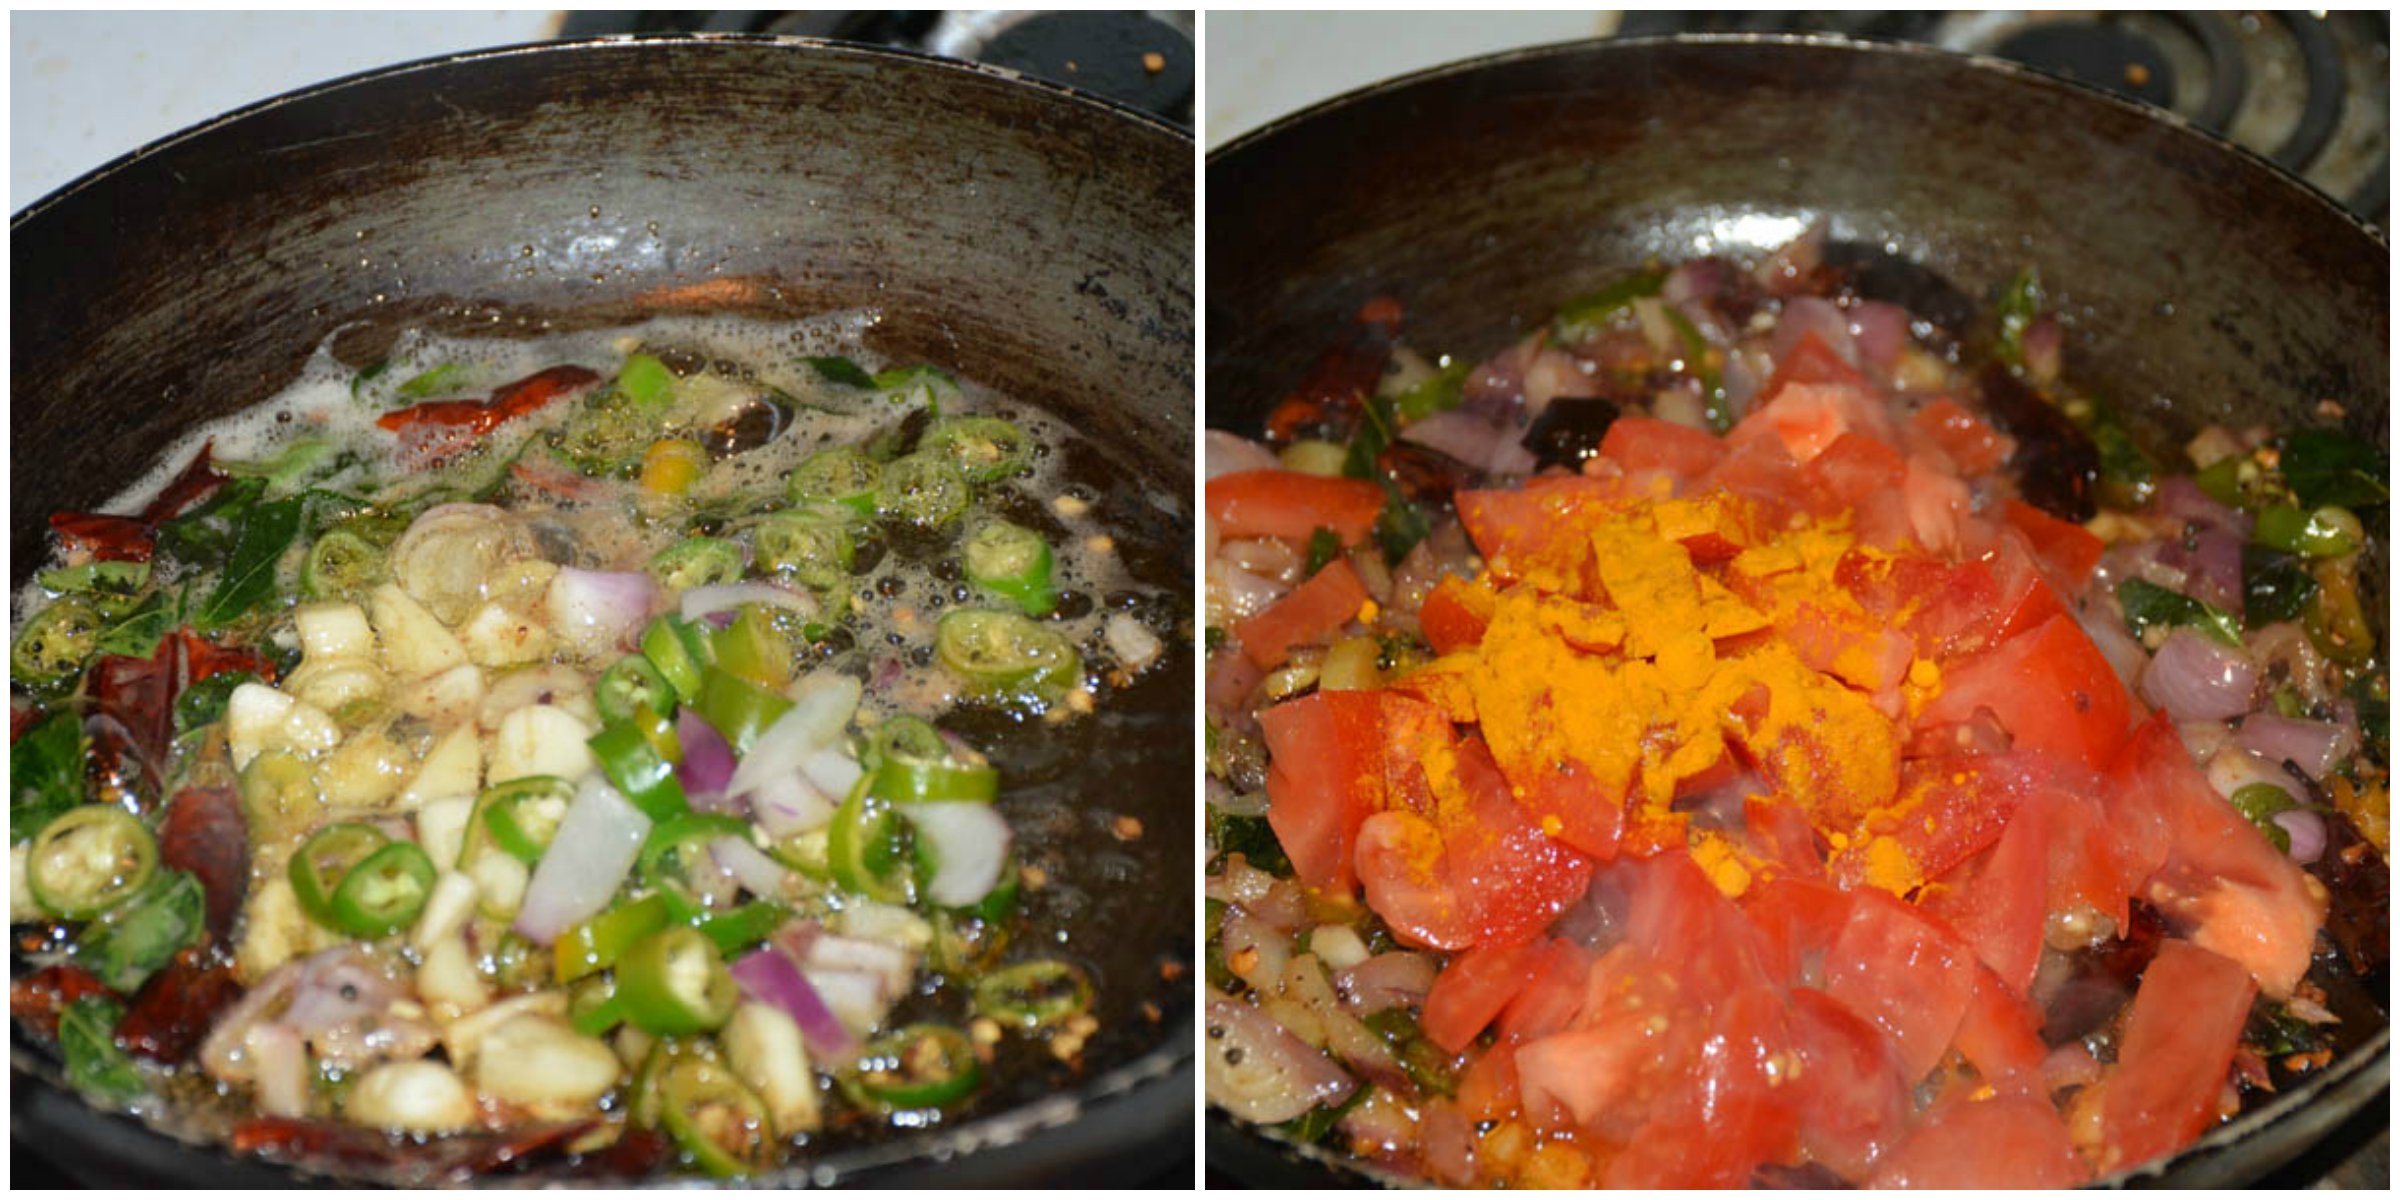
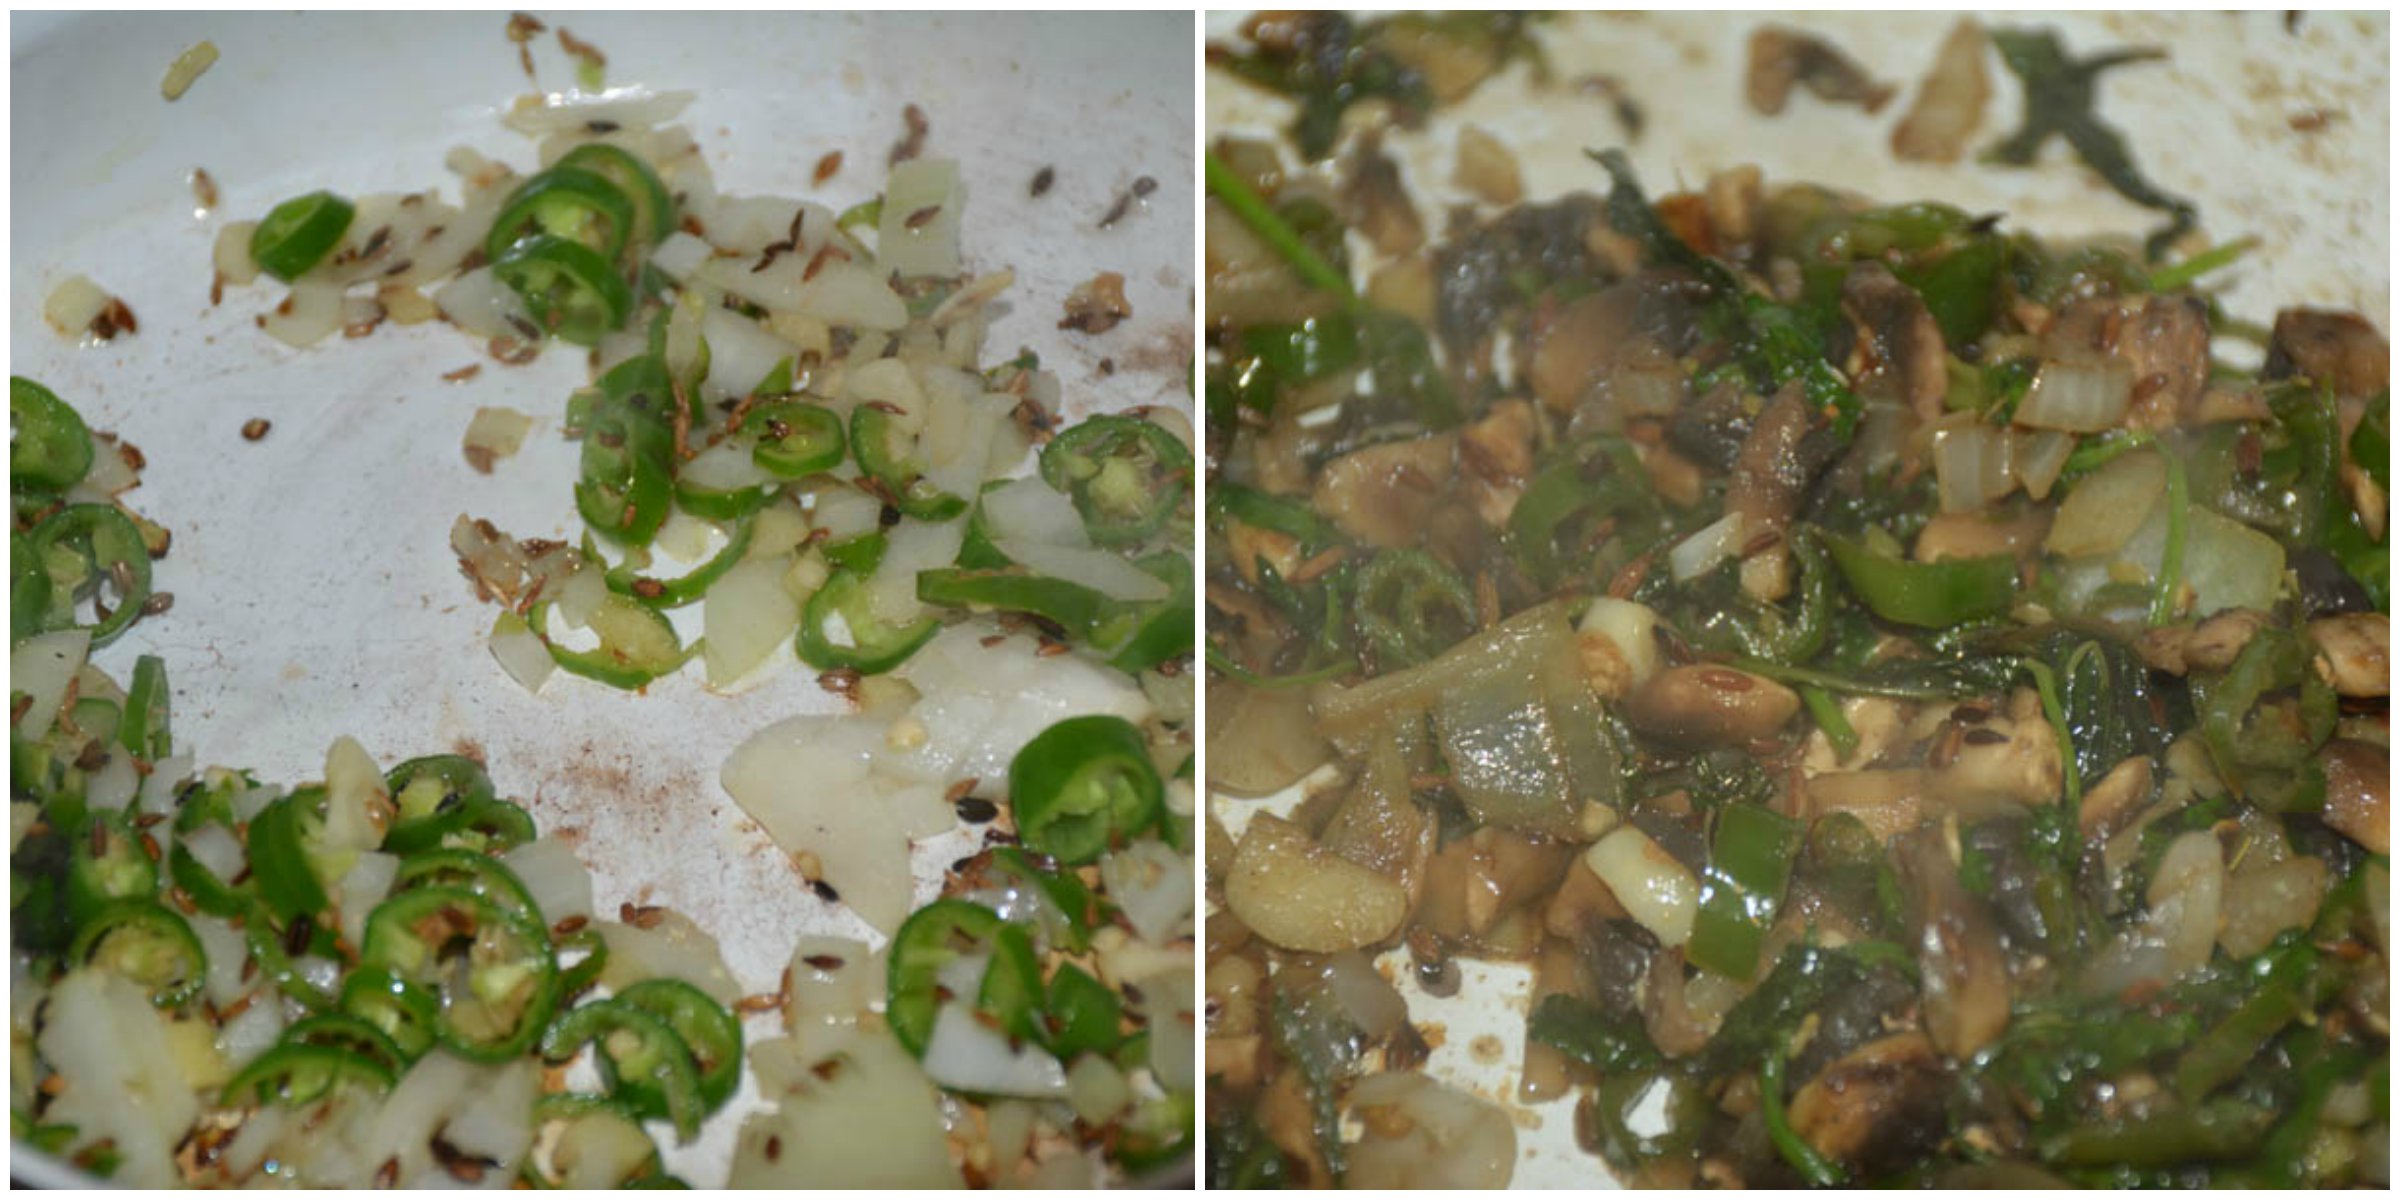
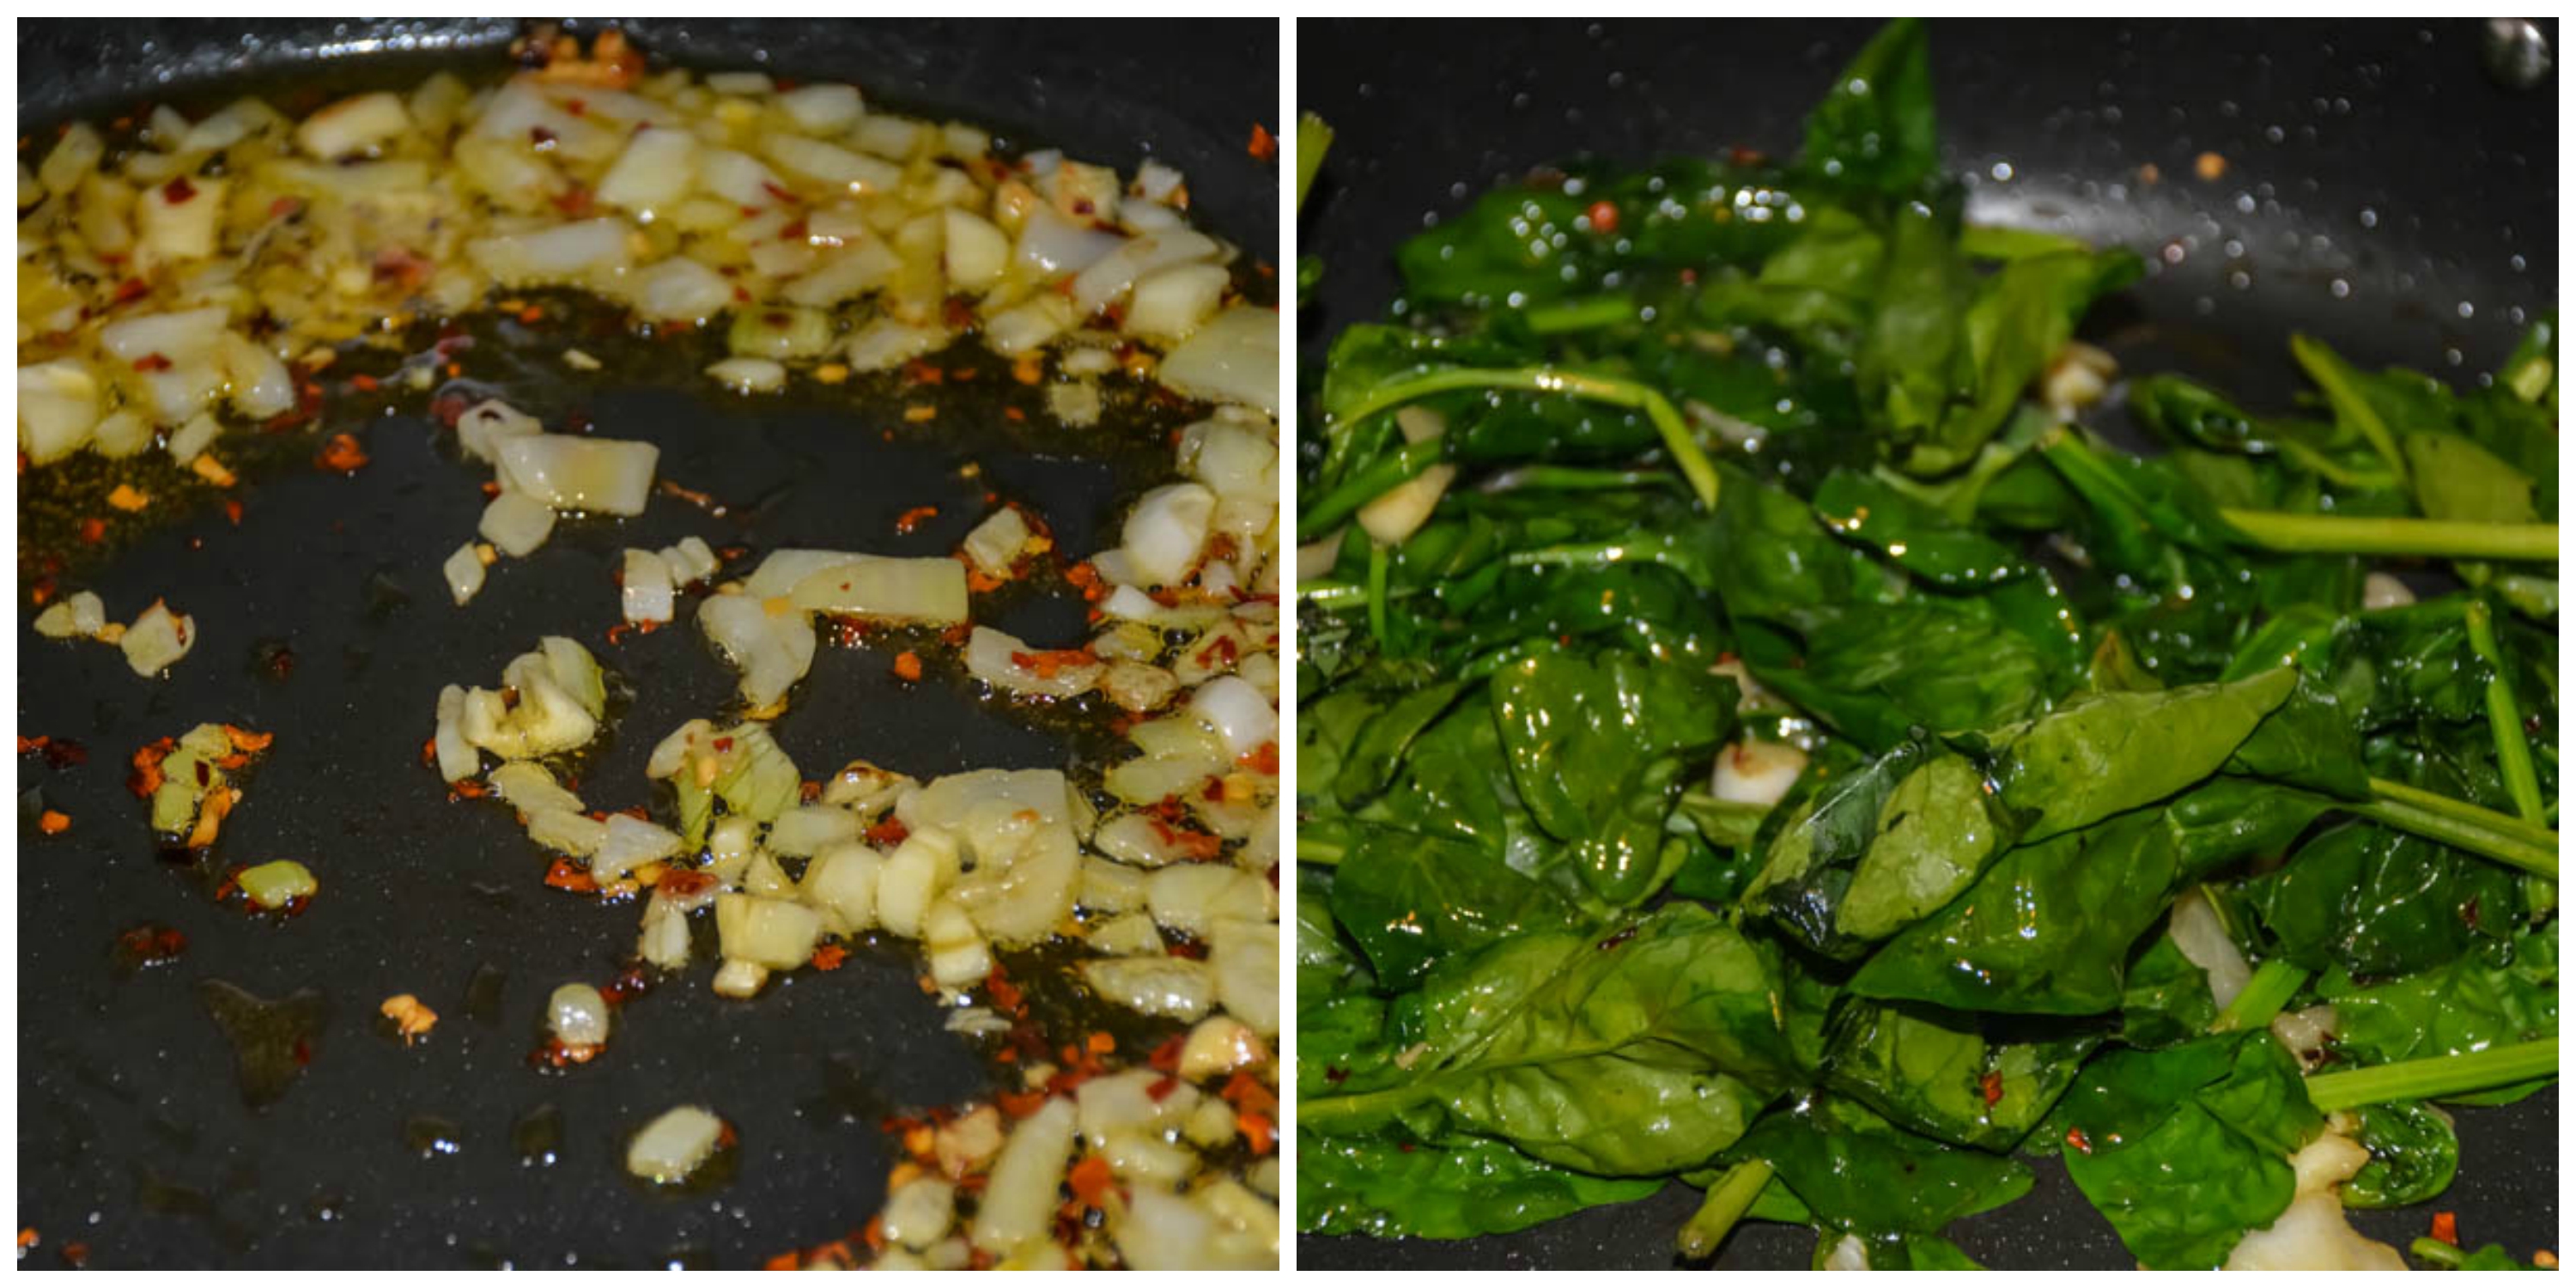
  2. In a skillet, add little oil, add the onion, pepper, jalapeno, garlic, little pepper and sauté them for few minutes.

  3. Meanwhile, preheat oven to 375 degrees F.
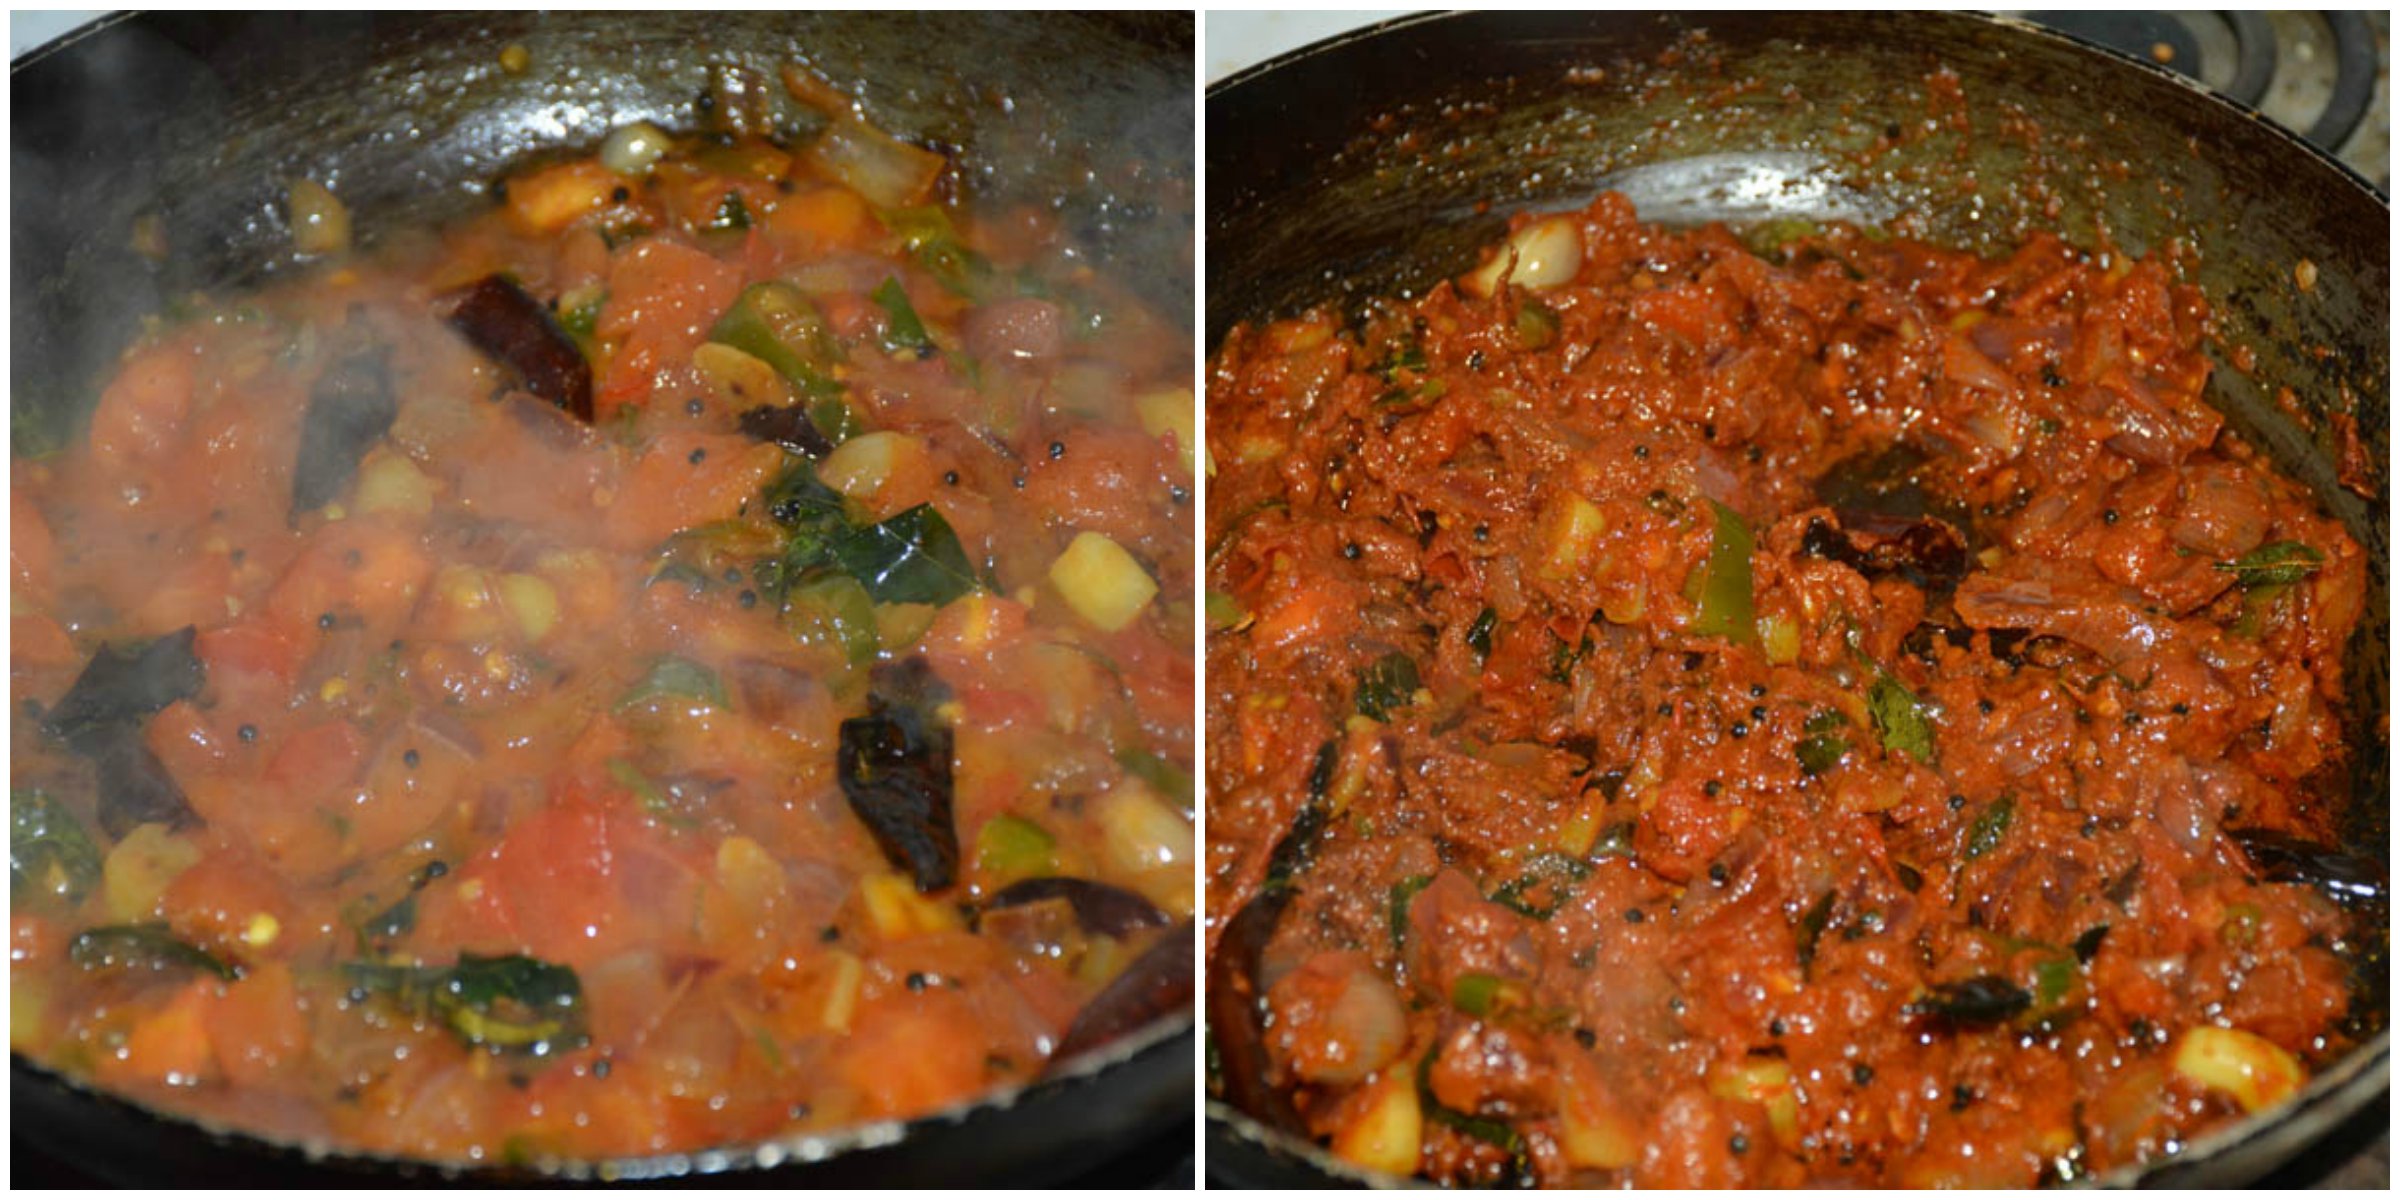
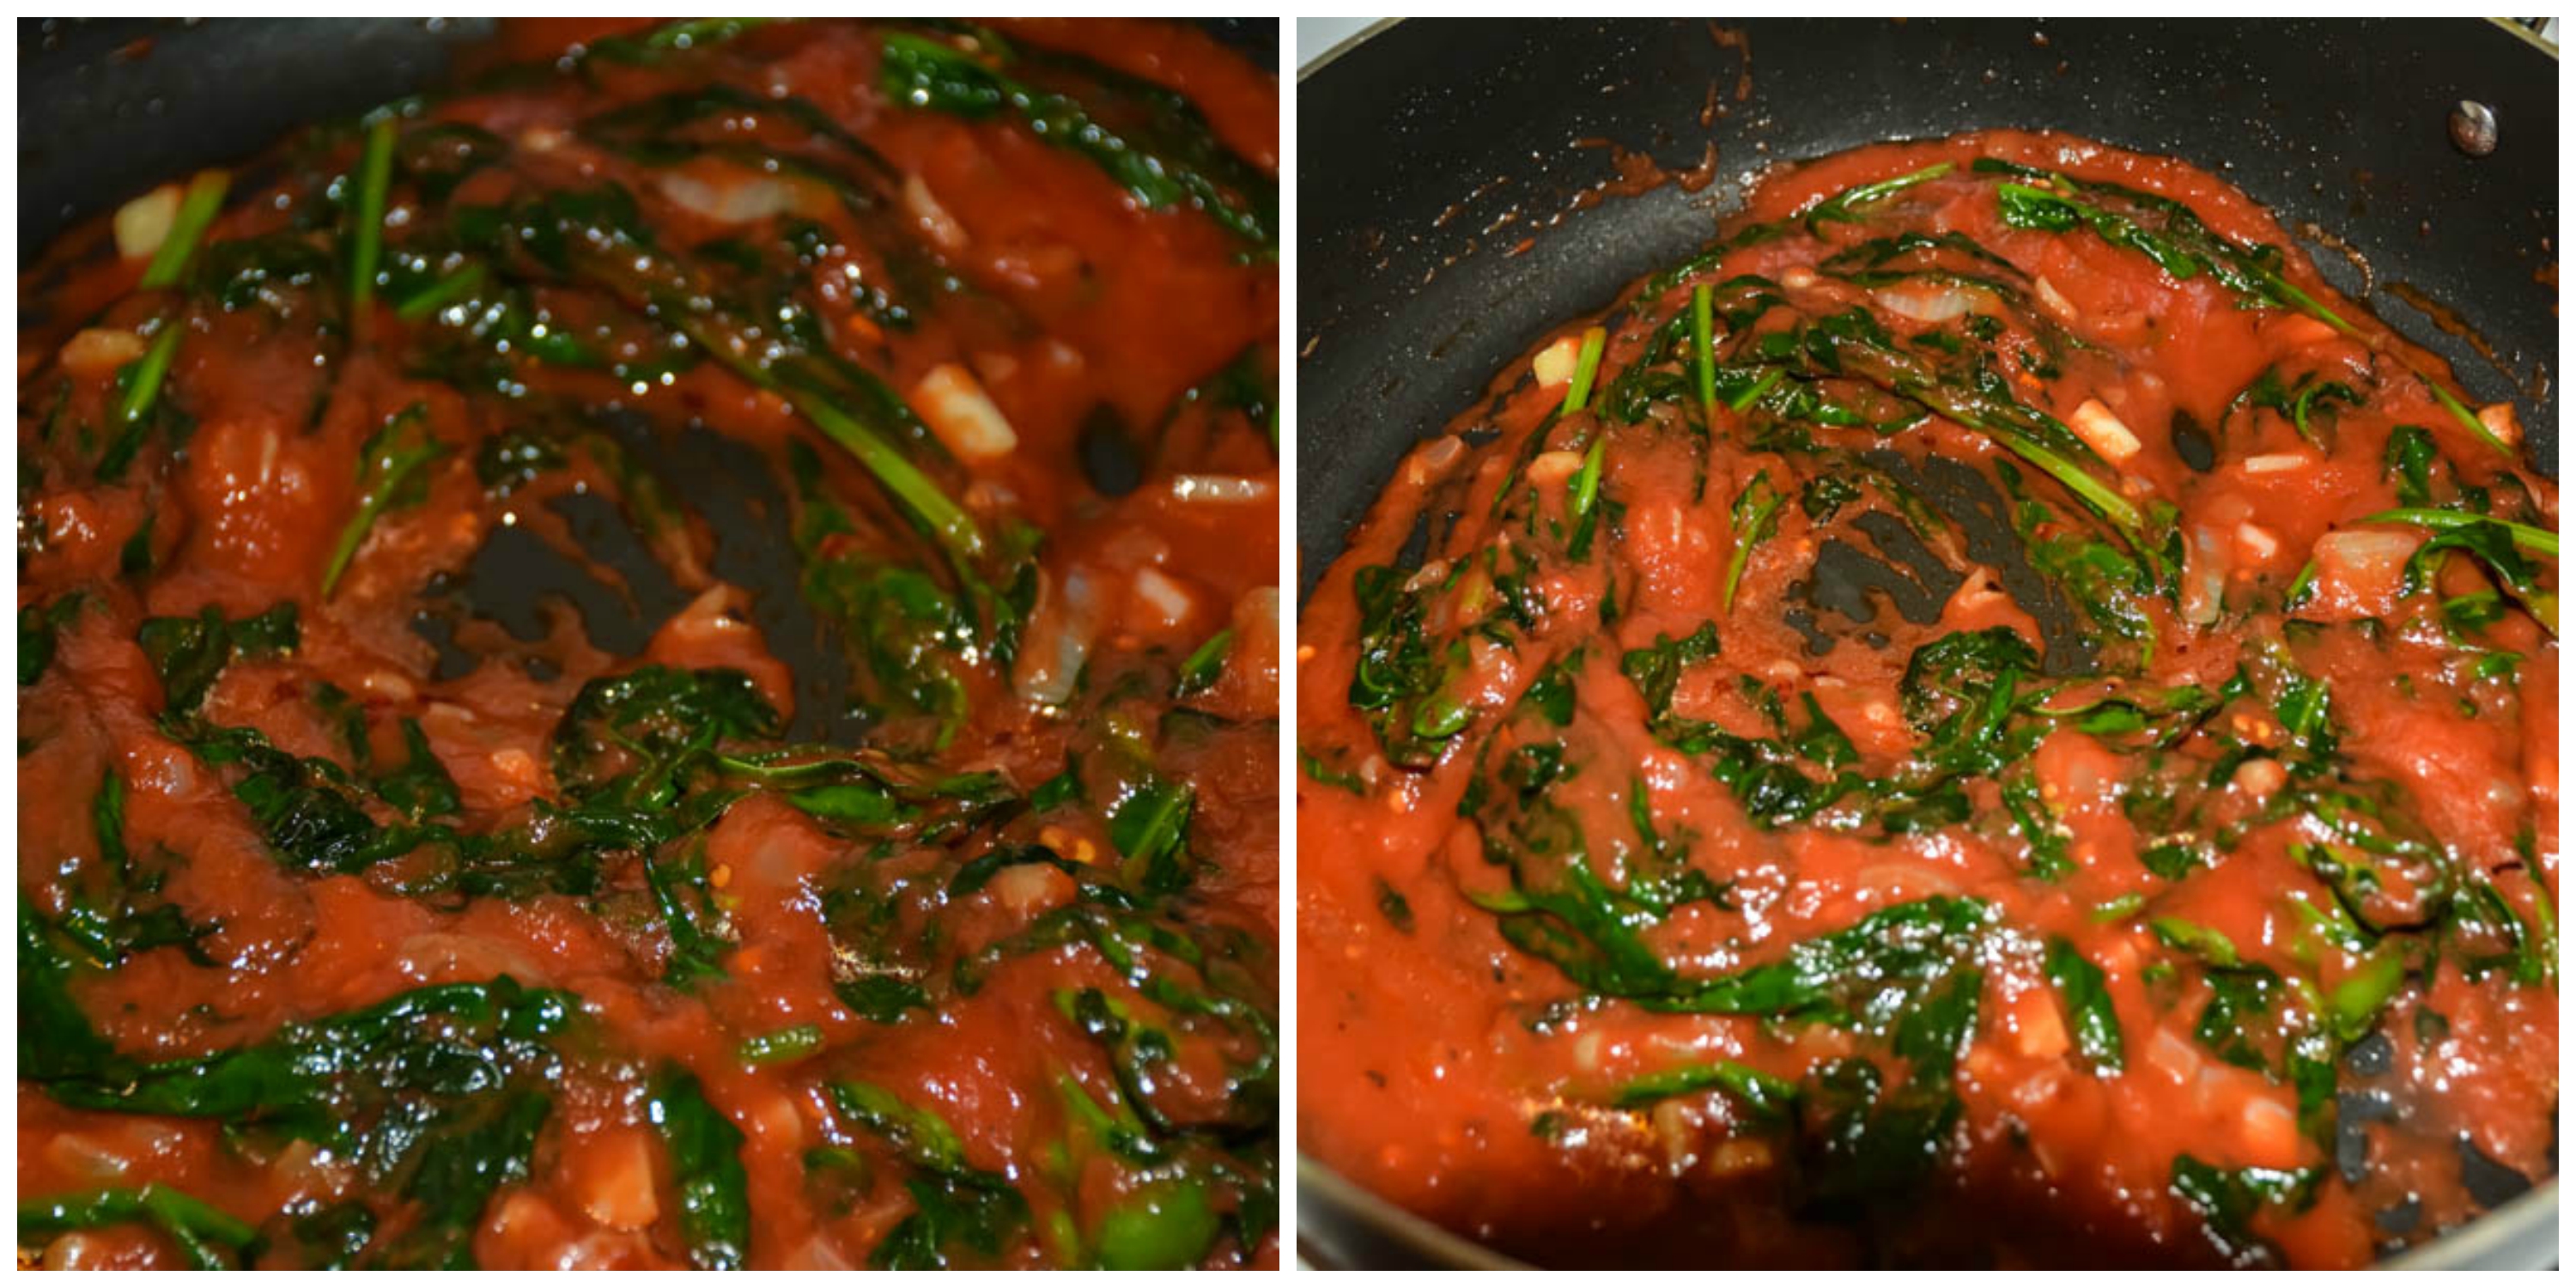
  4. Then now to the skillet, add the corn, beans, enchilada sauce, chilli powder, 2 tbsp of water, salt to taste and cumin powder. Keep sautéing till the raw smell leaves for 2 minutes.

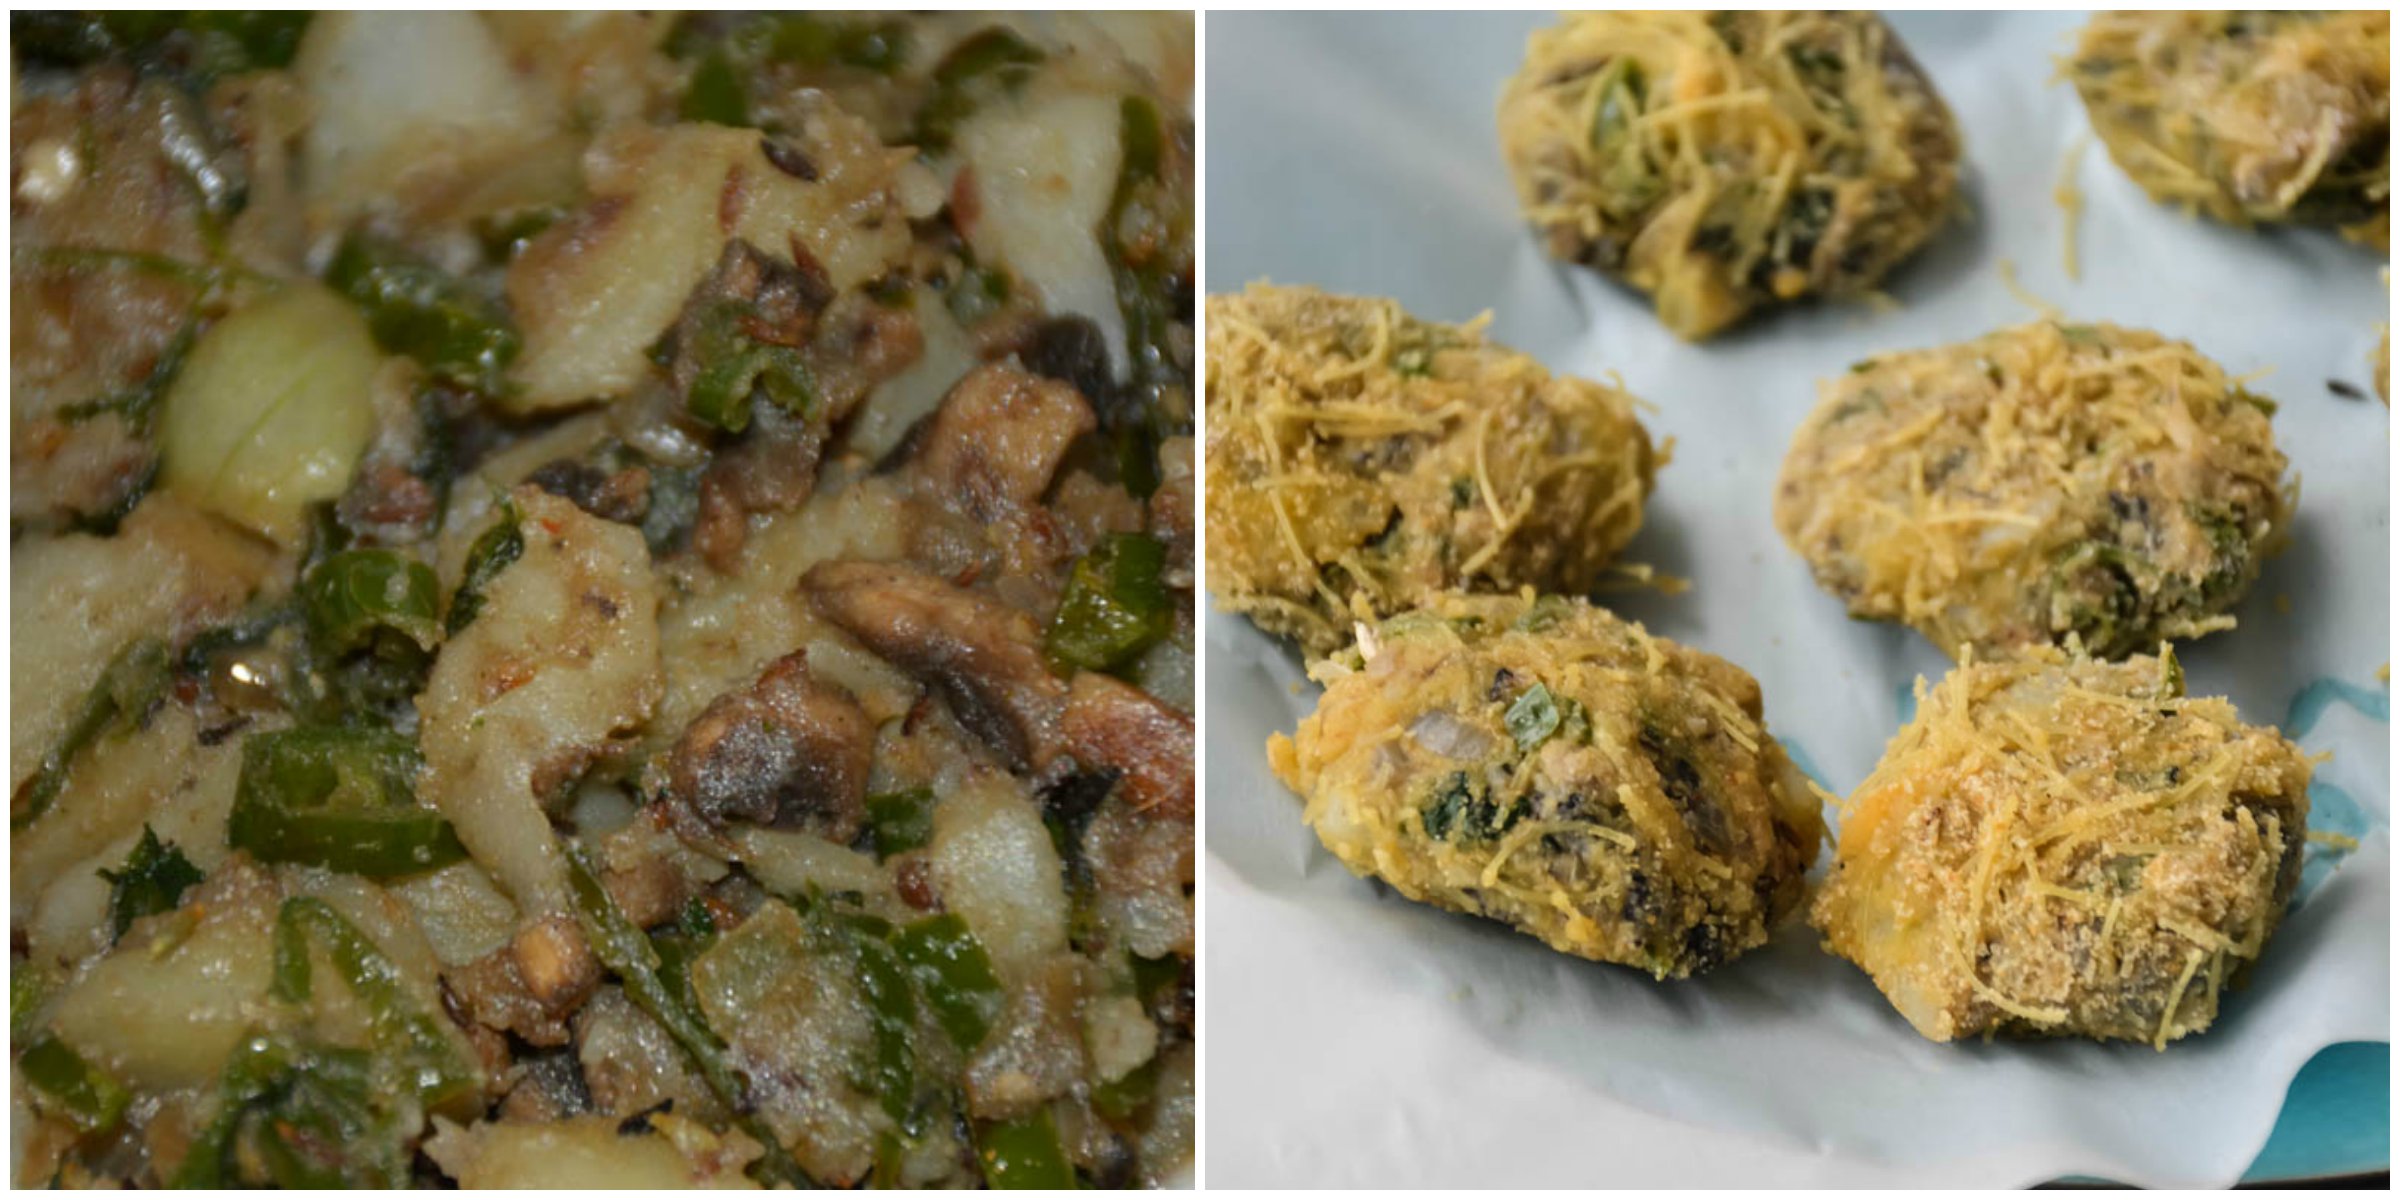
  5. Then add the quinoa to the skillet, mix and switch off.
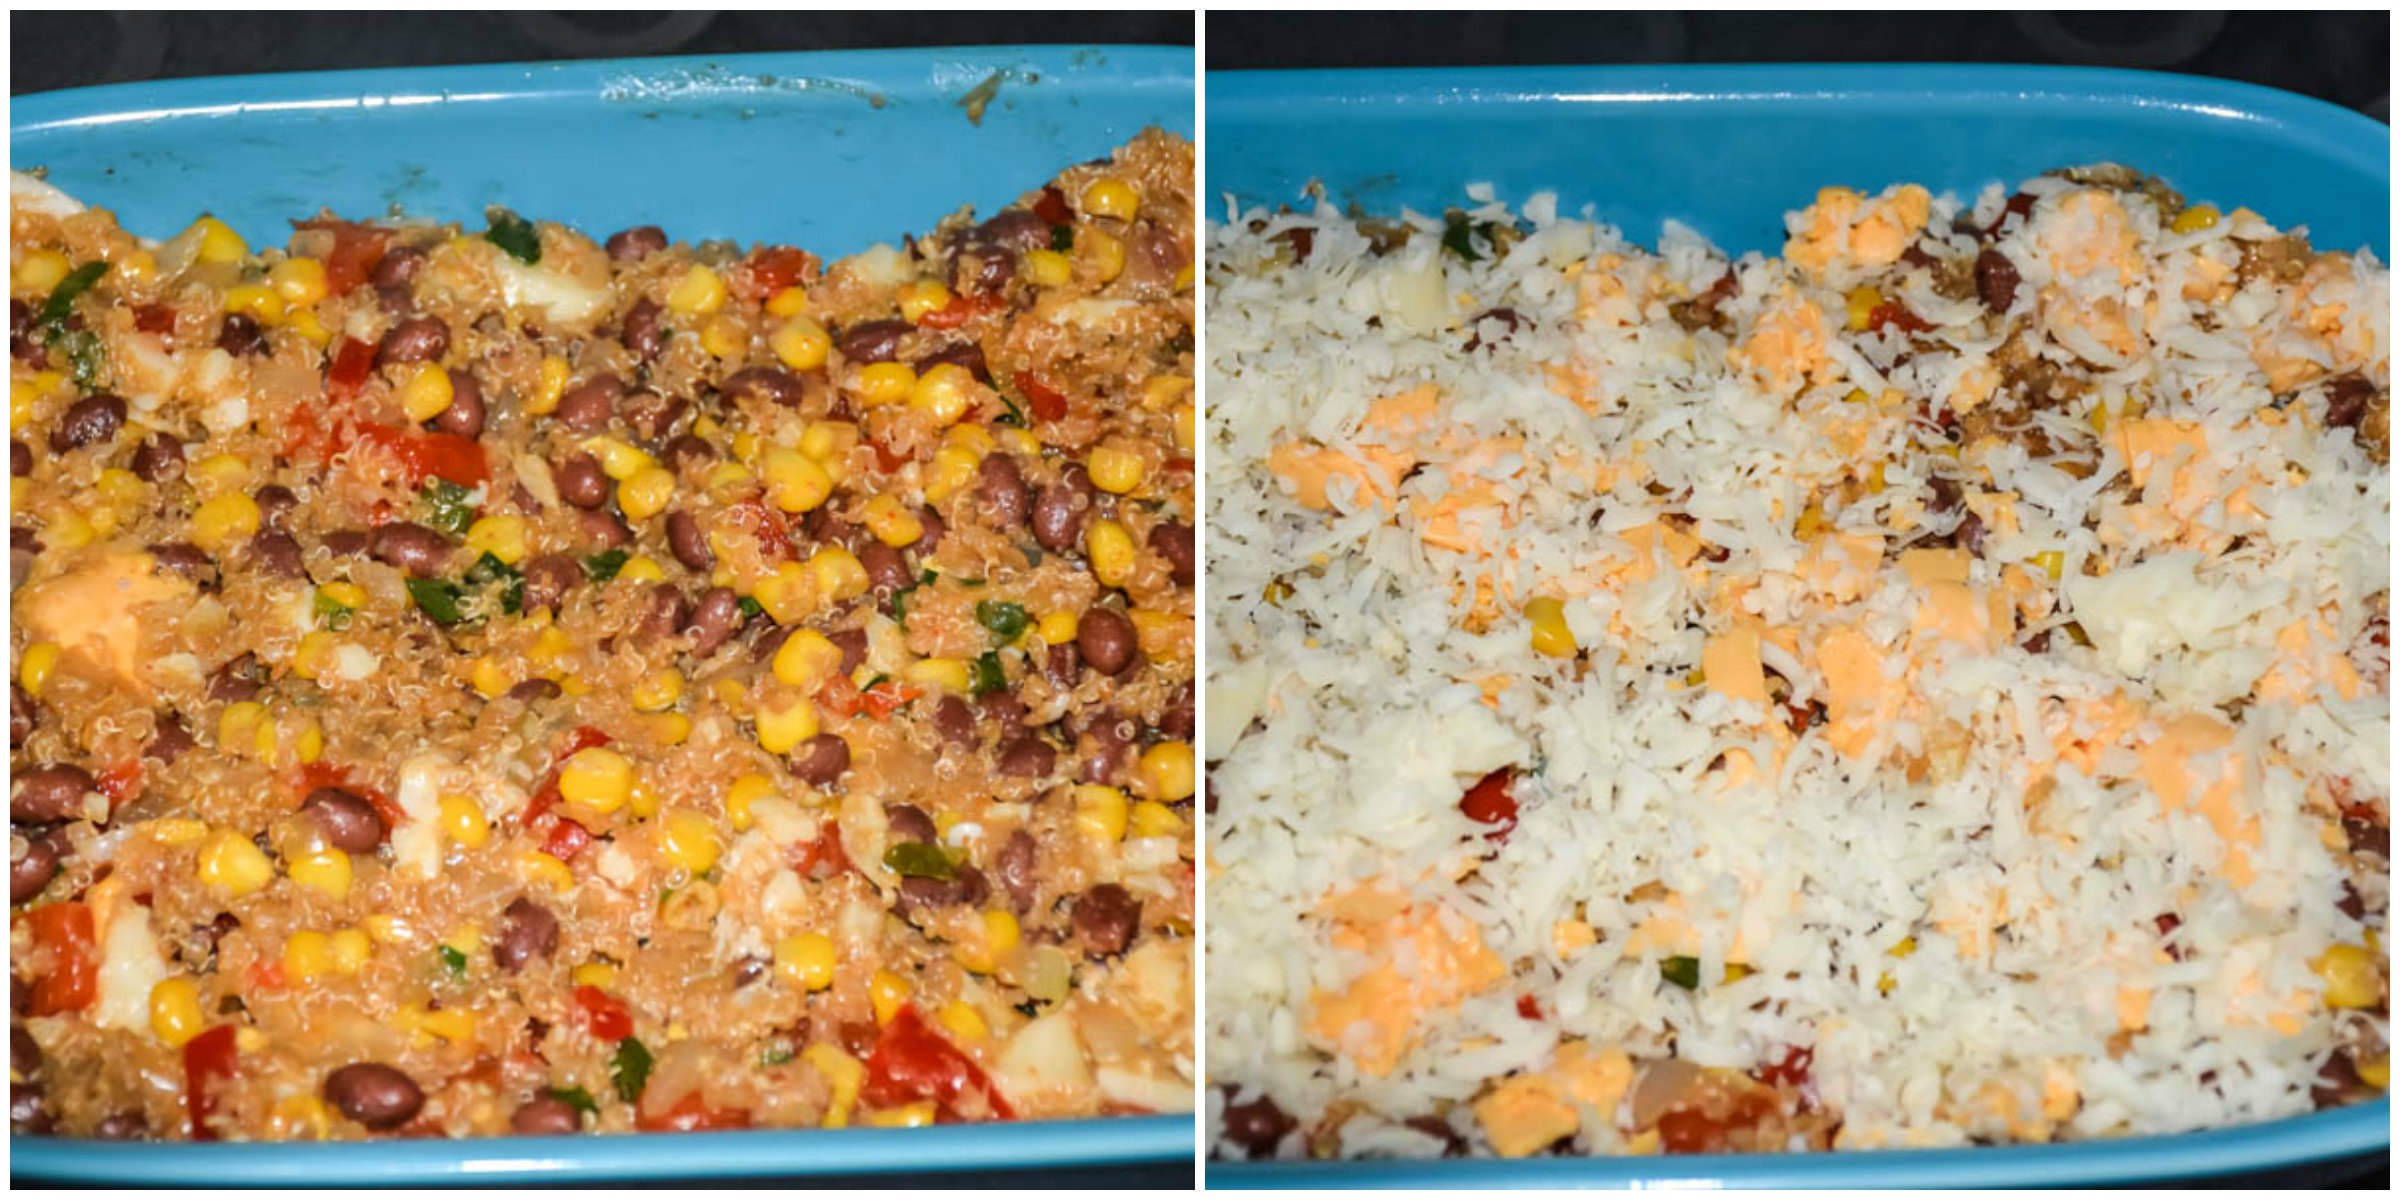
  6. Now take the oil greased baking dish, just spread little enchilada sauce, then place half of the tortillas ( I cut them into half), cooked veggies, 1 cup of cheese, then again rest of the tortilla, cooked veggies, rest of the cheese and squeezed some lime on top.

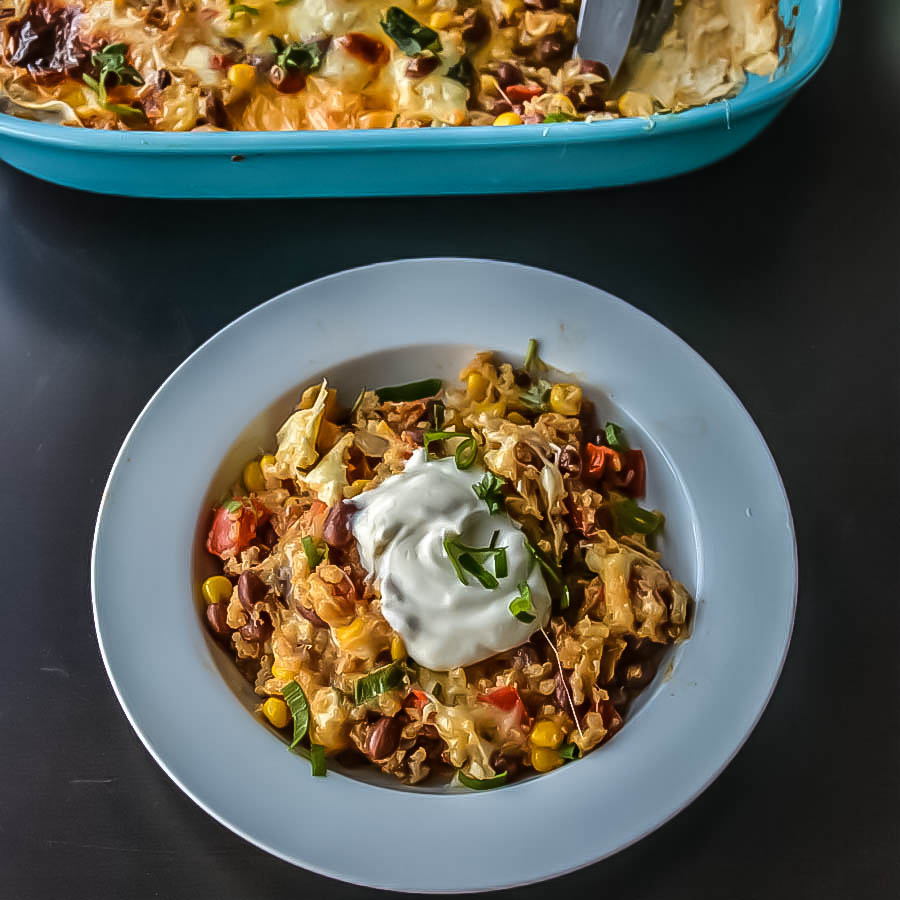
  7. Bake it by covering with foil for 15-20 minutes. Remove it when the sauce is bubbling and the cheese is melted.
  8. Garnish with some sour cream/ yogurt and green onions/ cilantro on top.
Wordpress Recipe Plugin by EasyRecipe
3.3.3077

Disclaimer: World Kitchen sponsored this post, I was given this beautiful four-piece set of Corningware baking dishes to try and I’ve been compensated monetarily for this recipe. However, all opinions are my own as always.

Casserole-3-2

Filed Under: PIZZAS & TACOS Tagged With: canada giveaways, corn quinoa casserole, Corning ware 2.5 qt giveaway, Corning Ware Giveaway, giveaway to canadians, giveaway to quebec, Healthy Mexican Corn quinoa Casserole, Healthy Mexican Corn quinoa Casserole + Corning Ware Giveaway, healthy mexican recipes, mexican recipes, quick vegetarian healthy recipes, quick vegetarian kid friendly recipes, quick vegetarian recipes, quick weeknight mexican recipes, quinoa party recipes, quinoa quick recipes

CLIF Organic Trail Mix bar Review

October 8, 2015 by Suki Leave a Comment

cliforganic

cliforganicBars have been a part of my daily life for almost two years now. I love to have it whenever I work out. It surely helps me to work out more. And I have heard from my friends and family that they prefer these too. So when I received these new CLIF Organic Trail Mix Bars, I was super excited to try them. These bars are totally organic, great source of fiber, healthy, vegan, vegetarian and are gluten free. 🙂 Cool, right?

The flavors of the new CLIF Organic Trail Mix Bars are:

  • Coconut Almond Peanut
  • Dark Chocolate Peanut Butter
  • Dark Chocolate Cherry Almond
  • Dark Chocolate Almond Sea Salt
  • Dark Chocolate Pomegranate Raspberry

cliforganic-3

I liked the way they have that large pieces of nuts and chocolates. Personally, I totally love the dark chocolate pomegranate raspberry in all of that and found it healthier than others. And the other dark chocolate bars were in my travel kit always, easy for on the go snack. And coconut almond peanut was like a dessert to me which was perfect that was not super sweet but perfect for a good dessert. Their retail price is around $1.99 and can be found in most major grocery stores and natural food stores such as Loblaws, Whole Foods, Sobeys, Wal-Mart, Longos, Safeway, Thrifty Foods, Save on Foods, Federated Coop, Calgary Coop, IGA, Costco, Shoppers Drug Mart, London Drugs, Rexall, Jean Coutu, most airports, Mac’s, Couche-Tard, Shell, Canadian Tire, 7 Eleven, Moutain Equipment Coop, Running Room, Sport Chek, Amazon.ca, Spud.ca. More details here.

I have tried CLIF bars before but when I knew this is organic, I wanted to try it :)! It was very tasty. Most bars had choc chunks 😉 so obvious that it is tasty.  These are different from Original Clif bars, it has way more fibre and less carbs and also it is higher in fat which is the only negative I would say. But few tasty things are worth the fat 😉 I think!

cliforganic-3

I always recommend Bars to people even though they are higher in sugar because it keeps us energetic. So these bars are great-tasting crunchy snack, organic, vegan, vegetarian, nutritious, gluten free and I totally recommend these bars for a try! 🙂 Those have an active lifestyle, these bars are ideal for them.


Disclaimer: CLIF bar provided me with my 10 CLIF Organic Trail Mix Bars for sampling and review purposes.  I’m not being paid, and CLIF Bar has not reviewed this post prior to publication. However all opinions are my own as always. 

cliforganic-4

Filed Under: Uncategorized Tagged With: clif bar review, CLIF bar reviews, Clif bars, CLIF Organic Trail Bar review, Coconut Almond Peanut review, Dark Chocolate Almond Sea Salt review, Dark Chocolate Cherry Almond bar review, Dark Chocolate Peanut Butter review, Dark Chocolate Pomegranate Raspberry review, Healthy Bar reviews, Organic bar review, Organic trail bar reviews

Whole Green lentil recipe/ Punjabi Sabut Moong Dal Recipe

October 7, 2015 by Suki 10 Comments

GreenMoongdal

GreenMoongdal

Insanely delicious & addictive Indian classic dal. Perfect for weeknight! So easy & healthy, no more takeaway!

It’s an authentic culinary dish from North Indian cuisine. It has only a handful of ingredients but yet the flavor and the spices with the fragrance ghee make the dish finger licking good for all seasons. I make dal always at least once in a week. But I really do not take pictures of it as it will be very late for me for have the food. I always feel it is delicious and perfect comfort food. And also healthy. Dal can be made in different ways using different dal like Normal simple dal, dal tadka, dal fry using different dal. I really love to make dal because it is simple and very comforting food. I make sure I make them once in a week atleast. I usually make them on a weekday because it just takes 10 minutes for me in a kitchen. I pressure cook them, meanwhile I chop some veggies for side dish. You can replace the dal with any dal you want.

You can have this as soup. This dal taste great with plain rice and some papad/veggies stir fry or paratha & some salad.


Vegan Note: use any oil in this recipe instead of ghee. 


My other Favorite Dal/ Lentil recipes: Dal with caramelized shallots, Lasooni Dal Tadka/ Garlic Tempered Lentils, Trevti dal/ Three Lentil dal, Gujarati Surati dal/ Peanut Tomato Lentil Recipe, Chana dal Paratha/ stuffed Lentil Paratha, Tomato dal Rasam/ Tomato Soup,Indian Style Lentils/ South Indian sambar, Bisibelabath/Hot spicy lentil Rice, crunchy lentil nuggets/Uppu seedai,spinach with lentils/ Keerai Moolagootal.


GreenMoongdal

4.8 from 6 reviews
Print
Whole Green lentil recipe/ Punjabi Sabut Moong Dal Recipe
Author: Suganya Hariharan
Recipe type: Main
Cuisine: Indian
Prep time:  10 mins
Cook time:  20 mins
Total time:  30 mins
Serves: 2 cups
 
Ingredients
  • • Green Moong Dal – 1 cup
  • • Tomatoes – 2 medium sized, chopped
  • • Onions – 1 medium sized, chopped
  • • Green Chilli – 1, chopped
  • • Garlic – 5, finely chopped
  • • Ginger – ½ inch, finely chopped
  • • Red chili powder – 1 tsp
  • • Turmeric powder – ¼ tsp
  • • Cumin powder – ½ tsp
  • • Garam Masala – 1 tsp
  • • Jaggery – ½ tbsp
  • • Lemon juice – ½ tbsp
  • • Dry Methi leaves – 1 tsp
  • • Coriander leaves – to garnish
  • • Salt – 2 tbsp

    For Tempering:
  • • Mustard seeds – ½ tsp
  • • Dry Red chillies – 3, broken
  • • Asafoetida – a pinch
  • • Curry leaves – 1 sprig
Instructions
  1. Rinse lentils and soak for an hour. And keep it in pressure cooker with tomatoes, onions, garlic, ginger, green chilles, turmeric powder with 3.5 -4 cups of water for 7-8 whistles in medium heat .
  2. Mash the lentils using a wooden spoon or a masher to a smooth mixture.
  3. Add the ½ tsp red chilli powder, cumin powder, garam masala and salt to the dal.
  4. Bring the dal to boil in medium-low heat for 5 minutes and add jaggery and methi leaves to it in this step. If you find the consistency to the dal becomes thick, add more water. If you think it’s too liquidy, boil it for few more minutes.
  5. It’s time to temper by heating oil or ghee in a pan, then add the mustard seeds, ½ tsp of red chilli powder and then when its pops, add the asafetida, curry leaves and red chillies. Fry for a few seconds but don’t burn it.
  6. Pour the tempering on top of dal. And squeeze some lemon juice and stir with the seasonings. Garnish with coriander leaves.
Notes
1. If you think it’s too spicy, you can reduce the green chillies.
Wordpress Recipe Plugin by EasyRecipe
3.3.3077

GreenMoongdal

Filed Under: NORTH INDIAN GRAVIES/DAL/CURRY Tagged With: dal recipes, dal recipes quick, greend al recipes, healthy Indian soup recipes, helathy soup recipes, lentil recipes, Lentil soup recipe, Moong dal recipes, Quick dal recipes, quick lentil recipes, quick north Indian dal recipe, quick punjabi recipes, quick recipe for kida, quick vegetarian recipes, quick weekday, Spicy soup recipes, vegan dal recipes

Spicy Tomato Chutney/ Thakkali Thokku

September 28, 2015 by Suki 2 Comments

tomatothokku-7

tomatothokku-7Tangy & Spicy tomato chutney with Indian spices using the freshest tomatoes. And it is an excellent side for many recipes. Store and enjoy it for 2- 3 weeks!

Whenever I leave from India, my mother used to make some homemade recipes that I can preserve for a month or two.  She used to make some coriander thokku, curry leaves thokku, tomato thokku, pulikachal, pickles and so on. So I thought of preparing some now and give it to my sister when I am planning to meet her next week. Following my Mom in cooking I guess 🙂 I don’t know how much my nephew would love this ;)! He is just 2 years 🙂

tomatothokku-10

I really love using my freezer to preserve food. I love these homemade chutney or sauce and they are always a great savior when it comes to weekdays. I am alright cooking on weekends, but on a weekday I get so tired that most of the days I tend to make recipes under 30 minutes, finish and sleep. You can also use these for travel, it will not get spoiled easily for a long travel. For this recipe, try to use ripe tomatoes. And adding sugar or jaggery enhances the flavor and helps in balancing out the acidity.


You can use them as a dip and it also taste great with paratha, bajji, curd rice or mix it with plain rice and its heaven on earth!


tomatothokku-12


5.0 from 1 reviews
Print
Spicy Tomato Chutney/ Thakkali Thokku
Author: Suganya Hariharan
Recipe type: Main
Cuisine: Indian
Prep time:  5 mins
Cook time:  45 mins
Total time:  50 mins
Serves: 50 minutes
 
Ingredients
  • Onion – 1 (medium), finely chopped
  • Tomatoes – 5 (medium), chopped
  • Garlic – 10 (medium sized cloves), chopped finely
  • Ginger – 3 inch, grated
  • Curry Leaves – 1 sprig
  • Asafoetida/ Hing – 2 tsp
  • Red Chilli (whole) – 2, broken
  • Salt – to taste
  • Turmeric powder – 1 tsp
  • Red Chilli powder – 2 tbsp
  • Fenugreek seeds powder – 1 tsp
  • Jaggery – 1 inch
  • Gingelly Oil – 3- 4 tbsp
Instructions
  1. Heat a pan with oil in medium flame and crackle the mustard seeds. Then add the broken red chilli, asafetida, curry leaves, ginger and garlic. Sauté till they change color slightly.
  2. Add the onions with a pinch of salt and sauté till they become translucent.

  3. Add the chopped tomatoes at this stage and cook it till it becomes mushy. Stir it occasionally.
  4. Add the red chilly powder, turmeric powder, fenugreek seeds powder with 2 tsp of oil again. Sauté till the raw smell leaves. Add 3 tbsp of water with jaggery and allow it to boil for few minutes in medium to low flame.

  5. It will start to ooze out oil in the sides at a stage and will become a thick paste. It takes about 20-30 minutes for this process.
  6. Switch off and cool it completely.
  7. Store it in an air tight container for 2- 3 weeks in the refrigerator.
Notes
1. we really need the amount of oil in the recipe to make the recipe if you want to store it.
Wordpress Recipe Plugin by EasyRecipe
3.3.3077

 tomatothokku-13


Filed Under: HOMEMADE, RAITA/DIPS/CHUTNEY Tagged With: chapathi side dish quick recipes, homemade dips recipes, homemade quick chutney recipes, homemade sauce recipes, homemade thokku recipes, iyer style thokku recipes, pickles for travelling, Poori side dish, quick chapathi side dish, quick curry for rice, quick naan side dish, quick paratha side dish recipes, quick roti side dish, quick south Indian vegetarian recipes, quick vegetarian recipes, readymade rice mix, readymade sauce, sauce for rice, Thakkali Thokku recipe, thokku recipes, travel Indian recipes, vegan chutney recipes, vegetarian chutney recipes

Paneer (Indian Cheese) & Tofu Recipe Collection

September 17, 2015 by Suki 4 Comments

 PaneerTofuRecipes

Paneer is a type of fresh cheese that can be made easily at home.  Paneer has a milky flavor on its own, so it taste best when paired with strong spicy flavor like curries or tikka. This is a cheese that won’t melt like mozzarella or cheddar will. We can add them on any curry, or crumble them into flat breads like roti. Or even add them to kebabs and the cheese will keep its shape and chewy texture. Anything with paneer is a definite win. The texture of paneer is similar to greek feta which is prepared in a similar manner. When there is guest over and I wanted to do vegetarian dishes, I will make it a point to do atleast one paneer dish . It goes well with any kind of pulao, jeera rice, naan,roti or any kind of bread you fancy.   Tofu(bean curd) made by coagulating soy milk and then pressing the resulting curds into soft white blocks. It is a healthy version of paneer and very amenable, versatile ingredient and a very light version to be paired with sesame, cucumber, capsicum, coconut, garlic and it add a lot of flavors.   Vegan note: Replace paneer with tofu, ghee/butter with oil and cream with yogurt.


    My other collection Recipes: Breakfast in 20 Minutes or less, Biryani Collection recipes, Garlic based Recipes, Mouthwatering Vegetarian Potato Recipes, Dinner recipes in 30 minutes or less.

  1. Pepper Paneer Do pyaza


paneerpyaaz-8 Paneer or cottage cheese cooked in a rich, creamy and mildly spiced onion based gravy. Recipe is here.


  1. Spicy Garlic Tofu in 10 minutes


  TOFU-3 Truly fancy, delicious, restaurant style, vegan dish in 10 minutes. This is a recipe which will come to your rescue when you haven’t planned a meal on a week day. Recipe is here.


  1. Malai Methi Paneer


  Malaimethipaneer1 This dish is made of beautiful capsicums, methi leaves and of course paneer. Recipe is here.


  1. Palak Paneer/Spinach with Indian Cheese


PalakPaneer-7name

Delicious creamy Indian spinach with cubes of cheese – takes only 30 minutes to make. Recipe is here.


  1. Cashew Paneer

cashewpaneerfinal-2

Fried cashew and paneer pieces simmered in rich and creamy tomato cashew gravy!Recipe is here.

  1. Matar Paneer/ Paneer Peas Masala

PaneerMatarMasalafinal1


Pan fried paneer with peas and spices in rich cashewnut gravy.Recipe is here.

  1. Paneer Makhanwala


Paneer_Makhanwala_Relishthebite_name1 Paneer cubes in a buttery nutty creamy tangy flavor. It is a rich dish with really tasty ingredients. Recipe is here.

  1. Paneer Biryani


paneerbiryaniname This is a treat for the vegetarians. Aromatic and flavorful one pot meal!Recipe is here.

  1. Mint & Tofu Whole Wheat Paratha


Tofu_Paratha_name It’s a whole wheat bread stuffed with mint and tofu. Recipe is here.

  1. Mushroom Tofu Veggie Potstickers with Chili Hoisin Ginger sauce


Dumplings-18 It’s a whole wheat bread stuffed with mint and tofu. Recipe is here.

  1. How to make Paneer or Cottage Cheese at home / Homemade Paneer Recipe


Homemade Paneer1 I like making paneer at home. But sometimes i do buy them outside if I am very indolent. But I am sure home-made paneer is more hygienic and it saves a lot of money as well.  Paneer is the star ingredient in some of my favourite north Indian dishes. You need very few ingredients to make paneer at home. if you have milk, lemon juice, pan, strainer and some cheesecloth/normal cloth, you can have fresh paneer cheese at home.Recipe is here.

  1. Red Thai Tofu Curry


Thairedcurry-12 [Read more…]

Filed Under: COLLECTION RECIPES Tagged With: asian tofu recipes, healthy vegetarian recipes, Indian paneer recipes, Paneer (Indian Cheese) & Tofu Recipe Collection, paneer recipes, Paneer recipes best, paneer recipes collection, paneer veg recipes collection, party paneer recipes, quick paneer recipes, quick tofu recipes, spicy thai tofu recipes, spicy tofu chinese recipes, spicy tofu recipes, Tofu recipes, tofu recipes in 10 minutes, vegan tofu recipes, vegetarian recipes

Lamb Spinach Curry/ Saag Gosht

September 13, 2015 by Suki 4 Comments

LAmbSpinach Curry-12

LAmbSpinach Curry-12Forget about the rich and creamy restaurant styled curry we’re all accustomed to! This is Insanely delicious & super easy.

I made this long back and never got some time to post it, thought would post it this week. I made this for my friends who gave a visit to my place. It is a classic lamb spinach curry. One of my friends before few months asked me to try the combination of lamb and spinach as she heard that it is one of the ultimate combo. I tried it and I totally agree, the whole house was full of beautiful aroma and that spinach gave the lamb a perfect taste. And there is no cream, milk or anything to this. It is just so simple to make that you would make this even on a weekday and you can make your week more happening! 🙂

Try having this with some plain rice; no one would stop with one bite on this cold weather. It’s so relaxing when you have this for a weekend lunch. Feel free to cut the chilli powder by half if you can’t take spicy food. And also you can replace the lamb by mutton. When all the lamb curry is over, take some plain rice mix it in the same pan and have it right away. oHHHH!! Darling & Delicious! You can have this with plain rice, ghee rice, rasam/sambar, or roti,naan, paratha, parotta.

I make different styles of lamb each time and I usually tend not to make the same recipe again and again. There are so many recipes to try, why to waste on preparing the same one.  We have thousands of recipes to try in every cuisine.    I made this with rasam one day. It is one of the finest spicy recipes. If you are making it for the first time, try to taste as you make to adjust to your spice level. This recipe was spicy, tasty and flavorful. The authentic method of preparing this recipe is by pureeing spinach, but I liked to make it this way.

I would say normally Mutton and lamb recipes are a treat to any Non Vegetarian food lover.

Other favorite Lamb/Mutton Recipes:  Restaurant style lamb biryani, Lamb pepper curry Roast, Kadai Ghost/Lamb Curry, Spicy Honey Garlic Rack of lamb, Mutton sukka, Ambur Mutton Biryani.

Other favorite spinach recipes: Palak paneer/ spinach paneer curry, Spinach peach balsamic salad, saag aloo capsicum/ spinach potato pepper curry, spinach garlic curry, spinach with lentils/keerai moolaigootal, Pasta baked in spinach creamy rose sauce.

LAmbSpinach Curry-11

5.0 from 1 reviews
Print
Lamb Spinach Curry/ Saag Gosht
Author: Suganya Hariharan
Recipe type: Main
Cuisine: Indian
Prep time:  15 mins
Cook time:  30 mins
Total time:  45 mins
Serves: 3 cups
 
Ingredients
  • Lamb – 500g, cleaned and cut into small pieces ( I used shoulder)
  • Oil – 3 tbsp
  • Mustard seeds – ½ tsp
  • Cumin seeds/ Jeera – 1 tsp
  • Red Chilli – 2, broken
  • Curry leaves – 1 sprig
  • Onions & shallots (mixed)– 2 cups, chopped finely
  • Tomatoes – 1 cup, chopped finely
  • Green chillies – 2, chopped finely
  • Garlic – 6, chopped finely
  • Ginger – 1 inch, chopped finely
  • Turmeric powder – 2 tsp
  • Chilli powder – 1 ½ tbsp
  • Coriander powder – 1 tbsp
  • Cumin powder – 1 tbsp
  • Spinach – 2 cups, chopped ( can add pureed spinach too)
  • Sugar – a pinch
  • Lime juice – 2 tsp
  • Coriander leaves – to garnish
  • Salt – to taste
Instructions
  1. In a cooker, add the lamb, 1 tsp of turmeric powder,little salt and water just to cover the lamb and not more. Close the pressure cooker, keep it in medium flame for 5-6 whistles till lamb is cooked well. Switch off and keep it aside. You can just cook the lamb with some more water in medium-low flame covered for 35-40 minutes if you don’t have pressure cooker.
  2. In a pan, heat oil and add mustard seeds. When it crackles, add cumin seeds and red chillies, curry leaves, when it changes color, add the onions, green chillies garlic, ginger ,little salt and sauté till golden brown.

  3. Now add the tomatoes, 1 tsp of turmeric powder and fry till it is mushy.
  4. Add the chilli powder, coriander powder and cumin powder. Saute them till they ooze out some oil on sides. Then add the spinach, lime juice, sugar and mix well for few seconds. (lime juice helps in absorption of iron from spinach).

  5. Add the cooked lamb with ¾ cup of water (use the broth from the cooked lamb). Mix well and let all the mixture get cooked together till they leave some oil on top and let the water evaporate. Do not cover it (Spinach will lose its color). Check salt at this stage and add it if needed.

  6. Finally garnish with coriander leaves and serve with hot rice.
Wordpress Recipe Plugin by EasyRecipe
3.3.3077

 LAmbSpinach Curry-9

Filed Under: LAMB, NON-VEG RECIPES Tagged With: Indian Recipes, lamb fall recipes, lamb indian recipes, lamb recipes, lamb saag, Lamb Spinach Curry/ Saag Gosht, mutton saag, quick lamb recipes, saag gosht, saag recipes, spinach fall recipes, spinach indian recipes, spinach lamb recipes, spinach recipes

2 Minute Chocolate Peanut Butter Crumb Mug Cake

September 11, 2015 by Suki 13 Comments

reese chocolate mug cake-4

reese chocolate mug cake-2

Moist chocolatey cake topped with chocolate cinnamon streusel in just 2 minutes. The quickest way to treat yourself! It’s only one serving size with no eggs. Drizzle some of your favorite syrup if you really want to but the crumb is just enough to cover. It has chocolate and peanut Butter! DOUBLE Yum! Right 🙂

reese chocolate mug cake-11

I have been experimenting with different mug cakes ever since I heard about them before two years. It’s so quick that I don’t click pictures most of the time. And my recent creation is this chocolate peanut butter mug cake. This is one of the ideas that popped into my head when Hersey’s sent me these two lovely jars of peanut butter chocolate spread. Yes, you are reading that right. 🙂 It is Hershey’s Reese peanut butter chocolate spread. It was in United States and now in Canada too. I had lot of ideas when I received it but I wanted to try something quick and tasty recipe only. I believe that quick recipes are what all we need in this busy life. I tried not digging into the jar because I want to try some great recipes 😉 I would surely spoon in otherwise 😀 if you know me. You can also try this recipe with plain chocolate or peanut butter spread. I always like to have mug cakes for breakfast with some milk or coffee. You can have it 🙂 even as a snack 😉 and actually you don’t need a reason to have this 😀 !

Vegan note: Replace the yogurt with soy milk or coconut milk.

reese chocolate mug cake-4

5.0 from 1 reviews
Print
2 Minutes Chocolate Peanut Butter Crumb Mug Cake
Author: Suganya Hariharan
Recipe type: Breakfast
Prep time:  2 mins
Cook time:  2 mins
Total time:  4 mins
Serves: 1 Mug cake
 
Ingredients
  • Vegetable oil – 3 tbsp.
  • Granulated sugar – 2 tbsp
  • Vanilla extract – ⅛ tsp
  • Chocolate Peanut Butter – 2 tbsp
  • Yogurt – 2 tbsp
  • All-purpose flour – 3 tbsp
  • Baking soda – ⅛ tsp
  • Cinnamon – ½ tsp
  • Salt – a pinch


  • Streusel:
  • Ground cinnamon – ⅛ tsp
  • Light or dark brown sugar – 1 tbsp
  • Semi-sweet chocolate chips – 1 tbsp
Instructions
  1. Make the streusel by combining all the streusel ingredients into a small bowl.
  2. In a mug, add vegetable oil, sugar and mix well. Then add the vanilla extract, the star ingredient “chocolate peanut butter”, yogurt and mix well.
  3. Now add the flour, cinnamon, baking soda, salt to it. Mix all well.
  4. Top it with the streusel.
  5. Microwave for 2 minutes on high. Start checking from 1 minute 20 seconds. Mine was done exactly at 1 Minute 30 seconds. Even keeping in microwave for long can turn it rubbery.
Wordpress Recipe Plugin by EasyRecipe
3.3.3077

Disclaimer: This post has been sponsored by the Hershey’s Canada and I have been compensated monetarily! However all opinions are my own as always.

reese chocolate mug cake-12

Filed Under: BREAKFAST, DESSERTS Tagged With: 2 minute recipes, 2 Minutes Chocolate Peanut Butter Crumb Mug Cake:, breakfats recipe under 5 minutes, chocolate cake recipes, chocolate spread mug cake recipes, eggless mug cake recipes, Hershey chocolate peanut butter recipes, Hersheys recipes, Mug cake recipes, peanut butter mug cake recipes, quick breakfast recipes, quick cake recipes, quick kid friendly breakfast, reese chocolate spread mug cake recipes, reese recipes, vegan mug cake recipes, vegetarian mug cake recipes

Spicy Curry leaves seedai / Crunchy Lentil Nuggets

September 4, 2015 by Suki 1 Comment

Seedai-7

Seedai-7Crispy curry leaves flavoured nuggets – A perfect snack to have while sipping a cup of hot chai.

Hello all , It’s Janmashtami/ Krishna Jayanthi on Saturday 5, September 2015. It’s the birthday of the Lord Krishna. I have a collection of festival recipes like uppu seedai, murukku, aval payasam, ladoos and so on, you could check it for more. But the main savory we do for this festival is the “Uppu seedai/sweet seedai”. I am going to uncover my own version of a revised “uppu seedai” recipe today here. I like savory more than sweet after coming to Canada. When it comes to seedai there are chances that it would burst out easily. I am not trying to scare you, but be careful when you do this. May be in older days they used to have lot of stones in the rice which made it burst. These days its loads better and also if you sieve it well, it should be very fine  I have made spicy curry leaves murukku before for last year Diwali and it was the best in the whole recipes I made. So, I wanted to share this with you all 🙂

Seedai-6

The correct way to do this recipe is to soak one cup of raw rice in water for two hours, dry them completely by placing on a cloth/paper and grind them. I used the ready-made rice flour instead. It was equally good. I have no complaints. Let me know someone if you get to know the reason why we need to do the former method.

Seedai-6


5.0 from 1 reviews
Print
Spicy Curry leaves seedai / Crunchy Lentil Nuggets
Author: Suganya Hariharan
Recipe type: snacks & appetizers
Cuisine: Indian
Prep time:  30 mins
Cook time:  30 mins
Total time:  1 hour
Serves: 2 cups
 
Ingredients
  • • Rice flour – 1 cup
  • • Urad dal – ¼ cup
  • • Sesame seeds – 1tbsp
  • • Ajwain – 1 tsp
  • • Jeera/Cumin – 1tsp
  • • Salt – as needed.( I used 1 tbsp)
  • • Ghee – 1 tbsp
  • • Grated Coconut – 2 tbsp
  • • Oil – to fry.

    To grind:
  • • Curry Leaves - 15
  • • Red chilli - 4
  • • Garlic - 3
  • • Ginger - 1 inch
Instructions
  1. Blend everything under to grind. And keep aside.
  2. Fry the urad dal for 2 – 3 mins. Grind the urad dal very finely. Mix rice flour and urad dal powder together, Sieve them twice.

  3. Mix the ajwain, coconut, jeera, ghee, blended curry leaves & red chilli mixture and salt to the flour mixture.
  4. Add water little by little to form soft dough but do not make it watery/sticky.

  5. Now comes the major step, hold a little dough part on your left hand on the fingers side like shown below. Take a tiny dough part, press them and release them by making anticlockwise directions on the right hand. And the first seedai dough is ready. It should not be hard or very soft. It should be in perfect texture.

  6. Make them all like the above step.
  7. Fry them in hot oil and take them out when it’s in golden color.
Notes
. Try to be careful when you put them in oil, it might easily burst. So, sieve it properly to avoid stones.
2. When you make the balls, make sure it’s not very hard or very soft. It will either break or it will be too hard.
3. Use unsalted butter instead of ghee or if you using ghee adjust your salt accordingly as ghee would have salt.
4. If you think the dough is too hard, add little ghee and water. Very little would be good.
5. Oil should be very hot, or else it will break.
6. Roast the urad dal just for few minutes, which should do the job.
7. Try to use whole urad dal for this recipe. I used the broken one’s, as I did not have the whole urad dal handy.
Wordpress Recipe Plugin by EasyRecipe
3.3.3077

Seedai-8

Filed Under: SNACKS & APPETIZERS, SNACKS & APPETIZERS FESTIVAL Tagged With: Chilli recipes, Crunchy Lentil Nuggets, crunchy snakcs, curry leaves recipes, diwali recipes, Diwali snack recipes, festival snack recipes, Garlic recipes, garlic seedai, indian snack recipes, Krishna jayanthi recipes, krishna jayanthi snack recipes, quick Indian spicy snacks recipes, Spicy Curry leaves seedai, Spicy snack recipes, spicy snacks

Mushroom Cutlets

August 31, 2015 by Suki 8 Comments

Mushroom Cutlet-6
Mushroom Cutlet-6
Fantastic little treats for appetizers packed full of goodness.I am sure this is one of the finger food that is finger licking good. 
 
Finely chopped mushroom laced with mashed potatoes and spices.These are perfect appetizers and super easy to prepare. Mushroom cutlets are packed with great flavor. You can add veggies or minced meat to this if you want 🙂 for meat lovers. And vegetarians, you can mix some all purpose flour and water, replace egg dip with the all purpose flour dip.You can very well pan fry by drizzling some oil over a hot pan and arrange 3-4 at a time and cook in a medium flame both sides, until crisp. My mother always used to prepare cutlets this way. 
Mushroom Cutlet-8
 
When I used to come from school around 4 pm, my Mom makes some snack for me 🙂 totally for me. My sister is not crazy about food like me 😀 so it is totally for me. And I would just guess each day at the door from the smell each day. I totally miss it! I love you Amma (Mom). Mothers are the best in the creator’s 😀 hand.
 
Other Mushroom recipes: Mushroom Biryani, Vegan tofu mushroom dumpling potstickers, Mushroom green toast, Mushroom Spring onion masala, Mushroom Mini Quesadilla, Malai pepper mushroom, Garlic Creamy mushroom spaghetti
Mushroom Cutlet-7
 

5.0 from 1 reviews
Print
Mushroom Cutlets
Author: Suganya Hariharan
Recipe type: Appetizer
Cuisine: Indian Fusion
Prep time:  10 mins
Cook time:  45 mins
Total time:  55 mins
Serves: 12
 
Ingredients
  • Mushroom - White button - (You can use any variety) - 200 gm
  • Cumin Seeds/ Jeera - 2 tsp
  • Onion - ½ cup - finely chopped
  • Fennel seeds - 2 tsp - crushed
  • Green chilli - 3 medium sized, finely chopped
  • Garlic - 3, finely chopped
  • Ginger - 1 inch, finely chopped
  • Potato - 2 medium sized.
  • mint - 2 tbsp, finely chopped
  • Coriander - 2 tbsp, finely chopped
  • Pepper powder - 2 tsp.
  • Salt - to taste
  • Garam Masala - 1 tsp
  • All purpose flour - 2 tbsp
  • eggs , slightly beaten (or) all-purpose flour &water
  • Breadcrumbs - 3 tbsp
  • Vermicelli - 2 tbsp
  • Oil - for deep frying and 1 tbsp for sauting.
Instructions
  1. Boil the potatoes, season with salt until tender. Then drain, peel and mash.
  2. Heat 1 oil in a pan in medium flame, add cumin seeds and when it changes color, add the onions, green chillies, ginger and garlic with little salt. Saute them till the onions becomes translucent.
  3. Add the finely chopped mushrooms now and saute they dry out all water and get cooked.
  4. Now add the mashed potato, mint, garam masala, fennel seeds, pepper powder and coriander to the pan. Mix well and switch off. Check for salt and add at the step according to your taste.
  5. Take the mushroom potato mixture, make it to small balls. Place in your hands, now press it gently to flatten it to round thick cutlets. You can make it to any shape you fancy.
  6. Dust it to flour, then dip it in egg mixture and shake off any excess for a thin coating and then dip in the breadcrumb mixture to coat evenly.

  7. Place them into a baking sheet or a plate till you finish all. Keep it aside for 15 minutes if possible to make it dry for deep frying.
  8. If you want, you can freeze the cutlets at this point up to one day. You do not need to thaw before frying. They can also be frozen up to 2 weeks and defrost completely before frying.

  9. Heat oil in a large pan in medium-high heat. Deep fry the cutlets till they are crisp and golden brown on all sides, turning once in between. Drain the excess oil by placing on kitchen paper.
  10. Serve hot with tomato ketchup or yogurt mint dip and thinly sliced onion rings and lemon slices.
Notes
1. If you are pan frying then just drizzle with some oil over a hot non stick pan and arrange 4 at a time and cook in a medium flame both sides,until crisp.
2. You can add veggies or minced meat to this if you want 🙂 for meat lovers. And vegetarians, you can mix some all purpose flour and water, replace egg dip with the all purpose flour dip.
3. Adjust the quantity of chilis and black pepper powder according to your taste.
Wordpress Recipe Plugin by EasyRecipe
3.3.3077

Mushroom Cutlet-5

Filed Under: SNACKS & APPETIZERS Tagged With: appetizer vegetarian recipes, mushroom appetizer recipes, mushroom canada recipes, Mushroom cutlet, Mushroom recipes, party appetizer recipes, quick party appetizer recipes, vegetarian cutlet recipe

Spicy Honey Garlic Rack of lamb

August 28, 2015 by Suki 7 Comments

Rackoflamb-9

Rackoflamb-9This oven roasted elegant rack of lamb is quick to make, juicy and will impress anyone! 🙂

Rack of lamb, I need to talk about this elegant juicy meat. When I was given an offer from Ontario Sheep Marketing Agency to cook something with Lamb, I wanted to make something only with Rack of lamb and nothing else. It is purely because I wanted to make it for a long time looking at the beauty of Rack of Lamb. Usually Rack of lamb tends to be a little more expensive but it is purely worth the taste. I wanted to prepare something less complicated and intense in flavor. When you want to buy rack of lamb, it mostly comes frenched which means the fat and meat that is attached to the rib bones is removed making it a fresh and classic. You can prepare this recipe by scoring (take a knife and cut diagonal cuts on the thick white fat) and season with your favorite seasoning, seal and bake in oven. A piece of cake? Right 🙂 I know it is really simple to make and taste delightful!

I made this recipe using a combination of my few favorite ones. I like spicy honey garlic sauce in few of my recipes so I made this lamb recipe. And I guess my choice was totally right. It turned out so beautifully and also totally dainty. You can find this recipe along with other recipes on the Ontario Lamb Website.

Rackoflamb-6

If you want some good taste, we need some good color on the lamb. So, it is a mandatory step to sear the lamb in the pan before keeping it for baking. I proudly want to say that I am using Canadian-raised lamb for this post. People tend to cook more chicken or beef as few people tend to get intimidated by it and think it involves a lot of hard work to cook lamb. It is really easy and quick to make lamb. For Indian recipes, you can pressure cook it for 4-5 whistles before adding them to the gravy. And if you are baking it, seal it and roast it in pan and bake according to the way you want the lamb to be cooked.

For every 500g of meat, a rough guide to cook your lamb in oven is about 40 minutes for well done, Medium is about 30 minutes, Medium rare is about 25 minutes and rare is about 20 minutes. Everyone has his or her own preference of cooking the lamb.

Other favorite Lamb/Mutton Recipes:  Restaurant style lamb biryani, Lamb pepper curry Roast, Kadai Ghost/Lamb Curry.

4.5 from 2 reviews
Print
Spicy Honey Garlic Rack of lamb
Author: Suganya Hariharan
Recipe type: Main
Prep time:  5 mins
Cook time:  40 mins
Total time:  45 mins
Serves: 600 g
 
Ingredients
  • Rack of lamb – 600 gms
  • Fennel seeds - 2 tsp , Crushed ( I used mortar and pestle)
  • Salt & pepper – to Season
  • Coriander leaves – 1 tbsp, chopped, for garnish.


    Sauce:
  • · Brown sugar – 1 tbsp
  • · Lemon Juice – 1 tbsp
  • · Dijon Mustard – 1 tbsp
  • · Honey – 3 tbsp
  • · Sodium soy sauce – 2 tbsp
  • · Rice vinegar – 1 tbsp
  • · Ginger – 1 tbsp, freshly grated
  • · Sriracha – 1 tbsp
  • · Red chilli Flakes – 2 tsp
  • · Garlic – 5 cloves, minced
  • · Freshly ground black pepper – to taste
Instructions
  1. Preheat oven to 400 degrees Fahrenheit. Pat the lamb dry with a paper towel.
  2. Heat a small pan with all the ingredients under “sauce” in medium heat for 6-8 minutes till it reduces a little and gets thicker.

  3. Meanwhile, Place the lamb on cutting board with fat side up. And lightly score the upper (fat layer ) with a knife.
  4. Sprinkle some salt and paper on the lamb and mop up all the excess salt & pepper with the lam so that it is thoroughly coated.

  5. Heat some olive oil in a pan. In medium to high heat, add the fennel seeds powder and place the lamb. Seal the lamb each side till it changes it color to golden. I did this by holding it in hands. You can use thongs.
  6. Rub the sauce to the lamb. Coat it completely and top it with the oil from roasting in the pan. Place in the baking dish into the oven.
  7. Place in the oven for 40 minutes for “well done” lamb.(or Medium is about 30 minutes, Medium rare is about 25 minutes and rare is about 20 minutes. ). I did well done.
  8. Serve hot by garnishing with chopped coriander leaves and with some roasted veggies on side
Wordpress Recipe Plugin by EasyRecipe
3.3.3077

Disclaimer: This post has been sponsored by the Ontario Sheep Marketing Agency and I have been compensated monetarily! However all opinions are my own as always. 

Rackoflamb-7

Filed Under: BAKED RECIPES, LAMB, NON-VEG RECIPES Tagged With: canada lamb recipes, chrismas dinner recipes, festival dinner recipes, honey garlic rack of lamb, honey rack of lamb, lamb recipes, ontario lamb recipes, quick lamb recipes, quick thanksgiving lamb recipes, rack of lamb, spicy honey garlic rack of lamb, spicy rack of lamb, sweet and spicy rack of lamb, valentines day dinner recipes

Baked Pasta in creamy spinach Rose sauce

August 25, 2015 by Suki 23 Comments

Rosesauce-19

Rosesauce-19

A lovely Italian rose sauce recipe for any night of the week.

When I get bored of rice and if I want to have something classic, I always choose pasta. I have my few favourite recipes like mushroom creamy pasta, eggplant pasta, pasta aglio e olio, penne arrabiata, fettucine alfredo, ravioli with pesto & pine nuts and the list goes on. These are my most favourites. But I don’t mind 😉 to add few more to it. My friend krips took me to a restaurant in little Italy here before few months and we had a pasta based on rose sauce. And we both got crazy about the sauce. It was totally yum, simple, tasty and classy. So, we wanted to try it at home and we did try the very next week. We just loved it. She made it with some chicken and I made it with mushroom. 🙂 I did not take pictures when I made it the first time, I wanted to try and taste it first. So, this time I made with spinach and I baked it with some cheese on top and again it tasted scrumptious. This sauce is really good. You should try it! It’s an addiction I would say!

Rosesauce-17

The way to season everything perfect is by seasoning everything along the way. Season your tomato sauce with salt and pepper, and also your pasta water with salt. Be careful not to season them more as we are adding cheese at the end which will give some additional salt.

You can just have this pasta without baking. I just took an extra step to make it even more delicious. I understand that this recipe has cheese, heavy cream and it makes many guilty. But once in a while we need to treat ourselves with these :), it will surely make you happy and complete! 🙂

4.5 from 6 reviews
Print
Baked Pasta in creamy spinach Rose sauce
Author: Suganya Hariharan
Recipe type: Main
Cuisine: Italian
Cook time:  1 hour
Total time:  1 hour
Serves: 5-6 servings
 
Ingredients
  • • Pasta – farfalle variety (you can use any variety) – 650g
  • • Olive oil – 2 tbsp
  • • Red chilli flakes – 2 tsp
  • • Garlic – 3 cloves, minced
  • • Onion – 1, medium sized, finely chopped
  • • Tomato sauce – 450 ml ( I used Hunt’s)
  • • Heavy cream – ¾ cup
  • • Sour cream – ¼ cup
  • • Salt and pepper to taste
  • • Sugar – a pinch
  • • Spinach – 2 cups
  • • parmeggiano reggiano/ Parmesan – 1 tbsp, grated, For garnish
  • • Fresh basil – 1 tbsp, chopped, for garnish
  • • Mozzarella –½ cup, grated for baking
Instructions
  1. Cook the pasta according to the instructions on the package. Boil water and add the pasta with the salt needed for pasta. Then remove and run the pasta through cold water. And toss with a little oil to prevent sticking.

  2. Take a pan in medium high heat, add oil. Add chilli flakes, onions, 2 cloves of garlic and sauté it till onions get translucent. Then add spinach and sauté it till it shrinks and get roasted a bit.

  3. Now add the tomato sauce, salt, pepper, sugar for the sauce. Let it get cooked in medium to low flame for 25 minutes until it thickens, stir it occasionally.

  4. Preheat the oven now to 350F.
  5. Add the cream and sour cream mixture and let it cook for 5 minutes. When you think it has got into nicely thick creamy texture, add the pasta to it.

  6. Now transfer this into a baking dish, top it with grated mozzarella and bake for 20 minutes till the cheese melts and turns its color into golden brown.

  7. Top it with fresh grated parmeggiano reggiano, chopped basil and some crushed pepper just before serving.
Notes
1. You can use fresh tomatoes too instead of canned tomato.
2. You can use any kind of pasta you fancy.
Wordpress Recipe Plugin by EasyRecipe
3.3.3077

Rosesauce-13

Filed Under: BAKED RECIPES, PASTA, PASTA PIZZA & TACOS Tagged With: Cheesy pasta recipes, cheesy spinach pasta, classic italian pasta recipes, creamy pasta recipes, farfalle recipes, italian sauce recipes, pasta in rose sauce, quick sauce recipes, rose sauce recipe, spinach pasta recipe, vegetarian Italian recipes, vegetarian pasta recipes

Beetroot vadai / Beetroot Lentil Fritters

August 23, 2015 by Suki 6 Comments

beetrootvada-7

beetrootvada-7Crunchy,healthy and delicious deep fried lentil fritters using beetroot.

Vadai is a popular snack in southern India. It is super addictive snack. Perfect party snack and also it taste best with tea time snack. So, when I was asking my best friend, Divya casually what to make with beetroot that I have at home, she suggested Beetroot vadai. And 🙂 the next day I made this. 🙂 Thanks to you my sweety! 😀

beetrootvada-6

And if you make these for parties, sure it is a great hit. The tips to make these vada tasty are by adding the shallots, and fennel seeds. And also people think it’s hard to make these. If you make them once, you will know how easy it is to make them. But make sure to not add water when you grind them. I have mentioned some tips in the notes. Do look at it 🙂 to make it perfect.

This red color vegetable is linked up with lot of health benefits like better stamina, improved blood flow and lower blood pressure. The beetroot has a sweet taste and is earthy and tender to eat. Beets are highly nutrious and healthy. It is a great dish for kids. Kids don’t love beetroot a lot, so it  is a good way to sneak it into their diet. Even beetroot tikki, Beetroot Halwa, Beetroot coconut stir fry, Beetroot paratha are good ideas to make them have this veggie.

beetrootvada-8

5.0 from 2 reviews
Print
Beetroot vadai / Beetroot Lentil Fritters
Author: Suganya Hariharan
Recipe type: Appetizer
Cuisine: Indian
Prep time:  2 hours
Cook time:  40 mins
Total time:  2 hours 40 mins
Serves: 16
 
Ingredients
  • • Channa Dal – 1 cup
  • • Shallots/Small onions – 1 cup, chopped
  • • Red Chillies – 3, broken
  • • Beetroot – 2, small, grated
  • • Curry leaves – 1 sprig
  • • Green Chillies – 2
  • • Fennel seeds/ Soambu – 1 tsp
  • • Ginger – 1 inch piece
  • • Garlic – 6 cloves
  • • Rice flour – 2 tbsp
  • • Salt – 1 ½ tbsp
Instructions
  1. Soak channa dal with red chillies for an hour.
  2. First grind ginger, chillies, garlic and fennel coarsely in a blender jar.

  3. Drain channa dal completely and keep aside 5-6 chana dal whole. And blend the rest of the soaked dal with the ginger paste in the same blender jar. Do not add water at all when you blend the dal.

  4. Mix the blended batter with finely chopped onion, grated beetroot , coriander, salt, rice flour and curry leaves.
  5. Heat oil in pan/kadai.
  6. Meanwhile Keep a bowl with water and wet both hands. Make equal sized balls first for uniform sized vadas. Shape each ball to flat patties of medium thickness.
  7. The oil should be hot and when it is hot, Drop the vadas. Simmer the heat and deep fry them in hot oil until golden brown in color, flipping once in between. It is always good to cook in medium flame to ensure even cooking and golden red colour.
Notes
1. Make sure not to add water while grinding.
2. Make sure to soak vada for three to four hours. It is hard to grind them otherwise and also if it is not soaked well, it may turn hard and too crisp.
3. Rice flour helps to make it crispier. It is optional. You can soak 1 spoon for rice with the dal and grind instead.
4. Garlic is optional too.
5. Shallots can be replaced with normal red/white onions. But shallots give great texture and flavor.
Wordpress Recipe Plugin by EasyRecipe
3.3.3077

beetrootvada-a9

Filed Under: SNACKS & APPETIZERS, SNACKS & APPETIZERS FESTIVAL Tagged With: appetizer recipes, Beetroot Lentil Fritters, beetroot recipes, beetroot snacks, Beetroot vadai, crunchy tea time snack, fennel seeds recipe, fritters recipes, healthy beetroot recipes, how to make masala vada, lentil recipes, masal vadai, masala vada recipe, masala vada with mint leaves, masala vadai recipe, paruppu vadai, snack recipes, veg fritters recipes, vegetarian appetizer recipes

Page 2 of 9
« Previous 1 2 3 4 5 6 7 … 9 Next »
  1. Pages:
  2. «
  3. 1
  4. 2
  5. 3
  6. 4
  7. 5
  8. 6
  9. 7
  10. 8
  11. 9
  12. »
  • « Previous Page
  • 1
  • 2
  • 3
  • 4
  • …
  • 9
  • Next Page »
  • Facebook
  • Google+
  • Instagram
  • Pinterest
  • Twitter

LOOKING FOR SOMETHING?

logo
Food Advertisements by
logo
Food Advertisements by

Categories

STAY CONNECTED

  • Facebook
  • Google+
  • Instagram
  • Pinterest
  • Twitter

SUBSCRIBE BY EMAIL

SEARCH RELISH THE BITE

logo
Food Advertisements by

Copyright © 2025 · Lifestyle Pro Theme on Genesis Framework · WordPress · Log in