• Home
  • Page Layouts
  • Page Templates
  • Theme Colors
    • Lifestyle Pro Blue
    • Lifestyle Pro Green
    • Lifestyle Pro Mustard
    • Lifestyle Pro Purple
    • Lifestyle Pro Red
    • Lifestyle Pro Teal

Relish The Bite

Taste of happiness

  • HOME
  • ABOUT
  • RECIPE INDEX
    • SNACKS & APPETIZERS
    • BREAKFAST
    • BAKED RECIPES
    • LUNCH & DINNER
      • RICE/BIRYANI VARIETIES
      • SIDES
        • DRY CURRY/STIR-FRY
        • SOUTH INDIAN CURRY/KUZHAMBU
        • NORTH INDIAN CURRY/DAL
        • RAITA/DIPS/CHUTNEY
        • Soups/Salads
      • PASTA PIZZA & TACOS
      • BREAD
      • CHINESE ASIAN INSPIRED
    • NON-VEG RECIPES
    • DESSERTS
    • BEVERAGES
  • SNACKS
  • BREAKFAST
  • NON-VEG RECIPES
  • RICE/BIRYANI VARIETIES
  • LAMB
  • SOUTH INDIAN CURRY/KUZHAMBU
  • VEGAN
  • NORTH INDIAN CURRY/DAL
  • DRY CURRY/STIR-FRY
  • PASTA & TACOS
  • CHINESE ASIAN INSPIRED
  • BAKED RECIPES
  • COLLECTIONS
  • BREAD
  • BEVERAGES
  • DESSERTS
  • FESTIVAL RECIPES
    • SNACKS & APPETIZERS
    • SWEETS/DESSERTS
  • RESOURCES
    • HOW TO START A BLOG
    • TITBITS
    • PRESS
  • CONTACT
You are here: Home / Archives for 2025

Archives for 2025

Fig Samosa Chaat Cups 🧄🌿🍇

October 22, 2025 by Suki Leave a Comment

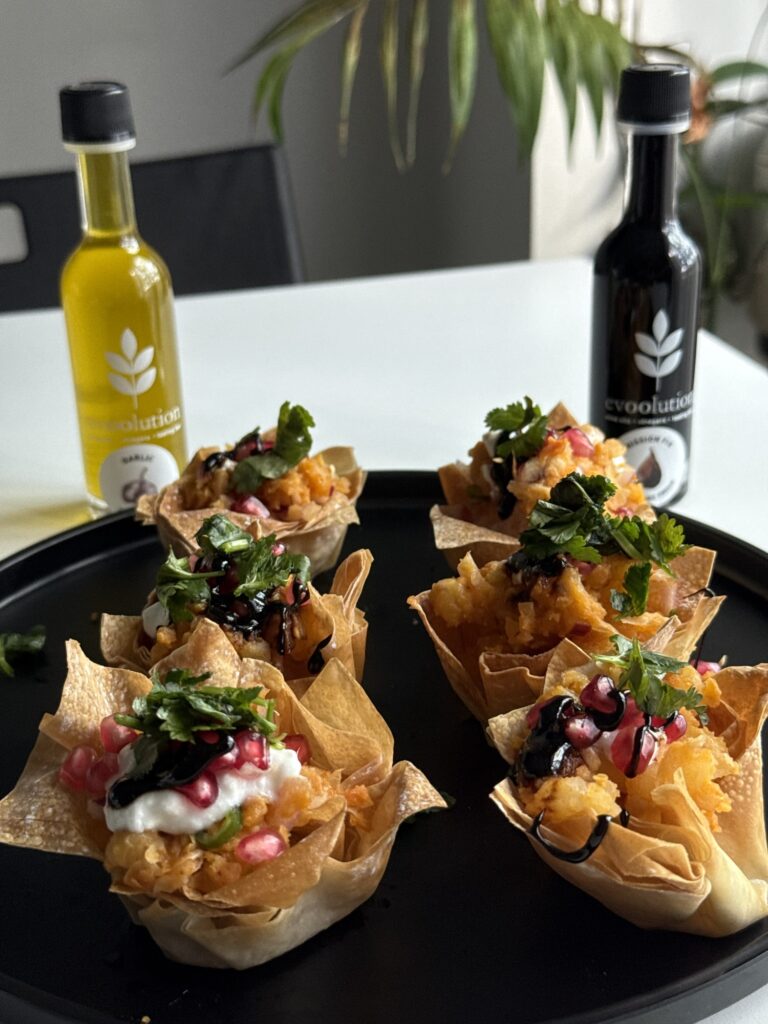
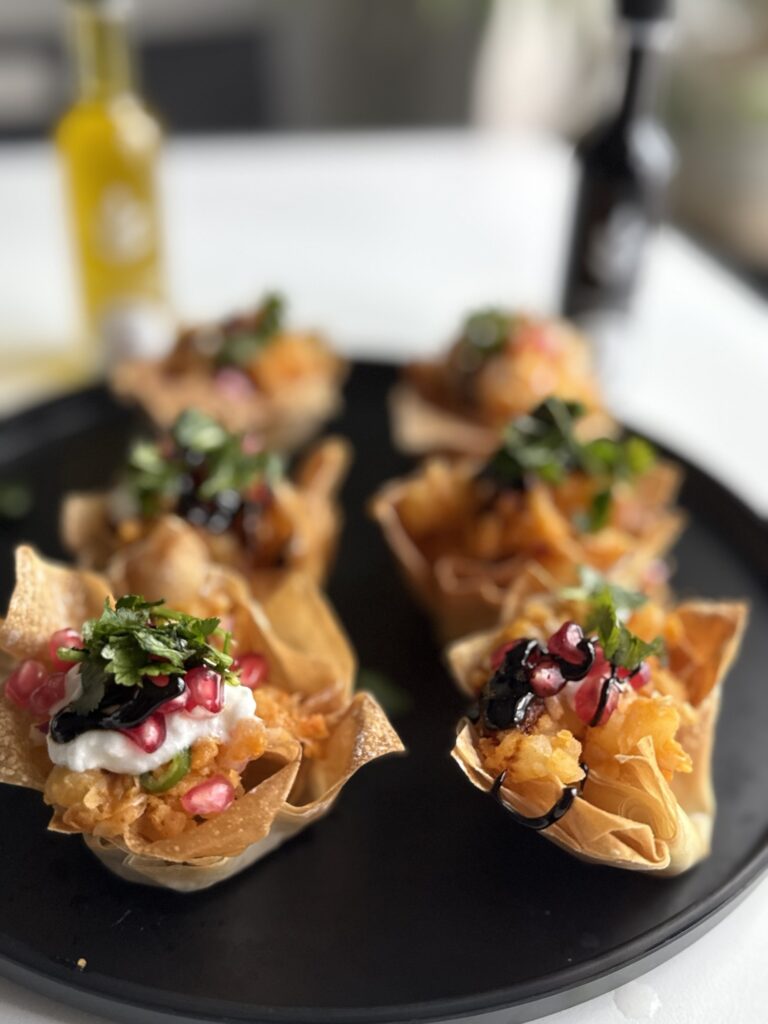
Bold Indian flavours meet gourmet finesse! Crispy phyllo cups filled with spiced potato-pea chaat, drizzled with @evoolutionoils Garlic Olive Oil and their Mission Fig Balsamic for that perfect tangy-sweet finish.


A fusion twist on a street-food favourite — easy to prep, perfect for entertaining, and guaranteed to impress. 💫

Servings: 6–8 (makes 12–16 mini cups)
Cook Time: 15 min

Ingredients

  • 12–16 mini phyllo cups
  • 2 medium potatoes, boiled & diced
  • 1/2 cup green peas (fresh or frozen, cooked)
  • 1/2 cup cooked chickpeas (lightly mashed)
  • 1/4 cup finely diced red onion
  • 1–2 green chilies, finely minced (optional)
  • 2 tbsp fresh cilantro, chopped
  • 1 tsp roasted cumin powder
  • 1/2 tsp chaat masala
  • 1/4 tsp Kashmiri chili powder (or mild paprika)
  • Salt, to taste
  • 2 tbsp Evoolution Garlic Olive Oil
  • 1/4 cup plain yogurt (whisked until smooth)
  • 1/4 cup Mission Fig Balsamic (reduced into a thick drizzle)
  • 1/4 cup pomegranate arils, for garnish

Method

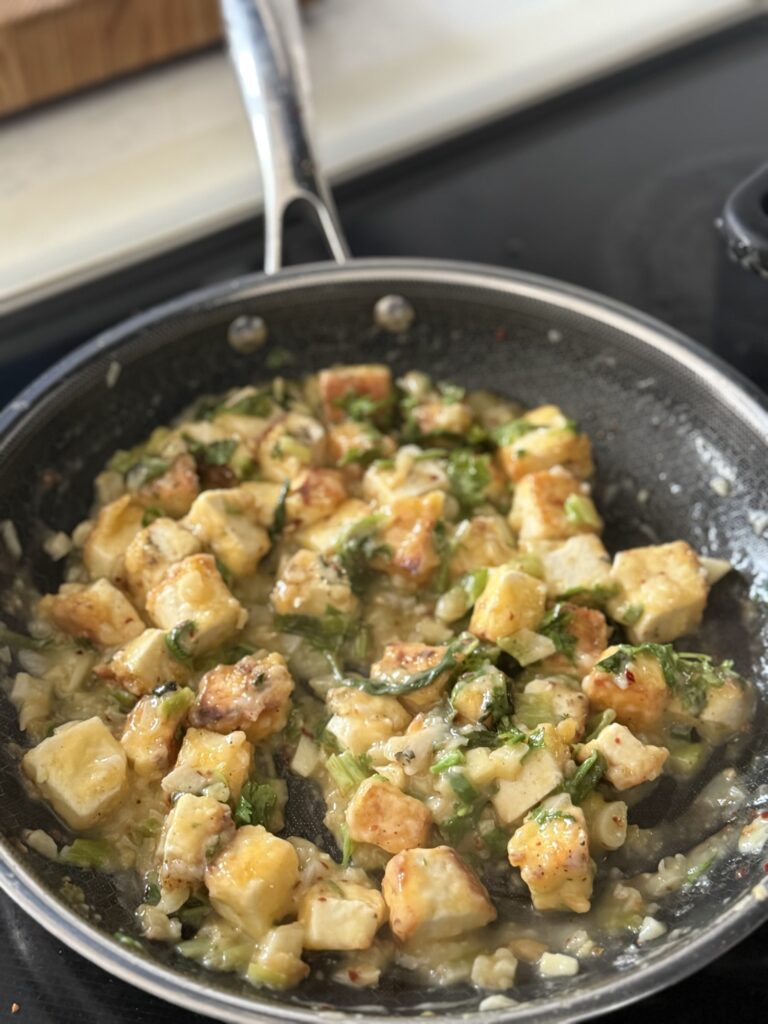
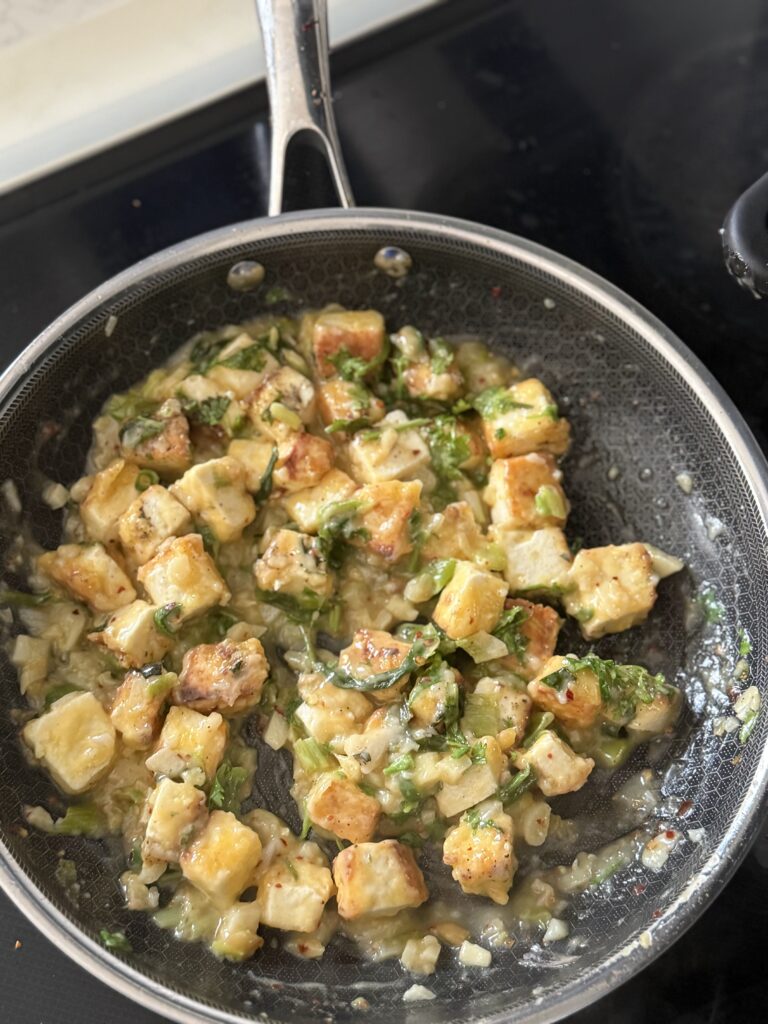
  1. Prepare the filling: In a skillet, heat 2 tbsp Garlic Olive Oil. Add diced potatoes, peas, and chickpeas. Season with cumin, chaat masala, chili powder, and salt. Cook for 3–4 minutes, gently tossing until coated and slightly crisped. Remove from heat and stir in red onion, cilantro, and green chili (if using).
  2. Assemble the phyllo cups: Spoon 1–2 tsp of the warm potato-pea mixture into each phyllo cup.
  3. Top with yogurt & fig drizzle: Add a small dollop of plain yogurt over the filling. Then drizzle each cup with the reduced Mission Fig Balsamic.
  4. Garnish & serve: Finish with a sprinkle of pomegranate arils and a touch more cilantro. Serve immediately while the phyllo cups are crisp.

Filed Under: SNACKS & APPETIZERS

California Prunes Masala Wraps | Healthy Indian-Inspired Wrap Recipe for Fall & Winter

September 25, 2025 by Suki

Collab with @CAprunesCAN

As the weather cools down, our cravings shift toward warm, spiced, and nourishing meals. Fall and winter are the seasons of comfort food — and what better way to add natural sweetness, nutrition, and flavour than with California Prunes?

These Prune Masala Wraps are a wholesome fusion of Indian spices, paneer (or tofu), crunchy vegetables, and juicy chopped prunes all tucked into a soft wrap. They’re quick to make, great for meal prep, and perfect for cozy lunches or light dinners.

Why Prunes Are Perfect for Fall & Winter
Prunes are a smart simple snack and must-have ingredient you’ll want in your kitchen all year long:

  • Triple effect: A powerhouse fruit for digestion, bones, and gut health.
  • Digestive support: Prunes are a source of fibre, which helps maintain good gut health.
  • Deliciously versatile: California Prunes are a versatile ingredient that can be used in cooking, baking or as a snack.
  • Seasonal flavour pairing: Their natural sweetness complements warming spices like cumin, cinnamon, and garam masala, making them ideal for fall and winter recipes.

Ingredients (Makes 4 wraps)

For the filling

  • 1 tbsp oil (olive or vegetable)
  • 1 tsp cumin seeds
  • 1 medium onion, finely sliced
  • 1 green chilli, slit (optional)
  • 1 tsp finely chopped garlic
  • 1 small bell pepper, thinly chopped
  • ½ cup chopped paneer (or firm tofu)
  • ½ tsp turmeric powder
  • 1 tsp red chilli powder (adjust to taste)
  • 1 tsp garam masala
  • ½ tsp coriander powder
  • Salt, to taste
  • 1 ½ cups California Prunes, finely chopped

For the cilantro yogurt sauce

  • 2 tbsp fresh cilantro, chopped
  • 1 green chilli
  • 1 tsp lemon juice
  • ½ cup Greek yogurt (or regular yogurt)

For assembling

  • 4 whole wheat rotis, tortillas, or wraps
  • Yogurt–cilantro sauce
  • Lettuce leaves or baby spinach
  • Optional toppings: sliced cucumber, onion rings, avocado


Method

  1. Make the filling
  • Heat oil in a pan, add cumin seeds, and let them splutter.
  • Add onions and green chilli, sauté until golden.
  • Stir in garlic and cook for 1 minute.
  • Add bell pepper, sauté until just tender.
  • Mix in paneer, turmeric, chilli powder, garam masala, coriander powder, and salt.
  • Stir well, then add chopped prunes. Cook 2–3 minutes until prunes soften and blend into the masala.
  • Finish with fresh cilantro.
  1. Make the cilantro yogurt sauce
  • Blend cilantro, green chilli, lemon juice, and yogurt into a smooth sauce. Adjust salt and consistency as needed.
  1. Assemble the wraps
  • Warm rotis or wraps.
  • Spread a layer of cilantro yogurt sauce.
  • Add lettuce or spinach, then spoon in the prune masala filling.
  • Top with optional cucumber, onion, or avocado.
  • Roll tightly and slice in half.
  1. Serve
  • Enjoy warm with extra yogurt sauce or a simple raita on the side.


 Serving Ideas

  • Pack these wraps in lunchboxes for a balanced mid-day meal.
  • Slice into smaller rolls for a healthy party appetizer.
  • Pair with a warm lentil soup or masala chai for the ultimate cosy dinner.


 Final Thoughts
Fall and winter recipes don’t have to be heavy — they can be flavourful, nourishing, and exciting. California prunes add just the right touch of natural sweetness, making these Prune Masala Wraps not only delicious but also seasonally perfect.

So next time you’re craving something warm, quick, and satisfying, wrap up some masala-spiced veggies, paneer, and prunes — and enjoy the comfort of flavour in every bite

Filed Under: Uncategorized

Butter Garlic Paneer – A Flavor-Packed Appetizer You’ll Love

August 11, 2025 by Suki Leave a Comment

If you’re a fan of bold flavors, this butter garlic paneer is going to be your new favorite. It’s all about the aroma of fresh garlic sizzling in butter, the gentle heat from green chilies and chili flakes, and that perfect golden crust on the paneer. The result? A dish that’s versatile enough to enjoy as a starter or toss with fried rice for a quick meal.

This recipe is quick to prepare and absolutely bursting with flavor — perfect for weeknights, party platters, or even a cozy snack with chai.

Serving Size:
2-3
Time:
10 mins
Difficulty:

Ingredients


  • For marinating paneer:
    • 200 g paneer, cut into cubes
    • ½ tsp salt
    • ½ tsp crushed black pepper
    • 1 tbsp corn flour


    For cooking:
    • 1 tbsp oil
    • 1 tbsp butter
    • 8–10 cloves garlic, finely chopped
    • 2–3 green chilies, slit
    • ½ tsp red chili flakes (adjust to taste)
    • 2–3 tbsp spring onion whites, chopped
    • 1 tsp corn flour mixed with 2 tbsp water (cornflour paste)
    • Salt, to taste
    • Pepper, to taste
    • 2 tbsp coriander leaves, chopped
    • 2–3 tbsp spring onion greens, chopped

Directions

  1. 1. Marinate the paneer:
    In a bowl, mix paneer cubes with salt, black pepper, and corn flour until well-coated.
    2. Pan-fry paneer:
    Heat oil in a pan over medium heat. Add the marinated paneer and roast until golden brown on all sides. Remove from the pan and set aside.
    3. Make the garlic base:
    In the same pan, add butter. Once melted, add garlic, spring onion whites, green chilies, and chili flakes. Sauté until the garlic turns golden and fragrant.
    4. Thicken the sauce:
    Pour in the corn flour paste and stir continuously for 30–40 seconds until it slightly thickens.
    5. Bring it together:
    Add the roasted paneer back into the pan. Season with salt and pepper. Toss well so the paneer is coated in the buttery garlic sauce.
    6. Finish & serve:
    Add coriander leaves and spring onion greens, give it a final toss, and serve immediately as an appetizer or with fried rice/noodles.


    ⸻


    💡 Tip: For an extra kick, squeeze a little lemon juice over the finished dish before serving.

Filed Under: NORTH INDIAN GRAVIES/DAL/CURRY, SNACKS & APPETIZERS

 Tomato Garlic curry /Kuzhambu – A Tangy, Bold South Indian Curry You’ll Crave

August 4, 2025 by Suki

If you’re looking for a comforting, bold, and easy South Indian curry that punches way above its weight in flavour — this Tomato Garlic Kuzhambu is it.

It’s spicy. It’s garlicky. It’s packed with roasted tomatoes, warming spices, red chilies, and that signature tamarind-tang you crave in a good kuzhambu. This version gets an earthy, nutty upgrade with roasted chana dal, coconut, and cumin — blended right into the masala paste for body and depth. The result? A thick, punchy curry that tastes even better the next day.

Perfect for rice, idli, dosa, or just sneaking spoonfuls straight from the pot.

⸻

💛 Why You’ll Love This Kuzhambu

In Tamil households, kuzhambu is a staple — a tamarind-based curry often built on a base of tomatoes, garlic, and spices. This version adds a roasted masala twist: blending tomatoes, roasted chana dal, cumin, coconut, and whole spices into a smooth, rich base. It gives the kuzhambu a satisfying thickness and a layer of deep, toasty flavor without adding dairy or cream.

It’s vegan, pantry-friendly, and comes together in under 35 minutes — but tastes like it simmered all day.

⸻

🌿 Ingredients You’ll Need:

For the Roasted Masala:

• 2 ripe tomatoes, halved

• 1 tbsp coriander seeds

• 1 tsp cumin seeds

• 1 tsp fennel seeds

• 2 tbsp roasted chana dal

• 2–3 tbsp grated fresh or desiccated coconut

• 2–3 dried red chilies (adjust to spice preference)

• A handful of fresh coriander leaves

• 1 tsp oil (for roasting)

For the Kuzhambu:

• 2 tbsp sesame oil (or any neutral oil; sesame gives the best aroma)

• 1 tsp mustard seeds

• 1 sprig curry leaves

• 8–10 garlic cloves, peeled and whole

• 1 medium onion, finely chopped

• 2 medium tomatoes, finely chopped

• 1/2 tsp turmeric powder

• 1.5 tsp sambar powder

• 1/2 tsp red chili powder (optional, for extra heat)

• Salt, to taste

• 1 cup water

• 1 tsp tamarind paste (optional, for added tang)

⸻

🔥 How To Make Tomato Garlic Kuzhambu

1. Roast the Masala Ingredients

In a small pan, heat 1 tsp oil. Add halved tomatoes (cut side down), coriander seeds, cumin seeds, fennel seeds, roasted chana dal, coconut, dried red chilies, and fresh coriander. Roast over medium heat for 4–5 minutes, stirring occasionally. When the tomatoes blister and soften, and the spices smell fragrant and toasty, remove from heat. Let cool slightly, then blend everything into a smooth paste with a few tablespoons of water as needed. This is your masala base — bold, nutty, and aromatic.

2. Temper the Base

In a heavy-bottomed pot, heat 2 tbsp sesame oil. Add mustard seeds and let them splutter. Toss in curry leaves and whole garlic cloves. Sauté until the garlic turns light golden and aromatic.

3. Add Onion, Tomatoes & Spices

Add chopped onions and sauté until soft and lightly browned. Stir in turmeric, chili powder, and sambar powder. Cook for a minute to bloom the spices. Then add the chopped tomatoes and cook until they break down and turn jammy.

4. Simmer with Masala Paste

Add the blended roasted masala, salt, and 1 cup water. Stir well. If you want extra tang, add tamarind paste at this stage. Simmer for 10–12 minutes uncovered, until the kuzhambu thickens slightly and oil begins to float on top. The garlic cloves will soften and absorb all the masala flavour — perfect to mash into rice later.

⸻

🍚 How to Serve It

This Tomato Garlic Kuzhambu is perfect with:

• Steamed rice and a dollop of ghee

• Crispy dosa or soft idlis

• Pongal or even quinoa for a twist

• Pair with stir-fried greens or pappadam for crunch

It’s also one of those magical curries that deepens in flavour overnight — making it ideal for make-ahead meals or fridge lunches.

⸻

💡 Tips & Variations

• More tang? Add a teaspoon of tamarind paste during the simmer step.

• Make it creamy: Stir in 2 tbsp coconut milk near the end.

• Bulk it up: Add boiled chickpeas, black-eyed peas, or cooked potatoes.

• No roasted chana dal? Use 1 tsp urad dal instead — it’ll still give you that nutty depth.

• Store it: Keeps well in the fridge for 2–3 days. Flavours get even better!

⸻

✨ Final Thoughts

This version of Tomato Garlic Kuzhambu is a celebration of big, rustic flavours: roasted spices, mellowed garlic, tangy tomato, and the grounding richness of dal and coconut. It’s humble, nostalgic, and incredibly satisfying — whether you’re cooking for yourself or sharing it with your family.

If you try this, tag me on Instagram @relishthebite — I’d love to see how your version turns out!

Suki 💛

Filed Under: SOUTH INDIAN GRAVIES/DAL/CURRY/KUZHAMBU, Uncategorized

🧆 Restaurant-Style Mutton (Goat) Biryani

July 27, 2025 by Suki

Aromatic. Layered. Deeply spiced.

There’s something undeniably regal about a good mutton biryani. With each bite, you get melt-in-the-mouth meat, long grains of perfectly cooked rice, and a complex blend of spices that linger warmly. This version is a pakki-style biryani — meaning the meat is cooked first and then layered with rice for final steaming (dum).

What makes this recipe stand out is the blended paste of poppy seeds, ginger, garlic, fennel, cumin, pepper, and Kashmiri chili — a base that brings both richness and aroma.

⸻

📋 Ingredients

Serves 4–6 | Prep Time: 30 min | Cook Time: 1 hr 15 min

For the Mutton:

• 1 kg mutton or goat, bone-in pieces

• Salt, to taste

• Water, as needed to pressure cook

For the Blended Masala Paste:

• 2 tbsp white poppy seeds (soaked 15 min in warm water)

• 1 tsp cumin seeds

• 1½ tsp fennel seeds

• 1 tsp black peppercorns

• 1-inch piece fresh ginger

• 8–10 garlic cloves

• 2–3 green chilies (adjust to taste)

• 2 tsp Kashmiri red chili powder

• ½ ripe tomato

• 1 tsp biryani masala (store-bought or homemade)

• Water, just enough to blend into a thick paste

For the Biryani Base:

• 3 large onions, thinly sliced

• 1 tomato, chopped

• 1–2 green chilies, slit

• ½ cup plain yogurt (optional, for extra richness)

• A handful fresh mint leaves

• A handful fresh coriander leaves

• 2 tbsp ghee or neutral oil

• Whole spices:

• 1 bay leaf

• 4 green cardamom

• 4 cloves

• 1 small cinnamon stick

• 1 black cardamom (optional)

For the Rice:

• 2 cups basmati rice, soaked for 30 min

• Water for boiling

• Salt, to taste

• Whole spices: bay leaf, cloves, green cardamom, cinnamon

For Layering (Optional but Recommended):

• Fried onions (from above)

• A few saffron strands soaked in 2 tbsp warm milk

• 1 tbsp ghee

• Fresh mint & coriander leaves

⸻

🔥 Method

1. Cook the Mutton

• In a pressure cooker, cook mutton with salt and just enough water for 5 whistles or until tender.

• If cooking in a pot, simmer covered for 35–45 mins on low heat until soft. Reserve the broth.

2. Make the Blended Masala Paste

• Dry roast cumin, fennel, and pepper. Let cool.

• Blend together with soaked poppy seeds, ginger, garlic, green chilies, Kashmiri chili, tomato, biryani masala, and a little water. Make a smooth, thick paste.

3. Prepare the Biryani Base

• In a heavy-bottomed pot, heat ghee/oil. Fry sliced onions until golden brown. Remove half for layering later.

• In the same pot, add chopped tomato, mint, coriander, and slit green chili. Sauté 1–2 minutes.

• Add the blended paste. Sauté for 5–6 minutes until raw smell disappears.

• Add cooked mutton along with a few tablespoons of its stock. Add yogurt if using. Simmer until thick and the masala coats the meat.

4. Cook the Rice

• Bring water to a boil with salt and whole spices. Add soaked rice and cook until 70–80% done (firm with slight bite).

• Drain immediately to avoid overcooking.

5. Layer and Dum Cook

• In the same pot with the mutton base, spread half the rice.

• Sprinkle half the reserved fried onions, saffron milk (if using), mint, coriander, and a drizzle of ghee.

• Repeat with remaining rice and toppings.

• Seal the lid tightly with foil or dough. Cook on low heat (dum) for 20 minutes. Let it rest 10 minutes before opening.

⸻

🍽️ Serving Suggestions

• Serve hot with boiled eggs, raita (yogurt + cucumber), or a simple onion salad.

• Garnish with fresh coriander and crisp fried onions for restaurant-style finish.

⸻

✅ Why You’ll Love This Biryani

• Deep flavor from the spiced paste

• Juicy, tender meat that’s pre-cooked just right

• Perfectly separate grains thanks to layering and dum

• Feels rich and festive without being greasy

Filed Under: Uncategorized

Mom’s Mint Rice Recipe (South Indian Style) 🌿

July 26, 2025 by Suki

Comfort in every bite — straight from my childhood kitchen.

There are certain recipes that instantly transport you home. This Mint Rice, lovingly made the South Indian way, is one of them. Refreshing, fragrant, and packed with flavor, this dish is a staple in many South Indian homes — especially on warm afternoons when something light yet satisfying is needed.

Mint (pudina in Tamil) is known for its cooling properties and bold aroma. When blended with fresh coriander, sautéed onions, whole spices, and mixed with rice, it creates an irresistible medley that is both soothing and energizing. It’s the kind of dish that comes together quickly but tastes like you’ve spent hours over the stove. Perfect for lunchboxes, quick dinners, or as a side for festive meals — this is comfort food, redefined.

I made this version using beautiful cookware from @tramontinaoficial and it turned out just the way mom makes it — soulful and full of love. 💚

Why You’ll Love This Mint Rice 🌱

Mint rice is more than just a flavorful meal — it’s therapeutic. The fresh, herbal aroma of mint with the grounding spices makes it a great choice when you’re looking for something to calm the senses but still tickle your taste buds. It’s also a clever way to use up leftover rice and sneak in some greens for the family.

Whether you’re in Toronto, Tamil Nadu, or Texas, this dish brings a slice of South India to your table — no matter where you are.

⸻

Serving Size:
Time:
Difficulty:

Ingredients

  • • 1 cup basmati rice (cooked and cooled)
    • 1 cup fresh mint leaves (washed)
    • ½ cup coriander leaves
    • 3 red chilies (adjust to spice preference)
    • 1 large onion (thinly sliced)
    • 1/2 cup green peas (fresh or frozen)
    • 8–10 cashews (optional, for garnish)
    • Whole spices: 1 bay leaf, 1-inch cinnamon stick, 2 cloves, 2 cardamom pods
    • 1 tsp mustard seeds
    • 1 tsp urad dal
    • 1 tsp chana dal
    • Salt to taste
    • 1 tbsp ghee + 1 tbsp oil

Directions

  1. Prepare the mint paste: Heat 1 tsp oil and lightly sauté the mint leaves, coriander, and red chilies until they wilt and reduce in size. Let it cool slightly, then grind into a smooth paste with a splash of water.
    2. Cook the base: In a heavy-bottomed pan, heat ghee and oil. Add mustard seeds, urad dal, chana dal, and the whole spices. Let them sizzle.
    3. Add cashews and sauté till golden (remove and keep aside for garnish). Add sliced onions and sauté until golden brown.
    4. Stir in green peas (and chopped tomatoes, if using), followed by a pinch of turmeric, cumin powder, ginger garlic paste, and red chili powder. Sauté until the raw smell disappears.
    5. Now add the prepared mint paste. Cook on medium flame until the oil begins to separate and the paste is fragrant.
    6. Add the cooked rice and gently toss until the rice is well coated with the mint masala. Cook for 1–2 minutes.
    7. Garnish with the roasted cashews and serve hot with papad, pickle, or raita.

Filed Under: RICE/BIRYANI VARIETIES

Chicken Chukka Masala (Dry Roasted Chicken Masala)

July 17, 2025 by Suki Leave a Comment

If you’re craving bold South Indian flavors, this Chicken Chukka Masala is a must-try. It’s a dry-style chicken dish made with a rich, aromatic blend of whole spices that are dry roasted and ground fresh. I made this using my favorite cookware from @starfrit — seriously, I’ve collected quite a few pieces from them, and they never disappoint in heat distribution or ease of use!

This dish pairs beautifully with hot steamed rice, flaky parathas, or pillowy naan — the kind of comforting Sunday meal that makes you close your eyes with every bite. It’s a keeper!

Why I Love This Dish 💛

Chicken Chukka Masala isn’t just a dish; it’s a flavor bomb — spicy, smoky, and deeply satisfying. Making it in my @therockcookware pan brings out those roasted masala flavors even better because of its even heating and non-stick magic. It’s a dish I love whipping up for cozy weekends or dinner guests — always a hit!

⸻

Let me know if you try it! Tag me and don’t forget to follow for more spice-filled recipes ✨

Serving Size:
Time:
Difficulty:

Ingredients

  • Ingredients:


    For the Chicken:
    • 500g chicken (bone-in or boneless, your choice)
    • 1 tsp turmeric powder
    • 1 tbsp red chili powder
    • 1 tbsp lemon juice
    • Salt to taste


    Marinate the chicken with the above for at least 30 minutes (overnight is even better!).


    For the Masala Paste (Dry-Roasted):
    • 1 tbsp coriander seeds
    • 1 tsp cumin seeds
    • 1 tsp fennel seeds
    • 1 tsp mustard seeds
    • 1 tsp black peppercorns
    • 1-inch cinnamon stick
    • 1 bay leaf
    • 3 green cardamom pods
    • 4–5 dried red chilies (adjust to your heat preference)
    • A pinch of fenugreek seeds (optional but recommended for an earthy depth)


    For Cooking:
    • 1 large onion, thinly sliced
    • A handful of fresh curry leaves
    • 2–3 tbsp oil or ghee (I love using ghee for extra richness)

Directions

  1. Instructions:


    🔥 Step 1: Prepare the Masala
    1. In a dry pan, roast all the spices listed under Masala Paste on low-medium heat.
    2. Stir constantly until aromatic — the spices will slightly darken and release a heady fragrance.
    3. Cool them for a few minutes, then grind into a coarse paste or powder using a spice grinder or blender. Set aside.


    🍗 Step 2: Sauté Onion and Curry Leaves
    1. In your Starfrit Rock Cookware pan, heat the oil or ghee.
    2. Add curry leaves and sliced onions. Sauté until the onions are golden and slightly crisp at the edges — this gives a beautiful base flavor.


    🍛 Step 3: Cook the Chicken
    1. Add the marinated chicken to the onions. Cook on medium-high heat for about 5–7 minutes, stirring occasionally until the chicken is no longer pink.
    2. Now add the freshly ground masala paste. Mix well so that every piece of chicken is coated.
    3. Cover the pan, reduce the heat to medium-low, and cook until the chicken is completely done and tender, about 15–20 minutes. You can cook it uncovered for the last few minutes to reduce any excess moisture and let the masala cling to the chicken pieces.


    🌿 Step 4: Finish and Serve
    • Garnish with fresh coriander or a few extra fried curry leaves (optional).
    • Serve hot with rice, paratha, or naan.


    ⸻


    Tips & Variations:
    • Spiciness: You can reduce red chili or pepper if making for kids or those with lower spice tolerance.
    • Protein Swap: Try the same method with mutton, tofu, or even mushrooms for a veg version.
    • Meal Idea: Pair with a cucumber raita and lemon rice for a balanced South Indian-style meal.

Filed Under: NON-VEG RECIPES, SOUTH INDIAN GRAVIES/DAL/CURRY/KUZHAMBU Tagged With: chicken re

🍗 Chicken Fried Rice

July 10, 2025 by Suki

Crispy fried chicken chunks stirred into garlicky, eggy fried rice. Crunch meets umami — comfort food goals!

⸻

Pan is from @starfrit @rockcookware

📝 Ingredients (Serves 3–4)

For the Fried Chicken:

• 300g boneless chicken thighs or breast, cut into bite-sized chunks

• 1 tbsp Kashmiri chili powder 

• 1 tsp  lemon juice

• 1 tsp garlic ginger  paste

• 1 tsp coriander powder and food Color a pinch (optional)

• 1 tsp turmeric powder

• 2 tbsp cornflour

• 1 egg

• Salt to taste

• Oil, for deep frying

For the Fried Rice:

• 3 cups cooked rice (preferably cold/day-old)

• 2 eggs, lightly beaten

• 7-8 garlic cloves, finely chopped

• ½ cup mixed veggies (carrots, cabbage, bell pepper)

• 2 tbsp soy sauce

• 1 tsp chilli powder 

• 1 tsp chili sauce (optional)

• 1 tsp sesame oil or vegetable oil

• Salt & pepper to taste

• Spring onion greens, chopped (for garnish)

⸻

🍳 Instructions

1. Marinate & Fry the Chicken

• Mix chicken with soy sauce, lemon juice, garlic ginger paste, chili powder, coriander, turmeric powder and salt. Let it sit for 15–30 minutes.

• Coat marinated chicken with cornflour and eggs.

• Heat oil in a pan. Deep-fry or shallow-fry chicken until golden and crispy. Set aside on a paper towel. cut them into smaller pieces m.

2. Make the Fried Rice

• In a large wok, heat 1 tbsp oil.  a

Add garlic, green chillies, white part of spring onions and mix well, add the veggies and add the eggs. 

add the chicken pieces and rice.

• Add soy sauce, chili powder, sesame oil, and season with salt & pepper.

  •  Add cooked rice. Break up any clumps and mix well.

• Lastly, drizzle some sesame oil. Stir-fry everything on high heat for 1–2 minutes.

3. Garnish & Serve

• Garnish with chopped spring onion greens. Serve hot with extra chili sauce or a fried egg on top.

⸻

🔁 Optional Variations:

• Spicy Korean Twist: Use gochujang in the sauce and Korean-style fried chicken.

• Indo-Chinese Style: Add chopped green chili, extra soy + chili sauce.

• Air-Fried Chicken Version: Skip deep-frying and use air-fried chicken bites for a healthier option.

• Leftover Hack: Use store-bought chicken tenders or nuggets chopped up.

#chicken #fried #masala #rice #streetstyle #restaurant #easyrecipes #food #egg #friedrice #foodie #trendingreels #instagram #lunchbox

#ChickenFriedRice #IndoChinese #DesiChinese #StreetStyleFriedRice #SpicyFriedRice  

#FriedRiceLovers #QuickDinnerRecipe #EasyChickenRecipes #ChineseFoodIndia #HomemadeFriedRice  

#DesiFoodCravings #GharKaKhana  

#IndoreStreetFood #IndianFoodReel #BiryaniVsFriedRice #ChatoriZubaan  

Filed Under: NON-VEG RECIPES, STREETFOOD Tagged With: chicken rec

🥙 Spicy Lentil Burgers with Prune Relish

June 29, 2025 by Suki Leave a Comment

Bold meets wholesome in these Spicy Lentil Burgers with Prune Relish 🍔💥—where earthy lentils and sweet California Prunes create a flavour bomb you didn’t see coming.

Plant-based, punchy, and seriously satisfying. 🌱✨

Who knew California Prunes could be this versatile? 🌿💜⁠

More than just a sweet snack, prunes bring depth, moisture, and an earthy richness that elevates both sweet and savoury dishes. Case in point: these Spicy Lentil Burgers with a bold, umami-packed prune relish. 🍔✨⁠

The natural sugars in California Prunes balance out heat and acidity, making them the perfect base for a tangy relish that totally transforms this wholesome, plant-based burger.⁠

Whether you’re vegetarian or simply looking to add more nutrient-dense, flavour-forward meals to your week, this recipe is proof that prunes deserve a spot far beyond the snack bowl. ⁠

This post is sponsored by @CAprunesCAN –

⁠

Serving Size:
Time:
Difficulty:
  • For the Lentil Burgers:
    1 cup cooked green lentils (well-drained)
    1/2 cup cooked quinoa (optional but adds great texture)
    1/2 cup rolled oats
    1/2 small red onion, finely diced
    2 cloves garlic, minced
    1 small carrot, grated
    1 tablespoon soy sauce or tamari
    1/2 teaspoon smoked paprika
    1/2 teaspoon ground cumin
    Salt and black pepper to taste
    1 flax egg (1 tbsp ground flax + 3 tbsp water)
    1–2 tablespoons olive oil (for cooking)
    For the California Prune Relish:
    1/2 cup California Prunes, chopped
    1/4 cup red onion, finely diced
    1 tablespoon olive oil
    1 tablespoon balsamic vinegar
    1 teaspoon Dijon mustard
    1/4 teaspoon crushed red pepper flakes
    Salt to taste
    2 tablespoons water (to loosen if needed)
    To Serve:
    Whole grain buns or lettuce wraps
    Sliced avocado or vegan mayo
    Baby spinach, arugula, or lettuce leaves
    Optional: Pickled onions, tomato slices, cheese (dairy or vegan)

Directions

  1. 1. Make the Prune Relish:
    In a small skillet, heat olive oil over medium heat.
    Sauté red onion until softened (about 3–4 minutes).
    Stir in chopped California Prunes, balsamic vinegar, mustard, red pepper flakes, and a pinch of salt.
    Add a splash of water and let simmer gently for 5–7 minutes until thickened and jammy.
    Adjust seasoning to taste. Let cool slightly.
    2. Prepare the Lentil Burger Mix:
    In a food processor, combine cooked lentils, oats, quinoa or bulgur, onion, garlic, carrot, tomato paste, soy sauce, flax egg,and spices.
    Pulse until mixture is combined but still has some texture.
    Taste and adjust seasoning. If too wet, add a tablespoon of oats. If too dry, a splash of olive oil.
    3. Form and Cook the Patties:
    Divide mixture into 4–6 patties.
    Heat a skillet with a bit of oil over medium heat.
    Cook patties 3–4 minutes per side until browned and crisp on the outside.
    4. Assemble the Burgers:
    Toast buns or prepare lettuce wraps.
    Layer with baby greens, the warm lentil burger, a generous spoonful of prune relish, avocado slices, and any additional toppings like cheese

Filed Under: VEGAN Tagged With: burger recipe, burger recipes, lentil burger, prune recipe, prune recipes, prune relish

 Two Flavor-Packed Chicken Marinades: Hariyali & Peri Peri

June 26, 2025 by Suki Leave a Comment

⸻

1. 🌿 Hariyali Chicken Marinade (Green Herbed Chicken)

A vibrant North Indian-style marinade bursting with cilantro, mint, garlic, and spices. Perfect for grilling or pan-searing.

Ingredients:

• 1 cup fresh coriander (cilantro) leaves, tightly packed

• ½ cup fresh mint leaves

• 4–5 garlic cloves

• 1-inch piece of ginger

• 2–3 green chilies (adjust to spice level)

• ½ cup thick curd (yogurt)

• Juice of ½ lime

• 1 tsp cumin powder

• 1 tsp garam masala

• Salt to taste

• 1–2 tbsp oil (for grilling or marinating)

Instructions:

1. In a blender, combine coriander, mint, garlic, ginger, chilies, and yogurt.

2. Blend into a smooth paste. Add lime juice, cumin powder, garam masala, and salt.

3. Coat 500g chicken (boneless thighs or drumsticks work well) with the marinade.

4. Cover and marinate for at least 2 hours, preferably overnight.

5. Grill, pan-sear, or bake until the chicken is cooked through and lightly charred.

6. Garnish with onion rings and lime wedges.

⸻

2. 🔥 Peri Peri Chicken Marinade (Spicy Portuguese-Inspired)

A fiery, tangy marinade inspired by Portuguese-African flavors—perfect for lovers of heat!

Ingredients:

• 4–6 dried red chilies (soaked in warm water 10 mins)

• 3–4 fresh garlic cloves

• 1 small red bell pepper (optional for color + body)

• Juice of 1 lemon

• 2 tbsp vinegar (white or apple cider)

• 1 tsp smoked paprika

• 1 tsp oregano

• ½ tsp black pepper

• Salt to taste

• 2 tbsp olive oil

Instructions:

1. Blend soaked chilies, garlic, red pepper, lemon juice, vinegar, and spices into a smooth paste.

2. Add olive oil and mix well.

3. Coat 500g chicken (boneless or bone-in) with the marinade.

4. Marinate for at least 3 hours or overnight.

5. Grill, roast, or pan-fry until charred and juicy.

6. Serve with peri peri mayo or herbed rice.

⸻

🔁 Tips for Both Marinades:

• Score the chicken slightly for deeper flavor penetration.

• Save some marinade to baste during cooking (if not mixed with raw chicken).

• Can be air-fried too (180°C for 12–18 mins depending on cut).

Filed Under: NON-VEG RECIPES Tagged With: chicken marinations, chicken recipes

Eggplant rice 

June 4, 2025 by Suki Leave a Comment

🌿 Simple Pleasures: Eggplant Rice, Raita & Chips on a Sunny Afternoon

here’s something deeply comforting about a plate of home-cooked food that doesn’t try too hard—just honest flavors, familiar aromas, and a feeling of “this is exactly what I needed today.”

This afternoon, under the soft golden sun, I found myself craving something quick, soulful, and satisfying. I ended up making this humble with my mom but flavorful eggplant rice, paired with cool cucumber raita and a side of crispy potato chips—a trio that reminded me so much of school tiffin days and weekend lunches at home. My mom made this with me and I recorded this. 

The brinjal rice (or vangi bath, as it’s fondly called in many South Indian homes) is one of those dishes that transforms a simple vegetable into something irresistibly aromatic. Sliced brinjals are sautéed with caramelized onions, tossed in a warm, earthy spice blend, and mixed with fluffy basmati rice. A spoonful of homemade or store-bought vangi bath masala does all the heavy lifting.

The raita, just a mix of chilled curd, cucumbers, and a pinch of cumin, adds the perfect cooling contrast to the spiced rice. And those chips? Pure nostalgia. No pretense, just a bit of crunch that makes everything on the plate feel extra special.

What I love about meals like this is how they hit that perfect note between comfort and flavor—quick enough to pull together on a lazy afternoon, but satisfying enough to feel like you’ve treated yourself.

📌 Tip: If you want to save time, pre-make a small batch of the spice powder and store it for future rice dishes—it works beautifully with other veggies too.

Have you tried making brinjal rice before? What’s your go-to nostalgic comfort meal? I’d love to know in the comments!

Serving Size:
2
Time:
15
Difficulty:
30 mins

Ingredients

  • For the rice:
    • 1 cup basmati rice (or any variety), cooked and cooled
    • 1 medium onion, finely chopped
    • 6–8 small brinjals or one big eggplant chopped finely, carrot chopped finely, peas
    • 2 tbsp oil (preferably sesame or sunflower)
    • 1/2 tsp mustard seeds
    • 1/2 tsp cumin seeds
    • A pinch of asafoetida (hing)
    • 1 sprig curry leaves
    • 1 tbsp chana dal
    • 1 tbsp urad dal
    • 1 medium tomato chopped finely 
    • Salt to taste
  • • GHEE to drizzle. Loved this Canadian ghee.


    Spice powder (or use ready-made vangi bath powder):
    • 1 tbsp chana dal
    • 1 tbsp urad dal
    • 1 tsp coriander seeds
    • 1/2 tsp cumin seeds
    • 1/2 tsp sesame seeds
    • 4–6 dried red chilies (adjust to taste)
    • 2 tbsp grated coconut (optional, fresh or desiccated)
    • 1/2 tsp cinnamon (or a small piece of stick)
    • 2 cloves


    Dry roast these ingredients on medium heat until aromatic and grind to a coarse powder once cooled.

Directions

  1. 🍳 Method:
    1. Cook the rice:
    Cook rice with a few drops of oil. Let it cool fully before mixing so it doesn’t get mushy.
    2. Prepare the masala powder:
    Roast and grind the ingredients listed above (or use store-bought vangi bath powder).
    3. Sauté the brinjals:
    Heat oil in a pan. Add mustard seeds and let them splutter. Add cumin, Chana dal, urad dal, hing, and onions. Sauté until golden.
    4. Add brinjal:
    Add the tomatoes, carrots , peas, brinjal and salt. Cook covered on low-medium heat until soft, stirring occasionally. Sprinkle a little water if needed. It takes good 8-10 mins
    5. Add spice powder:
    Once the brinjals are cooked, add 2–3 teaspoons of the spice powder and sauté for 2–3 minutes.
    6. Mix with rice:
    Gently fold in the cooled rice. Adjust salt and spice level as needed. Add a squeeze of lemon juice for freshness (optional). Add curry leaves and coriander leaves to garnish. Drizzle ghee on top.
  2. 🥄 Serving suggestions:
    • Pair with raita (like the cucumber one in your image), papad or chips.
    • You can add roasted peanuts or cashews on top for extra crunch.

Filed Under: RICE/BIRYANI VARIETIES Tagged With: brinjal recipes, brinjal rice, eggplant rice, rice, rice recipes, Rice variety, vegan recipe, Vegan recipes, vegetarian recipes

🌶️Spicy Chili Peanut Noodles 🍜

May 31, 2025 by Suki Leave a Comment

Kicking things up with spicy olive oil from @maisonorphee and a creamy peanut sauce that clings to every strand of noodle. Bold, nutty, spicy, and satisfying in every bite! Perfect weeknight comfort food.
I saw the spicy police oil from maison prphee and had to try them. Tasted so good on my noodles. I tried them on my pizza and morning toast which was delicious as well. 

Serving Size:
Time:
Difficulty:

Ingredients

  •  Noodles (any type – ramen, rice, or wheat)
    • 2 tbsp peanut butter (smooth or crunchy)
    • 2–3 garlic cloves, minced
    • 1–2 green chilies, finely chopped
    • 1–2 tsp red chili flakes (adjust to heat preference)
    • 1 tbsp soy sauce
    • 1 tbsp Maison Orphee Spicy Olive Oil
    • 1/2 tsp onion powder
    • 2 tbsp noodle water (reserved from boiling noodles)
    • 1 tbsp peanuts, crushed or whole (for crunch)
    • 1 tsp sesame seeds (plus more for garnish)
    • Fresh coriander leaves, chopped (for garnish)

Directions

  1. 1. Cook the noodles:
    Boil noodles as per package instructions. Reserve a few tablespoons of the noodle water before draining.
    2. Make the sauce:
    In a bowl, mix:
    • Peanut butter
    • Soy sauce
    • Onion powder
    • Red chili flakes
    • Noodle water (to thin it slightly)
    • green chillies
    • garlic 

    3. Sauté aromatics:
    In a pan over medium heat, add the spicy olive oil.

    4. Combine:
    • Add the heated olive oil to the pan of sauce. Add the noodles as well.

    • Toss everything together until noodles are well coated.
    5. Garnish:
    • Sprinkle crushed peanuts and sesame seeds.
    • Add fresh coriander leaves on top.

    ⸻

    Optional Add-ins:
    • A dash of spicy olive oil for that extra kick
    • Stir-fried veggies or tofu for a fuller meal

Filed Under: CHINESE ASIAN INSPIRED, VEGAN Tagged With: 10 garlic based recipes, 10 minute dinner recipes, chilli peanut noodles, noodles recipes, recipes noodles, spicy oil recipe videos, spicy oil recipes, vegan recipe, vegetarian recipes

Page 1 of 2
1 2 Next »
  1. Pages:
  2. 1
  3. 2
  4. »
  • 1
  • 2
  • Next Page »
  • Facebook
  • Google+
  • Instagram
  • Pinterest
  • Twitter

LOOKING FOR SOMETHING?

logo
Food Advertisements by
logo
Food Advertisements by

Categories

STAY CONNECTED

  • Facebook
  • Google+
  • Instagram
  • Pinterest
  • Twitter

SUBSCRIBE BY EMAIL

SEARCH RELISH THE BITE

logo
Food Advertisements by

Copyright © 2026 · Lifestyle Pro Theme on Genesis Framework · WordPress · Log in