• Home
  • Page Layouts
  • Page Templates
  • Theme Colors
    • Lifestyle Pro Blue
    • Lifestyle Pro Green
    • Lifestyle Pro Mustard
    • Lifestyle Pro Purple
    • Lifestyle Pro Red
    • Lifestyle Pro Teal

Relish The Bite

Taste of happiness

  • HOME
  • ABOUT
  • RECIPE INDEX
    • SNACKS & APPETIZERS
    • BREAKFAST
    • BAKED RECIPES
    • LUNCH & DINNER
      • RICE/BIRYANI VARIETIES
      • SIDES
        • DRY CURRY/STIR-FRY
        • SOUTH INDIAN CURRY/KUZHAMBU
        • NORTH INDIAN CURRY/DAL
        • RAITA/DIPS/CHUTNEY
        • Soups/Salads
      • PASTA PIZZA & TACOS
      • BREAD
      • CHINESE ASIAN INSPIRED
    • NON-VEG RECIPES
    • DESSERTS
    • BEVERAGES
  • SNACKS
  • BREAKFAST
  • NON-VEG RECIPES
  • RICE/BIRYANI VARIETIES
  • LAMB
  • SOUTH INDIAN CURRY/KUZHAMBU
  • VEGAN
  • NORTH INDIAN CURRY/DAL
  • DRY CURRY/STIR-FRY
  • PASTA & TACOS
  • CHINESE ASIAN INSPIRED
  • BAKED RECIPES
  • COLLECTIONS
  • BREAD
  • BEVERAGES
  • DESSERTS
  • FESTIVAL RECIPES
    • SNACKS & APPETIZERS
    • SWEETS/DESSERTS
  • RESOURCES
    • HOW TO START A BLOG
    • TITBITS
    • PRESS
  • CONTACT
You are here: Home / Archives for Suki

🍅 Spicy Tomato Rice 🍅

May 19, 2025 by Suki Leave a Comment

Tomato rice

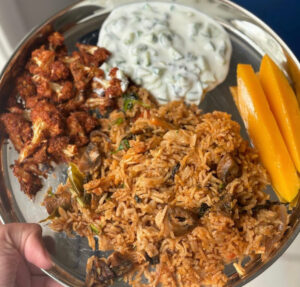
Quick & Tasty Tomato Rice
A simple, flavorful South Indian-style tomato rice made with ripe tomatoes, spices, and cooked rice. Perfect for a quick lunch or dinner—fragrant, tangy, and ready in minutes! I have used ghee to make this recipe. Coconut milk is a key ingredient also.

I posted this recipe via Instagram with a reel and had millions of views so thought of sharing this recipe here.

Ingredients:

• 2 tbsp Ghee

• 1 cup basmati rice (cooked and cooled)

• 2 medium tomatoes (chopped)

• 1 medium tomato blended

• 2 cardamom, 2 cloves

• 1 small onion (sliced)

• 1 green chili (slit)

• 5 garlic

• 3/4 cup coconut milk

• 1/4 tsp turmeric powder

• 1/2 tsp red chili powder

• 1/2 tsp garam masala

• 1/4 tsp fennel seeds

• 1/4 tsp cumin seeds

• 8-10 curry leaves

• Fresh coriander leaves (chopped, for garnish)

• Salt to taste

Instructions:

1. Prep: Cook 1 cup of rice, then spread it out to cool (keeps it fluffy).

2. Tempering: In a pan, heat ghee. Add mustard and cumin seeds, letting them splutter.

3. Sauté: Add curry leaves, sliced onions, and green chili. Sauté till onions turn golden.

4. Flavor Base: Add garlic. Cook until the raw smell disappears.

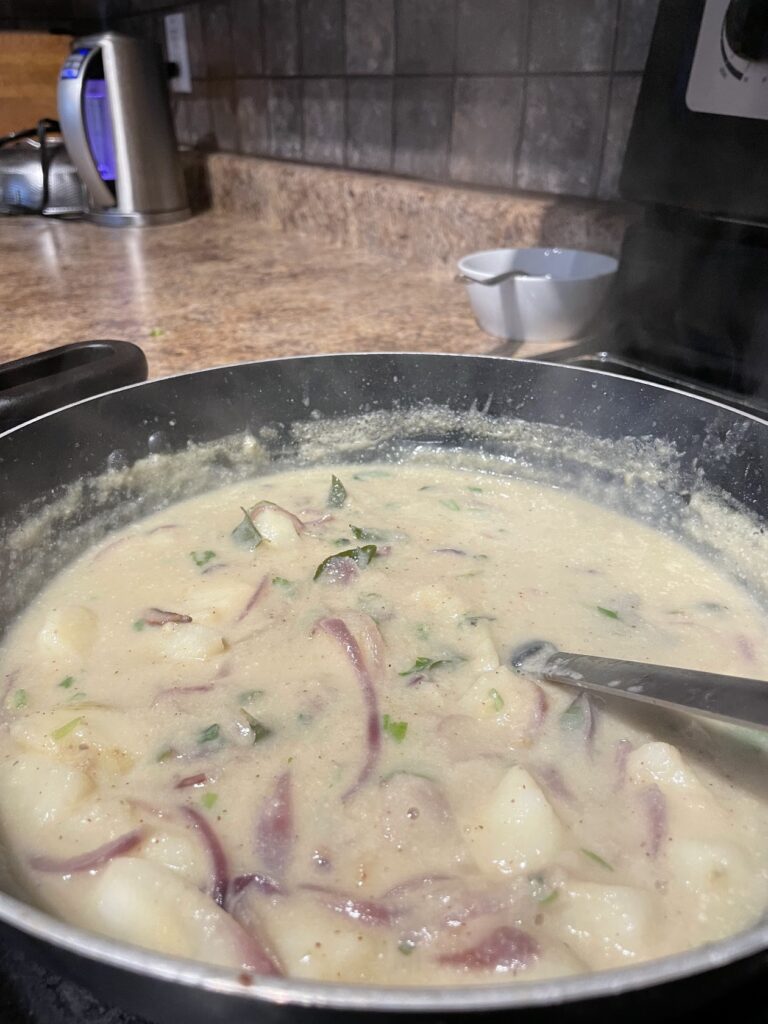
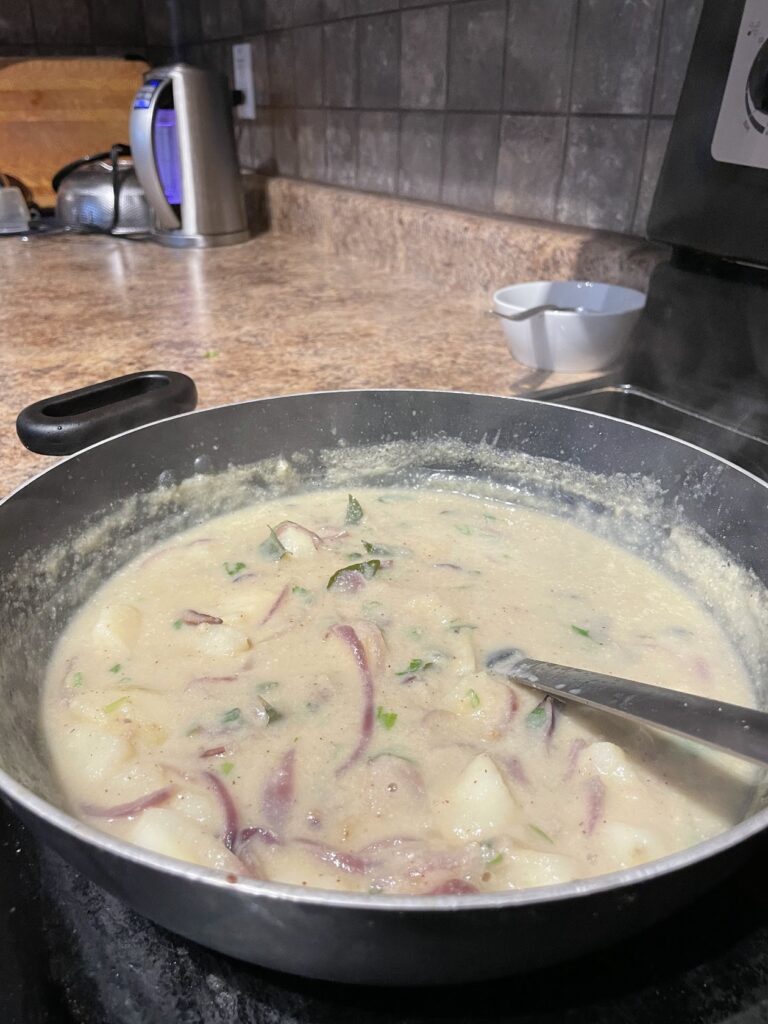
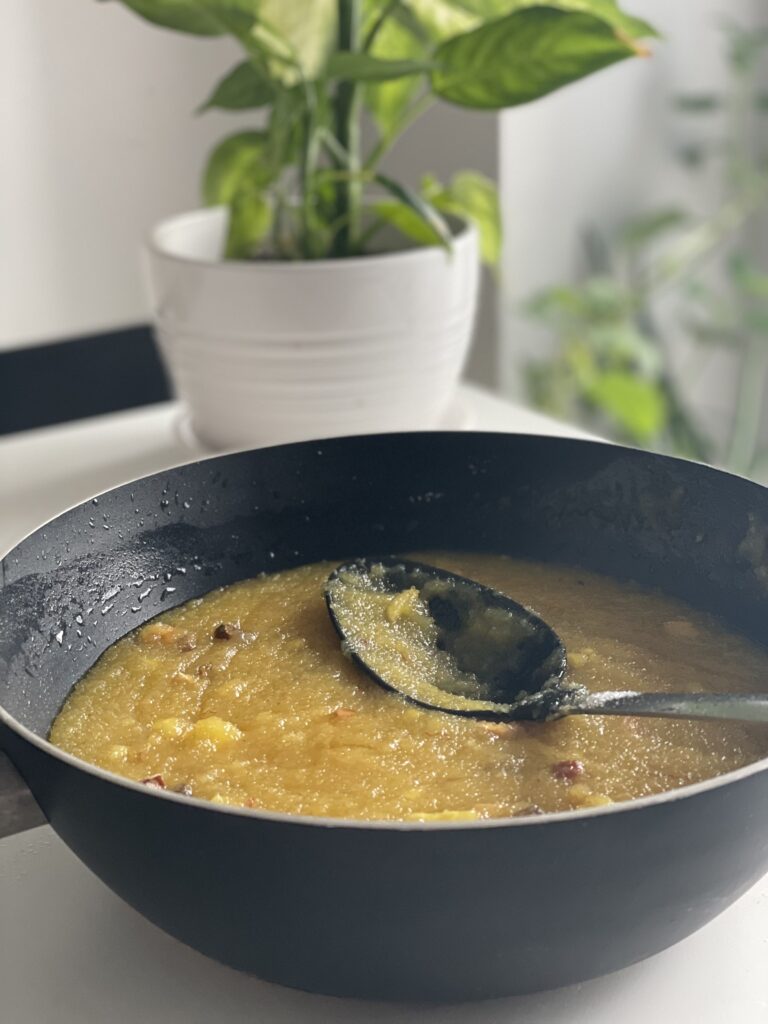
5. Tomato Masala: Add chopped tomatoes, tomato paste, turmeric, chili powder, and salt. Cook until tomatoes soften and oil releases. Add coconut milk and cook it closed for two minutes

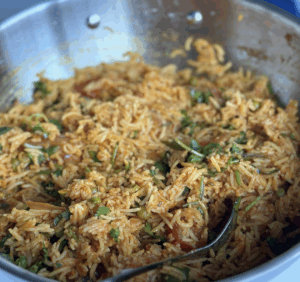
6. Combine: Add cooked rice to the pan. Gently mix to coat rice in masala.

7. Garnish & Serve: Sprinkle garam masala and fresh coriander. Serve warm with raita or chips!

Filed Under: RICE/BIRYANI VARIETIES Tagged With: best tonato rice, Indian Recipes, side dish for rice, tomato rice, Vegan recipes, vegetarian recipes

PANEER CHILA/ PANEER LENTIL PANCAKE

May 9, 2024 by Suki Leave a Comment

Paneer protein chila

Welcome to my new series. 30

Episode 1

30g protein

30 Minutes

Vegetarian version

Recipes that will take you under 30 minutes to make and contains over 30g of protein vegetarian version

This is super simple paneer lentil pancake.

Serving Size:
Time:
Difficulty:

Ingredients

  • To blend
  • Moong dal – 1 cup
  • Green chillies – 2-3
  • Ginger – 1 Inch
  • To add
  • Paneer – 200gm, Grated
  • Red chilli flakes – 1.5 tsp
  • Onion – 1/4 cup, chopped finely.
  • Carrot – 1/4 cup, grated
  • Coriander leaves – 1/4 cup, grated
  • Red chilli powder – 1.5 tsp
  • Salt – 2 tsp or change for your salt level.
  • For pancake
  • Coconut or avocado oil – 1 tbsp .

Directions

  1. Soak green moong dal for 10 minutes in boiling hot water or for 2-3 hours if you have the time.
  2. Meanwhile Finish grating the vegetables.
  3. Now remove the excess water from moong dal and grind it to smooth paste with green chillies and Ginger.
  4. Mix all ingredients well and form a smooth mixture. It does not need to be in liquid consistency.
  5. Take a pan. Pour a spoon of pancake mixture on a pan, drizzle some oil on it.
  6. Once it is cooked, turn it and cook from other side till it is golden brown from both the sides.
  7. Serve it with Chilli oil (or) Greek yogurt (for added protein) and Pickle.

Filed Under: RECIPES Tagged With: Indian Recipes, lentil recipes, paneer recipes, protein plant based protein, protein recipes, Protein recipes 30g vegetarian protein recipes, Vegan recipes, vegetarian recipes

Pistachio Herb Scallops

April 17, 2024 by Suki Leave a Comment

This recipes takes only 15 minutes to make and I am not kidding.Sear the scallops so it’s crispy outside and juicy inside.

Serving Size:
Time:
30 mins
Difficulty:
easy

Ingredients

  • Pistachio mixture : crushed pistachios , red chilli flakes, coriander leaves, rosemary leaves and salt
  • Egg mixture : beaten egg with salt and pepper
  • Butter, Scallops, Salt, pepper, lemon juice

Directions

  1. 1. Pat dry the scallops
    2. Season the scallops on all sides with salt and the black pepper.
    3. Then dip them with in egg mixture
    4. Next to pistachio mixture
    5. Pan with butter, when it melts, scallops cooked in one side for two minutes, flip and other side from 1-2 minutes.
    6. Season with lemon juice and chilli flakes.

Filed Under: NON-VEG RECIPES

Spelt Flour Banana Bread (Eggless)

February 2, 2024 by Suki 1 Comment

Spelt_cake2
Spelt_cake2

I have a lot of recipes I wanted to share and it is with me on my drafts. Honestly, it is difficult to gauge what is appropriate to share right now. There are so many things which are said healthy. No sugar , no oats daily, no carbs, yes to carbs, walk not run, run but no weights, self care, mental care, do this, eat this, don’t do this, do this and this list goes on. 

I wanted to share something useful. In my mind, what do I even share anymore?. May be share what I do!? That will be depressing to share my life. Is it not?!!! Lol!

I eat what I want to eat. There were days I did not eat carbs at all and other days just few chocolate bars. Now I just eat more of non processed food, home cooked food and eat balanced. To me, I think now it is all about balance and do what make your soul happy! Happiness is a myth 😀

So, I tried this banana cake because I had lot of ripe banana’s and spelt flour. So, gave it a try. I couldn’t take step by step pictures or any videos because I was not even sure how this will turnout. Tasted too good and I decided to share this!

Spelt-_cake

Serving Size:
9*9
Time:
60 mins
Difficulty:
Medium

Ingredients

  • DRY INGREDIENTS
  • 180 g / 1½ cups Spelt flour or Whole wheat flour or all purpose flour
  • 1 tsp of baking powder
  • 1 tsp of baking soda
  • 1/2 tsp salt
  • 1½ tsp of cinnamon
  • 110g chocolate chips
  • 60g Pecans /walnuts or combination
  • WET INGREDIENTS
  • 360 g / 2 cups mashed up, overripe bananas
  • 1/2 cup unsalted butter or 1/2 cup melted coconut oil
  • 90 ml almond milk or any milk
  • 2 tsp lemon or lime juice
  • 1 tsp vanilla extract
  • 50 g normal or coconut sugar
  • EXTRAS
  • 2 tsp maple syrup for glaze (optional)

Directions

  1. Warm up the oven to 175° C / 350° F and line a 900 g / 2 lb cake tin with baking paper.
  2. Combine wet ingredients and Mix very well. 
  3. Add dry ingredients one at a time.
  4. Transfer the cake batter into the prepared baking tin. It should be fairy thick. 
  5. Bake for about 50-55 minutes, or until a toothpick comes out fairy clean (this cake should be moist). 
  6. Remove from the oven and brush with with a little maple syrup while the cake is still hot. Let the cake cool down completely before removing it from the tin and slicing. 
  7. Use a serrated knife to slice if you have one – I find that it produces neater looking slices.
Spelt_bananacake

Filed Under: BAKED RECIPES Tagged With: banana bread recipes, banana cake, banana chocolate chip recipes, banana recipes, eggless banana cake recipes, eggless banana chocolate chip, eggless cake recipes, eggless recipes, healthy banana recipes, healthy spelt flour recipes, vegetarian recipes

One pot Mushroom biryani recipe

November 30, 2023 by Suki Leave a Comment

Mushroom Biryani

This is my first option if I have mushrooms at home so let the world know this… 😉! 

I know and I have heard this from my loved ones that “Biryani” can never be vegetarian. However, I am a vegetarian and this is the only biryani I have tasted 😀 so this is a delicacy to me. I am here in Costa rice for a break last few days. Obviously, new place and beautiful. However, Vegetarian options are not great unless I cook here. If I go to the the main town I might get some option. So, for now all I am having –> rice, beans and plantain. At this point, I choose peace over food and humans which is unlike me. So, no complaints!

Serving Size:
Time:
Difficulty:

* Oil – 2 tbsp
* Bay leaf – ½
* Cinnamon – 1 thin piece
* Cloves – 3
* Cardamom pods – 2
* Onions – 1, big, sliced thinly
* Mint – 1 cup, chopped finely
* Coriander leaves – 1 cup, chopped finely
* Garlic – 6, very finely chopped
* Ginger – 2 cloves, finely chopped
* Green chilli – 8, slit
* Tomato – ½, sliced
* Turmeric powder – ¼ tsp
* Biryani masala – 1 tsp
* Red Chilli powder –1 tbsp
* Mushrooms chopped (crimini, or another favourite variety) – 2 cups
* Salt – 2.5 tbsp or as per your taste.
* Basmati Rice – 2 cups
* Water – 4 cups
* Coriander leaves – 1 tbsp, chopped

Directions

  1. Take a big wide pan, add oil on medium heat, and add the spices like bay leaf, Cinnamon, cloves, cardamom pods, and sauté for a minute. Add the cumin seeds, then the onions, mint, coriander leaves, ginger, garlic, green chillies, and fry for two minutes with a bit of salt.
  2. Then add tomatoes with mushrooms, turmeric powder, biryani masala, red chilli powder and salt.
  3. Mix well and sauté for two minutes.
  4. Then add the rice and mix well.
  5. Add the water to it and close the pan in medium high heat for ten minutes.
  6. After ten minutes, change it to low for ten minutes.
  7. Finally, keep it closed for ten minutes after removing from heat.
  8. Garnish with coriander leaves.
  9. Notes: Remove chilli powder if you find it spicy.
Mushroom Biryani

Filed Under: RICE/BIRYANI VARIETIES, VEGAN Tagged With: biryani recipes, Indian Recipes, Mushroom recipes, vegan recipe, Vegan recipes, Vegetable biryani recipes, vegetarian biryani recipes, vegetarian recipes

Tikka Masala Pasta

November 26, 2023 by Suki Leave a Comment

Tikka Masala Pasta
Tikka Masala Pasta

For National Pasta Day this month, I’m making a spicy Indian Tikka Masala Pasta with
@forpastalovers . This is the best pasta you will ever have when you have no time to cook yet you want to have something delicious with a kick! I always liked recipes which are close to my heart.


This is one recipe that my mom made for me when I was a kid. It has a fusion traditional touch
to it. She used to make this with no cheese and I added some cheese to it. If you love pasta, and if you love Indian food, you need to try this recipe!

Recipe Video


I’ve used Italpasta’s Artisan Penne Rigate pasta for this recipe! Their pastas are made in Canada with 100% Canadian wheat and the utmost care. This makes their pasta nutritious and delicious :). Their pastas have been made in Canada for over 30 years, offering different shapes and sizes.

Tikka Masala Pasta

Serving Size:
4
Time:
30 minutes
Difficulty:
Easy

Ingredients

  • Olive oil – 2 tbsp
  • Garlic – 7 cloves, chopped finely
  • Ginger – 2 inch, chopped finely
  • Green chilli – 2, chopped finely
  • Tomato sauce – 4 tbsp
  • Tikka masala powder – 1 tbsp
  • Salt – 1 tsp
  • Heavy cream – 1/4 cup
  • Italpasta Artisan Penne Rigate Pasta – 500 gms
  • Parmigiano-Reggiano cheese – 4 tbsp
  • Coriander leaves – 2 tbsp, chopped finely

Directions

  1. Boil pasta for 12 minutes on medium heat. Strain and set aside. Keep the pasta water.
  2. In medium heat, add olive oil, onion, ginger, garlic, and green chillies.
  3. Add tomato sauce, pasta water, tikka powder and salt. Sauté for 2 minutes.
  4. Add heavy cream and mix well.
  5. Then add cooked pasta and mix well.
  6. Garnish with coriander leaves and cheese.

Filed Under: PASTA PIZZA & TACOS Tagged With: Indian pasta, Indian pasta recipes, Indian Recipes, Pasta recipes, Quick pasta recipes, recipes spicy pasta, vegan recipe, vegetarian recipes

Paneer Kabab

November 25, 2023 by Suki Leave a Comment

Paneer Kababs
Paneer Kababs

Paneer Kabab is a delicious shallow fried crisp yet melt in mouth Indian cottage cheese kababs seasoned with spices. It took only 30 minutes to make this.

This is totally a no onion no garlic paneer recipe. This is a great protein rich snack or a meal by itself with some vegetables. My mom loves anything with paneer so tried this to make it for her. I had a block of paneer to be used and this paneer kabab recipe was the perfect fit for this. I have all the time in the world to try. I am in a break from work and everything, so why not explore something in my kitchen at-least?!

To make paneer kabab recipe you can either deep fry the shaped kababs, shallow fry them, toast them on tava or bake them. Serve paneer kabab hot with chai.

Other Paneer recipes:

Paneer Biryani

Paneer Dum Mirch/ Spicy simmered paneer curry

Dhaba Style Paneer curry

Serving Size:
8
Time:
30 minutes
Difficulty:
easy

Ingredients

  • * Paneer (cottage cheese) grated 400 grams 
  • * Chilli powder 2 tsp
  • * Green chillies 3 finely chopped 
  • * Chaat masala 1/2 teaspoon 
  • * Garam masala powder 1/2 teaspoon 
  • * Salt to taste 
  • * All purpose flour 1.5 tablespoon
  • * Rice flour 2 tablespoon 
  • * Coriander leaves chopped 1 tablespoon 
  • * Methi leaves dry 1 tbsp
  • * Lemon juice 2 teaspoons 
  • * Onion rings and lemon to serve 
  • Oil to roast 

Directions

  1. Take a bowl with grated paneer with other ingredients (except onion and oil) and mix together. Use a bit of water to make it a round ball. 
  2. Divide the mixture into equal portions. Pat each portion onto a shape like in this video (imagine patting into a skewers or do with an actual skewers).
  3. Heat oil in a non-stick grill pan, place the kebabs on it and cook, rotating the kebabs, till golden brown on all sides.
  4. Serve with lemon onion slices (must!)

Filed Under: SNACKS & APPETIZERS, SNACKS & APPETIZERS FESTIVAL Tagged With: Indian Recipes, paneer cutlet recipes, paneer recipes, side dish for rice, vegetarian recipes

Mutton Kurma

March 10, 2023 by Suki Leave a Comment

Quick and easy coconut based mutton curry! Darling and delicious. Taste great with plain rice or Indian bread like roti, paratha or parotta. 🙂

Kurma belongs to Mughlai cuisine but differs from state to state. 

My other Mutton recipes to try – Lamb/Mutton sukka dry curry, Restaurant Style Lamb Biryani, Kadai Gosh/Lamb curry, lamb kebabs

Serving Size:
Time:
Difficulty:

Ingredients

  • Ingredients:
  • Coconut oil – 2.5 tbsp
  • Cinnamon – 1
  • cloves – 3
  • cardamom – 2
  • Garlic.- 1 tbsp, chopped finely
  • ginger – 1 tbsp
  • Cumin seeds – 1 tsp
  • Onion- 1 big onion, Sliced
  • Green chillies – 2, chopped finely
  • Curry leaves – few
  • Turmeric powder – 1 tsp
  • coriander powder- 1 tsp
  • Fennel powder – 1 tsp
  • Tomato – 1, chopped
  • Mutton – 500 gms
  • Salt – to taste
  • Pepper – 1 tbsp
  • cashews – 10
  • coconut milk- 1/2 cup
  • Coriander leaves – 1 tbsp, chopped finely

Directions

  1. In a pressure cooker, add coconut oil, cinnamon, cloves, cardamom,chopped garlic and chopped ginger. Sauté for 30 secs on medium flame. 
  2. Now add onion sliced, salt to taste and sauté for 4 mins on medium flame. 
  3. Add green chillies, curry leaves and combine. Then, add 1turmeric powder, coriander powder, fennel powder and combine well. 
  4. To this, add tomato diced and sauté. Add mutton chunks, salt to taste and sauté for 3 mins on high flame. 
  5. Add 1/2 cup water, combine, cover and cook for 4-5 whistles on medium flame. 
  6. Grind 10 soaked cashews to a paste and add it to the curry, along with  coconut milk. 
  7. Cook for 5-6 mins on low flame. Add pepper powder. Check salt at this stage to add if needed. Serve hot with Rice.

Filed Under: Uncategorized

Empava 150W cold press Juicer BLRD03 REVIEW

February 26, 2023 by Suki Leave a Comment

If you’re craving the sweetness of freshly squeezed orange juice or the bright, earthy tang of green juices on a regular basis, it might be time to think about purchasing a juicer.  Many have asked me looking at my juice pictures which one to buy and I have a suggestion now.


The link for the juicer to buy: https://kitchenappliancestore.com/?ref=pNTMkE5QPvNjRG

Before you select a juicer, I asked myself the following questions

How much space do I have?

How much prep time am I willing to invest in my daily juicing?What’s my budget?

How much cleanup am I willing to endure on a daily basis?

I have had a juicer which I bought like 5 years back and I use it almost every week. I love fresh juices. I would do it more often but I did not like the cleaning version of the filter much. So, this empava juicer when I got it I thought I should try to see how the cleaning part is before posting the review. the cleaning part is much more easier now and this is dishwasher safe so here is the review and details of the juicer I recommend:

I followed the instructions for assembly, and it was fairly easy to put together. It comes with a decent number of parts, but they all connect pretty intuitively. Some are just extras to keep on hand, like a giant toothbrush for cleaning the device and a filter with larger holes if you’d prefer to make a thicker smoothie.
My first concoction was a mix of what I had in the fridge (apple, ginger, Orange) and I tried spinach, celery too which was perfect! In winters for some reason I like juices instead of fresh fruits. Maybe it’s just me.
What I Like

  • Powerful motor
  • Easy to set up, use, and clean
  • Compact, but makes large batches

What We Don’t Like

  • Leaves a bit of juice un extracted which I had to put again.

It has a 60 Rpm Slow Masticating and Grinding with With less foaming and no clogging. They are all BPA free. Juice & Pulp Separation Function helps us by saving some time. It doesn’t make the noise like my old one which is great.

Centrifugal Juicers use a fast-spinninga grater to shred the fruits and veggies. The juice then gets flung through a strainer and out the spout, while the pulp flies up and into a catch basket. The innovative cold press technology effectively delays oxidation, preserving the original flavor and vivid color of fruit juice. Abundant nutrients are also retained.

My verdict is this juicer is great for a slow juicer. https://kitchenappliancestore.com/?ref=pNTMkE5QPvNjRG

The link for the juicer to buy: https://kitchenappliancestore.com/collections/juicer/products/150w-cold-press-slow-juicer-empv-bldr03

Not paid for this article.

Filed Under: Uncategorized Tagged With: cold press juicer review, empava juice, juice recipes, juice review, juicer review, juices, orange juice, recipes for cold

Kumbakonum Kadappa

January 29, 2023 by Suki 1 Comment

Kumbakanom_Kadappa
Kumbakanom_Kadappa

A vegetable stew using coconut and moong dal which is a very famous side dish for idlis and dosa from the Kumbakonam/Tanjore region of Tamil Nadu.

This is my friends’s recipe and it came out so good that I wanted to post the recipe on my website. My dad really loved it. He was telling me when he was in a town called “mayavaram” , he used to have it almost everyday with dosa/idli. Happy!

Kumbakanom_Kadappa

Kumbakanom_Kadappa

Serving Size:
Time:
Difficulty:

Ingredients

  • Moongdal – 1/4 cup
  • Aloo – 1 
  • Garlic 3 I add more 
  • Ginger 
  • Onion 1
  • To grind:
  • Coconut- 3 tbsp
  • Pottu kadalai- 1 tbsp
  • Poppy seeds -1/2 tbsp
  • Green chilli 2
  • Garlic 2

Directions

  1. Pressure cool moong dal with turmeric and aloo.
  2. In kadai add oil, cloves, cinnamon stick, sombu and bay leaves. Add thinly sliced onions. Add more garlic and green chilli. Add ginger garlic paste. Then cooked dal + half cup water. After that boils add aloo. After 2 mins add ground paste and salt to tast. 
  3. Boil for 5-7 mins and garnish with coriander leaves.

Filed Under: SOUTH INDIAN GRAVIES/DAL/CURRY/KUZHAMBU Tagged With: dosa kadappa recipe, idli dosa side dish, Indian Recipes, recipes for vegan, sid dish for dosa, side dish for idiyappam, side dish for idli, side dish for rice, stew vegetable recipes, vegan recipe, Vegan recipes, vegan side dish recipes, vegetarian recipes

Pineapple Kesari

December 20, 2022 by Suki 1 Comment

Semolina cooked with lots of ghee, sugar and is mixed along with pineapple chunks which adds in the rich flavour to the dish.

Pineapple Kesari Recipe is one of the most common, traditional dishes in Karnataka. The Kesari Bhath is a must during weddings for breakfast. It is simple to make and taste delicious. 

My dad makes kesari at my home. Better than any of us. So made him do this when he is here with me in Canada. He said it is all about measurements. So use the exact measurements to make it as good as it tasted. Also only if you use this much of ghee, it will taste good. If not it will be little dry but that’s your wish. If you want to eat after few hours its made, just warm it a bit and it will get back to this texture.

Other favourite dessert recipes: Gulab Jamun, Palkova, Basundi

Serving Size:
2.5 Cups
Time:
30 Minutes
Difficulty:
Easy

Ingredients

  • 1 cup Sooji (Semolina/ Rava) , fine
  • 1/2 cup Ghee
  • 1/2 cup Pineapple , finely chopped
  •  1/2 cup Pineapple , blended
  • Saffron strands , around 12-13
  • 2 cup Sugar
  • 1 teaspoon Cardamom Powder (Elaichi)
  • Seasoning
  • 1 tablespoon Ghee , for tempering
  • 10 Cashew nuts , as required
  • 10 Raisins , as required

Directions

  1. To begin making the Pineapple Kesari, soak the saffron in a tablespoon of normal water and keep aside.
  2. In a pan, add 2.5 cups of water to a brisk boil. Let it boil super good.
  3. Heat a tablespoon of ghee in a pan over medium heat. Add the cashew nuts and allow it to roast until crisp and golden brown. Add the raisins and sauté until it puffs up and turn off the heat. Keep this aside.
  4. In the same pan, add some ghee with rava and roast in medium heat. Roast for at least 7-8 minutes. Stay close to it and watch as you sauté them.
  5. Add the pineapple puree, pineapple slice, saffron (with water) and mix well.
  6. Then add the boiling water to it and mix well. Keep stirring continuously as you add the water so no lumps form. Be careful when you add the boiling water and milk mixture as the rava bubbles up suddenly.
  7. Keep stirring for at least 5 minutes until you notice the Kesari leaves the sides of the pan.
  8. Add sugar and ghee to it. Mix well and this time for 3-4 minutes and it will form into a nice consistency.
  9. Once done, stir in the cardamom powder, roasted cashew nuts and raisins and mix well.

Filed Under: DESSERTS Tagged With: halwa recipes, indian dessert recipes, Indian Recipes, Indian sweet quick recipes, indian sweet recipes, kesari recipes, pineapple halwa, pineapple halwa recipes, Pineapple kesari, Pineapple recipes

Kerala Chicken Roast 

December 13, 2022 by Suki 2 Comments

Chicken roasted to perfection using coconut oil. A simple recipe to make.

I have been making quite a few chicken recipes recently even though I don’t eat chicken or either my parents do. The main reason being it is easier to make for guests when they come home.

This is a recipe I made a month back and it was pretty popular in Instagram so wanted to share the recipe here. I have scheduled posts for every week now so 🙂 You will see more recipes for me hopefully.

Kerala Chicken Roast Video

I am not a regular because this is my side hustle/passion and sometimes I lose energy to deal with everything. Anything which keeps me busy keeps me happy and gives me hope. There was never a night or a problem that could defeat sunrise or hope until quite recently. But.. still let us all believe …! When you have lost hope, you have lost everything. And when you think all is lost, when all is dire and bleak, there is always hope. !

Serving Size:
2 cups
Time:
30 minutes
Difficulty:
easy

Ingredients

  • Chicken breast – 500 gms
  • Turmeric powder – 1 tsp
  • Chilli powder – 1 tbsp
  • Green chilli – 3 whole
  • Ginger garlic paste (fresh) – 2 tbsp
  • salt – 2 tsp
  • Sliced onions – 3/4 cup
  • Yogurt – 2 tbsp 
    • To cook:
  • Coconut oil – 2 tbsp
  • Curry leaves – 1 sprig
  • Coriander leaves – 1 tbsp, chopped finely

Directions

  1. Marinate everything under marination by mixing it together and keep it aside for 30 minutes to 3 hours.
  2. Take a pan, in medium heat, add coconut oil, then everything under marination and curry leaves to top.
  3. Mix well for 2 minutes
  4. Then close the pan by adding no water.
  5. 8 minutes and then open it will have some water in it. Let it get roasted and the water evaporate for 5-6 minutes.
  6. Garnish with coriander leaves. Simple and tasty!

Filed Under: NON-VEG RECIPES Tagged With: chicken recipes, chicken recipes for biryani, chicken side fro biryani, holiday chicken roast recipes, holiday recipes, kerala chicken recipes, kerala recipes chicken roast Indian style recipes, quick chicken roast recipes

Page 2 of 29
« Previous 1 2 3 4 5 6 7 … 29 Next »
  1. Pages:
  2. «
  3. 1
  4. 2
  5. 3
  6. 4
  7. 5
  8. 6
  9. 7
  10. ...
  11. 29
  12. »
  • « Previous Page
  • 1
  • 2
  • 3
  • 4
  • …
  • 29
  • Next Page »
  • Facebook
  • Google+
  • Instagram
  • Pinterest
  • Twitter

LOOKING FOR SOMETHING?

logo
Food Advertisements by
logo
Food Advertisements by

Categories

STAY CONNECTED

  • Facebook
  • Google+
  • Instagram
  • Pinterest
  • Twitter

SUBSCRIBE BY EMAIL

SEARCH RELISH THE BITE

logo
Food Advertisements by

Copyright © 2026 · Lifestyle Pro Theme on Genesis Framework · WordPress · Log in