• Home
  • Page Layouts
  • Page Templates
  • Theme Colors
    • Lifestyle Pro Blue
    • Lifestyle Pro Green
    • Lifestyle Pro Mustard
    • Lifestyle Pro Purple
    • Lifestyle Pro Red
    • Lifestyle Pro Teal

Relish The Bite

Taste of happiness

  • HOME
  • ABOUT
  • RECIPE INDEX
    • SNACKS & APPETIZERS
    • BREAKFAST
    • BAKED RECIPES
    • LUNCH & DINNER
      • RICE/BIRYANI VARIETIES
      • SIDES
        • DRY CURRY/STIR-FRY
        • SOUTH INDIAN CURRY/KUZHAMBU
        • NORTH INDIAN CURRY/DAL
        • RAITA/DIPS/CHUTNEY
        • Soups/Salads
      • PASTA PIZZA & TACOS
      • BREAD
      • CHINESE ASIAN INSPIRED
    • NON-VEG RECIPES
    • DESSERTS
    • BEVERAGES
  • SNACKS
  • BREAKFAST
  • NON-VEG RECIPES
  • RICE/BIRYANI VARIETIES
  • LAMB
  • SOUTH INDIAN CURRY/KUZHAMBU
  • VEGAN
  • NORTH INDIAN CURRY/DAL
  • DRY CURRY/STIR-FRY
  • PASTA & TACOS
  • CHINESE ASIAN INSPIRED
  • BAKED RECIPES
  • COLLECTIONS
  • BREAD
  • BEVERAGES
  • DESSERTS
  • FESTIVAL RECIPES
    • SNACKS & APPETIZERS
    • SWEETS/DESSERTS
  • RESOURCES
    • HOW TO START A BLOG
    • TITBITS
    • PRESS
  • CONTACT
You are here: Home / Archives for side dish for rice

Ginger Chilli chutney – Inji Puli

September 15, 2016 by Suki 2 Comments

gingerchilichutney

gingerchilichutney
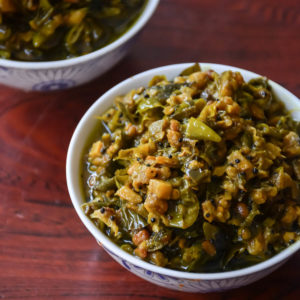
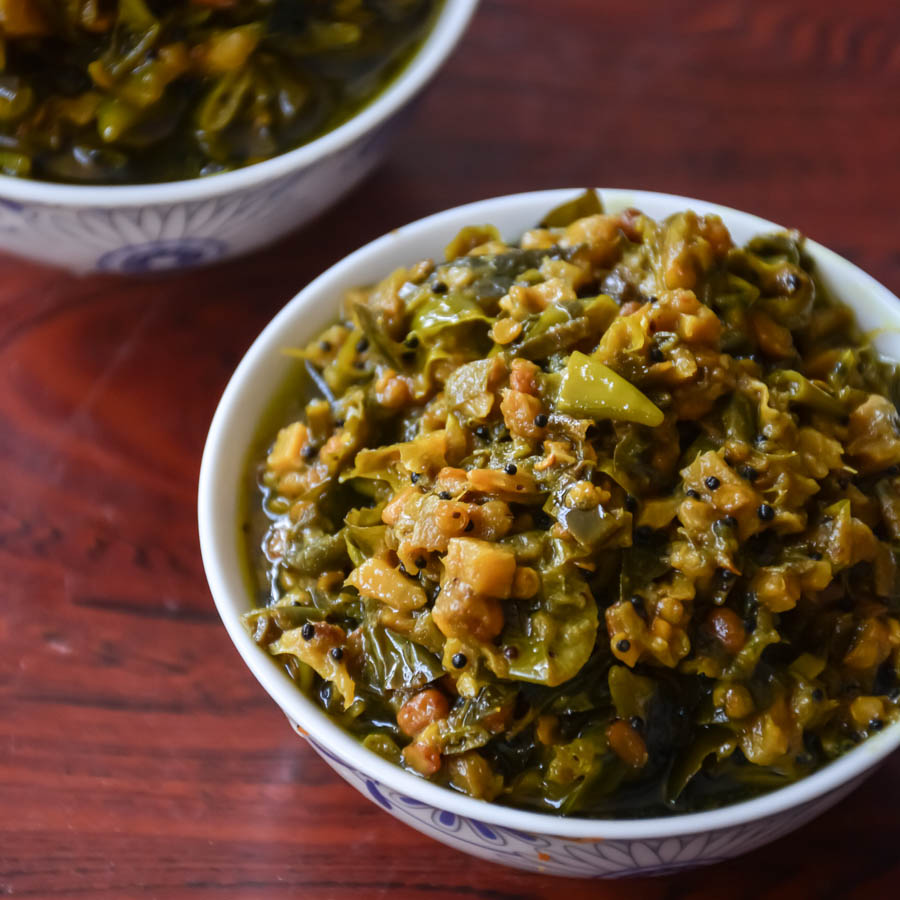
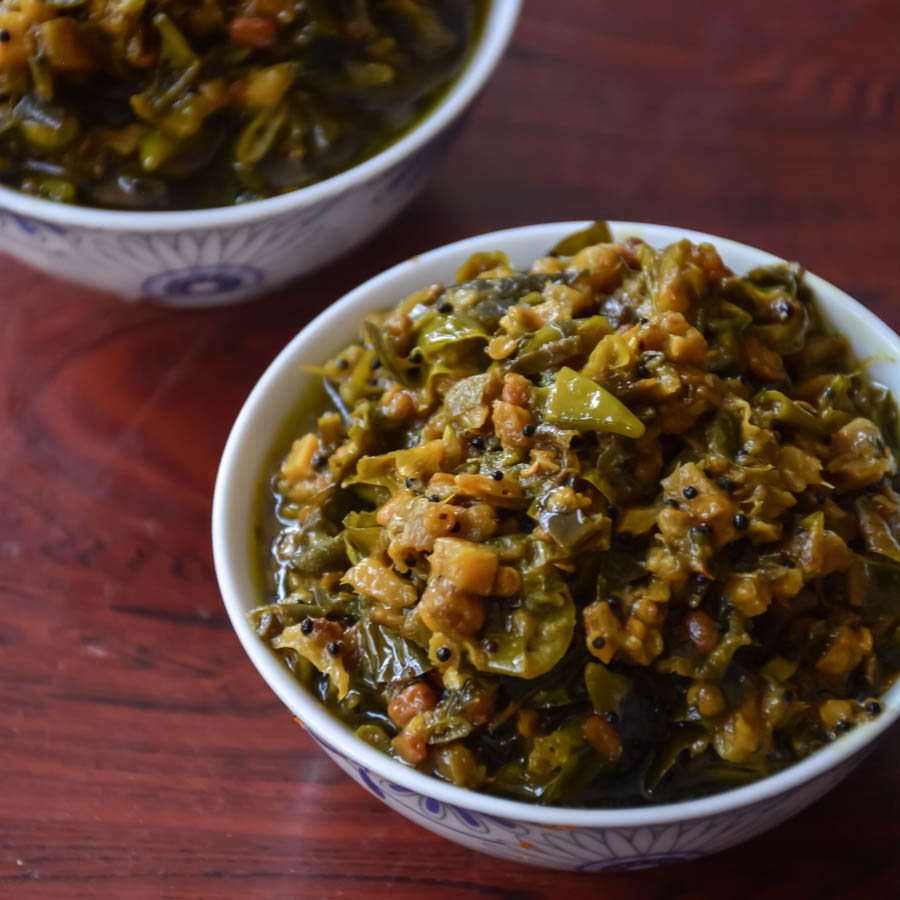
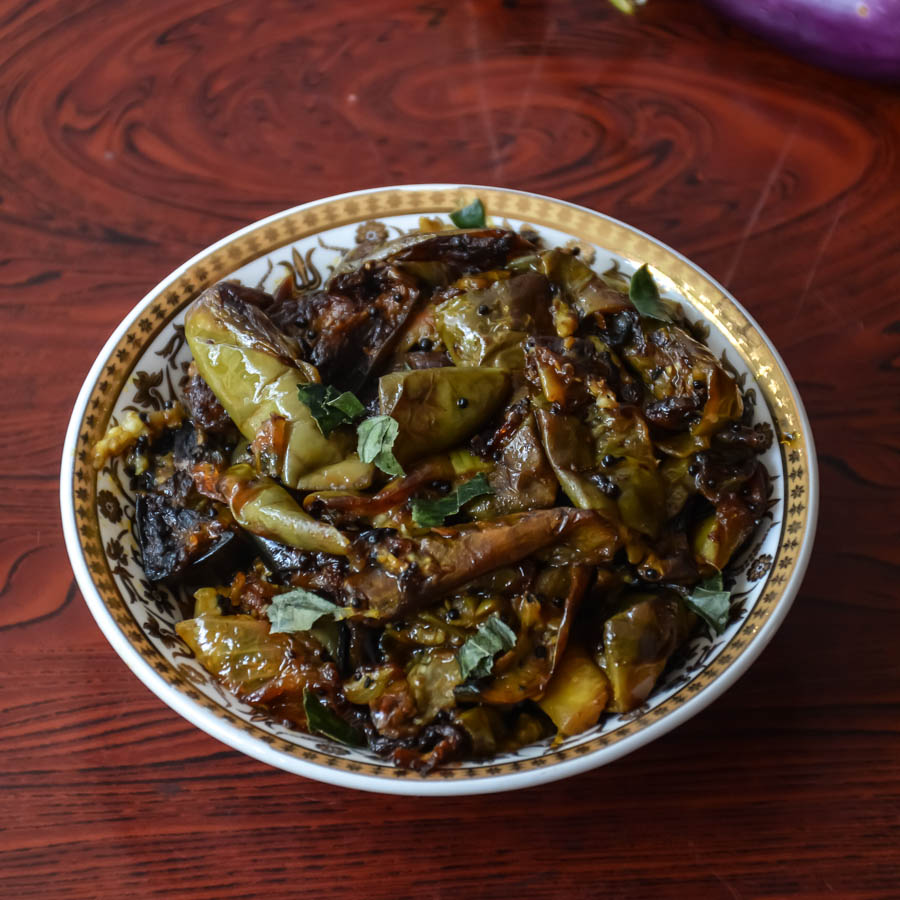
Sweet sour and spicy mom’s ginger chutney recipe!

This is made for onam(kerala festival) meals (sadhya) in Kerala. It is a kerala cuisine recipe. This recipe connects me with my family a lot. My mom makes this for me always. It is something I like to have with my curd rice/ dosa. When I went to India last time, she had this already prepared in her fridge in a bottle for my sister who visited a week before. So, I just had it after a year and tasted yum after my 35 hours of travel (delayed flights). Comfort food for me! Ginger has lots of health benefits and makes stomach alright. I try to have ginger lemon honey tea daily and it really helps in digestion. I am typing this as I have one 😀 how not ironic :D! My mom made this again before I left and my dad packed it for me. It did travel with me to my fridge in Montreal. You can store them for two – three weeks in the refrigerator. I clicked the pictures when my mom made this and noted the recipe. My dad always made sure that I click pictures in most of my vacation even when I said no or got bored or felt low. 😀 May be he believed this is not some passion to go just like others I did :D. I don’t think this one is same as the usual inji puli recipe when I checked few photos online, they looked different. I guess it’s my mom’s delicious version recipe :D. I once tried to make ginger rice , carrot ginger raita and I loved it too. It was not that strong as I expected!

My other favorite chutney recipes : Spicy tomato chutney, Ridge gourd chutney, Garlic coconut chutney

gingerchilichutney-4

5.0 from 2 reviews
Print
Ginger Chilli chutney - Inji Puli
Author: Suganya Hariharan
Recipe type: Main
Cuisine: Indian
Prep time:  10 mins
Cook time:  25 mins
Total time:  35 mins
Serves: 1 cup
 
Ingredients
  • Oil – 3 tbsp (preferably gingelly oil)
  • Mustard seeds – 1 tsp
  • Methi/fenugreek seeds – blended – 1 tsp
  • Urad – 1 tbsp
  • Curry leaves – 2 sprigs
  • Asafetida/hing – 2 tsp
  • Ginger – 2 cups, chopped finely (FINELY)
  • Green chilli – 1 cup, chopped finely
  • Turmeric powder – 1 tsp
  • Salt – 2 tbsp (change it as per your taste)
  • Tamarind extract – ½ lemon size soaked in ¾ cup of water
  • Powdered Jaggery - 1 tbsp
Instructions
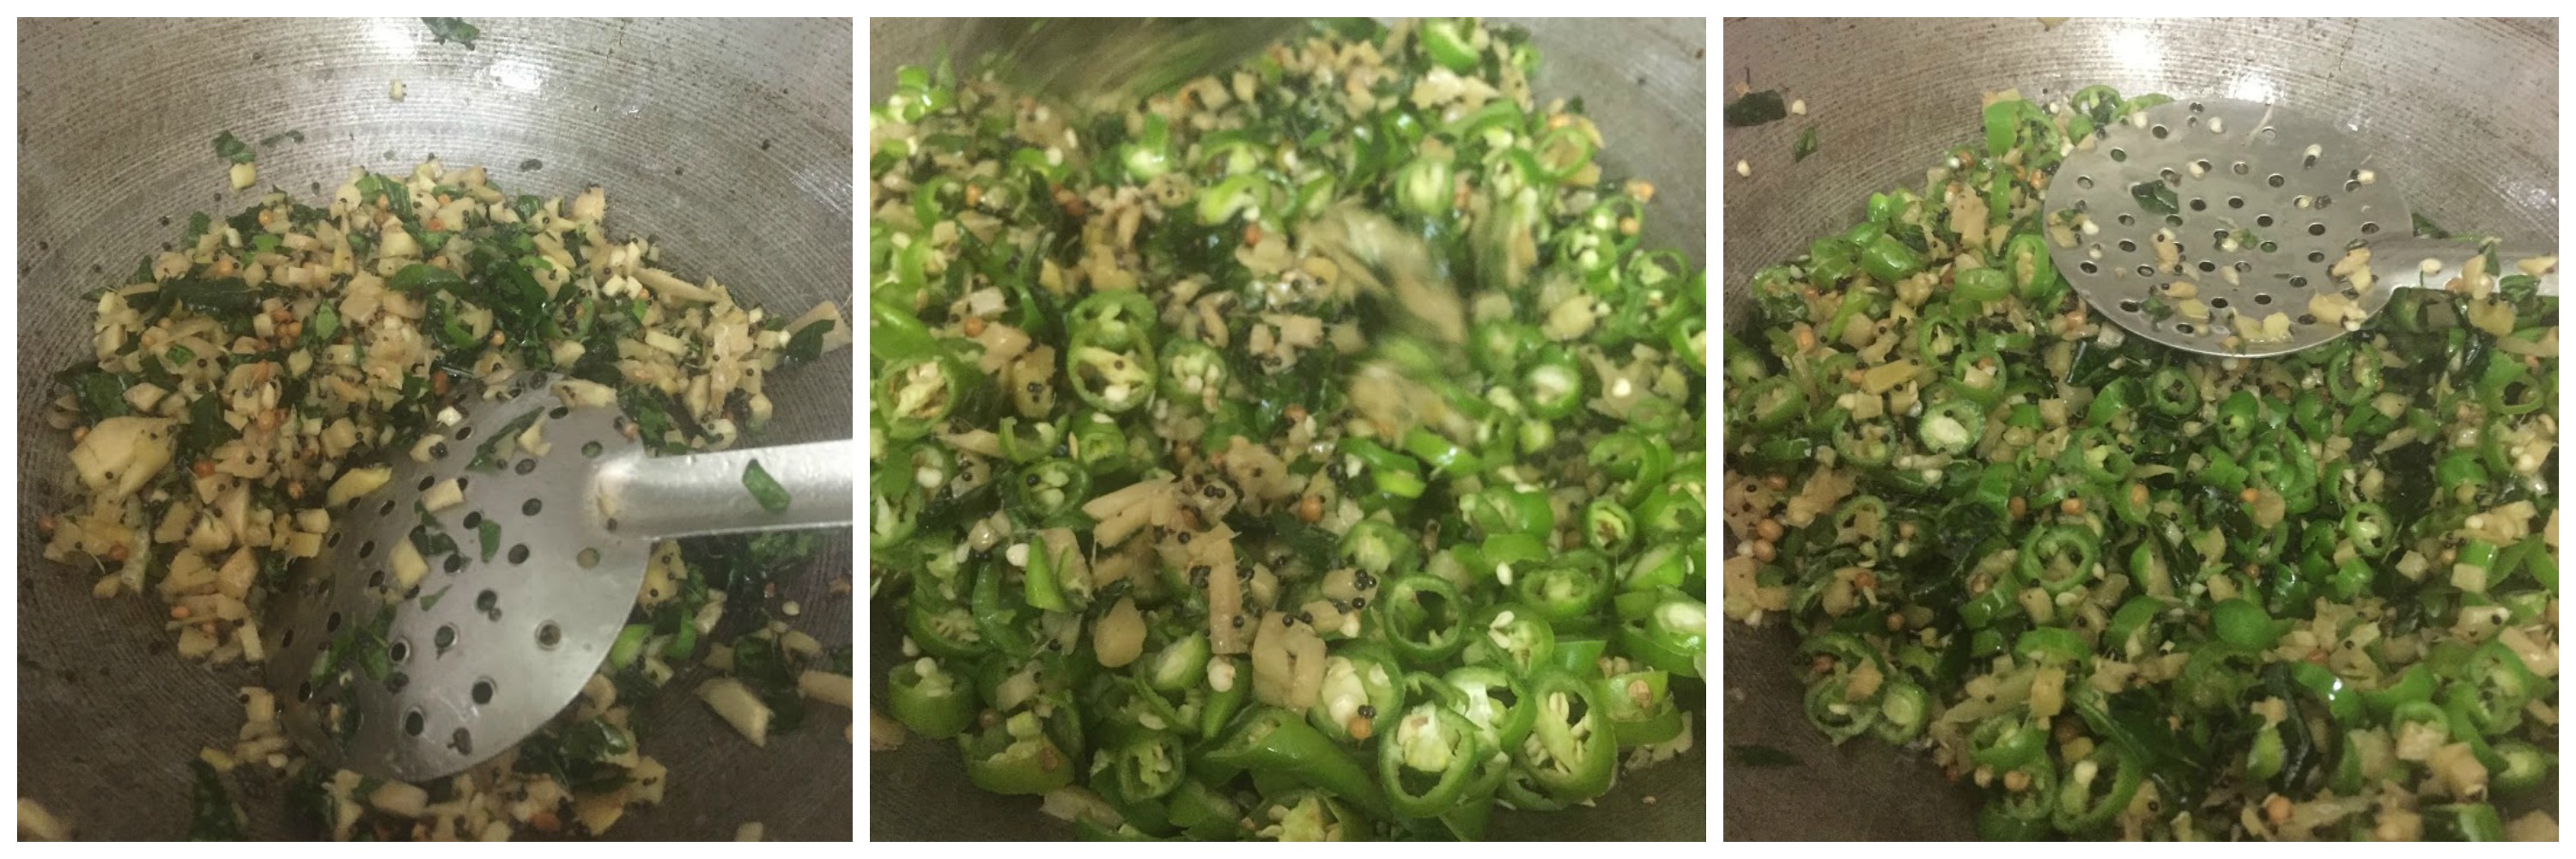
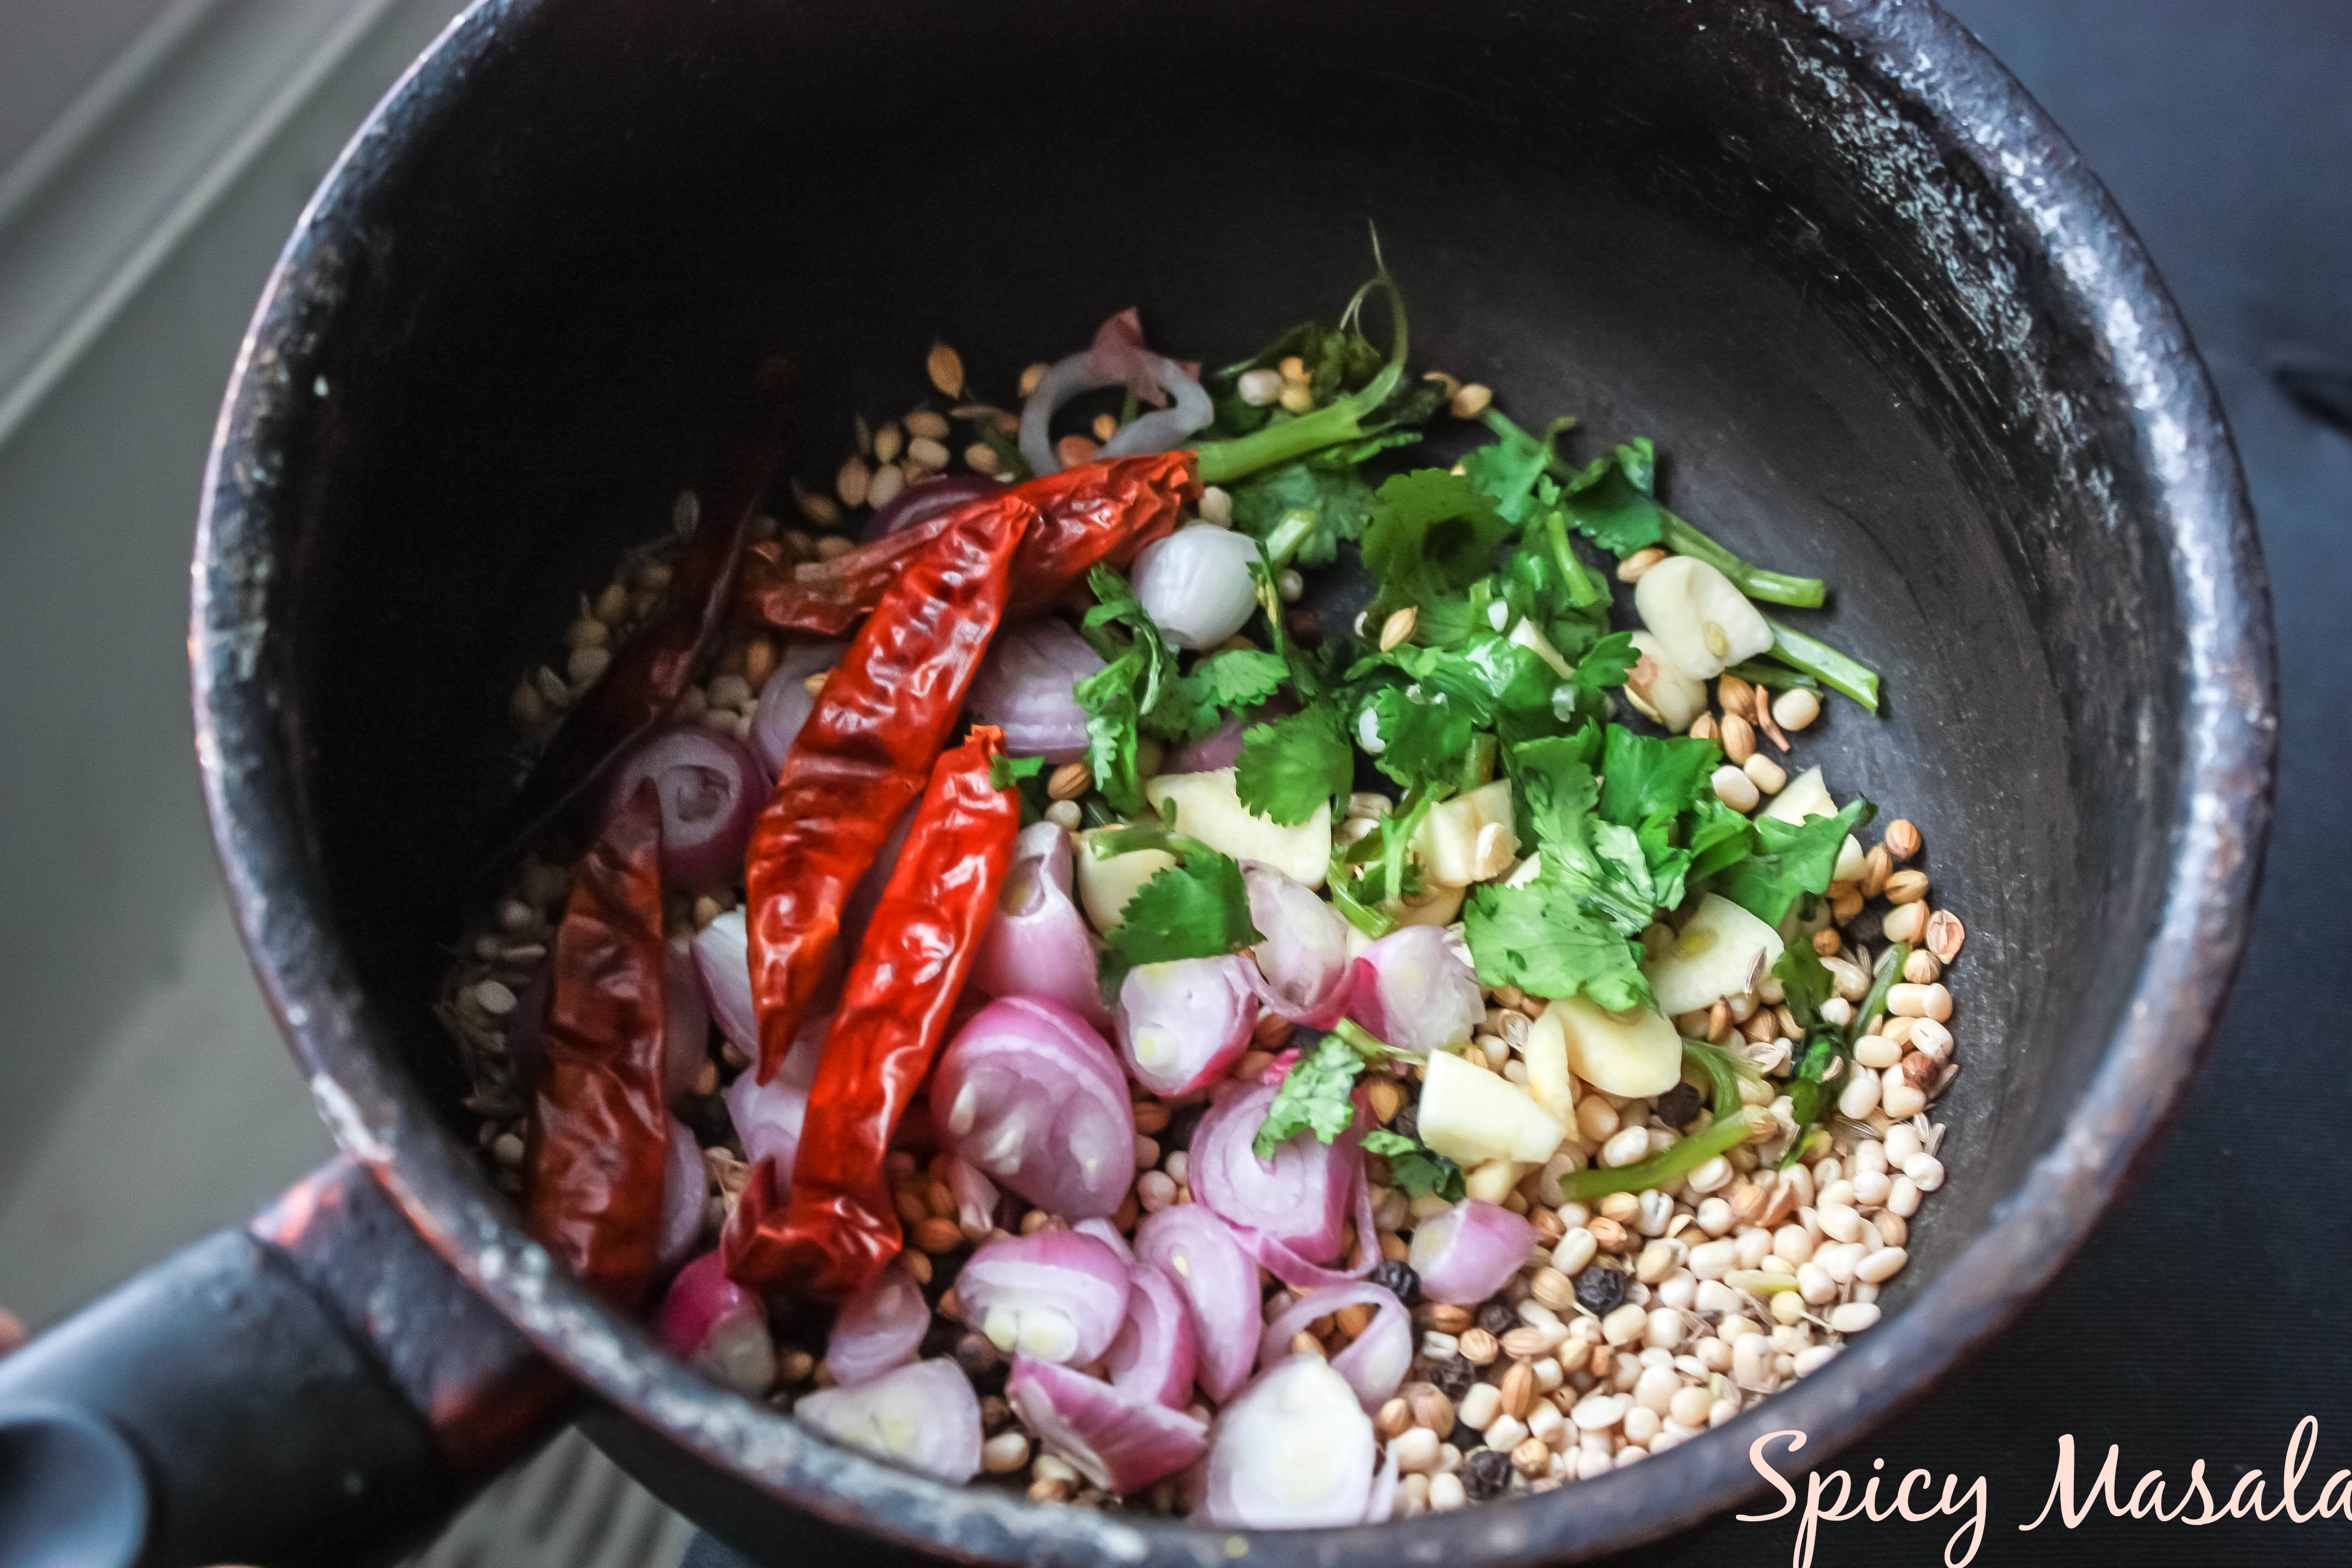
  1. Wash, peel of the skin and chop ginger finely. Chop the green chilli finely without edges. Soak tamarind in ¾ cup of water and set aside.
  2. Take a pan with gingelly oil (3 tbsp., do not compromise) in medium heat, add some mustard seeds, wait you hear pop sound (cracks), and then add the urad dal, wait till it changes color to brown, add curry leaves and asafetida.

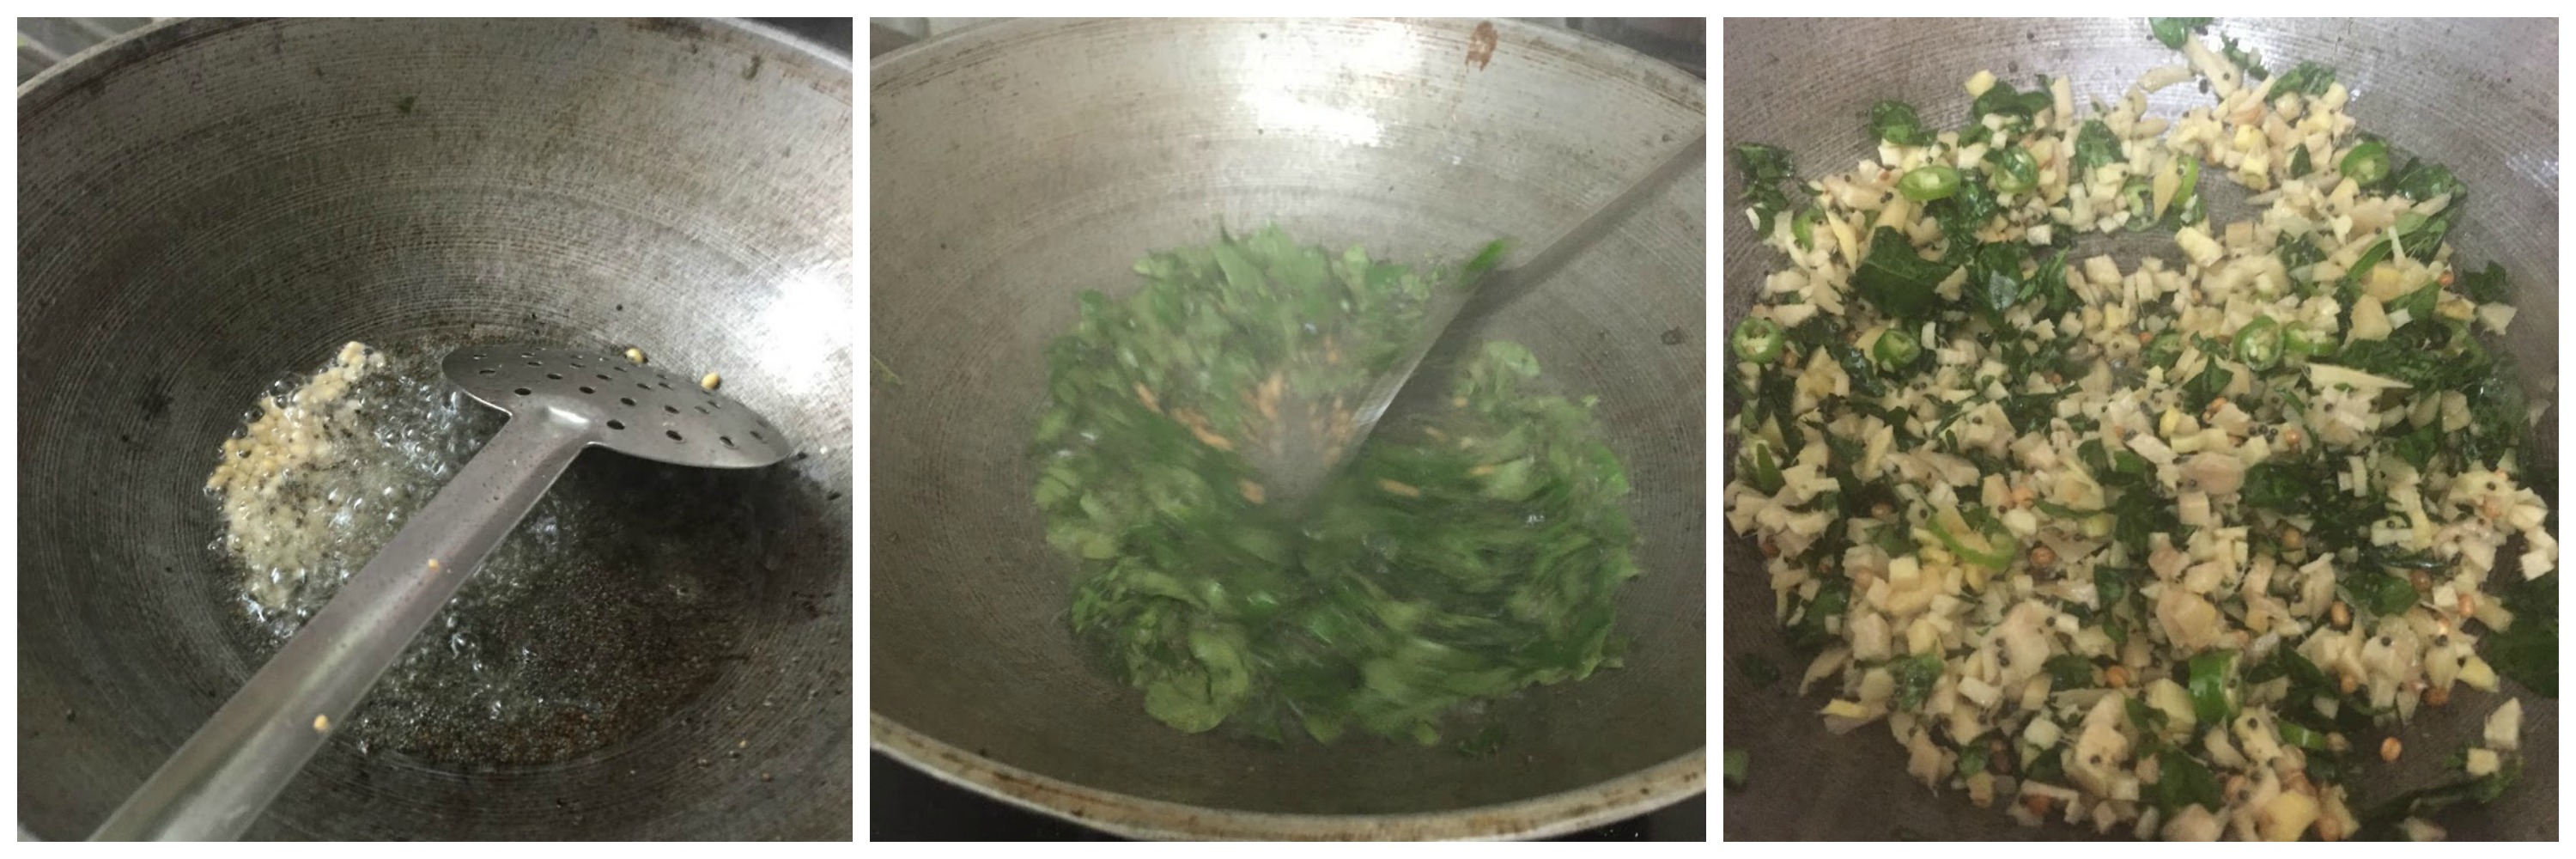
  3. Then add ginger and green chillies and fry till nicely browned. It will shrink. This might take around 10 minutes. Filter and add the tamarind water with required salt.

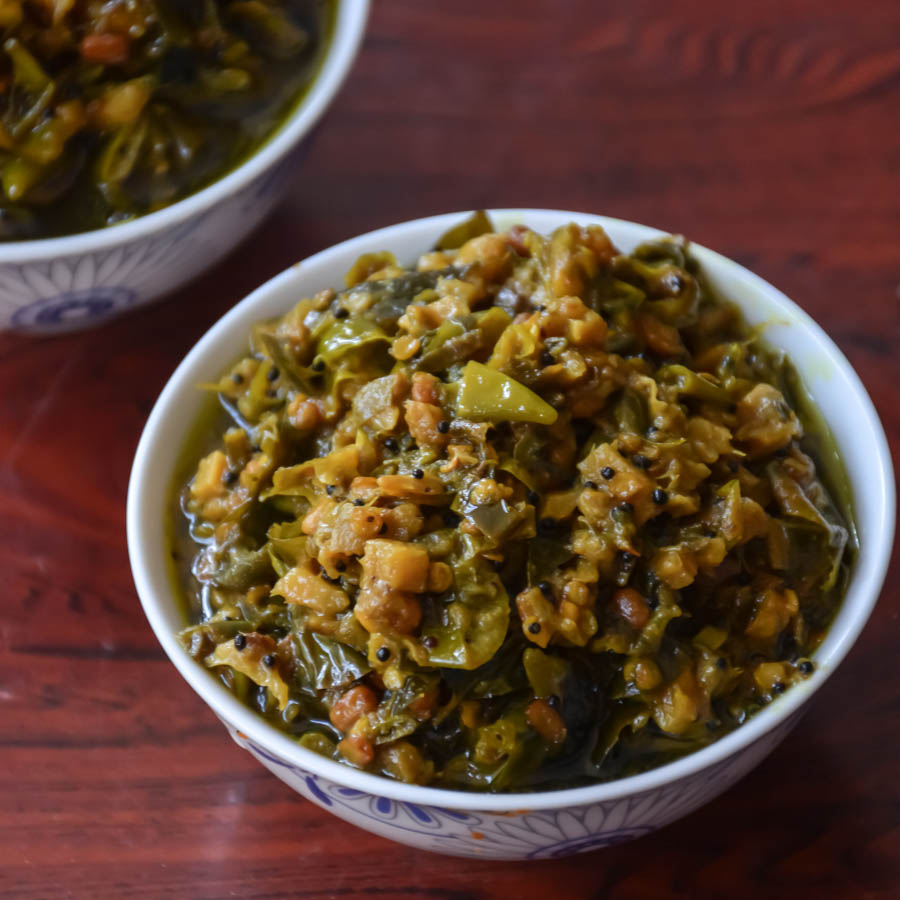
  4. Allow it to boil for another 5 minutes till the raw smell leaves. Then lower the heat and let it get just mixed, sautéed, thicken and ooze out some oil.
  5. Add powdered jaggery, fenugreek powder and let it boil for another 2 minutes and switch off.
  6. Cool and store in a glass bottle for 2-3 weeks. Use clean spoon every time
Notes
1. DO not compromise on oil, it helps for storage and not spoil easily.
2. The ginger and green chilles need to be chopped finely.
Wordpress Recipe Plugin by EasyRecipe
3.5.3208

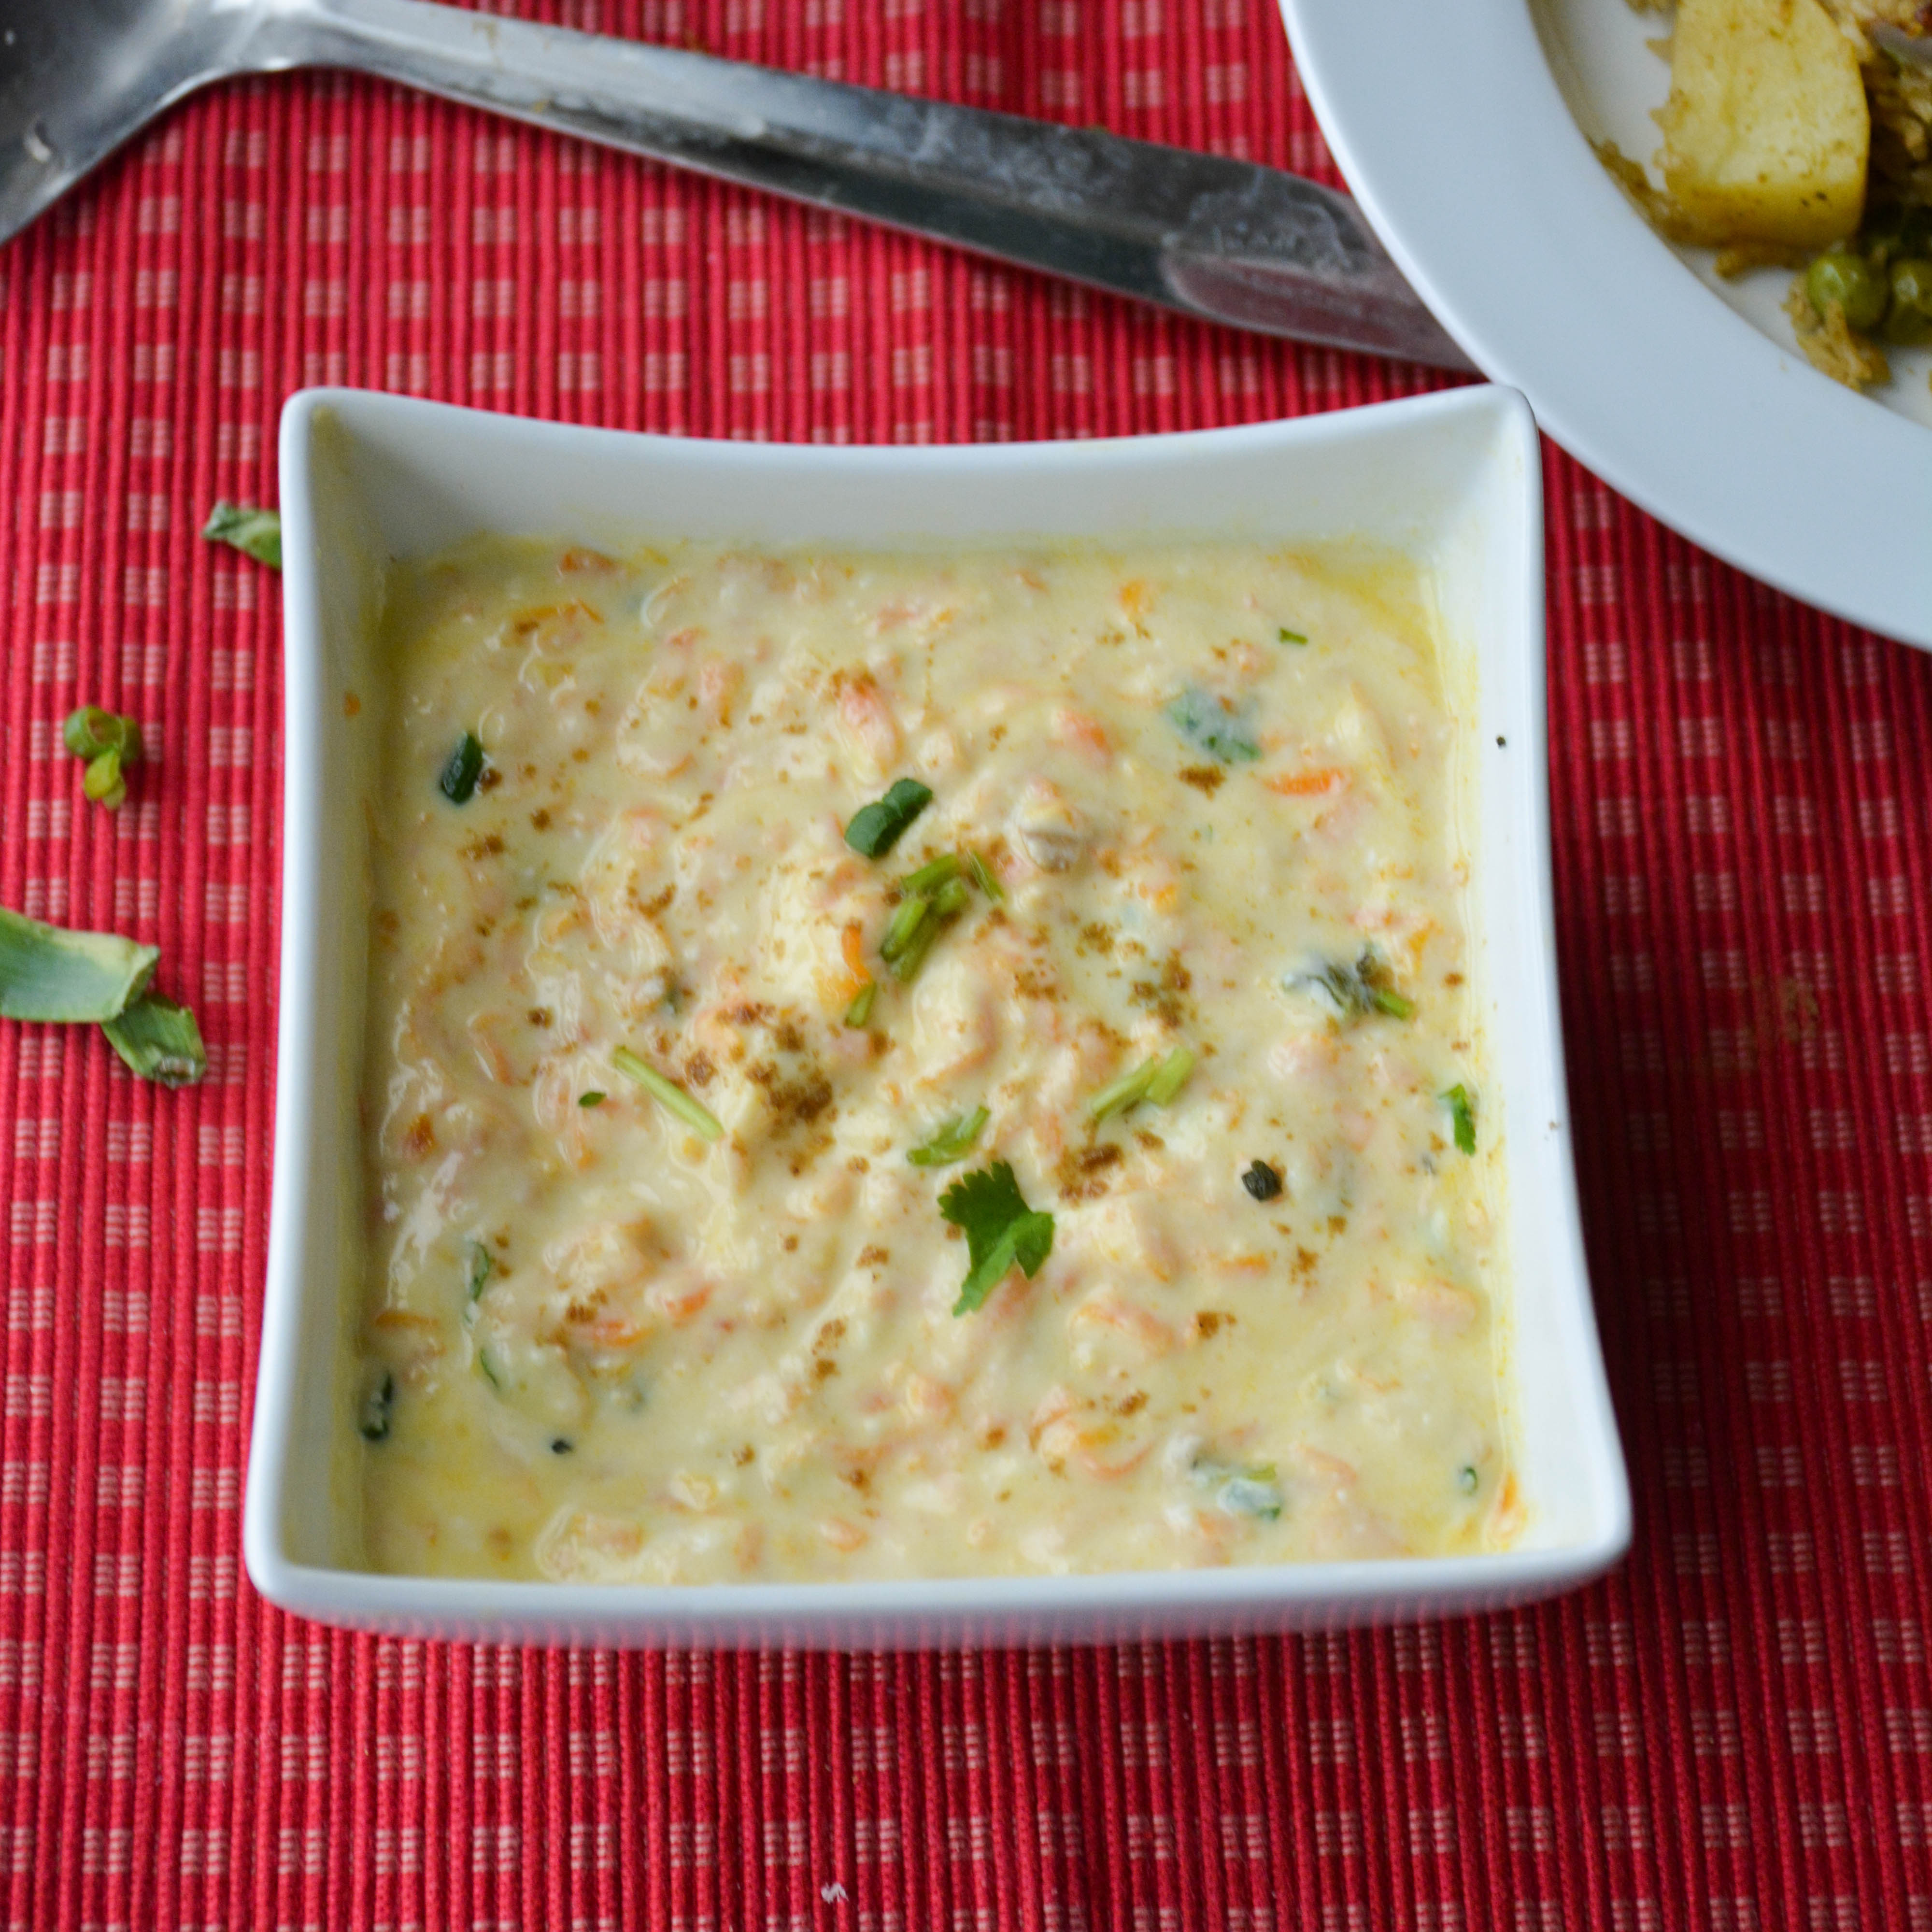
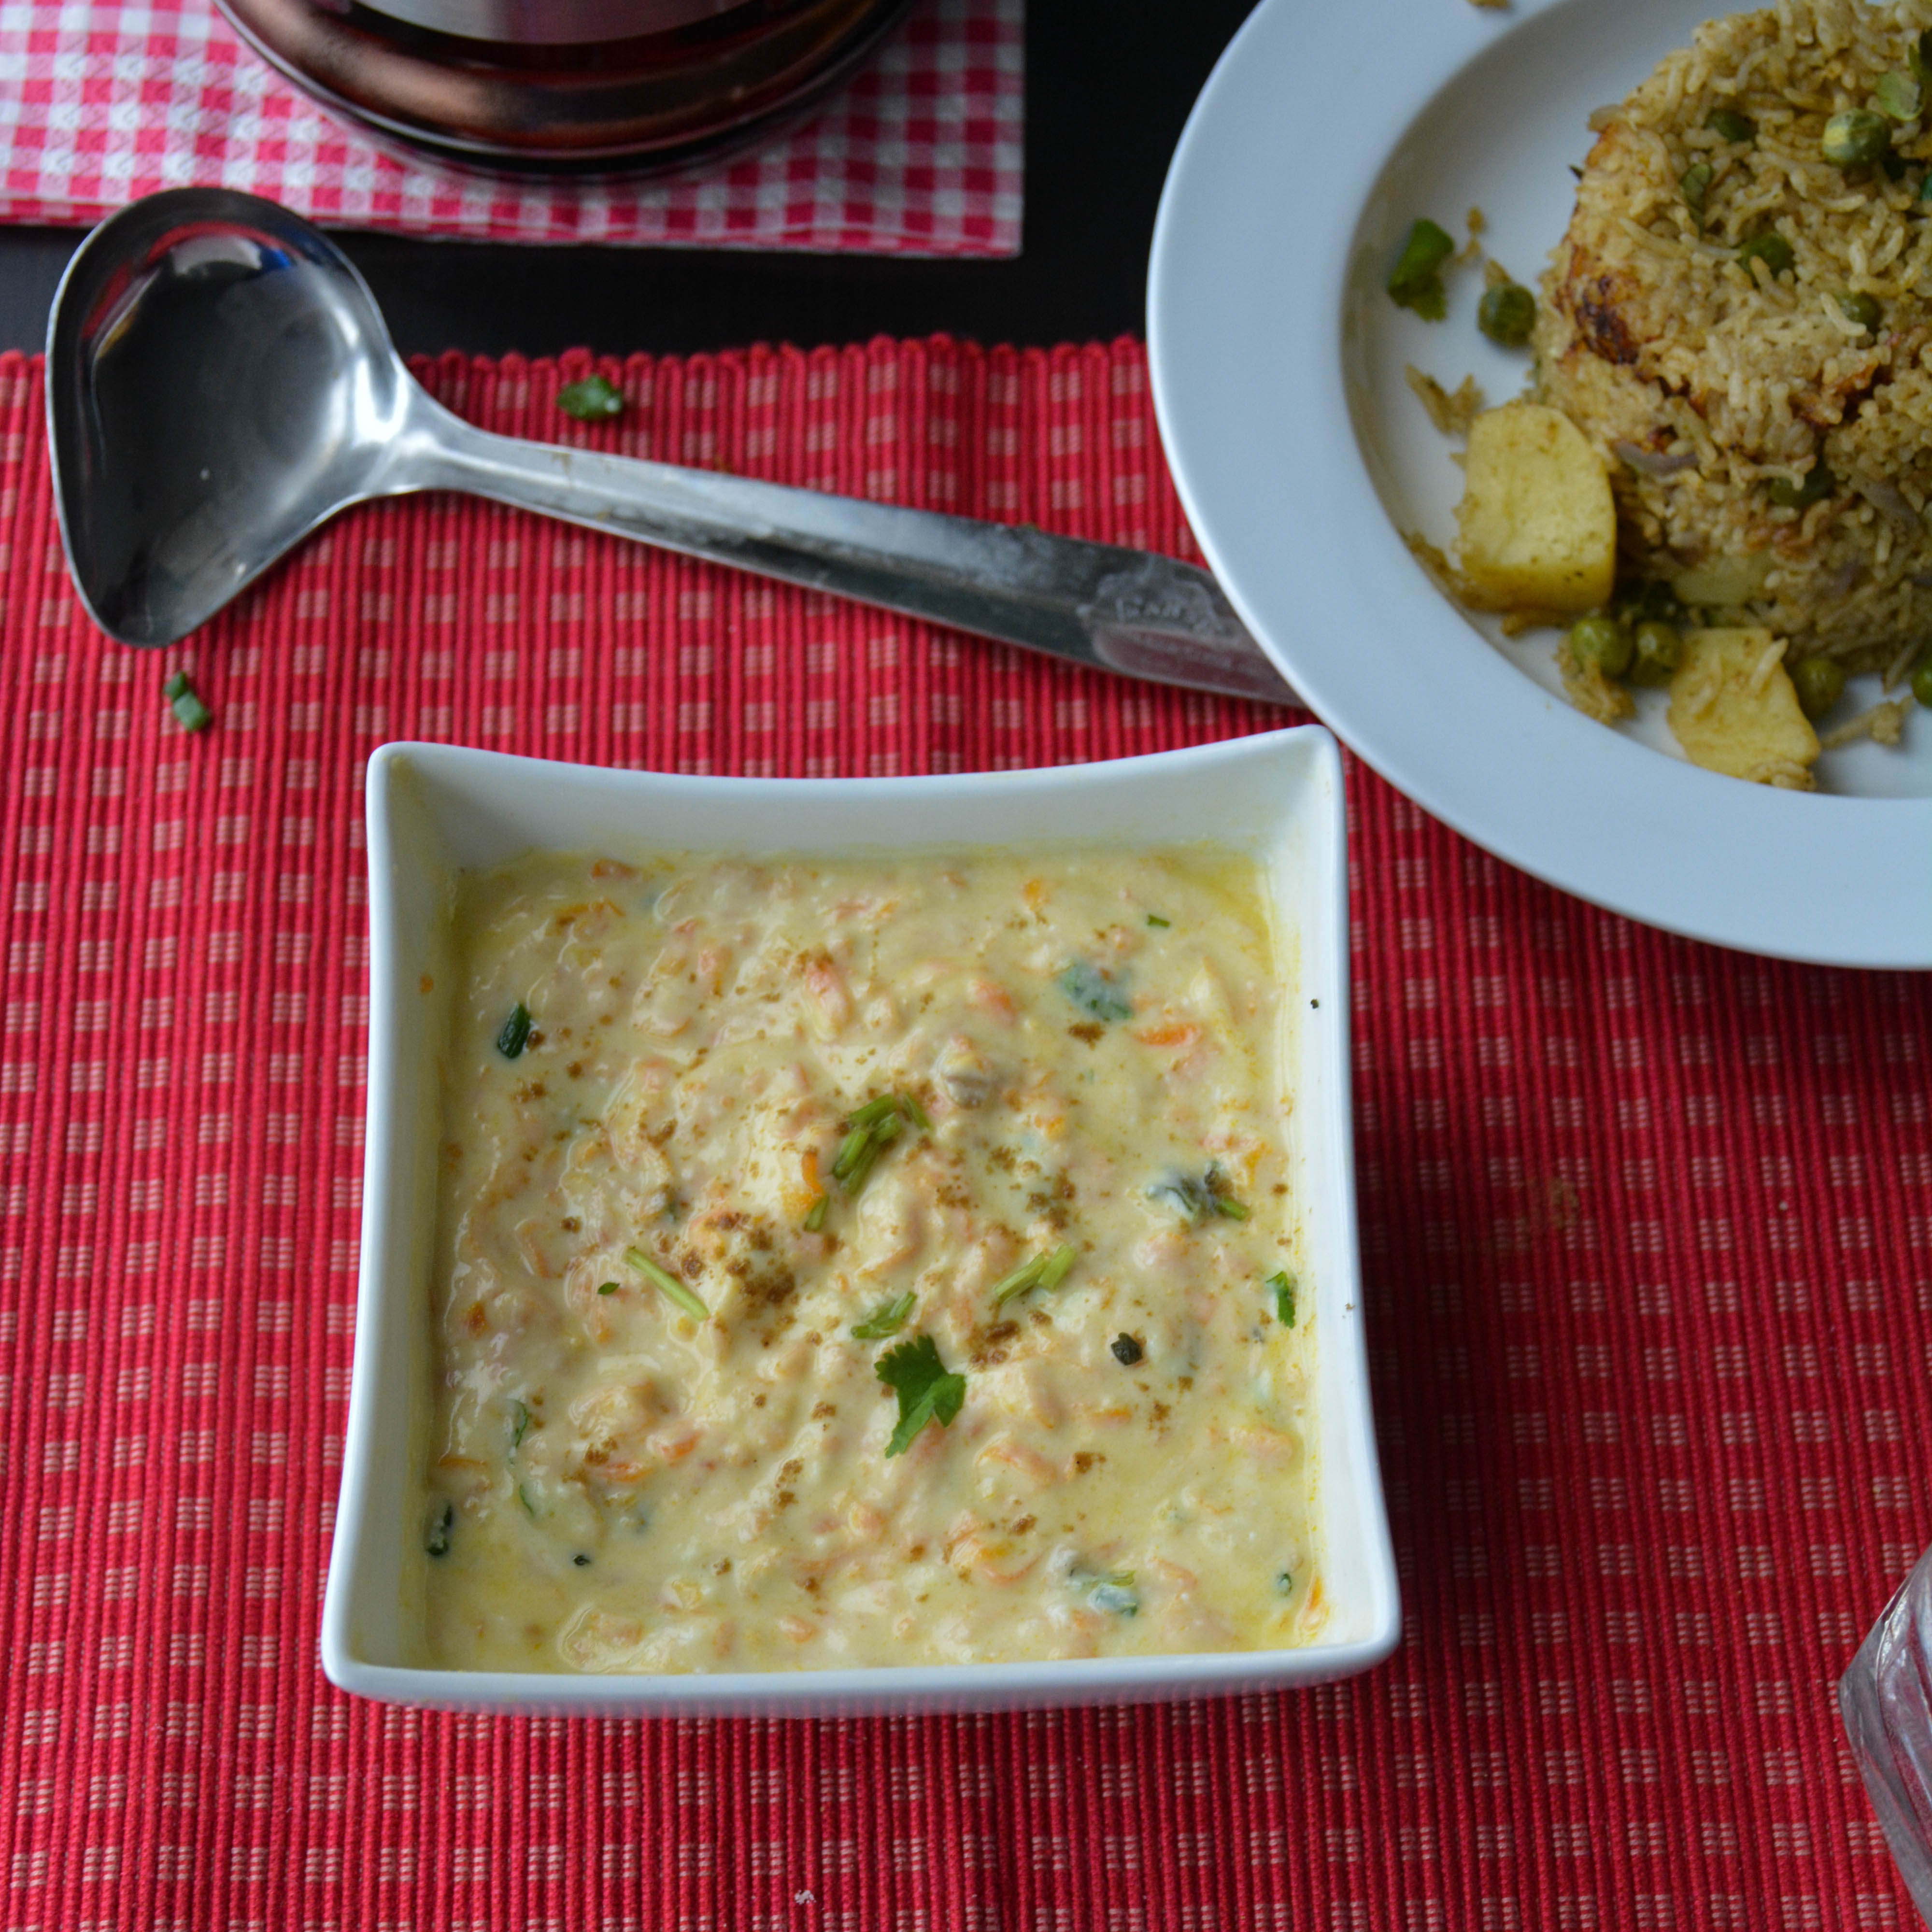
It is a great side for Roti, Chana dal paratha, curd rice, idli, paniyaram

gingerchilichutney-5

Filed Under: RAITA/DIPS/CHUTNEY Tagged With: chilli chutney recipes, Chutney Indian recipes, Dip, Ginger Chilli chutney - Inji Puli, ginger chilli dips, ginger chilli pickle, ginger chtney recipes, Ginger Indian chutney recipes, ginger pickle, Indian food recipes, Indian ginger recipes, kerala recipes, onam inji puli, sadya inji puli, side dish for curd rice, side dish for rice, Spicy chutney for dosa idli, spicy chutney recipes, spicy dips, spicy dips recipes, vegan chutney recipes, vegetarian chutney recipes

Quick Spicy Brinjal Fry/ Kathirikkai Varuval

May 4, 2016 by Suki 21 Comments

BrinjalRoast-7

BrinjalRoast-7Quick, flavorful, light and perfect vegan accompaniment for rice or roti!
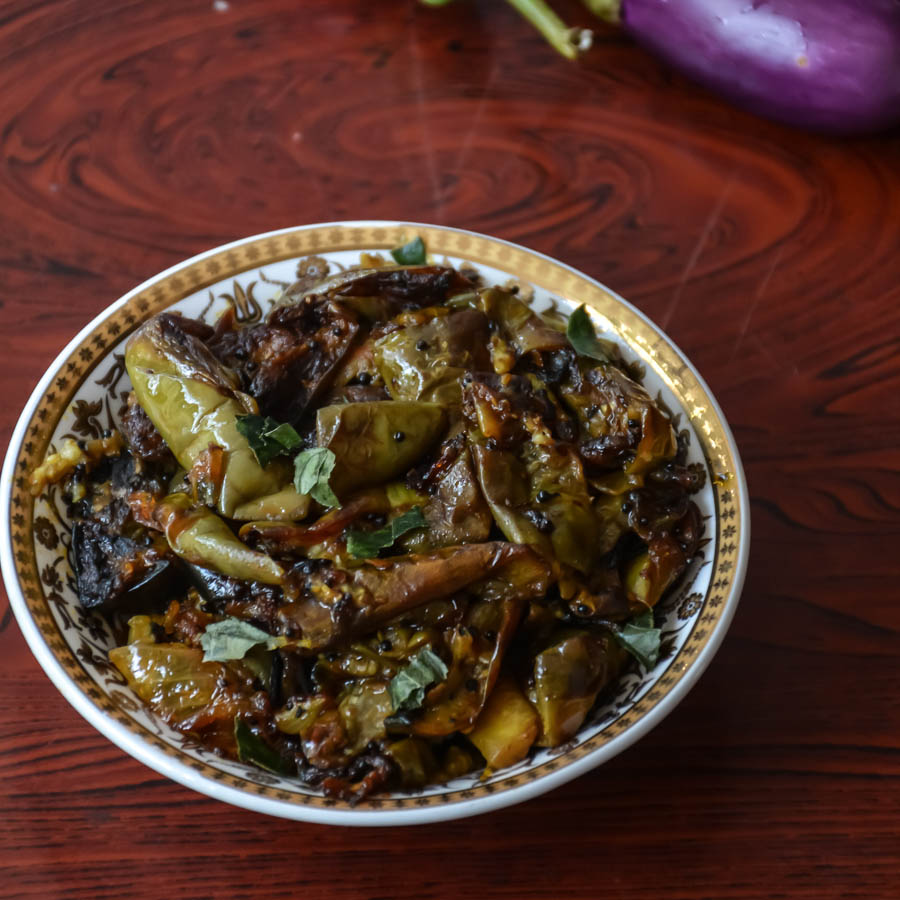
When I was a kid, I was never fond of brinjal like many of them. I had these weird thoughts that they look gross 😀 which is not true at all. I later realized it is one the versatile easy vegetables to cook with and also taste great! So, try to make this vegetable for your kids and try to implant into their minds that 😉 it is tasty, I say this because I still see people don’t like to have this vegetable for the same reason. Brinjal is rich in iron, fibre and vitamins.  Brinjal is one of the low calorie vegetable when it comes with antioxidants, magnesium but it takes a lot of oil.

My dad made this for me this time when I went to India. He made it one afternoon with some tomato rasam when my mom and I went to doctor and informed him that we will be late. And that night I had this 😀 and I totally loved it. So I asked him to make it again another day and I clicked the pictures the same day. My dad is a great cook 😉 just like my mom. In India, I have never seen Men cook as much as women. I know and agree the fact that there are lots of male chefs compared to women. But when it is compared to home cooking, it is so weird that men don’t cook much and I have seen and heard that most men don’t cook whole of their life. How weird is that? Just because they are born as male, doesn’t make them any better ;)! Back to topic, I am proud and happy that my dad is not one among the crowd J He always helps my mom in cooking and he is always there for everything!

BrinjalRoast-4

He used the small brinjals for this recipe and I would totally recommend that instead of eggplant for the recipe. But I have made this with eggplant also and it does taste good except that the taste of the vegetable is different. This is one of the quickest recipes to make on a weekend as a side for Indian breads like roti, paratha or for plain rice and or for garlic dal/ tomato rasam/Buttermilk rasam /sambar !

My Other favorite Brinjal recipes. Masala Stuffed Baby Eggplants/Ennai Kathirikkai,Roasted eggplant mozzarella pasta and Honey garlic EGgplant.


5.0 from 8 reviews
Print
Quick Spicy Brinjal Fry/ Kathirikkai Varuval
Author: Suganya Hariharan
Recipe type: Main
Cuisine: Indian
 
Ingredients
  • • • Small Eggplant/ Kathirikkai – 10
  • • • Mustard seeds – ¼ tsp
  • • • Urad dal /black gram – 2 tsp
  • • • Curry leaves – 1 sprig
  • • • Sugar – a pinch
  • • • Turmeric powder – ½ tsp
  • • • Onions – 1 medium, sliced
  • • • Salt – 1 tbsp
  • • • Oil – 2 tbsp
  • • • Red chilly Powder – 1 tsp
  • • • Sambar powder – 1 tbsp
Instructions
  1. Remove the ends of the eggplant and slice them and soak them in water till you cook.
  2. Heat a wide pan with oil and add mustard seeds. When it crackles, add the urad dal and when it gets lightly golden brown, add the curry leaves.
  3. Add sliced onions, pinch of sugar, little salt, sauté till they become nicely golden in colour.
  4. Now add the eggplants to it. Add the turmeric powder, chilli powdfer, sambar powder, required salt and add 2 tbsp of water. Mix it well and cover it for 7-8 minutes.
  5. After 7-8 minutes, open the pan, the water would have evaporated and now mix and turn brinjal so that all sides gets roasted. Cook it uncovered in medium heat till both sides get evenly roasted.
  6. Switch it off and serve with some hot rice and dal.
Notes
1. Use a wide pan as it helps to turn the eggplants.
2. Reduce the amount of spicyness if you want by avoiding the chilli powder.
Wordpress Recipe Plugin by EasyRecipe
3.5.3208

 This roast is perfect for rice and tomato rasam/Buttermilk rasam/dal/sambar !

BrinjalRoast-5

Filed Under: DRY CURRY SIDE DISH/ STIR-FRY Tagged With: 30 minute eggplant recipe, brinjal curry, Brinjal fry, Brinjal kari, Brinjal restaurant style, Brinjal roast recipe, Eggplant fry, Eggplant roast, healthy eggplant recipes, Indian best recipes, Indian eggplant recipes, Kathirikkai curry, Kathirikkai fry, kathirikkai hotel style, kathirikkai kari, kathirikkai lunch recipes, kathirikkai varuval, Quick brinjal fry recipe, quick brinjal roast, Quick brinjal roast recipe, quick eggplant recipe, quick eggplant recipes, Quick Indian eggplant recipes, quick kathirikkai recipes, Quick kids brinjal recipe, Quick vegan brinjal recipes, roasted eggplant, side dish for naan, Side dish for rasam, side dish for rice, small brinjal recipes, SPicy brinjal fry recipe, spicy brinjal recipe, Spicy eggplant fry, SPicy eggplant fry recipe, vegan brinjal recipes, Vegetarian eggplant fry recipe, Vegetarian eggplant recipe, Vegetarian quick recipes, vegetarian quick recpes, vegetarian sides

Carrot Ginger Raita

April 23, 2015 by Suki 6 Comments

CarrotGingerRaita-5
CarrotGingerRaita-5
This is a unique combo and that Sauteed ginger in yogurt gives great flavor. It has cooling and soothing taste and it is perfect side dish for any biryani recipes like vegetable biryani or lamb biryani. And the ginger us perfect for health.There are countless varieties of raita – Onion raita,cucumber raita,tomato raita, carrot raita, fried onion raita, mint raita, spinach raita and pomegranate raita and so on. Raitas are always a good way to include yogurt in your everyday meal. I like to even have plain yogurt but for many i understand it is really hard. So this is the best way. I know many might think the ginger flavor is overpowering but it is not and lends a fresh aroma to the raita. I always make raita, chill and serve. 
CarrotGingerRaita-3
I have never tried this combo of carrot and ginger. But when i tried this, i was in pure love.
Other raita recipes if you would like to have a look 🙂 – Garlic raita or cucumber carrot raita. 
Vegan Note: You can use soy yogurt instead.
 
 
Print
Carrot Ginger Raita
Author: Suganya Hariharan
Recipe type: Main
Cuisine: Indian
Prep time:  5 mins
Cook time:  5 mins
Total time:  10 mins
Serves: 1.5 cups
 
Ingredients
  • Oil – 2 tsp
  • Carrot – 1 cup, grated finely
  • Ground cumin – ½ tsp
  • Salt – 1 tsp
  • Ginger - 2 inch, minced finely
  • Red chilli flakes – ¼ tsp, garnish
  • Fresh cilantro – 1 tbsp, finely Chopped
  • Yogurt - 1.5 cups
Instructions
  1. Take a small pan; add the oil and ginger and roast till golden.
  2. , In the same pan, add the grated carrot and minced garlic and salt and sauté well. And keep aside.
  3. Combine the yogurt with the sauted carrot ginger and cumin powder. Mix well.
  4. Garnish with red chilli flakes and coriander leaves.
Wordpress Recipe Plugin by EasyRecipe
3.5.3229
 
Raitas are best to have plain or with pulao,veg biryani or shrimp biryani or with parotta or paratha.
CarrotGingerRaita-4

Filed Under: RAITA/DIPS/CHUTNEY Tagged With: Carrot Ginger Raita recipe, carrot recipes, ginger raita recipes, ginger recipes, raita recipes, side dish for biryani, side dish for pulao recipes, side dish for rice, vegan raita recipe, vegetarian recipes, yogurt recipes

30 Minute Spicy Brinjal/Eggplant Fry

April 5, 2015 by Suki 4 Comments

Brinjalfry-6

Brinjalfry-6Extremely easy vegan eggplant recipe!

It is perfect for rice or roti. I love this recipe because you don’t have to chop anything much other than eggplant. And it is very quick to make this. I made this on a weekend where I wanted to make something quick. Usually on weekends I would have all patience to cook big lunch, but that weekend I wanted to make something quick and tasty for my spinach dal. I tried this and it turned out so roasted and beautiful. Anybody would love to make quick lunch or dinner, if they are given an option. So, these days I am trying to make a lot of quick recipes. This recipe is good only for the smell tender eggplants. You can surely use the big eggplant, but I am not sure how it will turn out. This recipe taste good for the small eggplants because of the cutting style and the roasting style.

Brinjalfry

Brinjal is one of the low calorie vegtable when it comes with antioxidants, magnesium but it takes a lot of oil. So add as much of oil you want and do not add more, so make it with the same amount of oil and roast it. I never used to eat the brinjal when I was a kid, now I just love them. I have few more eggplant recipes if you would like to have a look – Masala Stuffed Baby Eggplants/Ennai Kathirikkai,Roasted eggplant mozzarella pasta and Honey garlic EGgplant.

 This roast is perfect for rice and tomato rasam/Buttermilk rasam/dal/sambar !

Brinjalfry-2

Print
30 Minute Spicy Brinjal/Eggplant Fry
Author: Suganya Hariharan
Recipe type: Main
Cuisine: Indian
Cook time:  25 mins
Total time:  25 mins
Serves: 10 small
 
Ingredients
  • • Small Eggplant/ Kathirikkai – 12
  • • Mustard seeds – ¼ tsp
  • • Urad dal /black gram – 2 tsp
  • • Curry leaves – 1 sprig
  • • Turmeric powder – ½ tsp
  • • Salt – 1 tbsp
  • • Oil – 2 tbsp
  • •


    [To grind:]
  • • Red chilly – 3
  • • Cumin seeds – 1 tsp
  • • Garlic – 4
  • • Fennel seeds – 2 tsp
  • • Chilli powder – 2 tsp
  • • Sambar powder – 1 tsp
Instructions
  1. Blend the ingredients under “to grind” smoothly.
  2. Remove the ends of the eggplant and cut into half lengthwise. Put a slit in the middle of the eggplant and soak them in water till you cook. Slitting helps in masalas to get in.
  3. Heat a wide pan with oil and add mustard seeds. When it crackle, add the urad dal and when it gets lightly golden brown, add the curry leaves.
  4. Now add the eggplants to it. Add the ground paste,turmeric powder,salt and add 2 tbsp of water. Mix it well and cover it for 7-8 minutes.
  5. After 7-8 minutes, open the pan, the water would have evaporated and now turn the brinjal the other side and cook it uncovered in medium heat till both sides get evenly roasted.
  6. Switch it off and serve with some hot rice and dal.
Notes
1. Use a wide pan as it helps to turn the eggplants.
2. Reduce the amount of spicyness if you want by avoiding the chilli/sambar powder.
Wordpress Recipe Plugin by EasyRecipe
3.2.2885

 Taste great with rice and tomato rasam/Buttermilk rasam/dal/sambar !

Brinjalfry-5

Filed Under: DRY CURRY SIDE DISH/ STIR-FRY, VEGAN Tagged With: 30 minute eggplant recipe, Brinjal fry, Brinjal roast recipe, Eggplant fry, Eggplant roast, healthy eggplant recipes, Indian eggplant recipes, Kathirikkai curry, Kathirikkai fry, Quick brinjal fry recipe, Quick brinjal roast recipe, quick eggplant recipe, Quick vegan brinjal recipes, roasted eggplant, side dish for naan, Side dish for rasam, side dish for rice, SPicy brinjal fry recipe, spicy brinjal recipe, Spicy eggplant fry, SPicy eggplant fry recipe, vegan brinjal recipes, Vegetarian eggplant fry recipe, Vegetarian eggplant recipe, vegetarian quick recpes

Beans Masala Stir Fry

November 19, 2014 by Suki 16 Comments

BeansStirFryFinal

BeansStirFryFinalThis crunchy 30 minute beans stir fry is simple and flavor-packed.

Green beans are very healthy and one can make quick dishes with them. You can also add them in pulavs, biryani, salads, Chinese recipes, kurma and also some beans rice. Green beans are very healthy I should say. They give good antioxidant support and cardiovascular benefits. If possible, purchase green beans at a store or farmer’s market that sells them loose so that you can sort through them to choose the beans of best quality. They should have a firm texture and “snap” when broken. Purchase them if they have vibrant green color and smooth feel and also free from brown spots.

BeansStirFryFinal1

I always tend to cook potato, okra, brinjal. I somehow don’t make beans, carrot or cabbage much. But when I make them, I cook them special by entertaining myself with some alteration each time to make it tasty and inviting for me to eat. It’s not I don’t like them, it’s just I am sooper lazy to chop carrots and beans. That’s the reason for this masala beans. It tasted really good and very out of ordinary. 🙂

This is a steamed vegetable dish made with coconut. This is called poriyal in tamil. Generally at home we make poriyal with French beans, cauliflower, caroor, cabbage, cluster beans and so on. I have already posted carrot poriyal. Whenever I add lots of spices like this, I add a bit of sugar. But this recipe already has a subtle sweet taste coming from beans, onions and coconut. I make this one, normal coconut (thoran) recipe with this beans and also one nice punjabi aloo beans curry. I will surely share that one day. Its one drooling beans recipe I have in mind to share for quite a long time. I have chopped them little long, you can chop anyways. But this looks attractive 😉 what do you think? 😉

5.0 from 3 reviews
Print
Beans Masala Stir Fry
Author: Suganya Hariharan
Recipe type: Main
Cuisine: Indian
Prep time:  10 mins
Cook time:  20 mins
Total time:  30 mins
Serves: 4
 
Ingredients
  • Mustard – 1 tsp
  • Urad dal – 2 tsp
  • Curry leaves – 1 sprig
  • French Beans – 2 cup
  • Onion – ½ cup
  • Turmeric – ⅛ tsp
  • Salt – as needed
  • Oil – 1 tbsp

    To grind:
  • Shallots – 5
  • Garlic – 4
  • Coriander seeds – 1 tbsp
  • Coconut – 3 tbsp
  • Red chillies – 5
  • urad dal- 2 tsp
  • Black pepper whole – 2 tsp
  • Jeera – 1 tsp
  • Coriander leaves - 2 tbsp
Instructions
  1. Cut the beans diagonally to 1 inch piece. And keep it aside.
  2. Dry roast the ingredients under the “to grind” table. And Grind the ingredients , without adding water.
  3. Heat oil in kadai and add mustard, urad dal and then add curry leaves and onion, fry till onion turns out golden brown.
  4. Then add the beans, salt and turmeric and fry in medium flame for 2 minutes.
  5. Now add enough water to the beans to get cooked.Mix well and cook cover with a lid in a medium flame, till the beans gets cooked.
  6. Add the ground masala powder and add two tbsp of water. Keep turning in between to avoid burning.
  7. After beans get cooked, fry till water evaporates completely and curry should be dry.
Notes
If desired, add coconut oil at the end.
Wordpress Recipe Plugin by EasyRecipe
3.2.1311

Serve this with rasam and rice or roti.

BeansStirFry-10r

Filed Under: DRY CURRY SIDE DISH/ STIR-FRY, VEGAN Tagged With: Beans Masala Stir Fry recipe, beans poriyal, beans thoran recipe, best side dish for roti, Healthy indian recipes, healthy recipe, indian stir fry recipe, side dish for rice, south indian poriyal recipe, Spicy masala recipe, vegan beans recipe

Matar Paneer/ Paneer Peas Masala

October 27, 2014 by Suki 6 Comments

PaneerMatarMasalafinal1

PaneerMatarMasalafinal1

Pan fried paneer with peas and spices in rich cashewnut gravy.

This healthy and delicious vegetarian curry can be on your plate in less than half an hour. Popular recipe amongst the north Indian recipes prepared with paneer and peas. Anything with paneer is a definite win. The texture of paneer is similar to greek feta which is prepared in a similar manner. I used the frozen peas instead of boiling some. I have seen that it’s a part of most restaurants menu. Goes well with steamed rice, Pulao, naan or roti. Paneer can be replaced with tofu also. Don’t add lots of cashews to make it rich, it will spoil the originality of the taste. I cut my paneer in this manner, but you can always cut in the way you fancy.

paneerMatarMasala2Final

I am getting busy these days at work, so when I am back home, I am so tired that I just cook something quick and I could not click any pictures. And also I have to tell you, its getting dark so I don’t feel like clicking pictures without natural light. So, this whole week it was more like quick cooking after diwali. I just made simple very comforting home food.

Yesterday the weekend started and I finally got some chance to click pictures with natural light. So, here it is. I made matar paneer and butter naan. I will post the recipe of butter naan soon. I have similar paneer recipes like malai methi paneer and paneer makhanwala.

Print
Matar Paneer/ Paneer Peas Masala
Author: Suganya hariharan
Recipe type: Main
Cuisine: Indian
Cook time:  30 mins
Total time:  30 mins
Serves: 4
 
Ingredients
  • For the gravy:
  • Onion – 1 cup, Chopped
  • Tomato – 1 cup, Chopped
  • Green Chilli – 1 , chopped finely
  • Ginger Garlic Paste – 1 tbsp
  • Cashews - 7 whole
  • Turmeric – 1 tsp
  • Oil – 1tbsp
  • Salt - As needed
    [other]
  • Unsalted Butter - 2 Tbsp
  • Paneer - 250gms
  • Chilli Powder - 1 Tbsp
  • Coriander powder – 1 tbsp
  • Cumin Powder – 1 tbsp
  • Kasturi Methi - 1 tbsp
  • Sugar - ½ tsp
  • Water – ½ cup
  • Cream - 2 Tbsp

  • [Garnish]
  • Coriander – 1 tbsp, chopped finely
Instructions
  1. Take 1 tbsp of butter in a pan, place the paneer cubes and fry for a minute in each side till they become crispy golden. Keep it aside. (Optional step)
  2. Take 1 tbsp of oil in a pan, add the cashews and fry till it is golden brown. Add the chopped onions and green chillies and sauté till they become transculent. Now add the tomatoes, garlic ginger paste and salt.
  3. Cook for about 10 minutes on a medium flame till everything gets cooked. Allow this to cool.
  4. Then add everything in a blender. Blend them into a smooth paste with not even small pieces of cashews on it.
  5. Heat butter in the same pan. Add the jeera, blended paste and stir well.
  6. Add chilli powder, coriander powder and cumin powder. (If you want rich color, you can add kashmiri chilli powder. I used normal one)
  7. Stir well &sauté the masala on a medium flame till and add the water and mix well. It has to be sauted really well till butter ooze out.
  8. Add washed boiled peas, dry methi leaves, cream,sugar, water and boil for five minutes and switch off.
  9. Garnish with chopped coriander or paneer, ginger or cream.
Notes
1. Frying the paneer is an optional step.
2. Its better to close the vessel with a lid when we add the blended gravy as it may spilt up some outside as it boils
Wordpress Recipe Plugin by EasyRecipe
3.2.1311

PaneerMatarMasalaFinal3

Filed Under: NORTH INDIAN GRAVIES/DAL/CURRY Tagged With: best side dish for chapathi naan, Matar paneer recipes, paneer recipes, peas masala recipe, peas paneer recipe, peas recipe, quick side dish for roti, side dish for rice

Mirchi Ka Salan / Green Chilli Curry

September 20, 2014 by Suki 4 Comments

Mirchikasalan1fname

Mirchikasalan1fnameIt’s a popular dish made with fried chillies, peanut, sesame seeds and coconut. The curry goes well with biryani.  Mirchi ka salan is similar to bhagara baigan except that you add chillies instead of eggplant and you add yogurt to it. The mirchis used are longer ones; they are called finger hots here. You can even use banana peppers or any kind of green chillies for this preparation. I guess the only curry I know with chilly is the mirchi ka salan. They are made from healthy ingredients – sesame seeds, peanuts, yogurt and coconut. These ingredients help to tone down the heat of the green chillies in the curry.

I came to know about this dish when I stayed in Hyderabad for few months. This dish really stood out to me, I say that because it’s been 6 years but I still remember this dish very much with other beautiful memories. It goes really well with hyderabadi biryani. Its light spiced, creamy and tangy. It looks really simple and normal dish but it is bursting with flavors. Baigan ka salan is also good with biryani. I will post the recipe soon. This goes well with jeera rice, roti,naan or phulka.

This dish involves a lot more of ingredients than an average dish. But its worth doing and tasting it. Making a Mirchi ka Salan is not the quickest thing you can do and it does involve a lot more ingredients than the average dish. But trust me when I say it’s worth it. I have made many a times and it has never failed. The very first time when I heard this dish, I was like” should I go with it”. Back then I was hungry so I just ordered it. But it was VERY TASTY not just because I was hungry ;). It tasted palatable every time I had it.

Vegan note: replace yogurt with coconut milk.

4.0 from 1 reviews
Print
MIRCHI KA SALAN/ GREEN CHILLI CURRY
Author: Suganya Hariharan
Recipe type: Main
Cuisine: Indian, Hyderabad
Prep time:  5 mins
Cook time:  35 mins
Total time:  40 mins
Serves: 4
 
Ingredients
  • To roast & grind:
  • Peanuts –2 tbsp
  • Sesame seeds – 1 tbsp
  • Coconut – 1 tbsp
    For gravy:
  • Oil – 1 tbsp
  • Red chillies – 2 broken roughly
  • Cumin seeds – 1 tsp
  • Mustard seeds – 1 tsp
  • Fenugreek – 1 tsp
  • Curry leaves – 6-8 leaves
  • Hing - a pinch
  • Onions – 1 large, sliced, 1 cup
  • Salt – as needed
  • Turmeric – 1 tsp
  • Ginger garlic paste – ½ tbsp
  • Red chilli powder – 1 tsp
  • Coriander powder – 1 tbsp
  • Cumin powder – 1 tsp
  • Mint – 1 tbsp, chopped finely
  • Coriander – 1 tbsp, chopped finely
  • Yogurt – ½ cup beaten
  • Green Chillies - 8- 10
Instructions
  1. Slit the green chillies in the middle and remove the seeds. When they are dry add them to oil and fry till they look little lighter shade.
  2. Dry roasts the peanuts in a medium flame. When the peanuts are roasted, add the sesame seeds. When the sesame seeds are golden brown, Add coconut. Keep an eye on this. It gets brunt easily. Add this mixture to the blender and blend it with some water to a fine paste.
  3. , Now add the oil in the pan and when the oil is hot, add the whole red chillies, and then add mustard seeds. And when the mustard seeds crackle, add fenugreek seeds and cumin seeds.
  4. Now add the curry leaves, onions, hing and little salt. Cook the onions till they are golden brown, Add turmeric and ginger garlic paste and cook to remove the raw smell.
  5. Add the blended mixture, cumin powder, red chilli powder and coriander powder to the mixture. Fry for two minute and add some water to it. Cook for fifteen minutes. Stir in between till the oil oozes out nicely. Add the chopped mint and coriander leaves. Boil for two minutes.
  6. add the beaten yogurt and simmer for another ten minutes. When it oozes out oil again add the fried green chillies and jaggery to the gravy and let it cook for 5 mins so that the juices of the gravy het absorbed by the chilies.
Notes
1. Roast the peanuts in medium flame as it gets roasted quickly.
2. You can also add tamarind juice in this recipe.
3. Any kind of chillies , seeds removed is good.
.
Wordpress Recipe Plugin by EasyRecipe
3.2.1311


This goes well with jeera rice, roti,naan or phulka.

Mirchikasalanfinalname2

Filed Under: SOUTH INDIAN GRAVIES/DAL/CURRY/KUZHAMBU Tagged With: biryani side dish, coconut peanut recipe, green chilli curry, hyderbad recipes, mirchi ka salan recipe, side dish for naan, side dish for rice, side dish for roti, very tasty

Page 2 of 2
« Previous 1 2
  1. Pages:
  2. «
  3. 1
  4. 2
  • « Previous Page
  • 1
  • 2
  • Facebook
  • Google+
  • Instagram
  • Pinterest
  • Twitter

LOOKING FOR SOMETHING?

logo
Food Advertisements by
logo
Food Advertisements by

Categories

STAY CONNECTED

  • Facebook
  • Google+
  • Instagram
  • Pinterest
  • Twitter

SUBSCRIBE BY EMAIL

SEARCH RELISH THE BITE

logo
Food Advertisements by

Copyright © 2026 · Lifestyle Pro Theme on Genesis Framework · WordPress · Log in