• Home
  • Page Layouts
  • Page Templates
  • Theme Colors
    • Lifestyle Pro Blue
    • Lifestyle Pro Green
    • Lifestyle Pro Mustard
    • Lifestyle Pro Purple
    • Lifestyle Pro Red
    • Lifestyle Pro Teal

Relish The Bite

Taste of happiness

  • HOME
  • ABOUT
  • RECIPE INDEX
    • SNACKS & APPETIZERS
    • BREAKFAST
    • BAKED RECIPES
    • LUNCH & DINNER
      • RICE/BIRYANI VARIETIES
      • SIDES
        • DRY CURRY/STIR-FRY
        • SOUTH INDIAN CURRY/KUZHAMBU
        • NORTH INDIAN CURRY/DAL
        • RAITA/DIPS/CHUTNEY
        • Soups/Salads
      • PASTA PIZZA & TACOS
      • BREAD
      • CHINESE ASIAN INSPIRED
    • NON-VEG RECIPES
    • DESSERTS
    • BEVERAGES
  • SNACKS
  • BREAKFAST
  • NON-VEG RECIPES
  • RICE/BIRYANI VARIETIES
  • LAMB
  • SOUTH INDIAN CURRY/KUZHAMBU
  • VEGAN
  • NORTH INDIAN CURRY/DAL
  • DRY CURRY/STIR-FRY
  • PASTA & TACOS
  • CHINESE ASIAN INSPIRED
  • BAKED RECIPES
  • COLLECTIONS
  • BREAD
  • BEVERAGES
  • DESSERTS
  • FESTIVAL RECIPES
    • SNACKS & APPETIZERS
    • SWEETS/DESSERTS
  • RESOURCES
    • HOW TO START A BLOG
    • TITBITS
    • PRESS
  • CONTACT
You are here: Home / 2014 / Archives for October 2014

Archives for October 2014

Herb & Garlic Oven Roasted Potatoes

October 12, 2014 by Suki 8 Comments

Oven-Roasted-Potatoes-name1

Oven-Roasted-Potatoes-name1
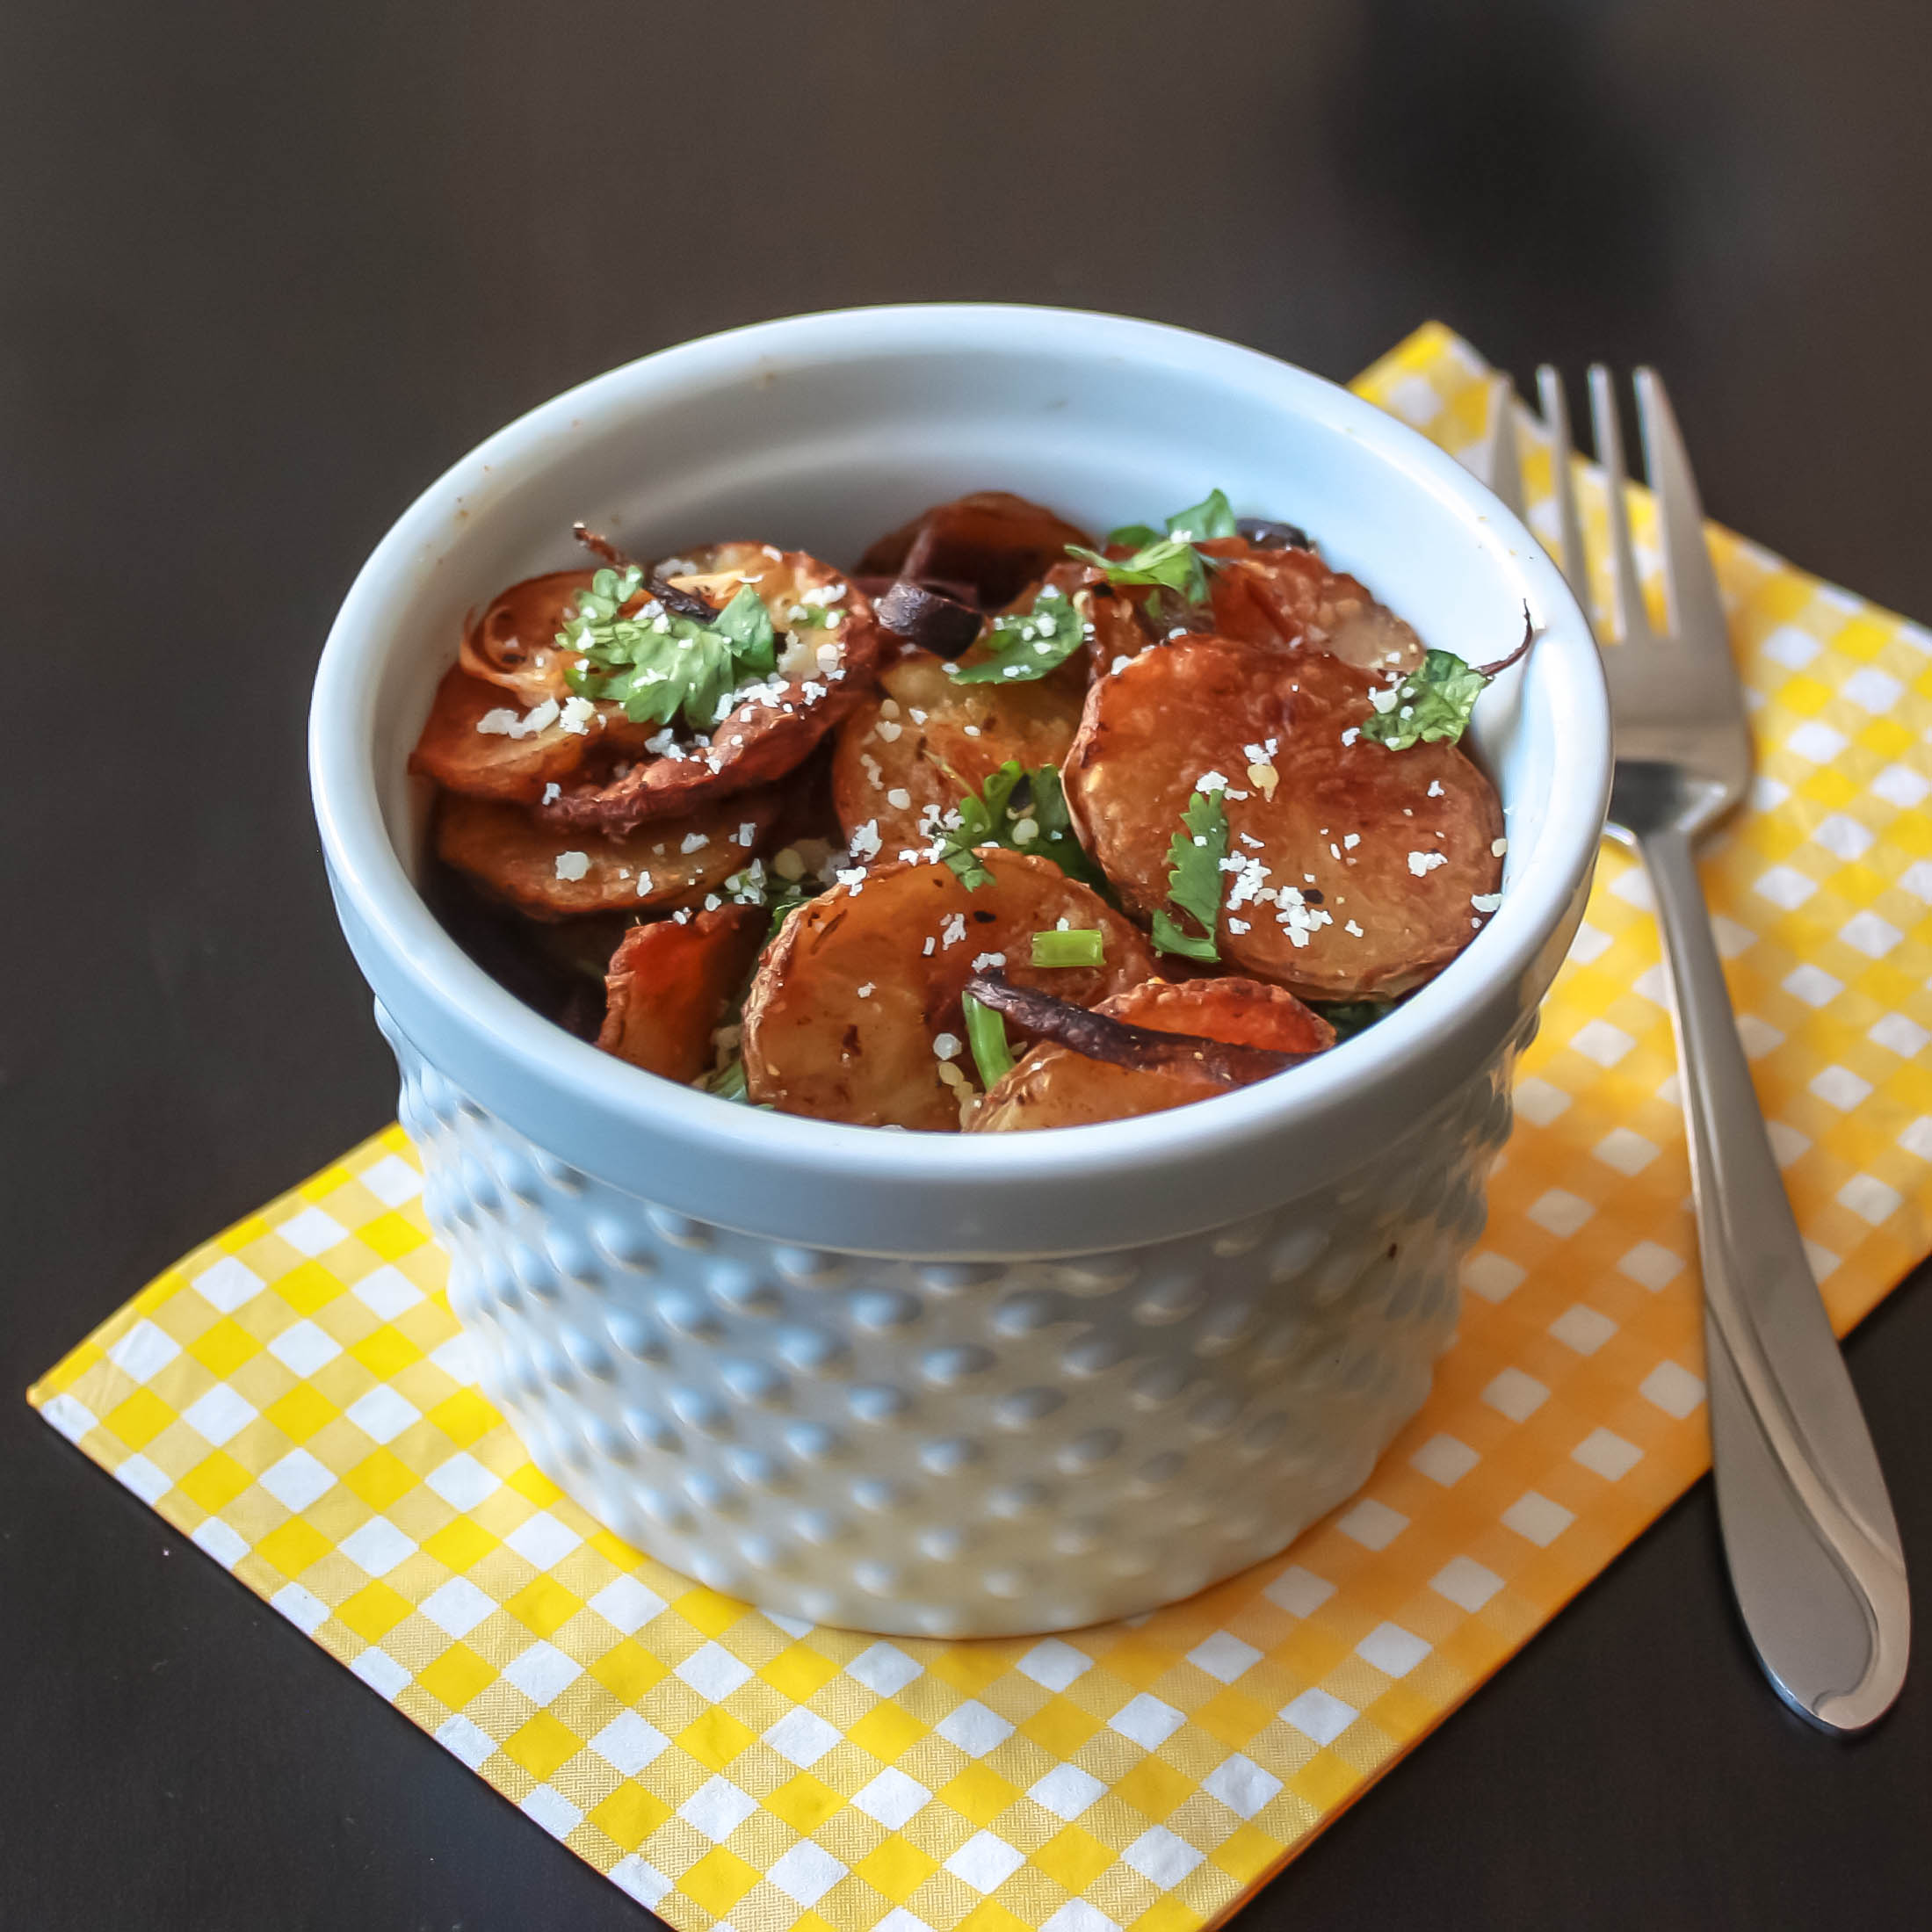
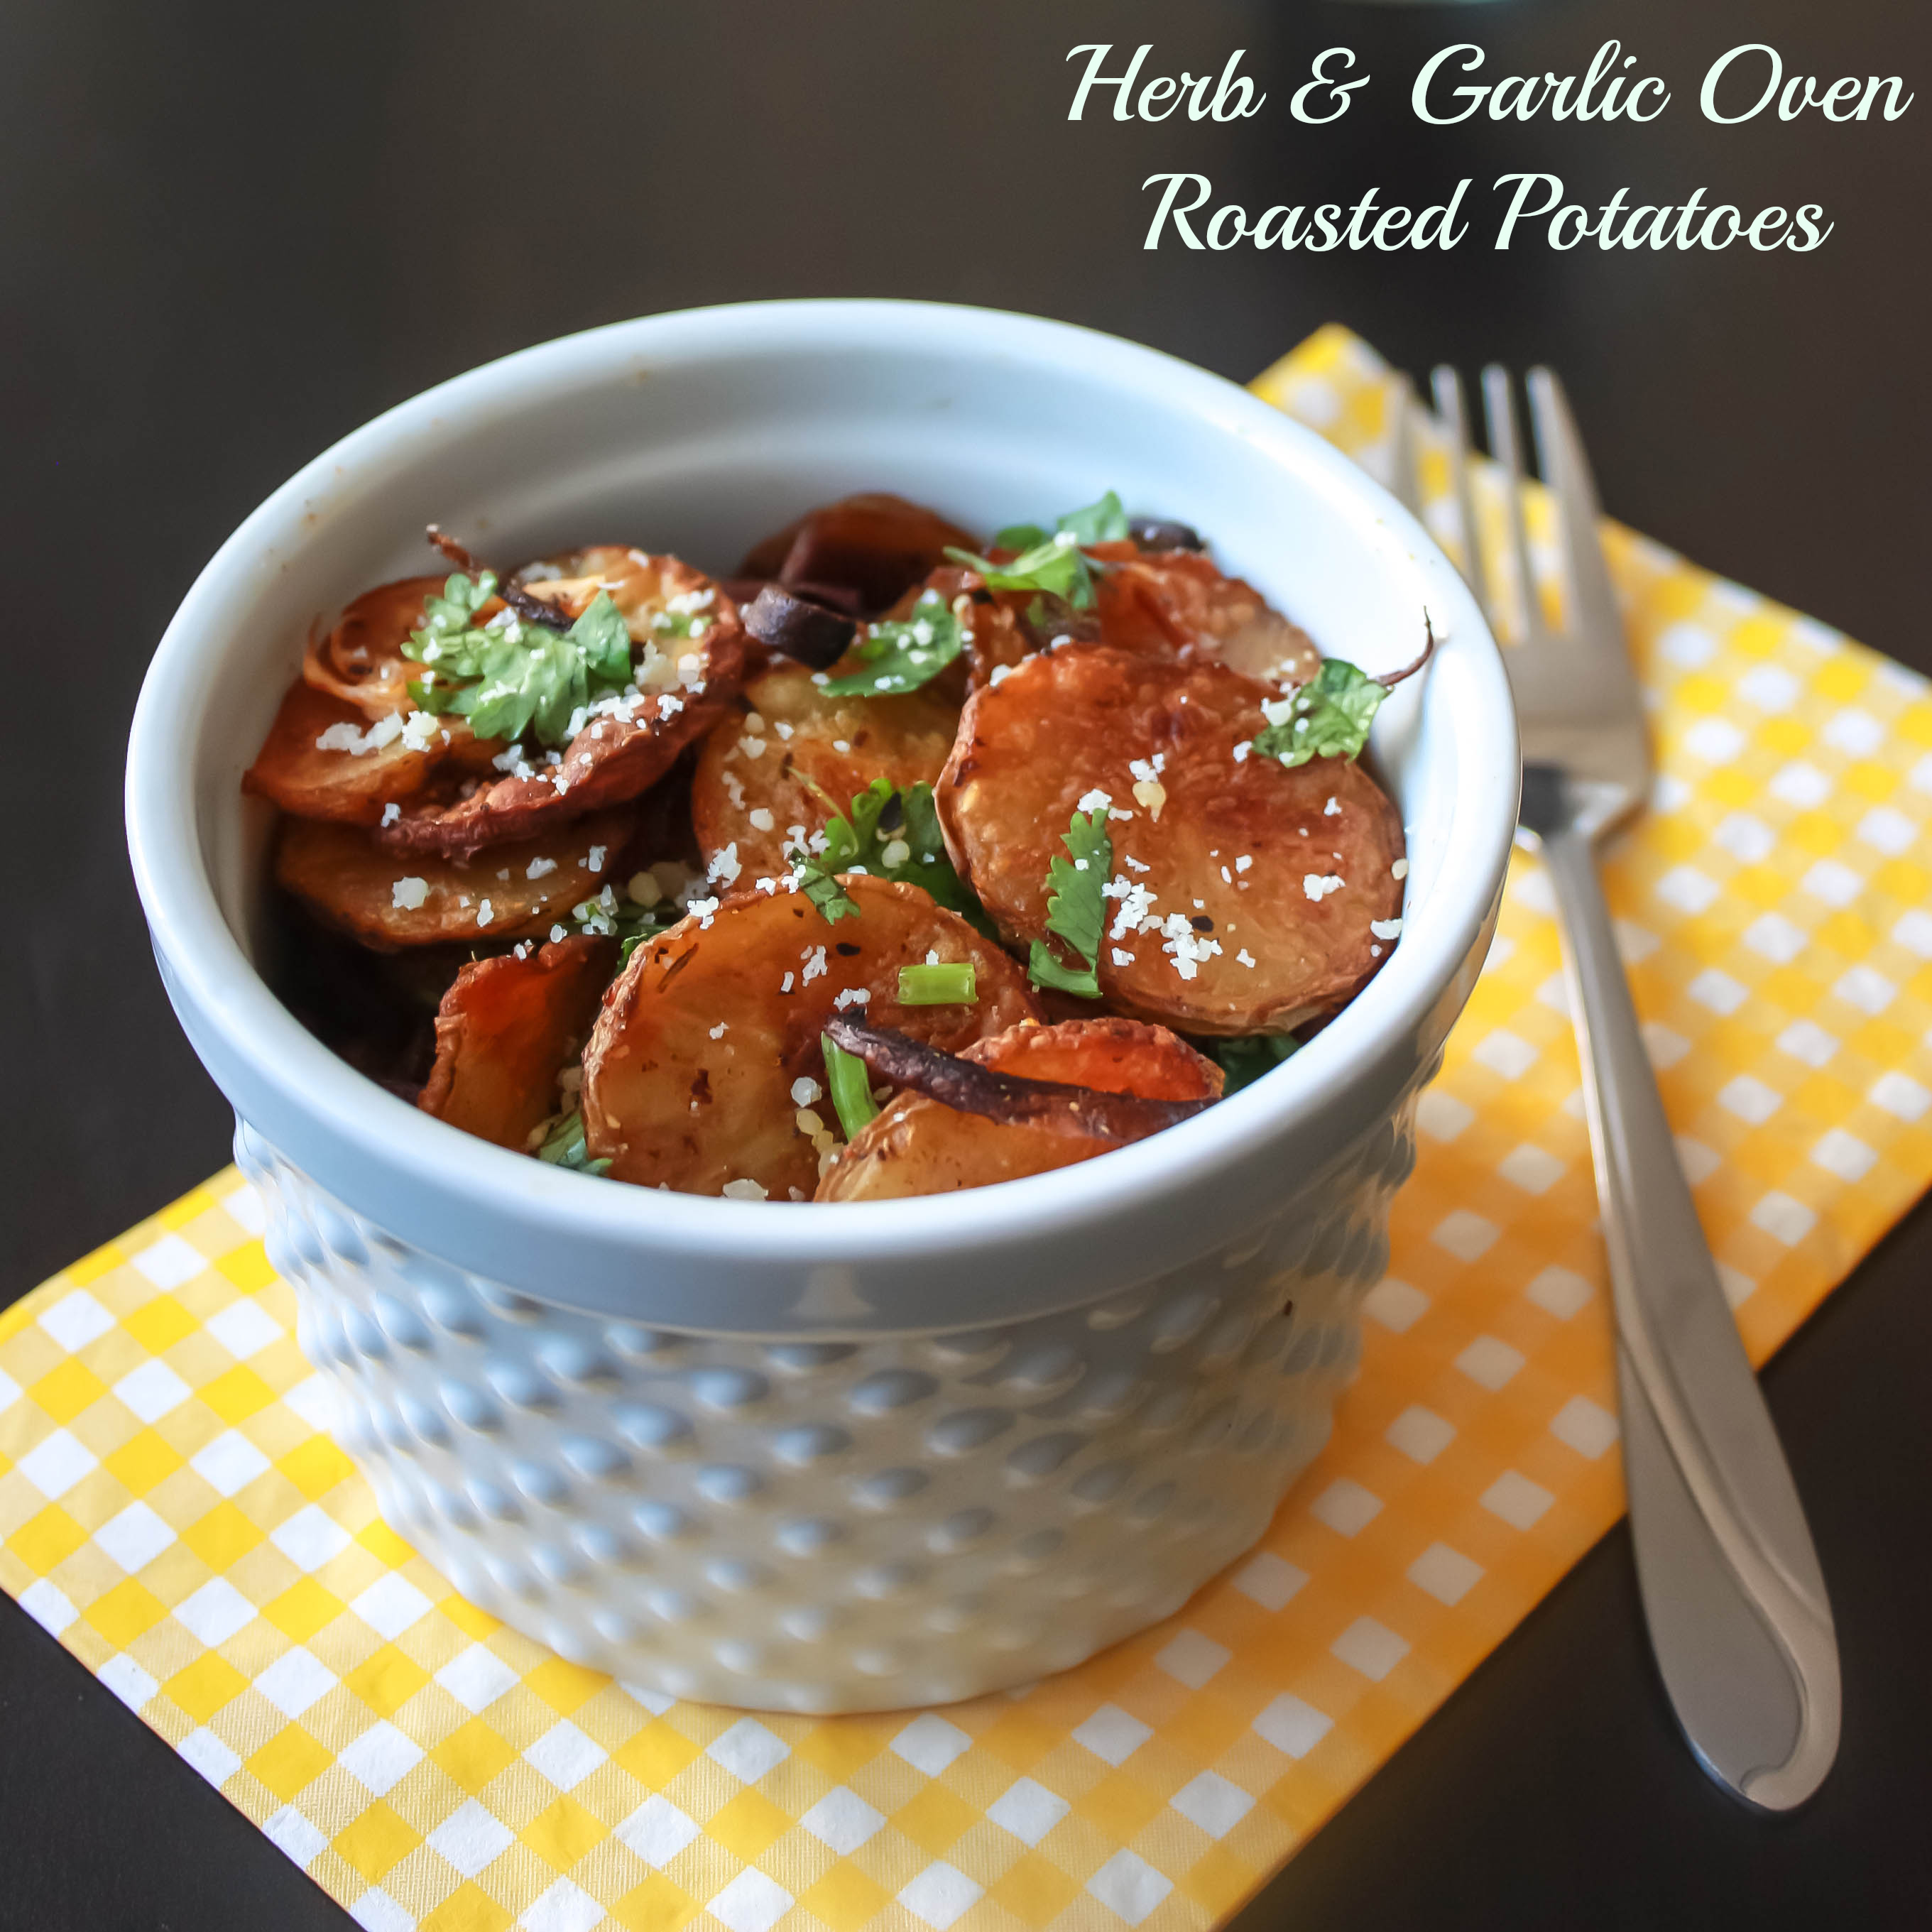
Cheesy, Garlicky, crispy roasted potatoes hot from the oven – completes the perfect brunch!

A great roasted potato side dish made with herbs and garlic.  They are baked in a hot oven for 30 minutes or so until lightly browned, crisp on the outside and tender inside, almost like a potato chip, and I know how you all like potato chips 😀  The seasoning is simple too but works wonders. Do you know how to get them perfectly crisp, every time? 😉 ! Here it is!

I made this for my brunch today with chocolate hazelnut crepe and tea. These were my favorite part of the meal. I could seriously eat the entire batch. Actually when I came to Montreal before 6 years, I was not a brunch person at all.  But for the past one year, I am starting to love it.  The only problem is I have very less places to go for brunch 😉 because I am a vegetarian. Otherwise there are so many brunch places here and I always love going there somehow. The best parts I love in my brunch meal are the Potatoes and the milkshakes! 😀 Whenever I order some pancakes, crepes, waffle or anything sweet, I need my Potatoes as my side. I love to have potatoes in the morning. I am planning to make brunch menu ideas from now on. I realized that I have very less brunch ideas.

Potatoes! Baked potatoes, Mashed potatoes, potato casseroles, hash browns and so on! Seriously, I have not tried a potato recipe that I didn’t like. The least I like are the French fries. These yummy roasted finger-licking potatoes are crispy, spicy and healthy too. Over roasted potatoes are much healthier than French fries. There are lots of ways to make oven-roasted potatoes. This is my personal favourite. 🙂

Vegan Note: avoid parmesan cheese! 🙂
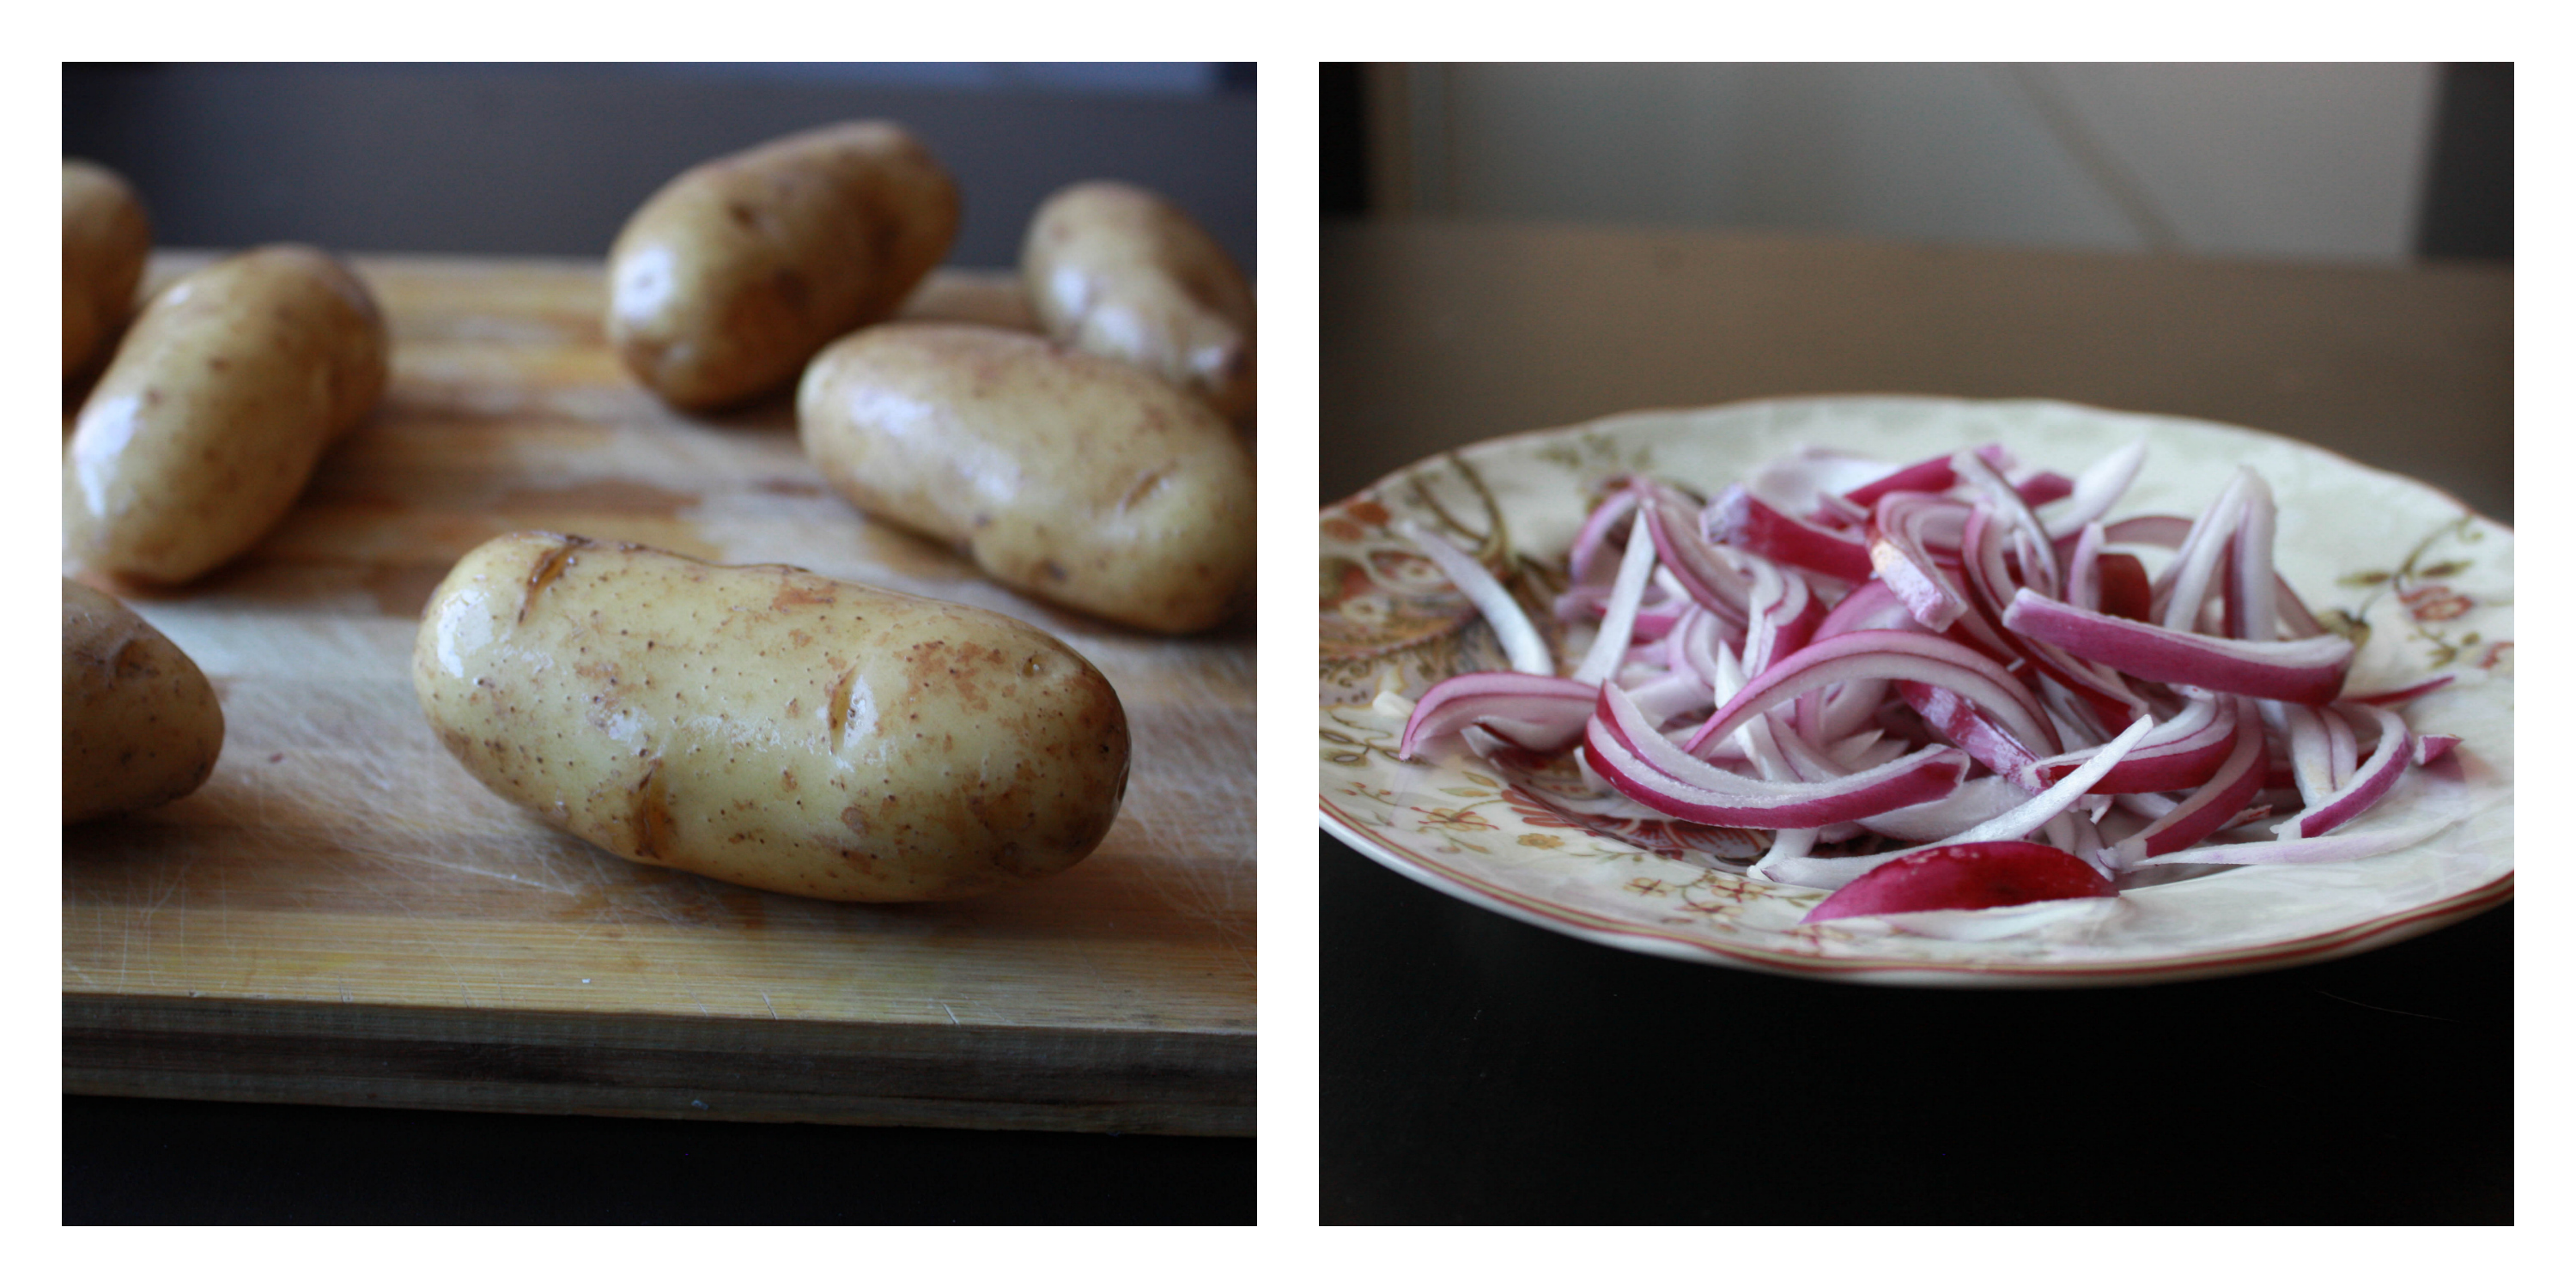
Print
Herb & Garlic Oven Roasted Potatoes
Author: Suganya Hariharan
Recipe type: Brunch
Cuisine: French
Prep time:  45 mins
Cook time:  45 mins
Total time:  1 hour 30 mins
Serves: 4
 
Ingredients
  • Potatoes – 5
  • Red Onion – ½
  • Sea salt – ¼ cup
  • Garlic powder – ¼ tsp
  • Dried basil – ¼ tsp
  • Paprika/Chilli powder – ¼ tsp
  • Black pepper – ¼ tsp
  • sugar – 1 tsp
  • Oil – 2 tbsp
  • Coriander – 2 tbsp, chopped
  • Parmesan Cheese – ¼ cup
Instructions
  1. Preheat oven to 450˚F
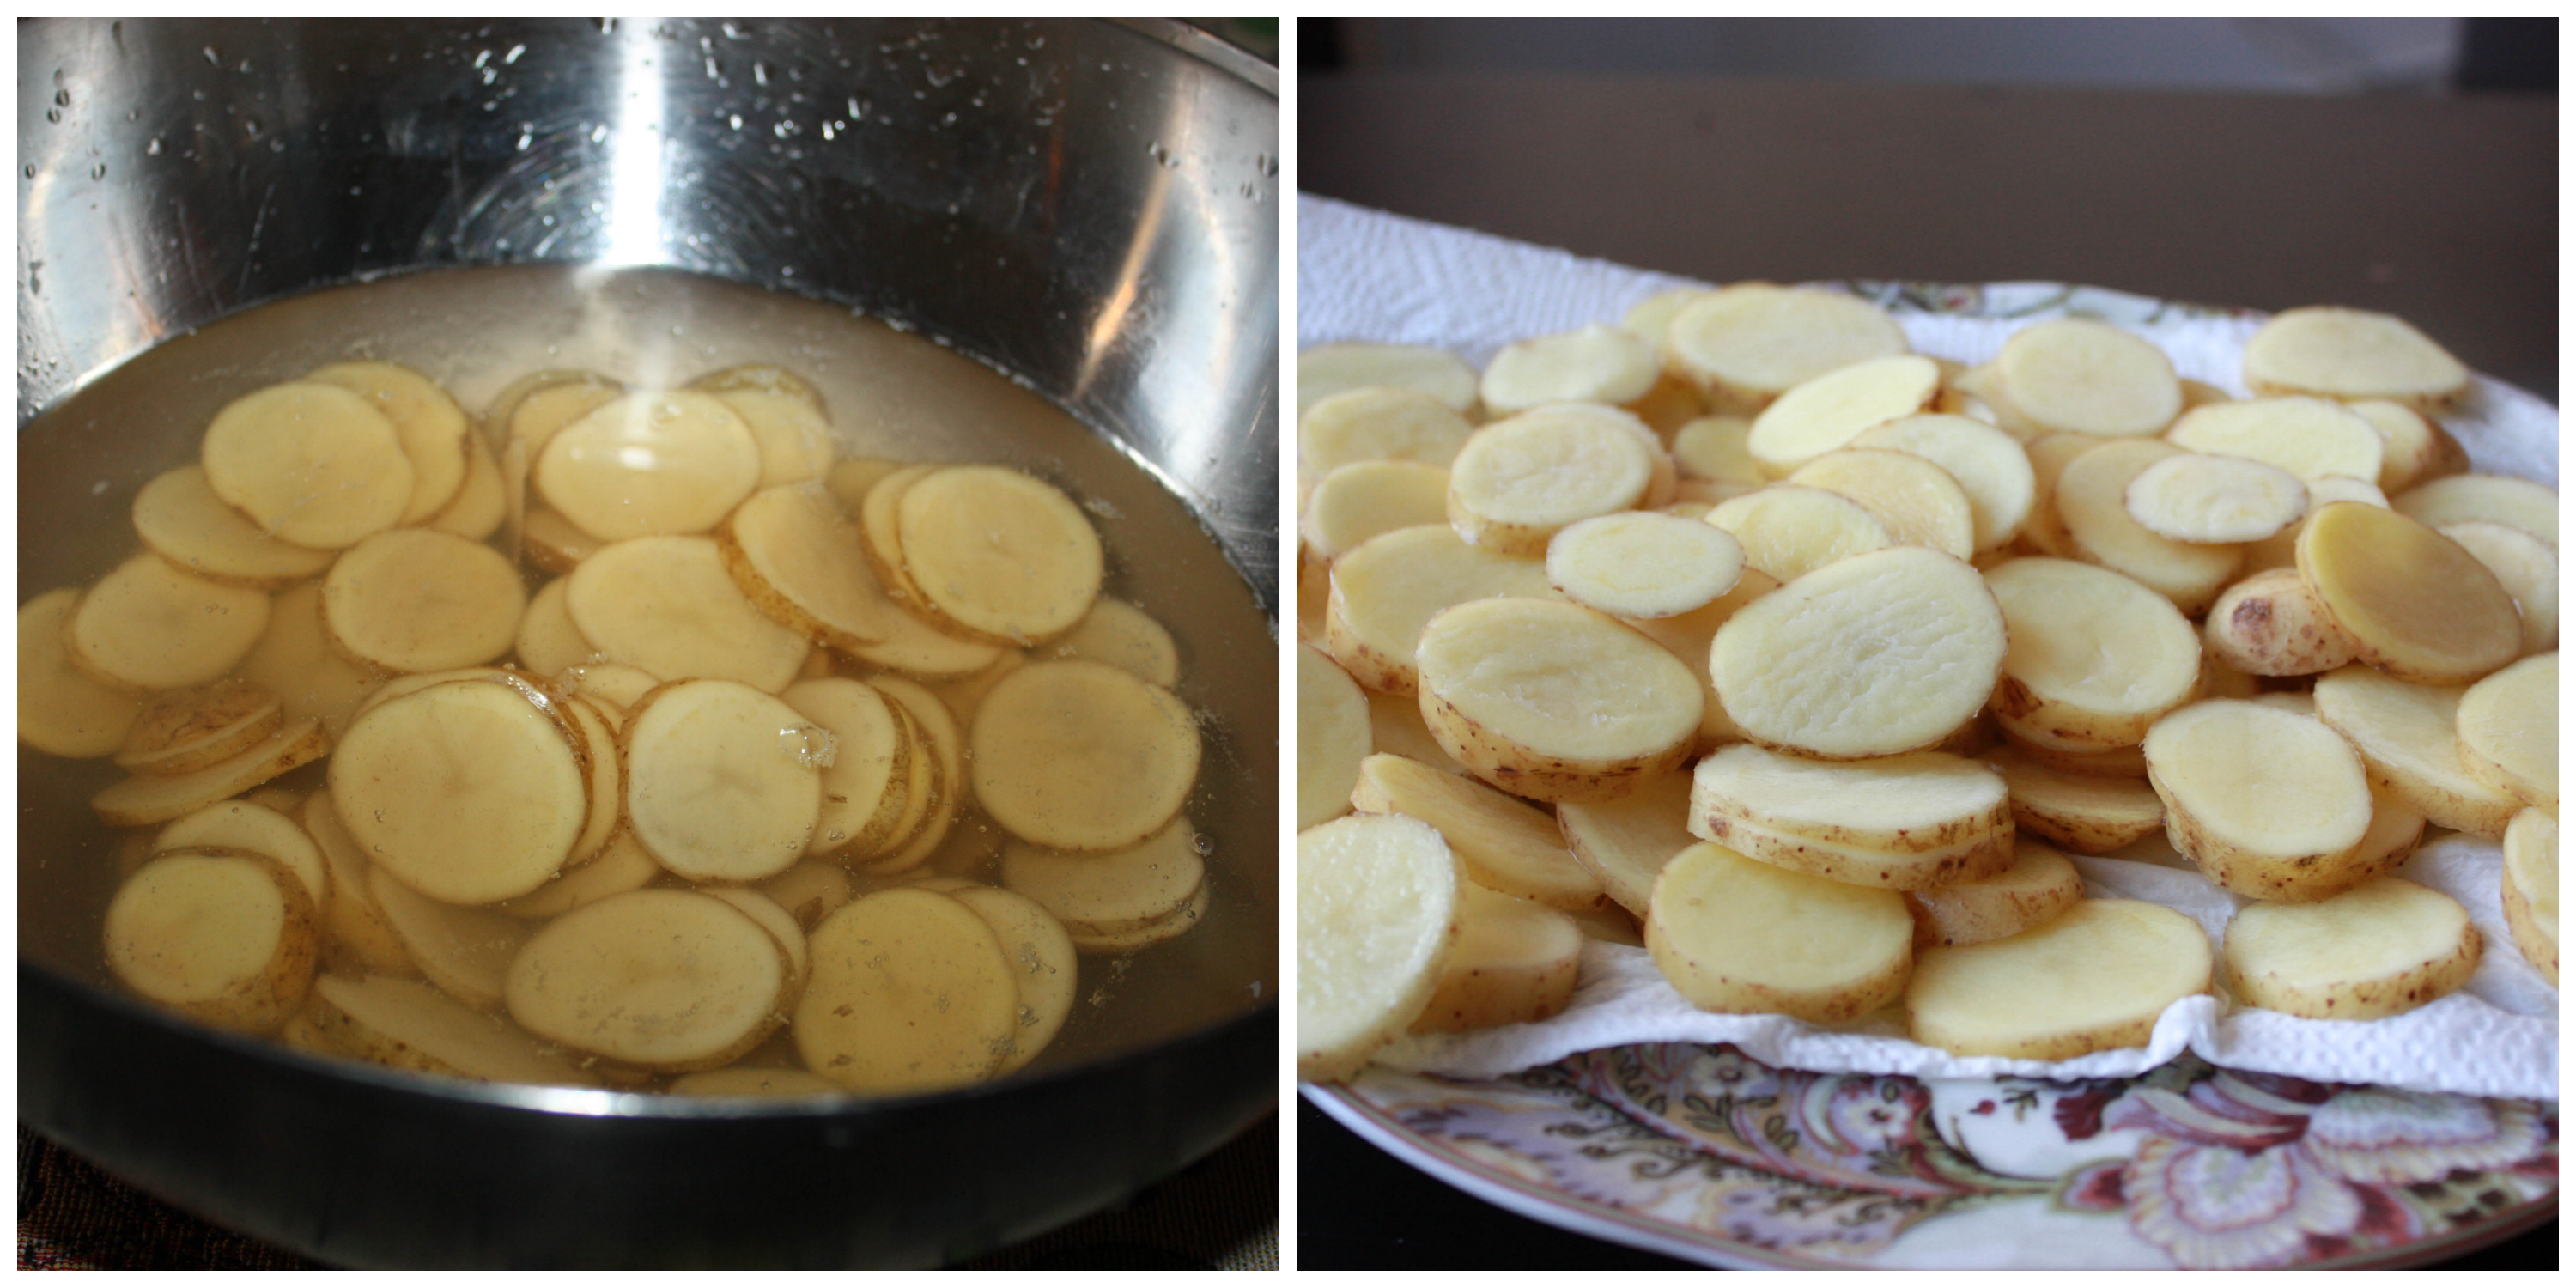
  2. Wash & cut potatoes into circles. And slice the onions.
  3. Place the potatoes in a bowl of water with two cups of cold water. Let them stand for 30 mins. Then pat dry with paper towels.
  4. In a bowl, mix the salt, garlic powder, chilli powder, pepper powder, sugar, dried basil and 1 tbsp of oil. Take a little and toss with onions. And toss the rest of the mixture with the dry potatoes in it.
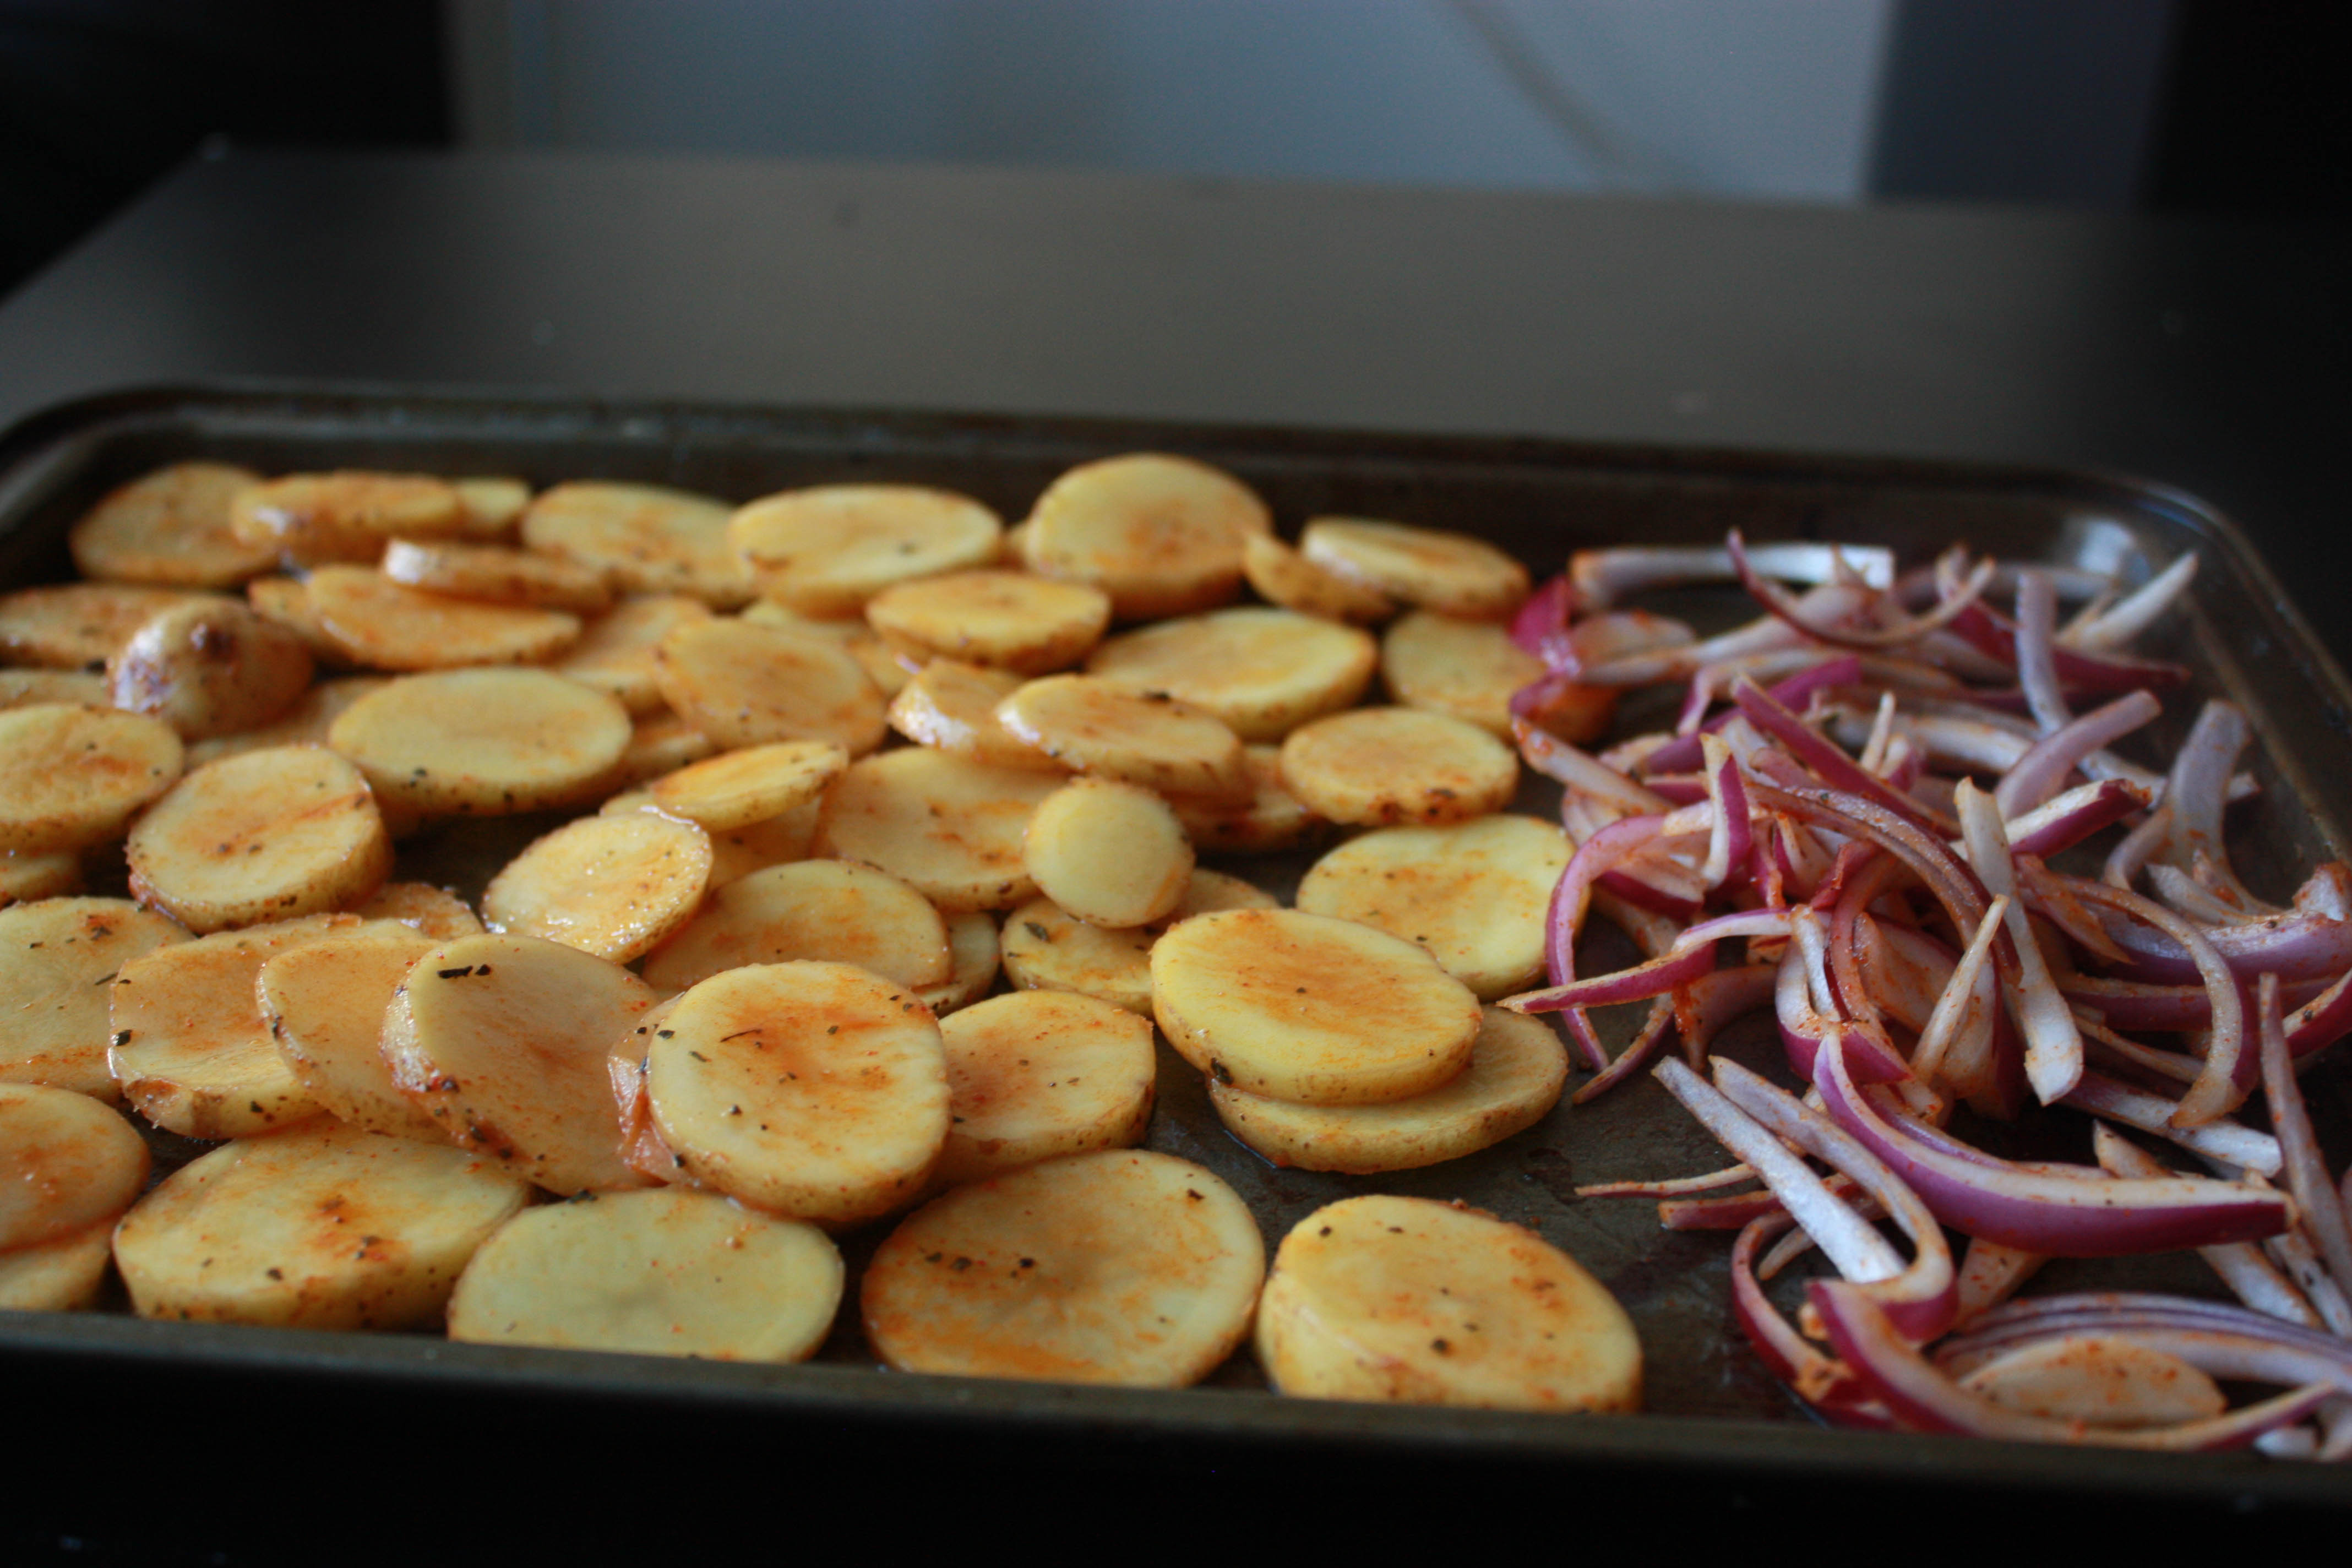
  5. Take a baking sheet and place the tossed potatoes and onions separately. Bake at 450˚F.
  6. I removed the onions after 15 mins and the potatoes after 35 mins until the potatoes are cooked through, browned and crispy.
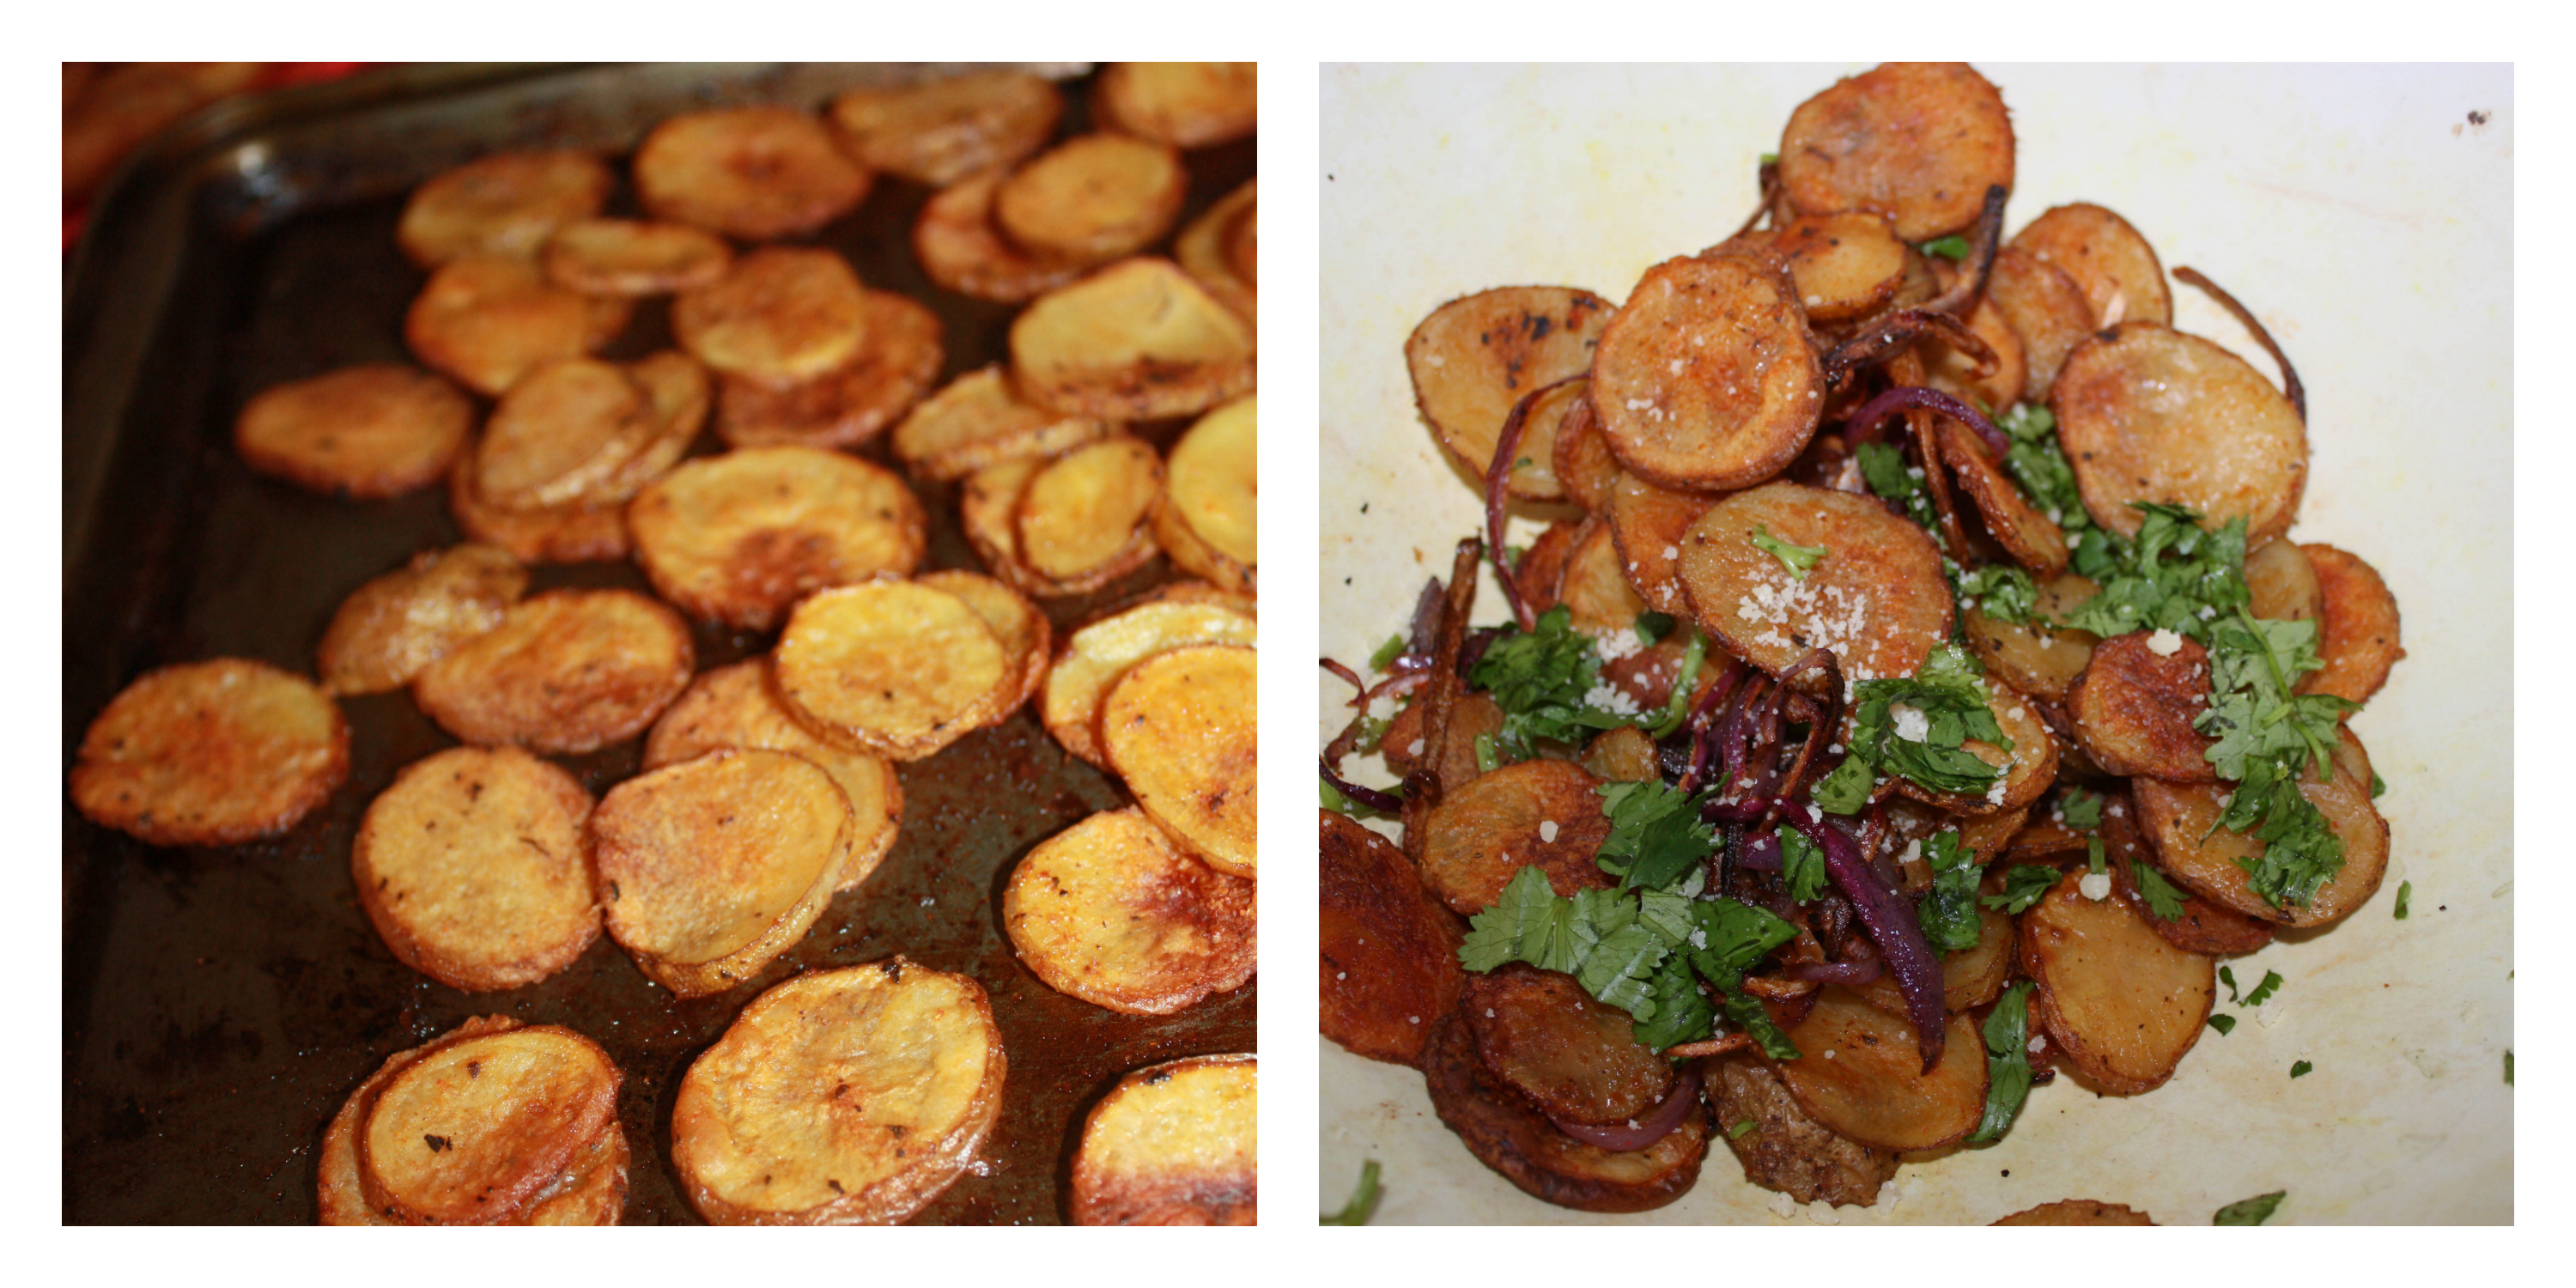
  7. Toss the potatoes and onions with the chopped coriander and grated Parmesan.
Notes
1. Onions cook faster, so remember to remove them in fifteen mins when they are crispy.
2. You can use the parchment paper to line in the baking sheet.
3. Parsley can be used instead of coriander to garnish
Wordpress Recipe Plugin by EasyRecipe
3.2.1311

Oven-Roasted-Potatoes-2-3

Filed Under: BAKED RECIPES, BREAKFAST, VEGAN Tagged With: baked potatoes recipes, brekfast potatoes, Brunch ideas, Brunch recipes, brunch sides recipes, brunch vegetarian recipe, herb and garlic oven roasted potatoes

Baby Corn Makhani

October 10, 2014 by Suki 5 Comments

BabycornMakhani-name

BabycornMakhani-nameCrunchy baby corn in creamy makhani gravy.

Baby Corn Makhani is a great side dish for rotis and mild pulao or jeera rice. Baby corn is a wonderful crunchy vegetable and easily gets blended with any masala. I usually make baby corn Manchurian or baby corn fry. But this time I wanted to make baby corn gravy with no frying.  Makhani gravy is usally made up of pureed tomatoes, ginger, garlic, red chilli powder and cream.

I made this with a simple roti, jeera rice and cucumber raita. Generally, baby corn is cooked or par boiled before using in any dish. But I used a can one, eve n otherwise I just wash and cook it without boiling. That crunchy texture gives great taste to the dish. If you prefer your baby corn more cooked and softer, I’d recommend cooking it in a pot of boiling water until soft before adding to the gravy.

I usually love baby corn in my pizza. And baby corn is a good source of folate or folic acid. It is rich in proteins, vitamins and iron. I used to make baby corn capsicum masala or baby corn peas masala. But after doing my paneer makhanwala, I got inspired and did this recipe.

You can always taste the ingredients a bit if you don’t have that specific ingredient at home. You can do this recipe with tofu,chicken,potato instead of baby corn. Never be afraid to try new flavors in your cooking. I always believe in that.

Vegan Note: Avoid cream and butter. 🙂 we have cashew paste inside already.

Print
Baby Corn Makhani
Author: Suganya Hariharan
Recipe type: Side Dish
Cuisine: Indian
Prep time:  5 mins
Cook time:  25 mins
Total time:  30 mins
Serves: 4
 
Ingredients
  • For the gravy:
  • Onion - 1 Chopped
  • Tomato - 2 Chopped
  • Garlic - 5 Chopped
  • Ginger - ½ inch Chopped
  • Cinnamon - 1
  • Cardomon - 2 whole
  • Cashews - 7 whole
  • Almond - 7 whole
  • Jeera - 1 Tbsp
  • Salt - As needed
  • Water - 2 cups

    [other]
  • Unsalted Butter - 2 Tbsp
  • Baby corn – 10 , slit.
  • Chilli Powder - 1 Tbsp
  • Green Chilli - 1 Slit
  • Kasturi Methi - 1 tbsp
  • Garam Masala Powder - 1 tsp
  • Sugar - ½ tsp
  • Water - 1½ cups
  • Cream - 1 tbsp

    [Garnish]
  • Coriander - 1 tbsp, chopped finely
  • Cream - 1 Tbsp
  • Salt - As needed
Instructions
  1. Mix the chopped onions, tomatoes, cashews, almonds, garlic, ginger, cinnamon, cardomon, jeera, salt and water in a pan.
  2. Cook for about 15- 20 minutes on a medium flame till everything gets cooked. Allow this to cool.
  3. Then add everything in a blender. Blend them into a smooth paste with not even small pieces of cashews on it.
  4. Heat butter in the same pan.
  5. Add the jeera, blended makhani paste and stir well.
  6. Add chilli powder. (If you want rich color, you can add kashmiri chilli powder. I used normal one)
  7. Stir well &sauté the masala on a medium flame till the butter ooze out. It has to be sautéed really well till butter ooze out.
  8. Add washed baby corn, methi leaves, chilli powder,cream,water and boil for ten minutes.
  9. Switch off the flame. Garnish with coriander, ginger and cream.
Notes
1. You can use julienne ginger to garnish as well.
2. Close the lid when you add baby corn and water at the end as it will splash out some gravy outside as it boils.
3. You can also fry baby corn in butter/oil before you add them.
Wordpress Recipe Plugin by EasyRecipe
3.2.1311


 BabycornMakhani-name2

Filed Under: NORTH INDIAN GRAVIES/DAL/CURRY, VEGAN Tagged With: baby corn best recipes, Baby corn curry, baby corn makhani, Baby corn makhani restaurant style, baby corn masala, baby corn recipe indian, Corn recipes, Indian side dish fro roti, Makhani recipe, side dish for roti and rice, Vegan recipes, vegetarian curry

Kid’s Lunch Box recipes – Indus Ladies E-Book

October 10, 2014 by Suki 1 Comment

IL-100KidsLunchboxRecipes-Banner

Looking for Kid’s Lunch Box recipes?

“Indus Ladies” has released 100 Kid’s Lunch Box recipes.

” Indusladies.com is the largest online community for Indian women in the world. It is a safe, friendly and helpful place for you to explore, share and belong. You can have a conversation, find answers, get advice, showcase your talent, learn new things, have fun and make friends there!”

I am feeling very proud and happy about my recipe “Mushroom Pepper Mini Quesadilla” being one of those 100 unique, simple and easy recipes in the book. I saw a lot of fun recipes there.

Recipe Book – http://www.indusladies.com/food/kids-lunch-box-recipes/

It’s free to download. 🙂 


IL-100KidsLunchboxRecipes-Banner

Filed Under: Uncategorized Tagged With: free recipe book download, freebies, indusladies kids lunch box dieas, recipe book

Pavakkai Fry/ Bitter Gourd Stir Fry

October 8, 2014 by Suki 7 Comments

Pavakkai-name1

Pavakkai-name1Healthy & Tasty Bitter Gourd stir fry made with few ingredients.

Bitter gourd is one of the healthy veggie that most kids fend off because of it bitterness. But by the method I prepare, you will not taste the bitterness at all. Even I started to have this veggie after going to college. But now this is one of favorite vegetable. It is really good for health and has natural power to kill worms and germs present in the stomach and intestine. It is very good for diabetic patient’s .People having a low sugar level should try to avoid this veggie.

We can also make stuffed bitter gourd. To be frank, somehow I did not like that much. We can make deep fry this veggie which is really tasty too, but I wanted to use lesser oil and stir fry so it’s healthier and also saves time. It goes well with any rice.

4.0 from 1 reviews
Print
Pavakkai Fry/ Bitter Gourd Stir Fry
Author: Suganya Hariharan
Recipe type: Side dish
Cuisine: Indian
Prep time:  20 mins
Cook time:  20 mins
Total time:  40 mins
Serves: 4
 
Ingredients
  • Bitter gourd - 2 cups, thinly sliced into circles
  • Salt - 1 tbsp for marination
  • Curd - ½ cup
  • Turmeric powder - 2 tsp
  • Onion - ½ cup, thinly sliced
  • Sambhar powder - 1 tbsp
  • Chilli Powder - 1 tbsp
  • Oil - 2 tbsp
  • Mustard seeds - ¾ tbsp
  • Cumin seeds (Jeera) - 1 tsp
  • Urad dal - 2 tsp
  • Curry leaves - 5
  • Sugar - 1 tsp
Instructions
  1. Wash bitter gourd and thinly slice them into circles. Discard any seeds. Soak the bitter gourd in curd, turmeric and 1 tbsp of salt for 20 minutes.
  2. Heat 1 tbsp of oil in a pan, add mustard, after it crackles, add urad dal and jeera. Add sliced onion and fry till golden brown, make sure not to burn the onion.
  3. Take the bitter gourd squeezed out from curd mixture.
  4. Add the bitter gourd to the pan which has the onion frying. Add sambhar powder, chilli powder, and little more salt, mix well and keep the flame in medium. Sprinkle 1 tbsp of water and cook for 5 minutes.
  5. Add 1 tbsp of oil and 1 tsp of sugar and keep frying until the bitter gourd turns into nice deep brown in color. Switch off the flame.
Notes
1. Adding sugar makes it caramelize and turns it crispy.
2. Sour curd and turmeric takes out the bitterness.
Wordpress Recipe Plugin by EasyRecipe
3.2.1311

Serve with rice and rasam or dal fry.


Pavakkai-name2

Filed Under: DRY CURRY SIDE DISH/ STIR-FRY, VEGAN Tagged With: bitter gourd recipe, healthy bitter gourd recipe, healthy pavakkai recipe, indian side dish recipes, Pavakkai Fry, Pavakkai stir fry, Pavakkai varuvala, quick and easy pavakkai recipe

Honey Garlic Eggplant

October 4, 2014 by Suki 6 Comments

HoneyGarlicEggplant-name

HoneyGarlicEggplant-nameFried Chinese eggplant coated in honey garlic sauce, topped with sesame seeds and served with rice. Fragrant and delicious!

When I went to market this week, I saw this Chinese eggplant, which was staring at me and asking me to take it home. I am truly an eggplant lover and I found these delicious. So, when I reached home I wanted to do something quick and easy from it.

I decided to slice the eggplant into sticks and shallow fry. The benefits of shallow fry:

1. Easy to make.

2. Ensures that the eggplant doesn’t absorb too much oil.

3. Cooks it quickly

4. Crispy exterior

5. Creamy interior!

You can even grill eggplant but I find this beautifully browned when fried. When I tossed them in sauce and I eagerly took a first taste. It has sweet, spicy, garlicky and smoky flavor in the same bundle. It is not mushy at all! It is quick to make and tasty to eat.

Print
HONEY GARLIC EGGPLANT
Author: Suganya Hariharan
Recipe type: Main
Cuisine: Asian
Cook time:  20 mins
Total time:  20 mins
Serves: 4
 
Ingredients
  • Japanese Eggplant – 2
  • Capsicum/Bell pepper - 2 tbsp, chopped
  • Oil – to fry
  • Garlic – 5 cloves, minced
  • Ginger – ½ inch, minced
  • Red chili – 3
  • Sesame oil – 1 tsp
  • Honey – 2 tbsp
  • Soy sauce – 2 tbsp
  • Ground pepper – 1 tsp
  • Sesame seeds – for garnish
  • Green onions/coriander - garnish
  • Fluffy white rice – to serve
Instructions
  1. Cut the eggplant into ¾ inch sticks.
  2. Heat oil in a deep-sided skillet to 360F. Fry the eggplant in small batches. Flip it if needed. Fry it for about two minutes until lightly golden brown. Don’t soak it in oil for long time. Remove from oil and drain on a cooling rack, or a tissue.
  3. In a small cup, mix honey, ground pepper and soy sauce and keep it aside.
  4. In a pan, heat up 1 tsp of sesame oil and cook the garlic and chilli on medium heat until slightly golden, but make sure it is not browned. Add the honey soy sauce mixture.
  5. Turn the heat to medium high so that the mixture bubbles, thickens and turns into sticky texture.
  6. Toss the fried eggplant with the sauce and garnish with sesame seeds, scallions and coriander.
  7. Serve immediately with rice or grain of your choice.
Wordpress Recipe Plugin by EasyRecipe
3.3.3077

HoneyGarlicEggplant-8

Filed Under: CHINESE ASIAN INSPIRED, VEGAN Tagged With: asian recipe, chinese eggplant recipe, honey garlic eggplant with sesame seeds recipe, honey garlic recipe

Rasgulla

October 1, 2014 by Suki 2 Comments

Rasgullafinal-2name

Rasgullafinal-2nameOne of the most popular Indian sweet made of homemade cottage cheese. These cottage cheese dumplings are fluffy and spongy, soaked in sugar syrup. With every bite you would have the sugar syrup oozing into your mouth.

“Ras” means juice and “gulla” means “round” or “ball”, describing round cheese balls soaked in soft juicy sugar. If you are not sure what Rasgullas are, then let me tell you, they are Cheeseeeee 😀 balls. For others who knows what is rasgulla, do you need any more introduction ? 😉 I don’t think so. It is originated in Orissa and was introduced to Bengal by a sweet seller (that’s the story I heard and I believe it J). Rasgullas were sold in small clay pots to keep them cooler but they don’t do it anymore as we have refrigerators everywhere. But still if you go to smaller towns in India, you would see that. I don’t remember my mom making them at home so I always believed that it was a tedious process. But the list of sweets she used to make when I come from school each day.. Uhhh!! I can never make them so quick and nice! But after making these Rasgullas at home, I always prefer them doing at home now. You need very few ingredients to make Rasgulla, but it takes some time to make it. It’s more preparation time than cooking time.

Some get frustrated because their Rasgullas break. Don’t worry, do not make it big in size, it will make it hard and not spongy. This was my second time trying  Rasgullas, it did not let me down both times. So , you can also do it 😀 Confidence :D.I always make Rasmalai (another popular Indian dessert). That is my favorite. So I made Rasmalai, homemade paneer and Rasgullas on the same day as they all involve same process except the final steps.

Indians are known all over the world for their spicy food 😉 and sweets. And if you have visited India, you would be amazed to see the variety of sweets at a local sweet shop. You have so many sweets and snacks available all over the places. So, when I came here, I missed that snacks and sweets. Actually snacks more 😉 we have lots of desserts in Montreal 🙂 Montreal is known for their French cakes 😀 I should say!

Rasgullafinal-3

The secret to make spongy Rasgullas is in the kneading of the cheese. It has to be kneaded really well until it is smooth and has a slightly “oil” feel. Diwali is around the corner. And it is Navrathri season. You should make them even if it is a normal day 😉 It will make the day special! 😀

5.0 from 1 reviews
Print
RASGULLA
Author: Suganya Hariharan
Recipe type: Dessert
Cuisine: Indian
Prep time:  60 mins
Cook time:  25 mins
Total time:  1 hour 25 mins
Serves: 20
 
Ingredients
  • Ingredients:
  • For Paneer:
  • Milk – 6 cups
  • Lemon Juice – 1⁄4 cup
  • Sugar – 1 cup
  • Ice cubes – 6
  • For sugar syrup:
  • Sugar – 1 cup
  • Water – 6 cups
  • Cardomon - 2
Instructions
  1. For Paneer:
  2. Mix lemon juice in half a cup of warm water and keep aside.
  3. Add 5 cups milk to a large pan over medium high heat. Constantly stir the milk at regular intervals to make sure the milk does not stick to the bottom.
  4. When it is boiling nicely, add the lemon juice/water mixture to the boiling milk. The milk will curdle in about a minute and most of the milk protein coagulates into lumps leaving very thin, slight cloudy water behind. When the water is clear, stop curdling by adding ice.
  5. Drain out the liquid using a muslin cloth or any clean thin cloth. Guess what you have in the cloth? Its cottage cheese! Squeeze out the excess water and hang the cloth with paneer for about 30-40minutes.
  6. Now rub the cloth that contains the paneer with another cloth. This removes the remaining water and helps us form the dough. Now remove the paneer from the cloth, knead it and make smooth small balls. Press them to resemble a bulging nugget.

    For sugar Syrup:
  7. Boil 6 cups of water in a large bottom pot and add one cup of sugar to it. Once the sugar dissolves, take one cup from it in a separate vessel and keep it aside.
  8. Now add the paneer balls in the boiling water. Cover and cook for about 7 minutes.
  9. Take the paneer balls and add to the sugar syrup that you kept aside before.
  10. Let the water boil and reach a one thread consistency, or little thicker consitency. Thats the syrup!
  11. After ten minutes, squeeze it lightly, remove the water and add them to the syrup.
  12. Garnish with sliced almonds/pistachios.
Wordpress Recipe Plugin by EasyRecipe
3.2.1311

 Rasgullafinal

Filed Under: DESSERTS, SWEETS/DESSERTS Tagged With: diwali recipe, indian sweet recipe, milk paneer cheese sweet recipe, paneer recipe, popular indan sweet, rasgulla home made recipe, rasgulla recipe, sugar syrup recipe

Page 2 of 2
« Previous 1 2
  1. Pages:
  2. «
  3. 1
  4. 2
  • « Previous Page
  • 1
  • 2
  • Facebook
  • Google+
  • Instagram
  • Pinterest
  • Twitter

LOOKING FOR SOMETHING?

logo
Food Advertisements by
logo
Food Advertisements by

Categories

STAY CONNECTED

  • Facebook
  • Google+
  • Instagram
  • Pinterest
  • Twitter

SUBSCRIBE BY EMAIL

SEARCH RELISH THE BITE

logo
Food Advertisements by

Copyright © 2026 · Lifestyle Pro Theme on Genesis Framework · WordPress · Log in