• Home
  • Page Layouts
  • Page Templates
  • Theme Colors
    • Lifestyle Pro Blue
    • Lifestyle Pro Green
    • Lifestyle Pro Mustard
    • Lifestyle Pro Purple
    • Lifestyle Pro Red
    • Lifestyle Pro Teal

Relish The Bite

Taste of happiness

  • HOME
  • ABOUT
  • RECIPE INDEX
    • SNACKS & APPETIZERS
    • BREAKFAST
    • BAKED RECIPES
    • LUNCH & DINNER
      • RICE/BIRYANI VARIETIES
      • SIDES
        • DRY CURRY/STIR-FRY
        • SOUTH INDIAN CURRY/KUZHAMBU
        • NORTH INDIAN CURRY/DAL
        • RAITA/DIPS/CHUTNEY
        • Soups/Salads
      • PASTA PIZZA & TACOS
      • BREAD
      • CHINESE ASIAN INSPIRED
    • NON-VEG RECIPES
    • DESSERTS
    • BEVERAGES
  • SNACKS
  • BREAKFAST
  • NON-VEG RECIPES
  • RICE/BIRYANI VARIETIES
  • LAMB
  • SOUTH INDIAN CURRY/KUZHAMBU
  • VEGAN
  • NORTH INDIAN CURRY/DAL
  • DRY CURRY/STIR-FRY
  • PASTA & TACOS
  • CHINESE ASIAN INSPIRED
  • BAKED RECIPES
  • COLLECTIONS
  • BREAD
  • BEVERAGES
  • DESSERTS
  • FESTIVAL RECIPES
    • SNACKS & APPETIZERS
    • SWEETS/DESSERTS
  • RESOURCES
    • HOW TO START A BLOG
    • TITBITS
    • PRESS
  • CONTACT
You are here: Home / 2014 / Archives for September 2014

Archives for September 2014

Spicy Chicken Stir Fry Egg Noodles

September 12, 2014 by Suki 15 Comments

Chickenstirfry_Relishthebite-2
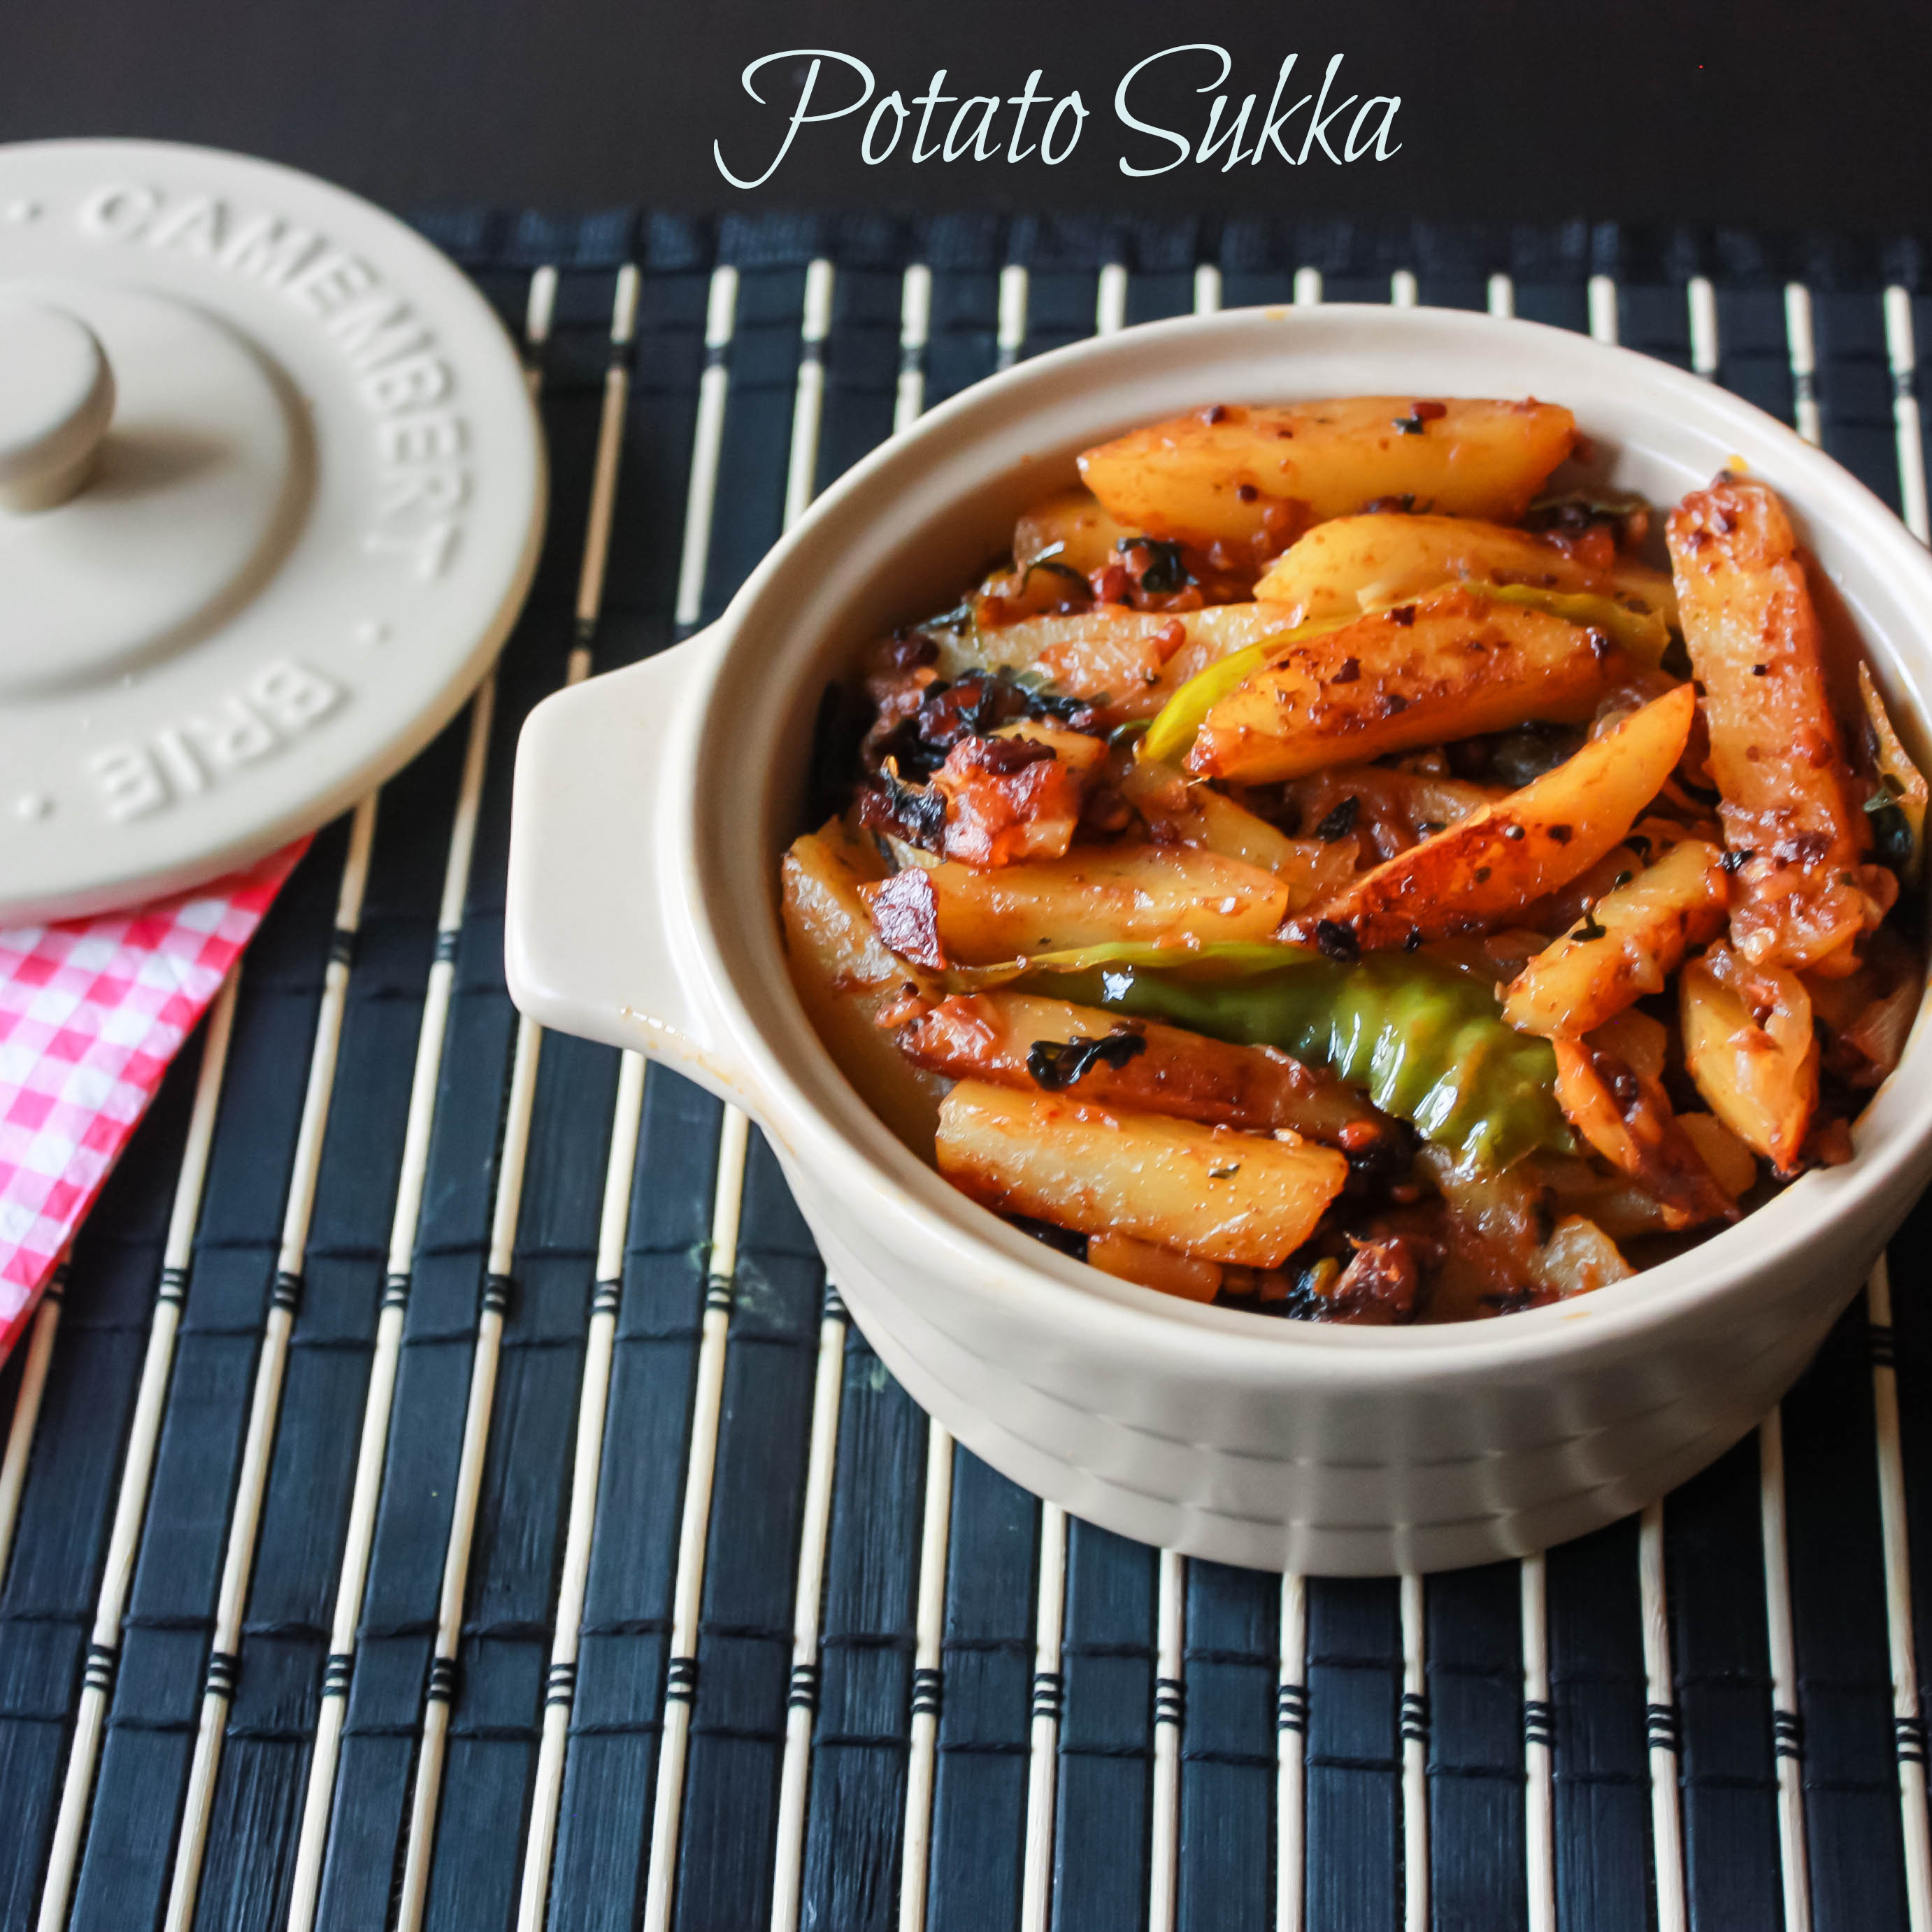
Today I am going to make one of the best Asian street food. I would like to visit there just to smell the delicious food in every small street there and also the Asian staple food, Noodles. If you learn to cook the noodles properly, you will be surprised how quick and easy you can make a delicious dinner. For the past two days, I did not get some time to post. I wanted to make it a point that at least I should post every alternative days. But I am so tired after the long day;) I just doze off staring at my screen. 😀 So I am trying to make very quick recipes.

This dish is sneakily easy. 30 minutes to finish 🙂 and you are done 🙂 you can use any vegetable that gets wasted in your refrigerator. Open it 😉 there will be something!


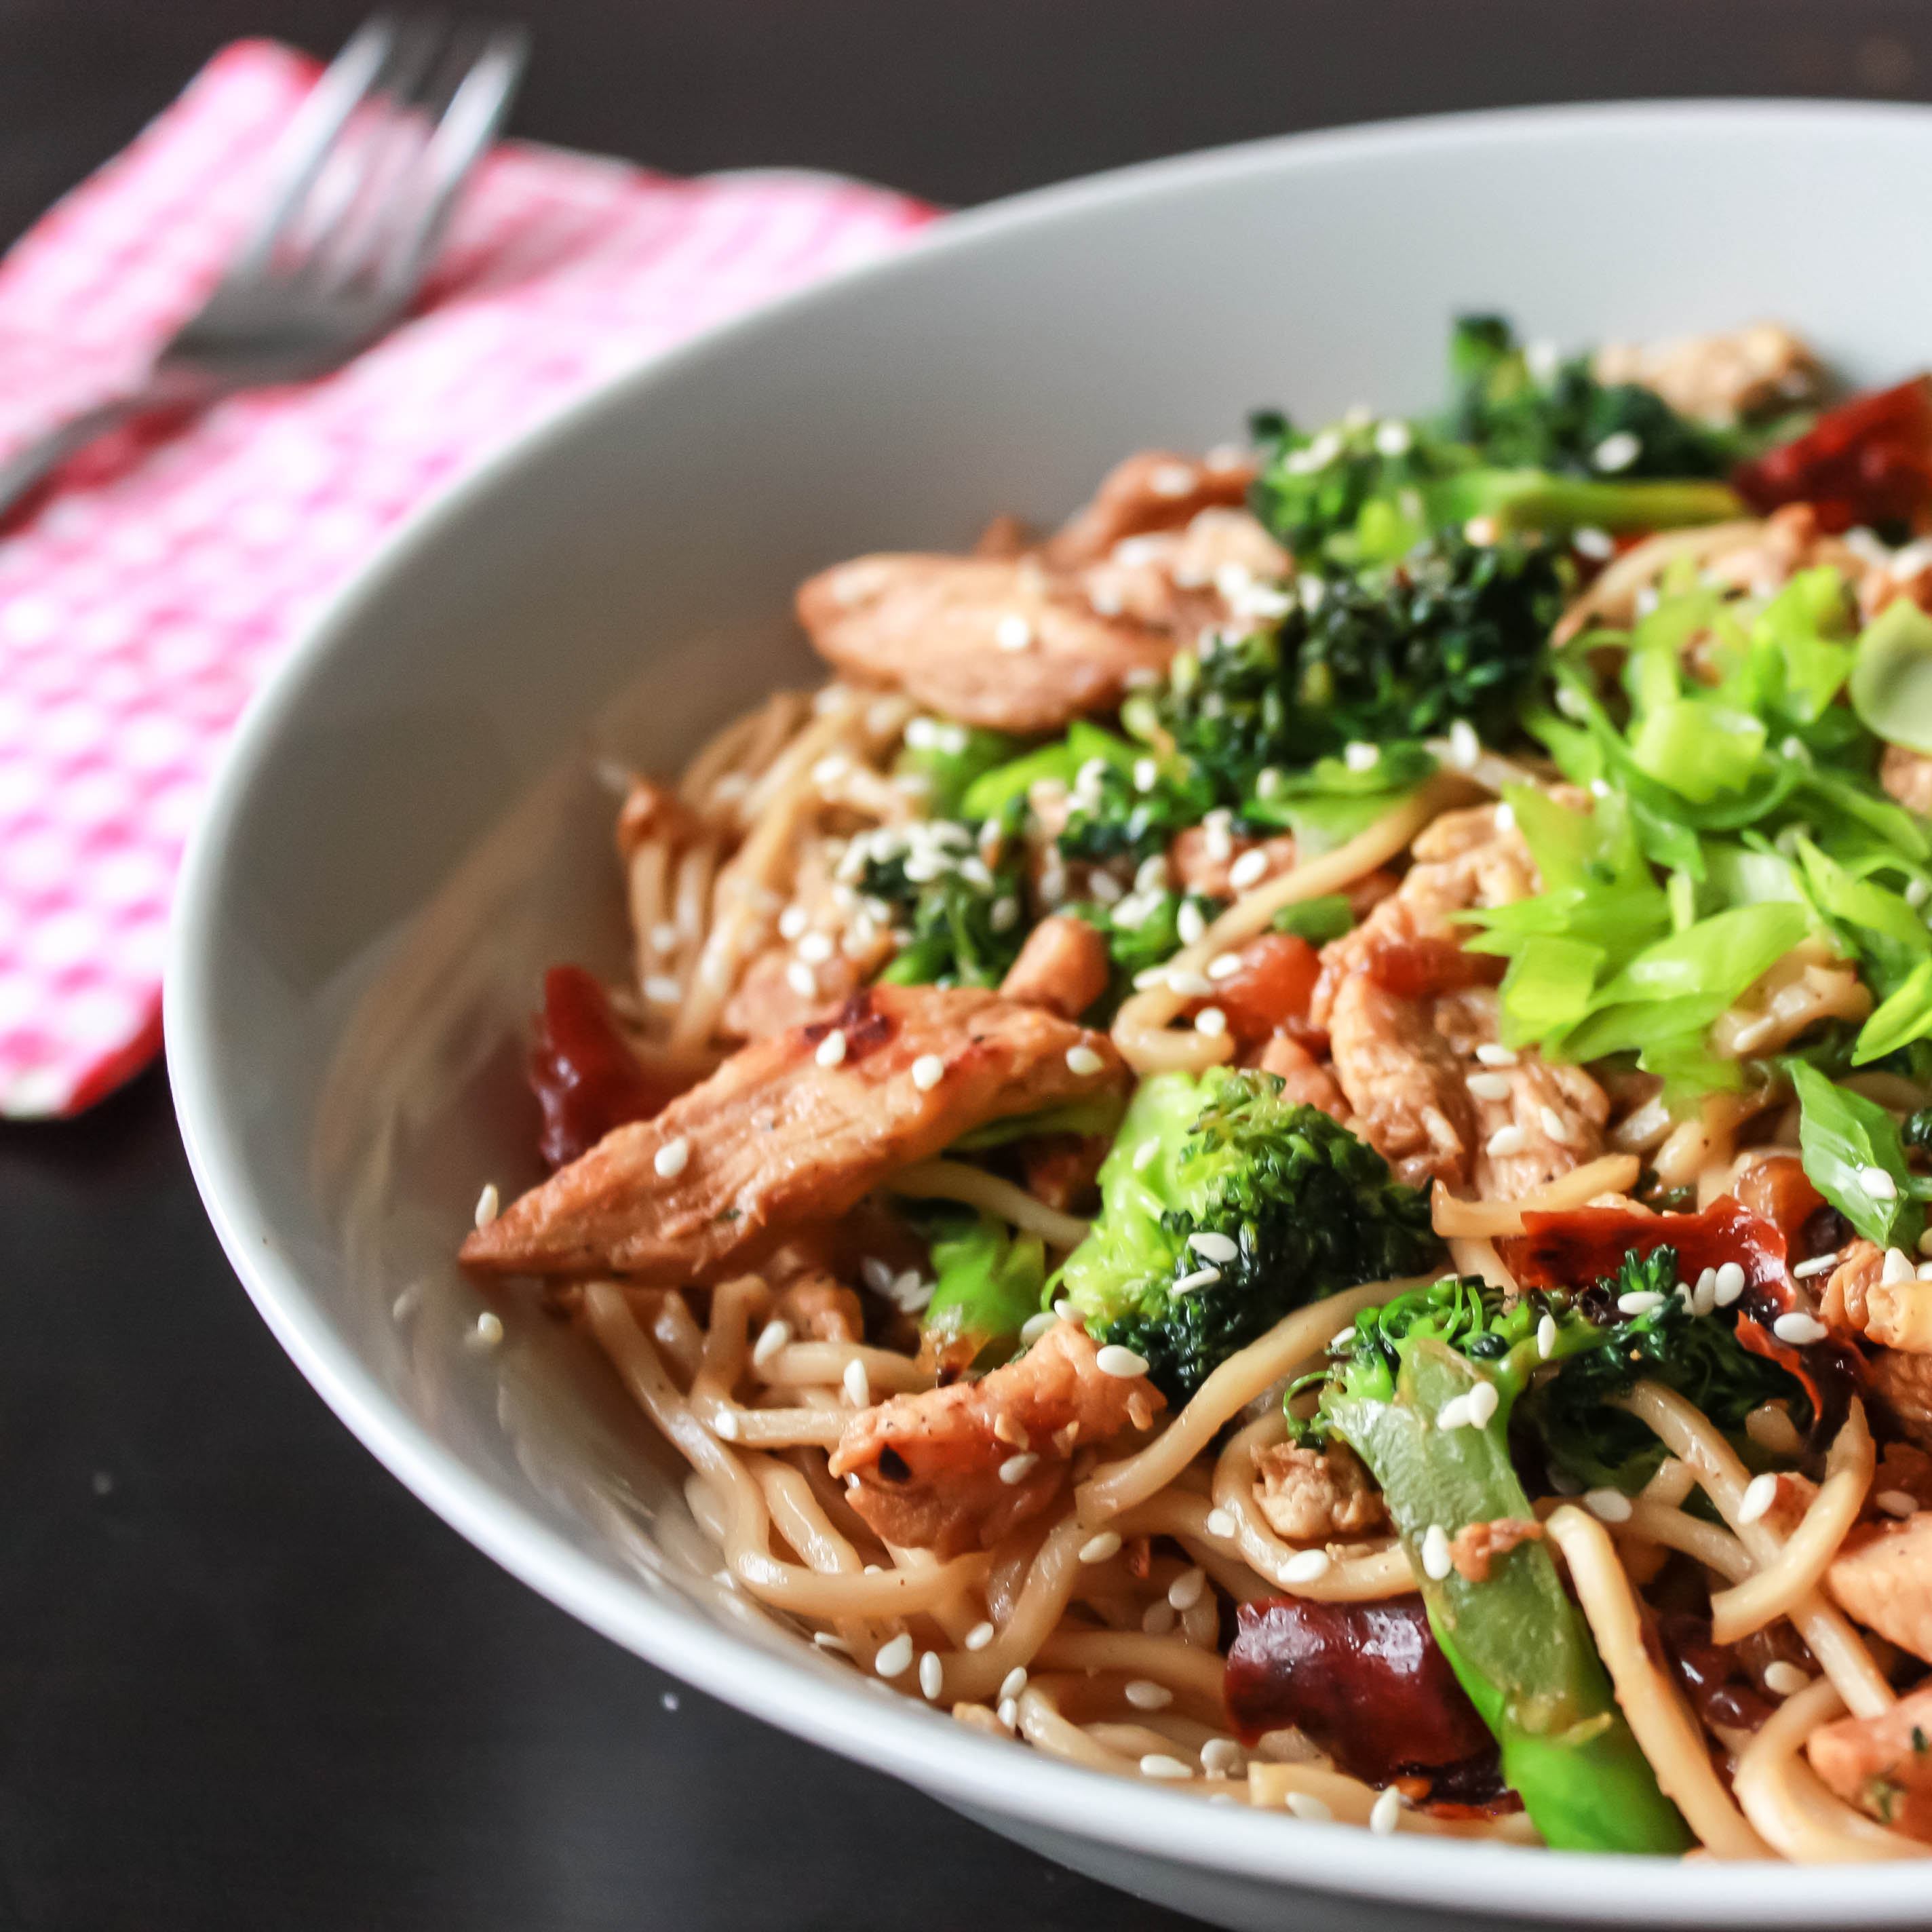
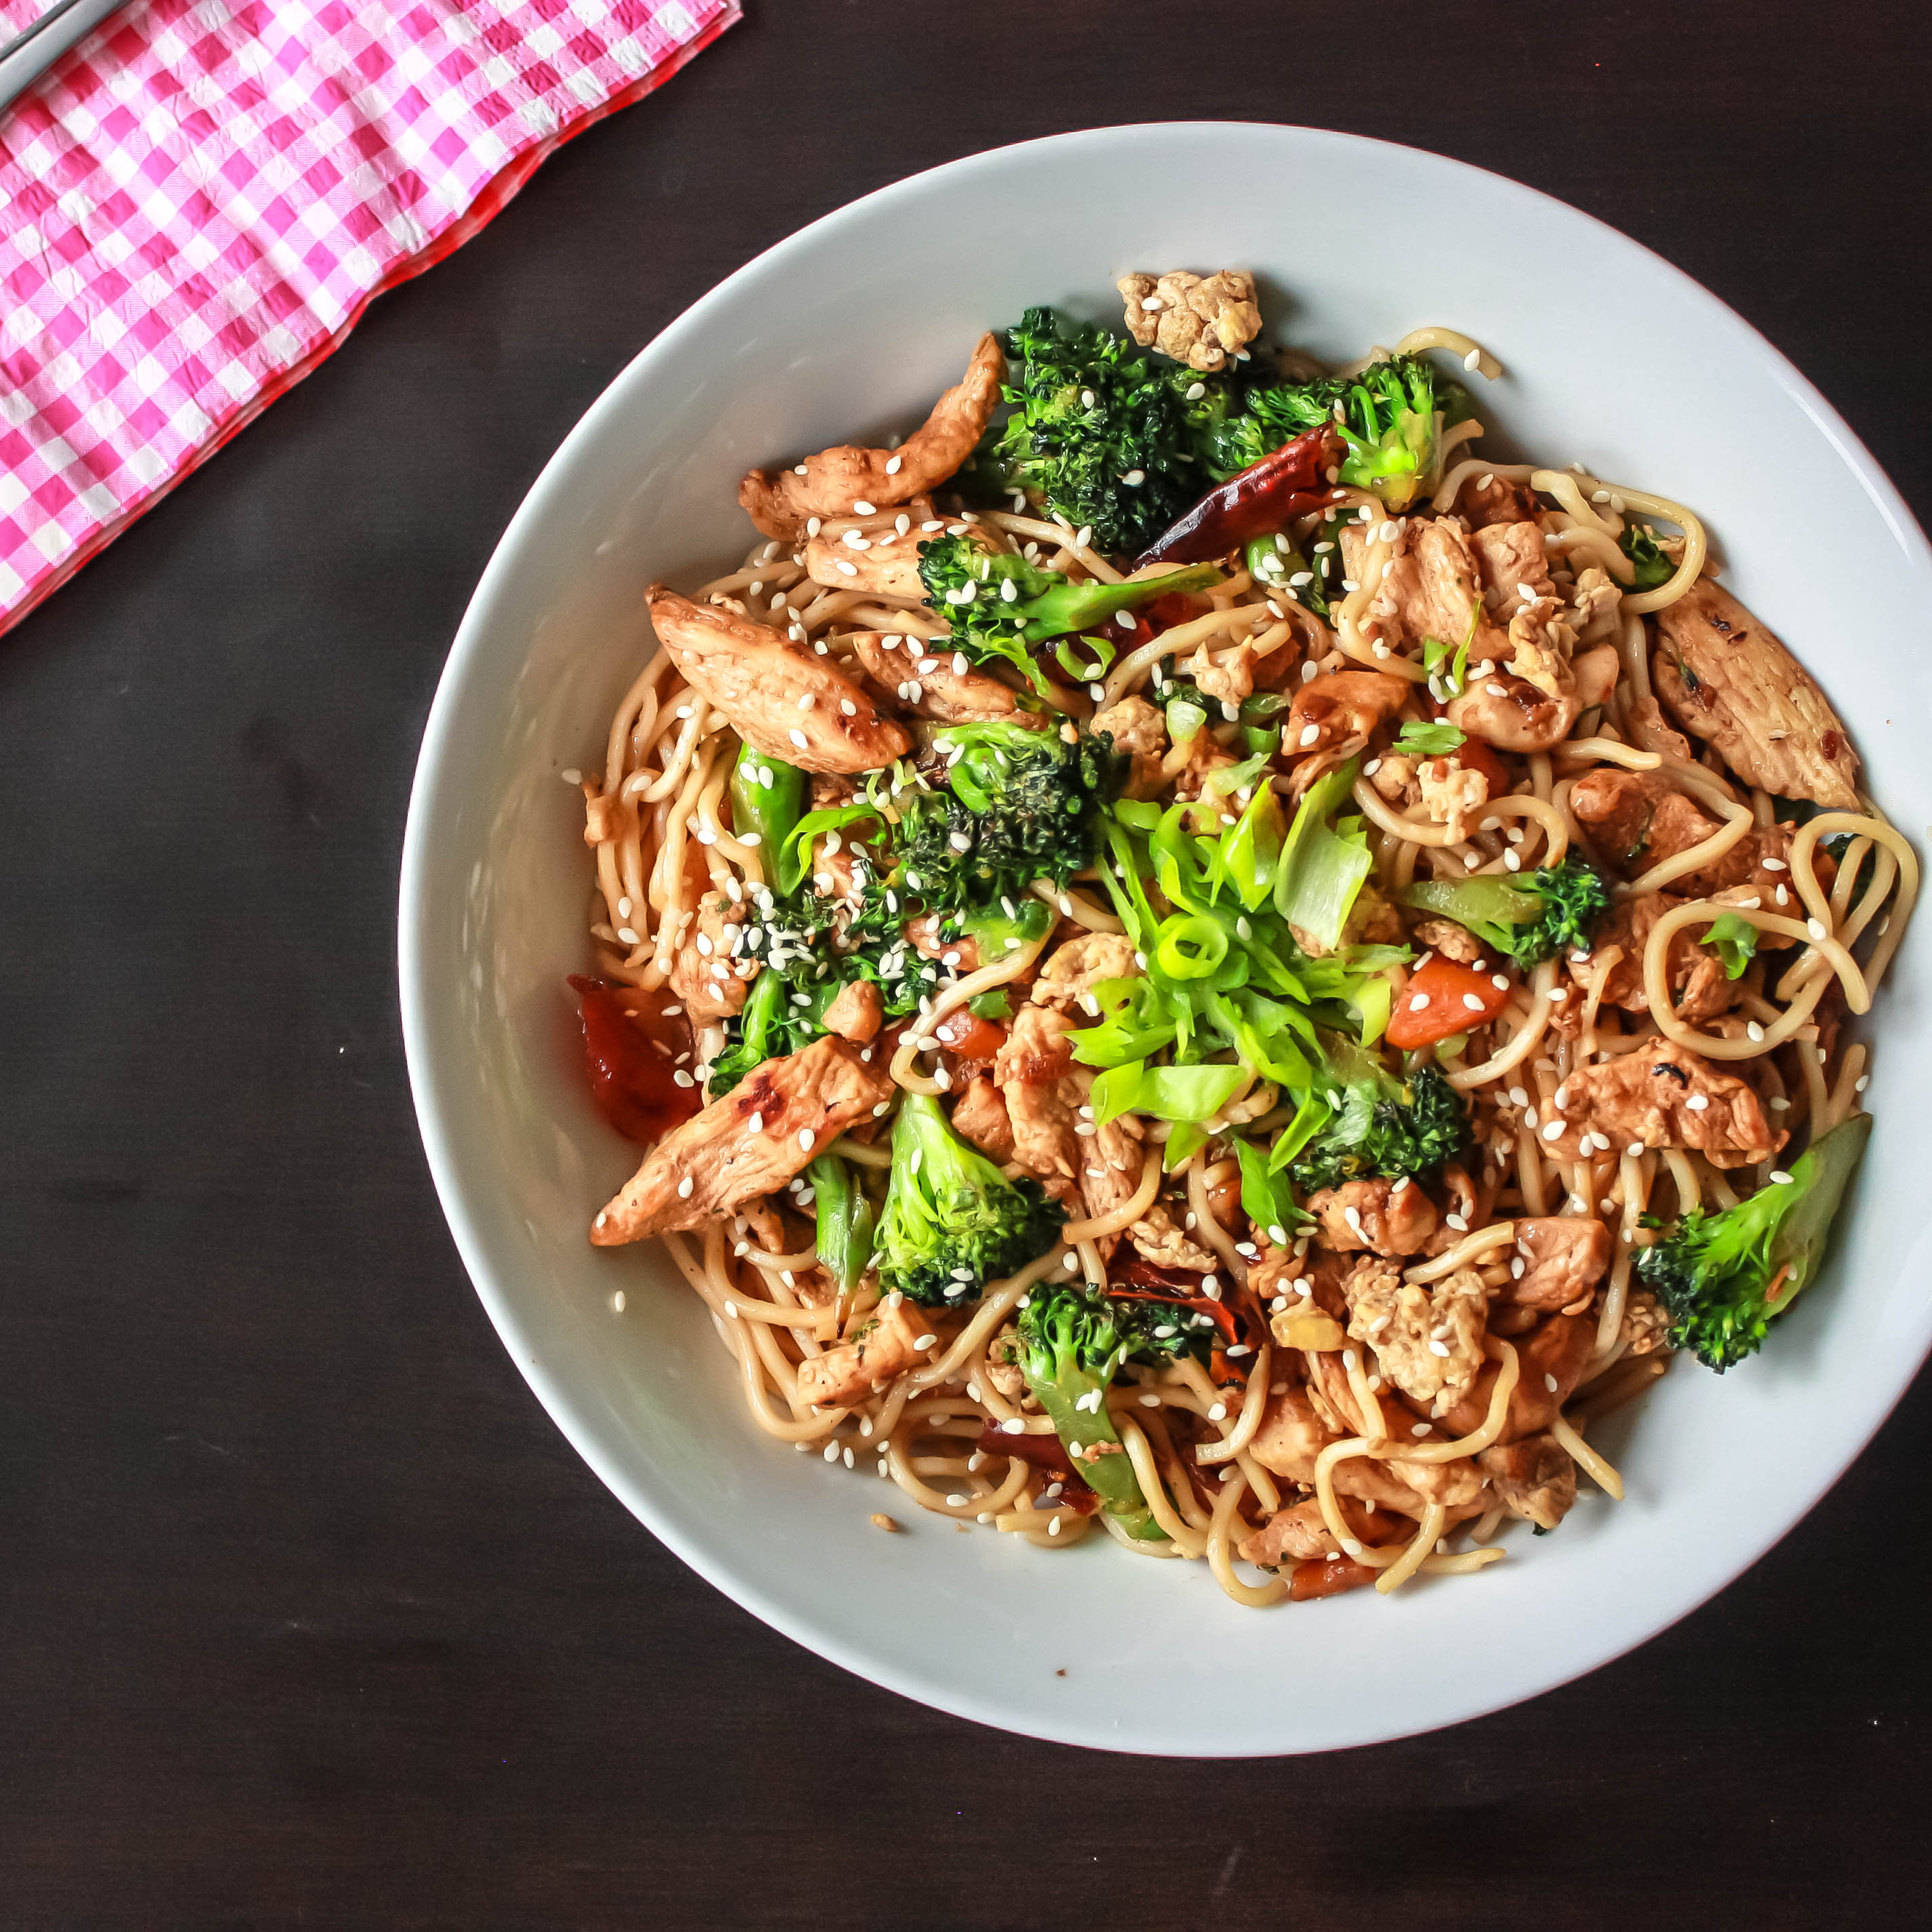
When you buy one chicken breast and try this recipe, it can easily serve two – three persons. This dish contains even distribution of noodles, garlic, chicken, broccoli, shredded carrot and egg. Lovely!  Make your dish with 1/3 rd noodles, 1/3rd vegetables and 1/3rd protein (chicken). This dish taken minutes to do, but my suggestion is to keep it organized so u can pull them in finger tips.

It looks colorful and very appetizing 🙂 Send me/ tag me if you make this recipe 🙂 I will be extremely happy to see your beautiful and colorful food 🙂


Print
CHICKEN STIR FRY EGG NOODLES
Author: Suganya Hariharan
Recipe type: Main
Cuisine: Asian
Prep time:  10 mins
Cook time:  20 mins
Total time:  30 mins
Serves: 3
 
Ingredients
  • Soy Honey sauce -
  • Ground black pepper corns.
  • Soy sauce – 3 tbsp
  • Black pepper corns – ½ tbsp. freshly grounded
  • Honey – 2 tbsp
    [other]
  • Noodles
  • Oil – 2 tbsp
  • Chicken Breast – 1
  • Garlic – 3 cloves
  • Ginger – 1 inch piece
  • Broccoli – 1 cup
  • Carrot – ½ cup shredded
  • Red chilli – 3 broken
  • Salt – very little ( as soy sauce has salt)
  • Pepper – a pinch
  • Egg - 2
  • Sesame seeds – to garnish
  • Scallions – to garnish (green part)
  • Lemon juice – Fresh to granish
Instructions
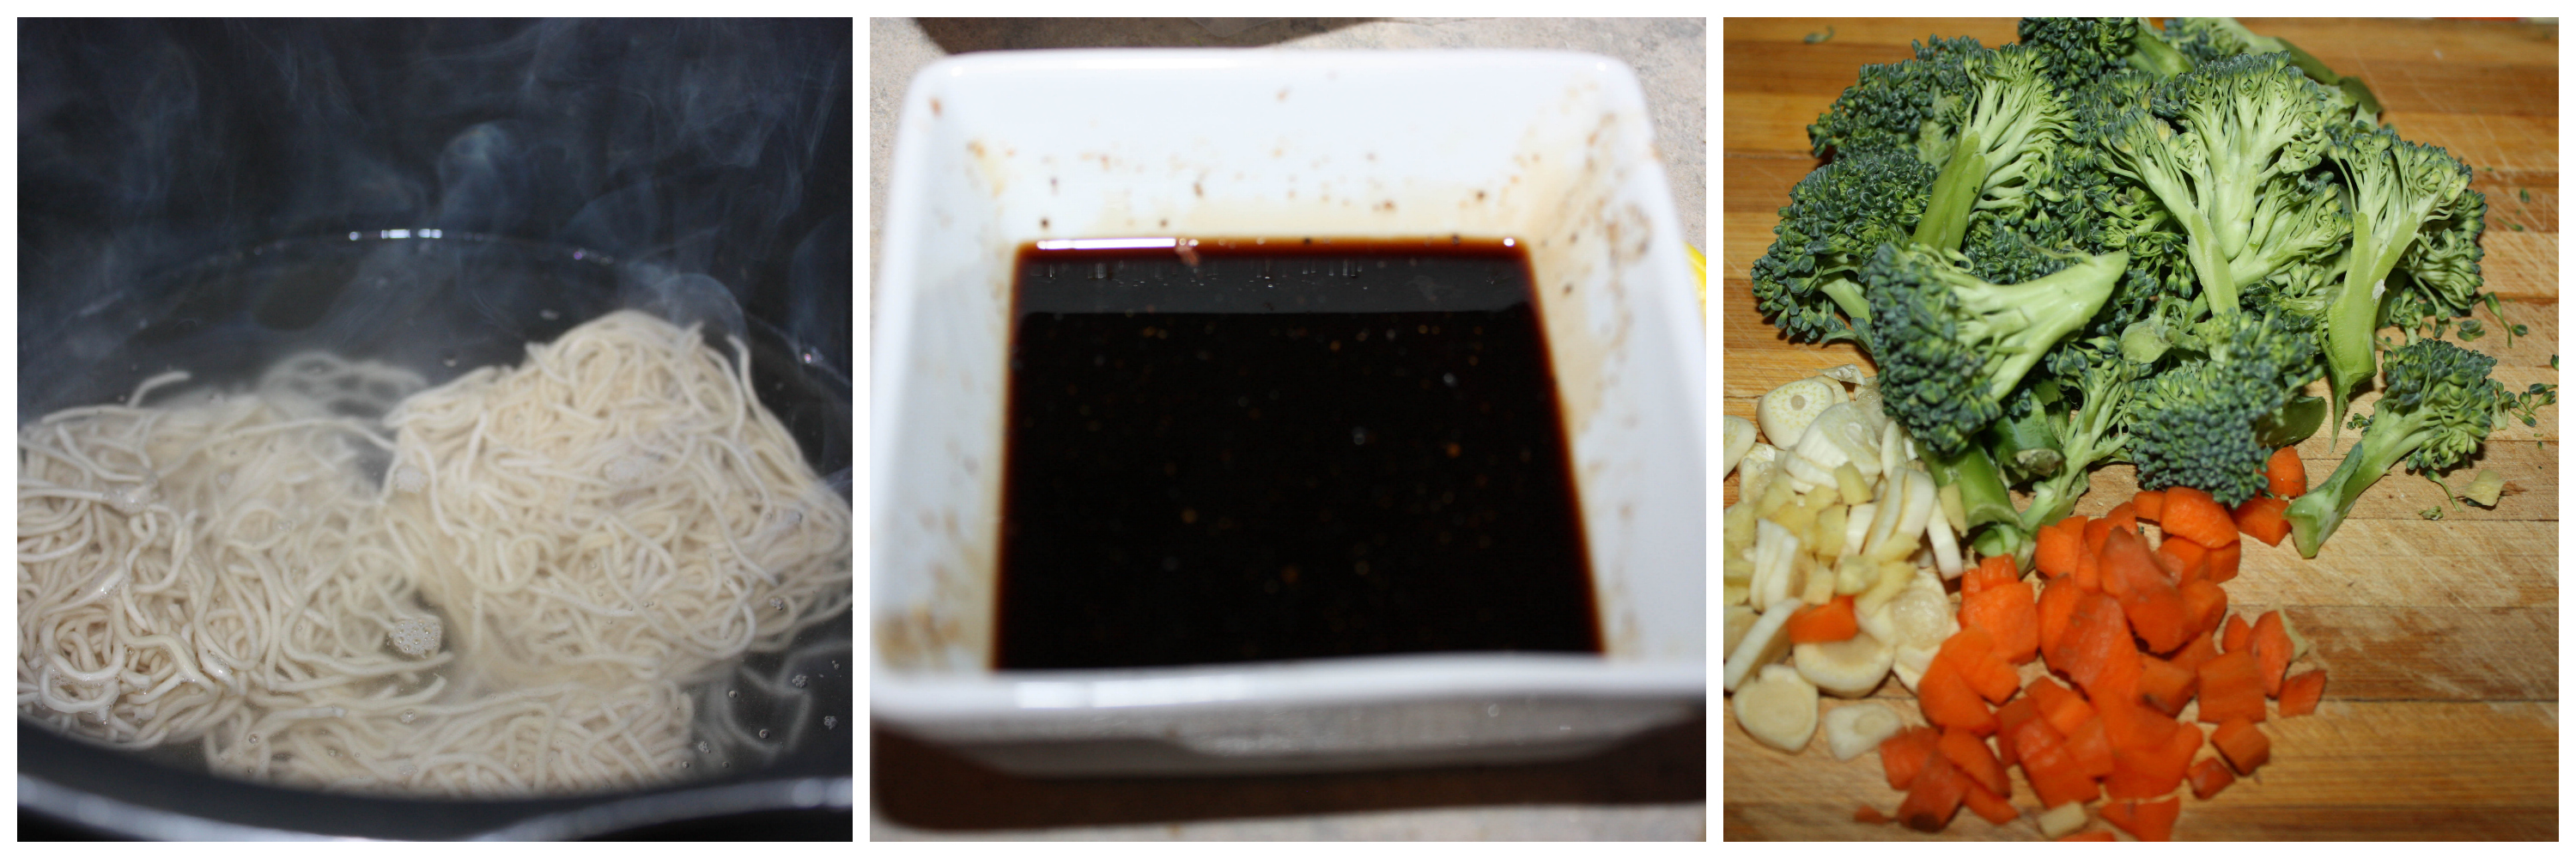
  1. Bring a large pot of water to boil, add the instant noodles and cook for two – three minutes. Drain them and rinse with cold water. This removes the starch and helps them stir fry.
  2. Mix the ingredients under “soy honey sauce”. And keep aside.
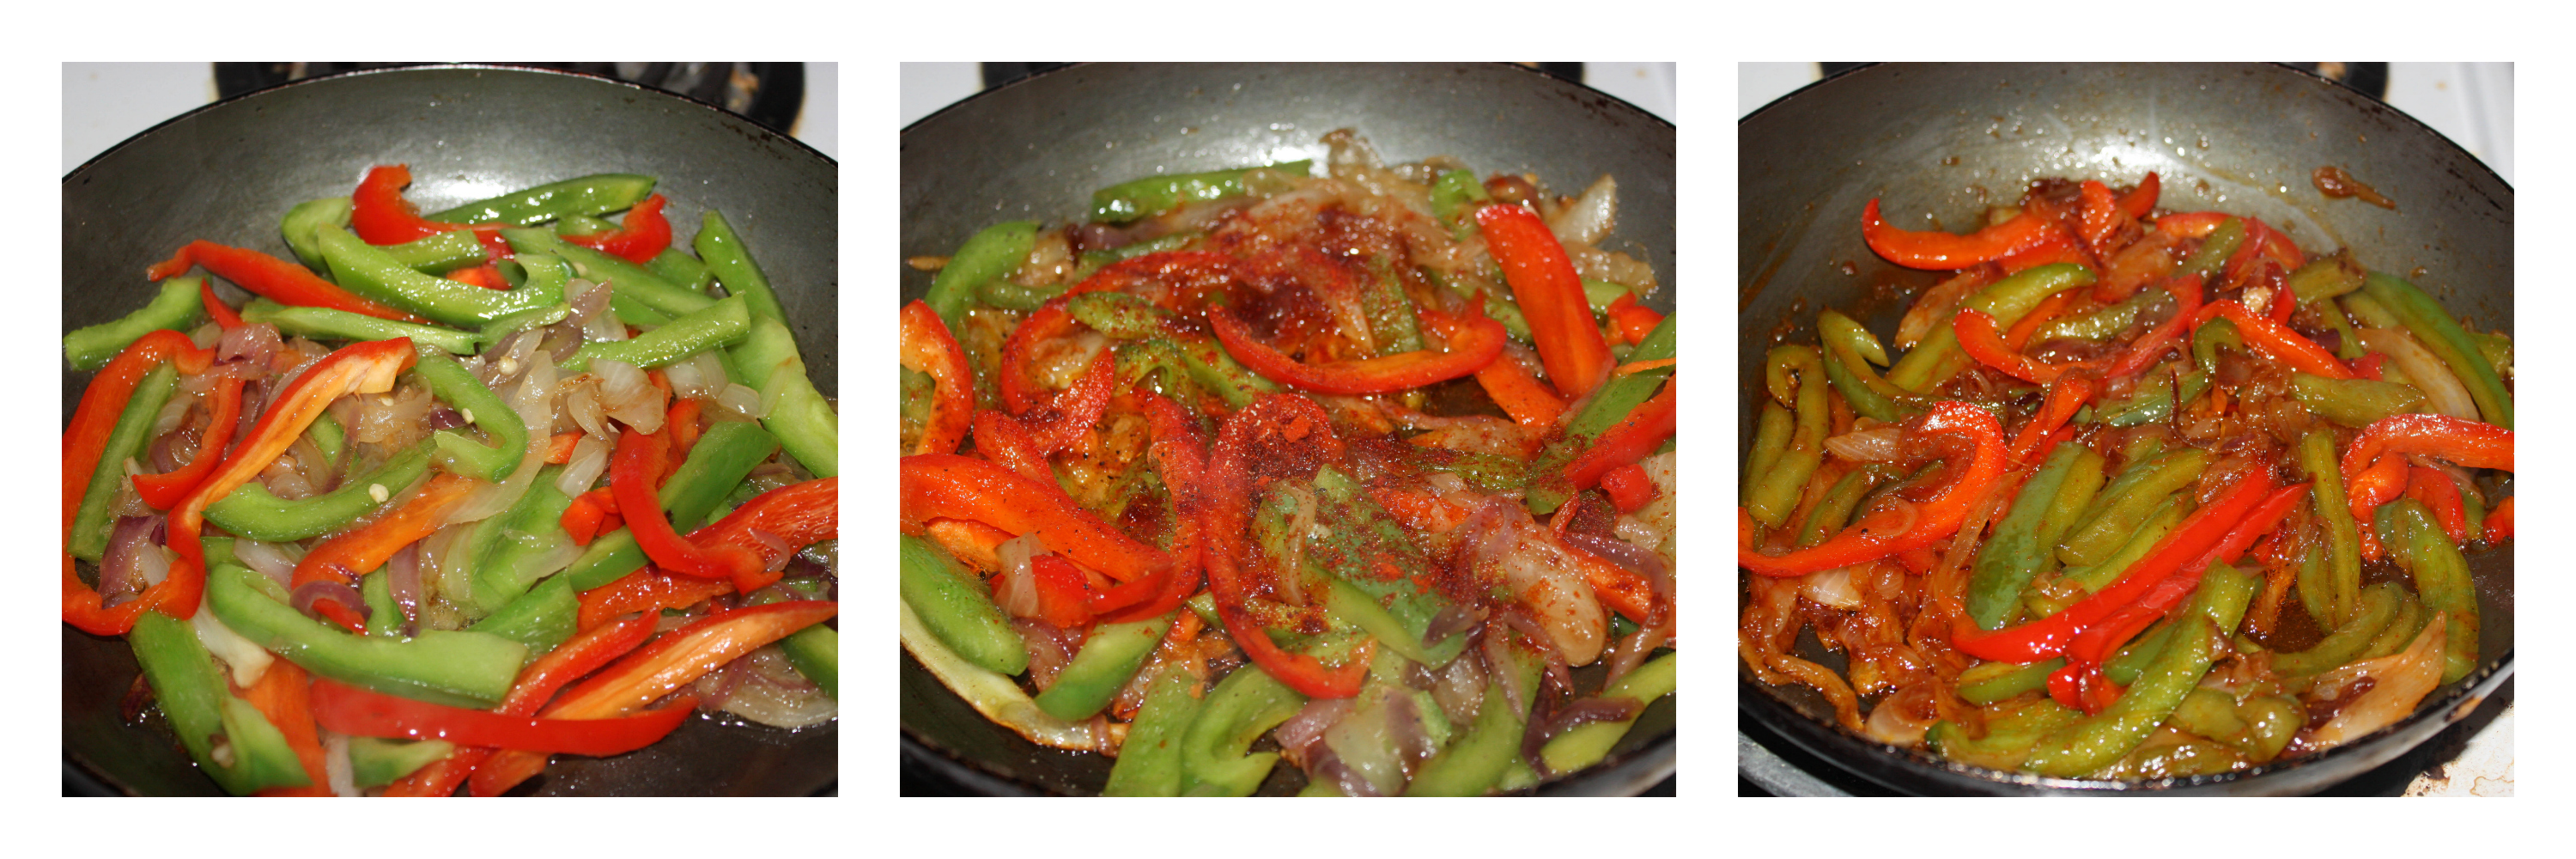
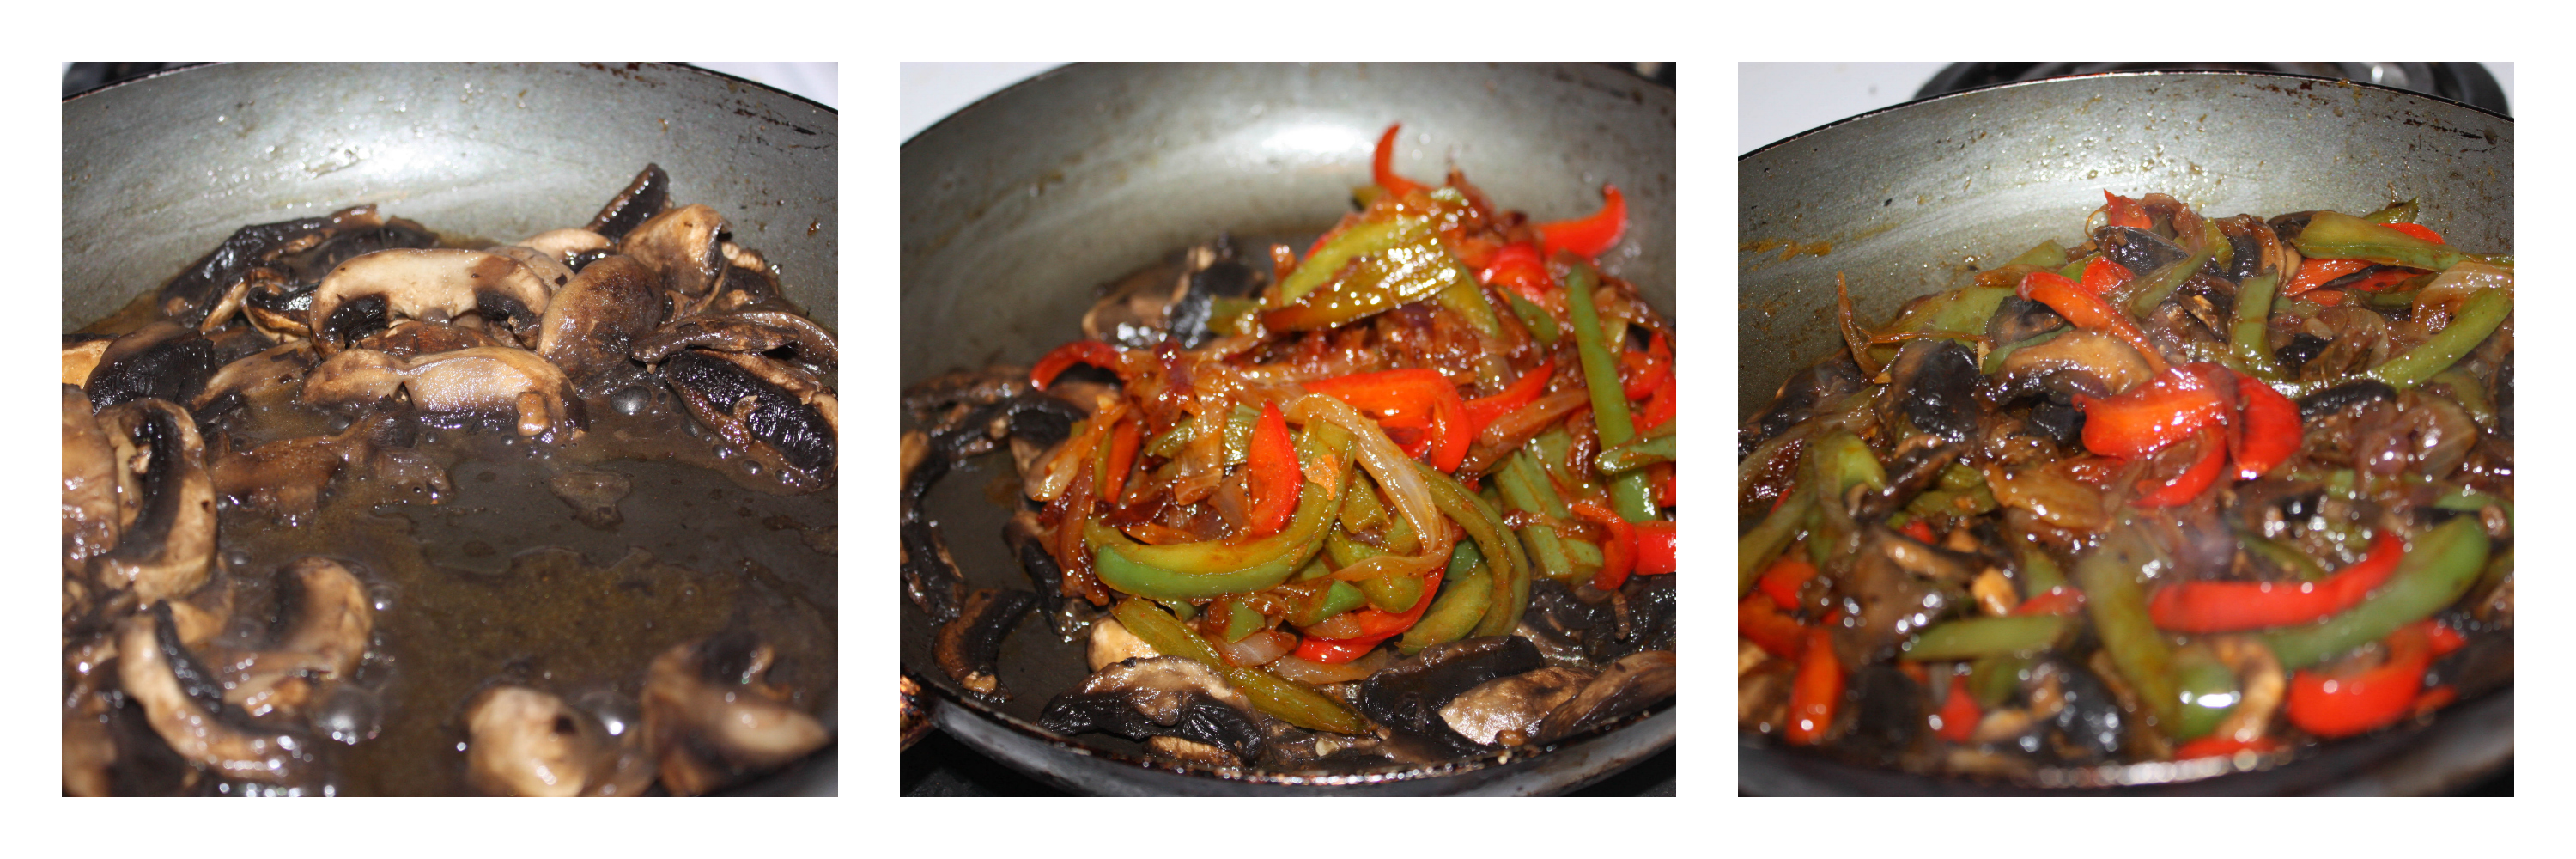
  3. Chop your garlic and ginger thin, the thinner the garlic and ginger, the crispier the taste. And chop your broccoli and slice them down. Shred ½ cup of carrot.
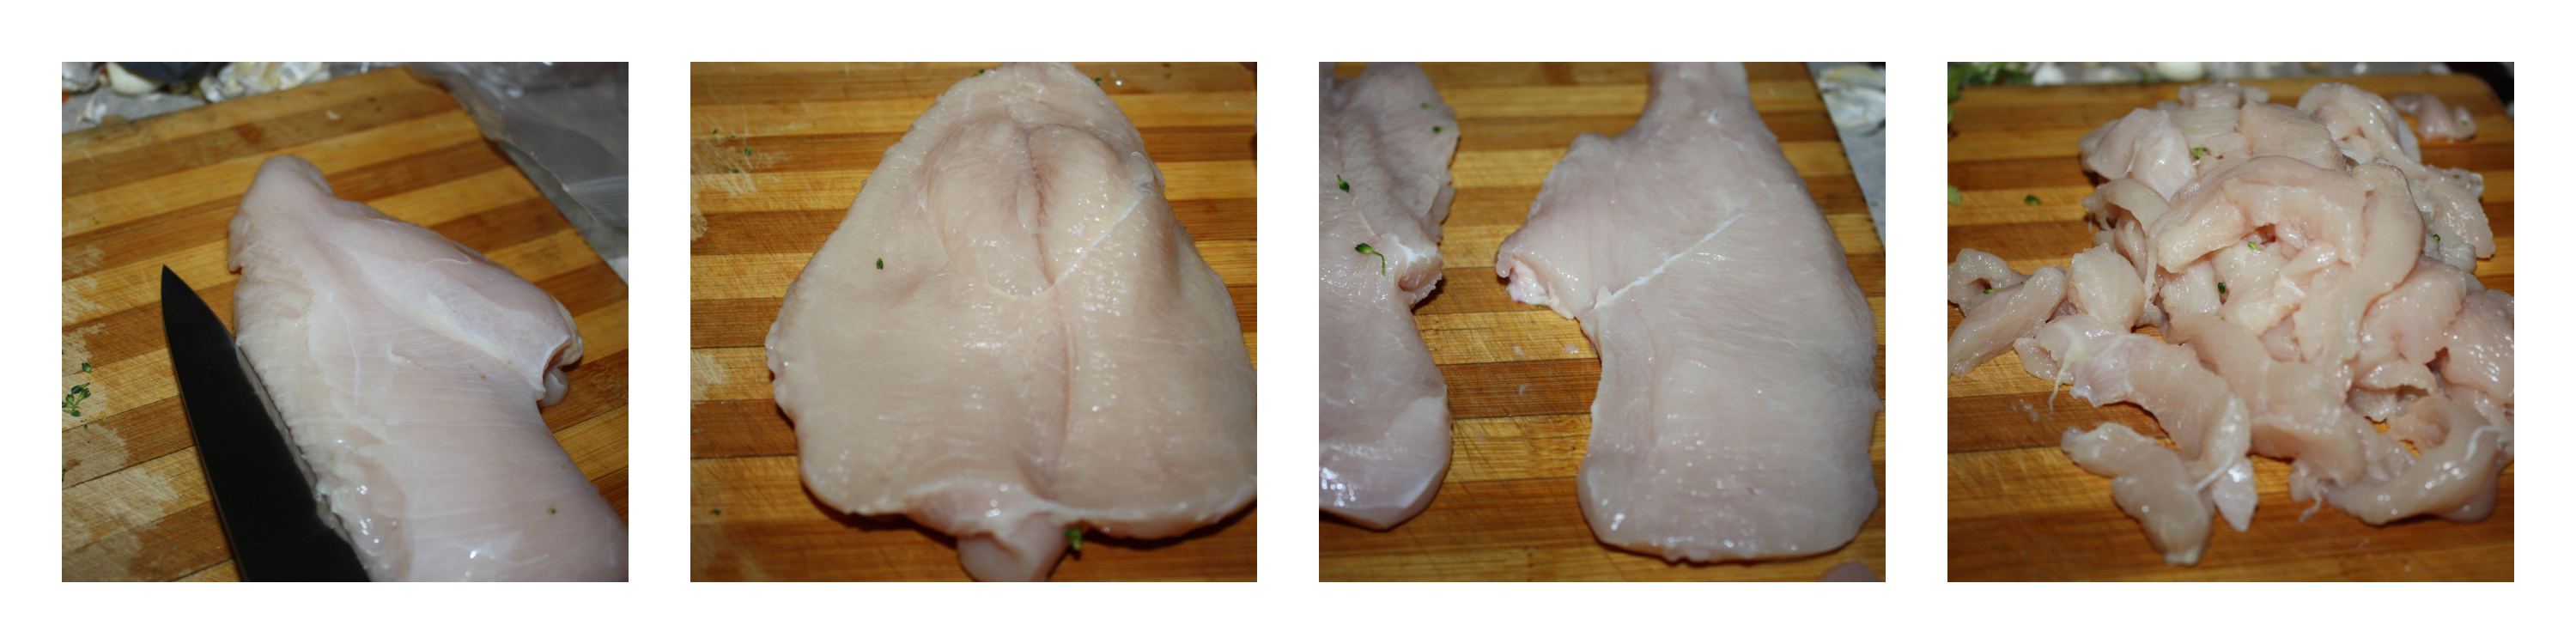
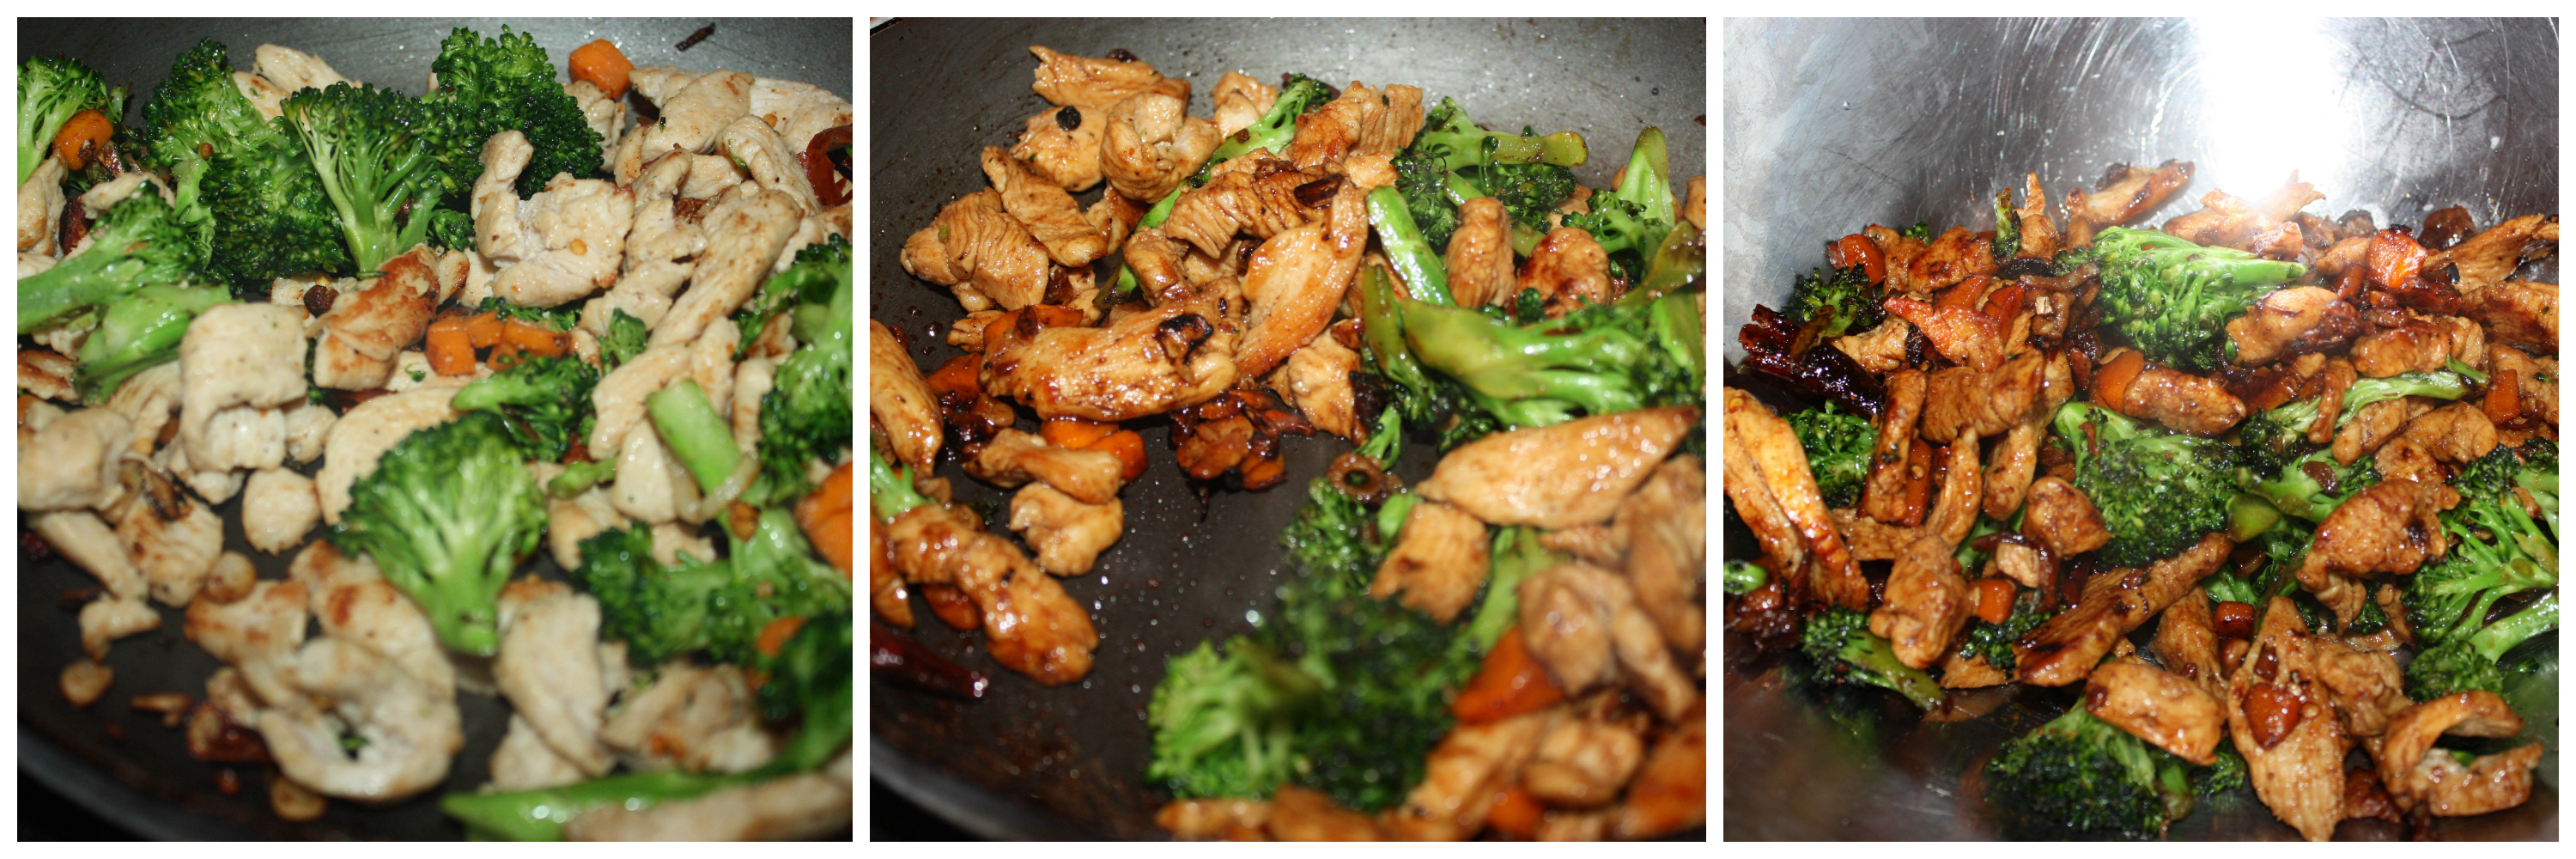
  4. Take the chicken breast, slice the fillet off. You need nice and thin strips of chicken. So, keep your chicken flat on the board, slice them half on the middle as shown. This is called butterfly in the chicken. Hehehe! Take a rolling pin, roll over it and flatten it. The thinner the slice, the crispier it is. Now take the chicken breast, slice them into thin strips.
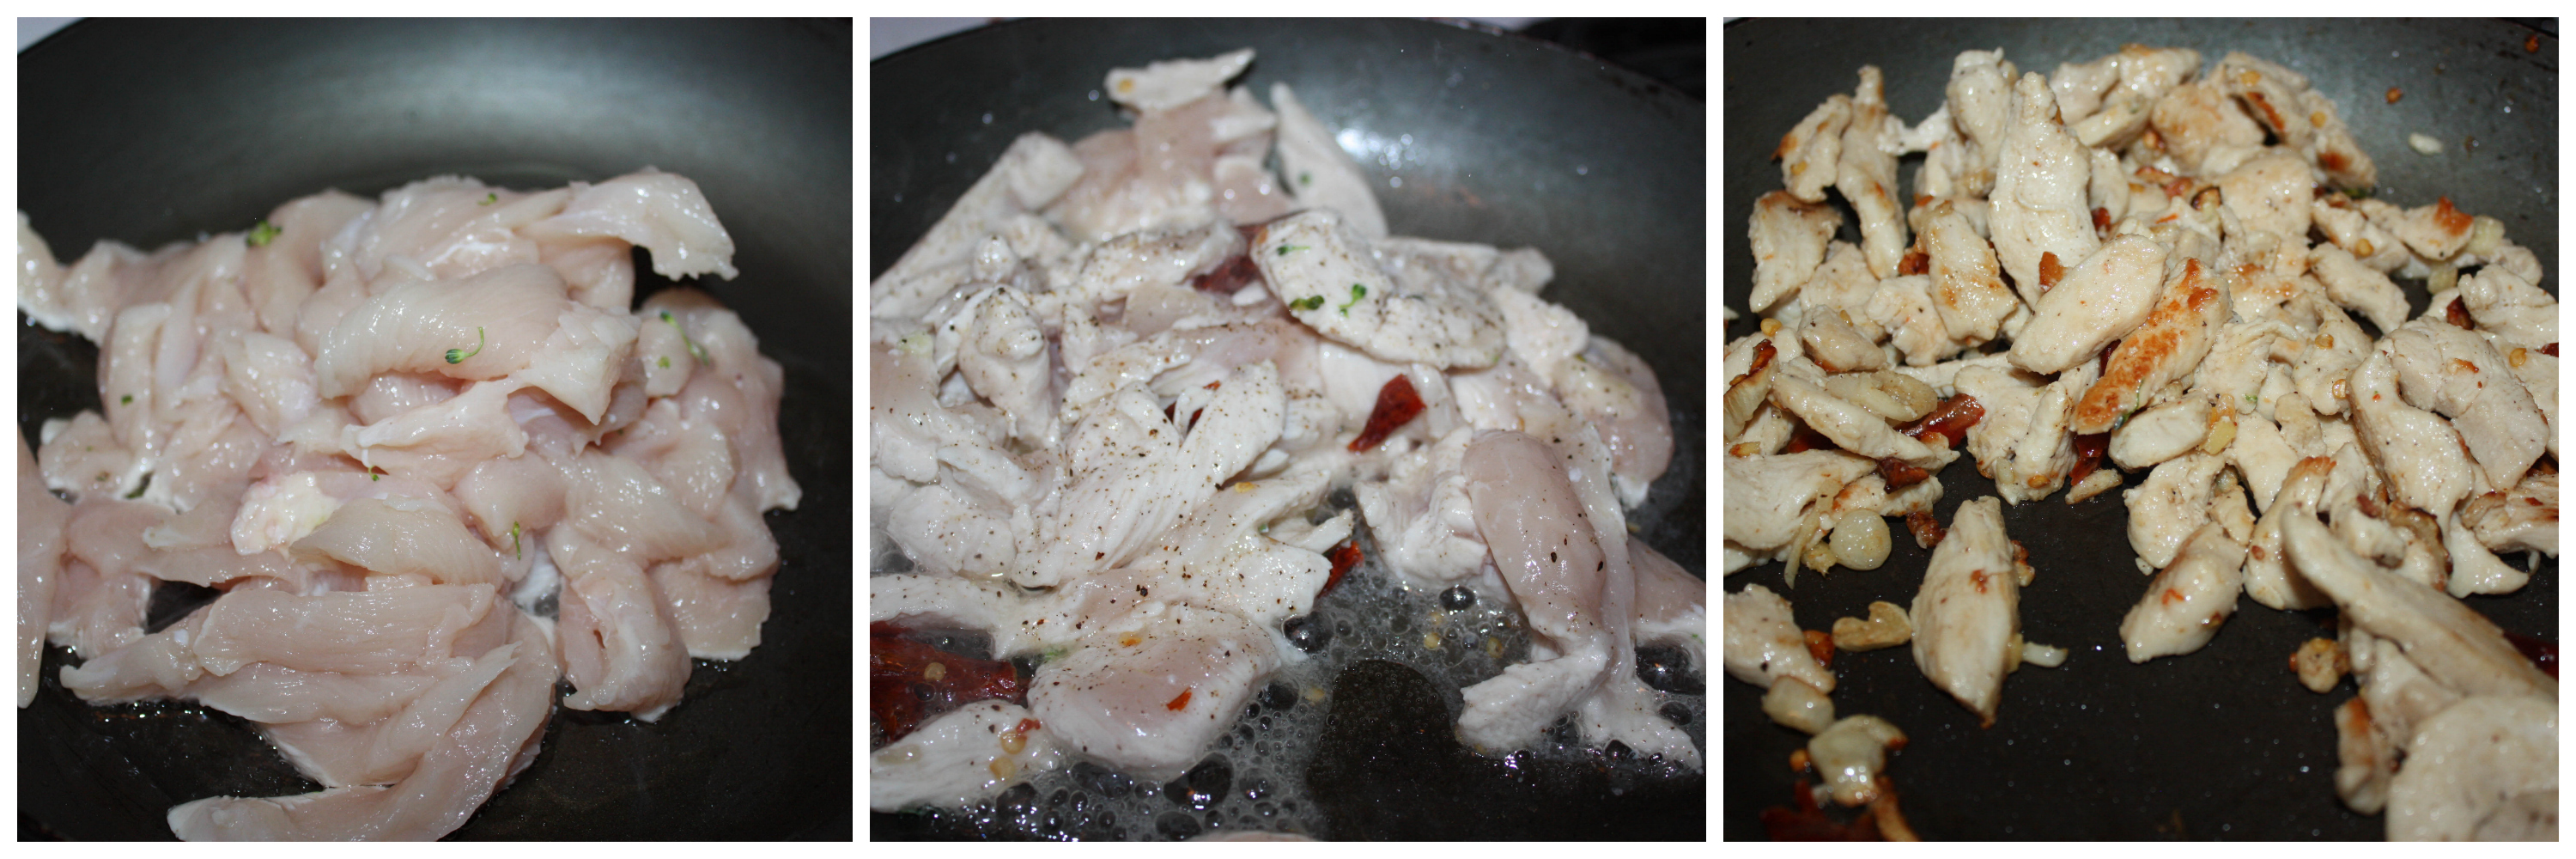
  5. Heat 1 tbsp oil on a hat pan/wok on a medium flame, add the red chillies and stir well for a minute. Add the chicken, some salt (add less salt, as soy sauce has some salt) and pepper. When it’s mixed, get the garlic in. If you cut both in thin strips, it takes same time to cook.
  6. When it gets crispy and little brown, add the broccoli and shredded carrots into it. You don’t have to boil them. That crunchy effect elevates the taste. Mix it well for a minute. And add soy-honey sauce to it. Mix well and pour this mixture onto a bowl and keep it aside.
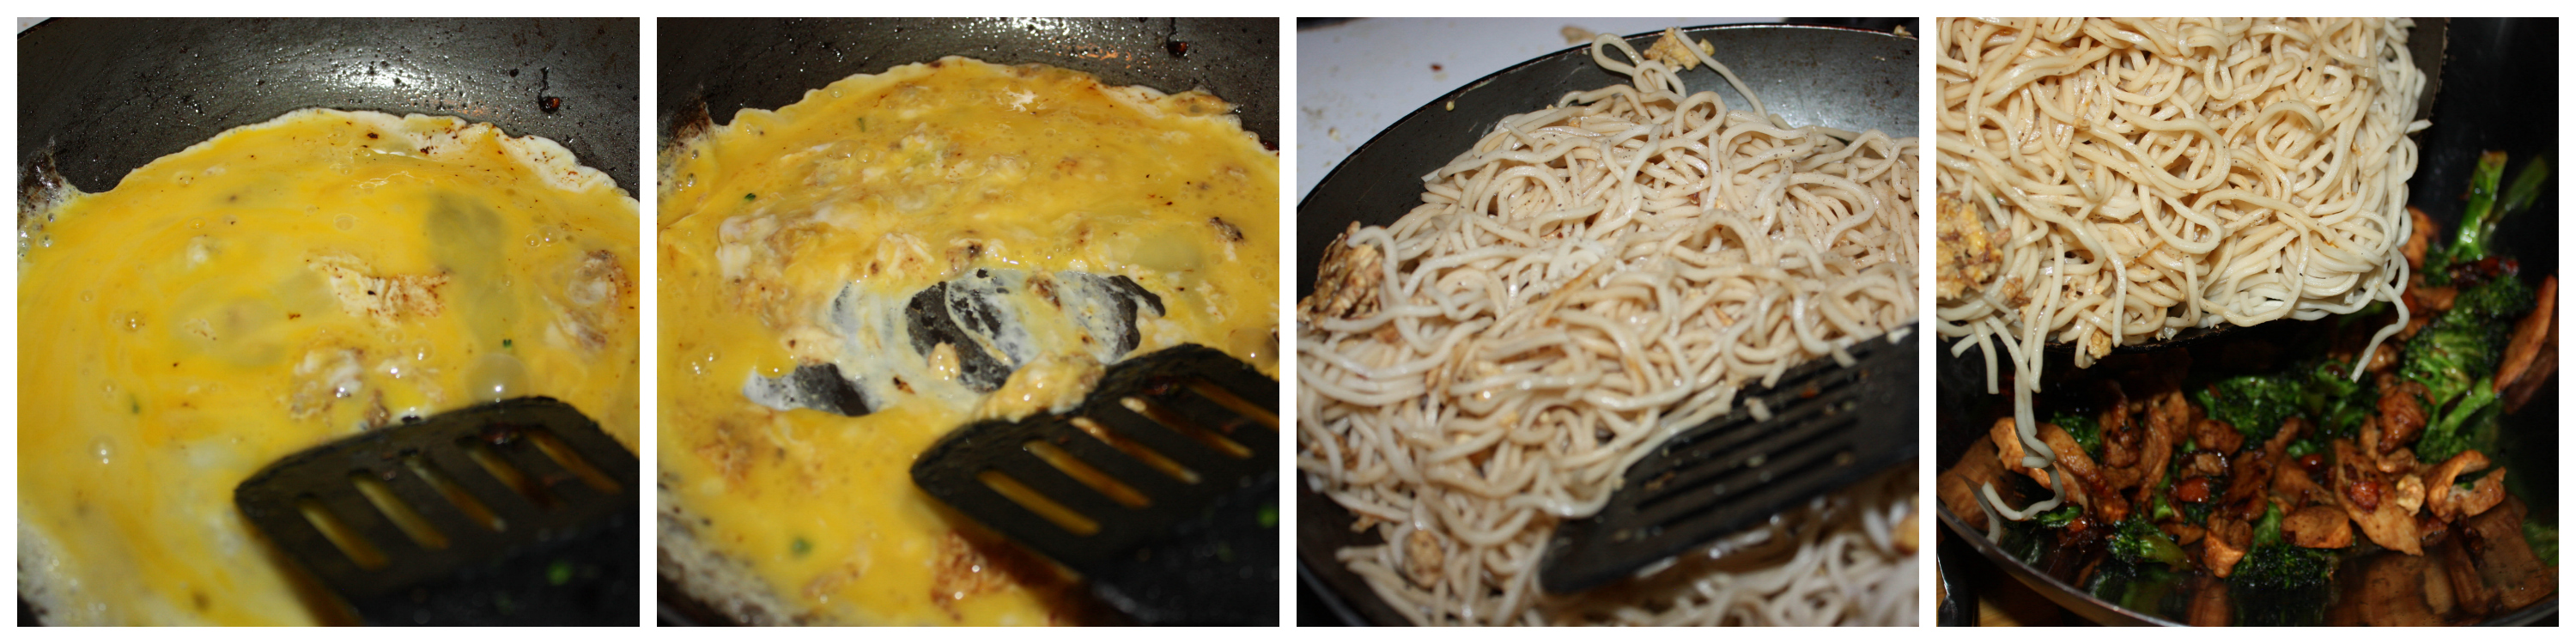
  7. Break two eggs and give that really good whisk.
  8. Use the same pan you used before. Wipe it with tissue and add 2 tsp of oil into it. Pour the whisked egg on it, season with little salt and pepper. Drop the noodles on it and give a quick stir. Add the stir fry chicken and vegetables. Bring them all together.
  9. Season with sesame seeds, chopped scallions juice and squeeze little fresh lemon juice.
Notes
1. Do note that the thin strips of chicken makes the chicken crispy and enhances the taste of this dish.
2. You can replace chicken with tofu and make this dish vegetarian stir-fry noodles.
Wordpress Recipe Plugin by EasyRecipe
3.2.1311

Chickenstirfry_Relishthebite-4-2

Filed Under: CHINESE ASIAN INSPIRED, NON-VEG RECIPES, NOODLES Tagged With: asian recipe, broccoli recipe, Chicken recipe, chinese noodles recipe spicy noodles recipe, egg noodles recipe, garlic recipe, quick and easy noodles recipe. recipe under thirty minutes, Spicy chicken recipe, stir-fry recipe, tasty and spicy recipe.

Mushroom Pepper Mini Quesadilla

September 8, 2014 by Suki 4 Comments

Quesadilla_Relishthebite

Quesadilla_RelishthebiteI’ve always loved Mexican food as I mentioned in my taco recipe. 🙂 But there is just something nice about a golden brown cheesy quesadilla! It always makes me go cRaZyyyyy! I am not sure if there is an authentic quesadilla recipe 😉 I guess just the taste matters to us.;)

This recipe contains sauted mushrooms+ onions +peppers +tortilla +CHEESE + toppings 🙂 I have tried many fillings and this is my personal favourite 🙂 If your quesadillas or for that matter any cheese sandwiches, when they leak cheese out of the edge and that that cheese is fried against tortilla.. sooper crispy.. That is heaven to me 😀 ! If you are a cheesy favorite person you will understand what I am trying to convey here 😀

Quesadilla_Relishthebite-19Quesadillas at their base are two tortillas filled with cheese and other veggies and they are toasted until the tortillas are nice and golden brown and the cheese has melted. I usually do quesadillas with wheat flour tortilla. But today I did with corn tortilla. Those are the tortillas that were left in the freezer after my tacos I did before few days. You can very well use the same recipe with wheat flour tortillas.

So with these corn tortillas I did a mini quesadilla. 🙂

No more delay, I am going to the recipe straight 😀

5.0 from 1 reviews
Print
MUSHROOM PEPPER MINI QUESADILLA
Author: Suganya Hariharan
Recipe type: Main
Cuisine: Mexican
Prep time:  10 mins
Cook time:  40 mins
Total time:  50 mins
Serves: 5
 
Ingredients
  • Yellow onion – 1 cup
  • Bell peppers – 1 cup (used both yellow and red)
  • Mushrooms – 2 cups ( sliced)
  • Butter – 3 tbsp
  • Olive oil – 1 tbsp
  • Tortillas – 10 corn tortillas
  • Cheese –1 ½ cup (shredded)
  • Chilli powder – 1 ½ tsp
  • crushed pepper – ½ tablespoon
  • Sour cream - to garnish
  • Spring onions - to garnish
  • Cilantro - to garnish
  • salt - as needed
Instructions
  1. Onion-Pepper preparation: Slice the onion and pepper into thin strips. Heat the olive oil in a wide pan, add the onions and a dash of salt and sauté them for 4-5 minutes over medium heat or until it gets soft. Then add the peppers and sauté them for 5 minutes until it becomes kind of roasted outside and soft. Add the chili powder and crushed pepper. Cook for five minutes. Switch off and Keep it aside.

  2. Mushroom preparation: Clean the same pan by wiping with a paper towel. Add one tablespoon of butter and add the mushrooms. Sauté them until it become soft. Keep it aside. Add the onion pepper that we kept aside on top of it. Give a stir and switch off.
  3. Tortilla plating preparation: Place one tortilla; keep some cheese on top of it, then some mushroom onion pepper. Then place some cheese on top of that and another tortilla on top of it. Arrange them all and keep aside.
  4. Final step: Heat a medium skillet on the stove over medium heat. Place one quesadilla preparation into the pan. If you have bigger one like this, you can cook like this. So, cook them for few minutes, and then flip carefully with a spatula. Cook for two minutes and switch off. Let the quesadillas cool on a cutting board for a few minutes, and then slice each quesadilla into four slices using a pizza cutter or a very sharp knife. Garnish with sour cream, spring onions and coriander.
Notes
1. You can garnish with anything you fancy. You can use guacamole.
2. For mini quesadillas, you have to use corn tortillas or use wheat tortillas and cut many pieces.
3. You can use wheat flour tortillas or corn tortillas.
4. You need to put cheese on the bottom and top of the onion-pepper-mushroom preparation for it to stick between tortillas.
5. Be careful when you flip the tortillas. It may slip easily.
Wordpress Recipe Plugin by EasyRecipe
3.2.1311


Quesadilla_Relishthebite-20

Filed Under: PASTA PIZZA & TACOS Tagged With: cheesy recipe, mexican recipe, mini quesadilla recipe, mushroom recipe, PEPPER RECIPE, Quesadilla recipe, quick mexican recipe, quick quesadilla recipe, tasty recipes, Vegeterian quesadilla

Grilled Peach and Pecan Walnut Crumble

September 6, 2014 by Suki 2 Comments

Peach_crumble_Relishthebite_name2

Peach_crumble_Relishthebite_name2It was really hot yesterday for us in Montreal. And I wanted to have something to cool it. 😀 Reason to have icecream 😉 ! Summer and Peach ice-cream crumble are made for each other, I should say. It is a straightforward recipe and mouthwatering :D. Ten minutes baking is required. You can even do this without baking. You can top this crumble with any fruit you fancy 😀

I used walnut and pecan. You can just use even one of them on your recipe.This recipe is simple and really tasty. You can have just the fruits and crumble. Or you can serve this with ice cream. But personally I feel the fruit combo with ice cream gives a exceptional taste. You can store this crumble on an airtight container for a week.

Print
GRILLED PEACH AND WALNUT PECAN CRUMBLE
Author: Suganya Hariharan
Recipe type: Dessert
Prep time:  5 mins
Cook time:  25 mins
Total time:  30 mins
Serves: 6
 
Ingredients
  • Peach – 4
  • Maple syrup
  • Brown sugar – 4 tbsp
  • Cinnamon – 1 tsp
  • Walnuts – ½ cup
  • Pecans – ½ cup
  • Flour – 4 tsp
  • Oats – 1 tsp
  • Salt – a pinch
  • Butter – 2 tbsp
  • Icecream – I used French vanilla, use whatever you like
Instructions
  1. Preheat oven to 350°F
  2. Mix the walnuts,pecans, flour, cinnamon, brown sugar and salt. Pulse them once in a blender or use a roller to blend them into a coarse texture. Don’t make them smooth. It will spoil the crumble.
  3. Mix the butter and oats to it. Keep it aside
  4. Grease your baking pan with oil and place the crumble mixture to it. And place it in oven for ten minutes.
  5. Remove from oven after ten mins.
  6. Meanwhile, slice your peaches, mis them with maple syrup and ½ tsp of cinnamon. Grill for few minutes on each side.
  7. Serve the peaches with some crumble and scoop of ice cream. The way I served them was some crumble, then grilled peaches, ice-cream, some crumble, grilled peach,, scoop of icecream and crumble on top.
Notes
1. Crumble can be stored at room temperature for a week.
2. You can use any fruits, icecream you fancy.
Wordpress Recipe Plugin by EasyRecipe
3.2.1311


Peach_crumble_Relishthebite_name1

Filed Under: BAKED RECIPES, DESSERTS Tagged With: cinnamon recipe, crumble recipe, dessert recipe, dessert with iceceam, grilled peach recipe, peach dessert recipe, peach recipe, quick dessert recipe, Walnut pecan recipe

Potato Sukka/ Potato Dry roast

September 5, 2014 by Suki 8 Comments

Potato Sukka_Relishthebite-8_name

Potato_Sukka_withname

Potatoes are the easiest ones to cook and also one of the most favourite vegetables of all especially the kids. And it’s really hard to go wrong with recipes when we have potato as our ingredient. It will be tasty always. There are loads of ways to do potato roast. I usually have this potato sukka with roti or rasam. There are lots of dishes that we can do with potato. This one is my personal favourite. All the herbs and spices go well into the potato and makes it even more tastier. It is simple and tasty to eat having a lot of flavors going into our mouth 🙂 If you see, all the veggies i used are sliced and not chopped. Thats a secret of this dish 😉 i would say!


5.0 from 1 reviews
Print
Potato Sukka
Author: Suganya Hariharan
Recipe type: Sides
Cuisine: Indian
Prep time:  5 mins
Cook time:  20 mins
Total time:  25 mins
Serves: 4
 
Ingredients
  • Oil – 2 tbsp
  • Mustard seeds – 1 tsp
  • Urad dal – 1 tsp
  • Cumin seeds – 1 tbsp
  • Onions – 1 sliced
  • Garlic pods – 6 sliced finely
  • Ginger – 1 inch sliced finely
  • Green chillies – 2 sliced finely
  • Curry leaves – 8 sliced finely
  • Coriander leaves – ½ cup chopped finely
  • Turmeric Powder – ½ tsp
  • Potatoes – 4 sliced
  • chilli powder – 1 ½ tbsp
  • salt
Instructions
  1. Heat some oil in a pan, add mustard seeds and urad dal and wait till it crackles.
  2. Add the cumin seeds,onions,garlic, ginger, green chillies, curry leaves, coriander leaves, salt and turmeric powder. Fry them till the onions get slightly brown.
  3. Add the potatoes and chilli powder. Pour ⅛ cup of water. Close the lid and boil them in medium flame.
  4. Open it after ten minutes and mix them. Wait till the bottem parts of potatoes get little brown evenly. Mix them and switch it off.
Notes
1. Do not add more water. You don't want the potatoes to be mushy for this recipe.
2. Slice the vegetables at equal length , it will give great presentation to the whole dish.
Wordpress Recipe Plugin by EasyRecipe
3.2.1311


It goes well with rotis,rice or with dal or rasam.

Potato Sukka_Relishthebite-7

Filed Under: DRY CURRY SIDE DISH/ STIR-FRY, SIDES, VEGAN Tagged With: chilli, curry, dinner, garlic, lunch, onions, poriyal, potato, side, sidedish

Lasooni Dal Tadka/ Tempered lentils

September 5, 2014 by Suki Leave a Comment

Lasoonidal_Relishthebite-4_name

Lasoonidal_Relishthebite-4_nameIt’s an authentic culinary dish from North Indian cuisine. It’s an easy way of dal tadka (lentil) with the flavors of garlic in it. It has only a handful of ingredients but yet the garlicky flavor and the spices in the fragrance ghee make the dish finger licking good for all seasons. This lasooni dal is made of pigeon pea lentils/tuvar dal. If you like garlic in your dish, you will just love this recipe. I would say its one of the easiest recipes.  And lahsun means garlic. 🙂

Dal can be made in different ways using different dal like Normal simple dal, dal tadka, dal fry using different dal.

I usually don’t like to add tomatoes in this dal recipe. I don’t want that tangy flavor in all my dal recipes. I want garlic to be the overpowering ingredient here. If you prefer a slight tangy flavor, you can squeeze lemon juice finally. That will really do the job.

Vegan note: Replace ghee with oil and taste this amazing dal 🙂

This can be served with rice, basmathi rice, jeera rice, roti.

Print
LASOONI DAL TADKA
Author: Suganya Hariharan
Recipe type: Main
Cuisine: Indian
Prep time:  5 mins
Cook time:  20 mins
Total time:  25 mins
Serves: 4
 
Ingredients
  • Tuvar dal/pigeon pea lentils – 1 cup
  • Onions – 1 finely chopped
  • Garlic – 2 tbsp
  • Green chillies – 2 chopped
  • Turmeric – 1 tsp
  • Asafetida/hing – pinch
  • Salt – as needed
  • Water – 3 cups for pressure-cooking the lentils
    [For tempering]
  • Ghee – 1.5 tbsp
  • Garlic – 1 tbsp finely chopped
  • Cumin powder – 1tsp
  • Red chilli powder – 1 tsp
  • Garam masala – 1 tsp
  • Coriander leaves - 1 tbsp finely chopped for garnish
  • Lemon – squeeze a little for garnish
Instructions
  1. Add washed tuvar dal, onions, garlic, green chillies, turmeric, little salt and asafetida in the pressure cooker with water.
  2. Pressure-cook the lentils for 10 whistles till you get a mashable smooth consistency.
  3. When it’s pressure-cooked, open the cooker and check if the consistency is ok. If not mash it, add little water and boil for two minutes. Or leave it.
  4. Heat ghee/oil in a pan. Ghee gives great flavors to dal but. Sometimes I use oil too. Add chopped garlic. Sauté the garlic for a minute till it becomes lightly browned. Add red chilli and sauté for few seconds.
  5. Switch off the flame, add red chilli powder,cumin powder, asafetida/hing, garam masala and dry methi leaves. Stir and pour the entire tempering on the dal.
  6. Garnish with chopped coriander and squeeze lemon. Check for salt and serve lasuni dal tadka hot with steamed rice and a potato fry. You can also serve this with rotis/naan.
Notes
1. When you boil the dal, just add little salt. Yu can always add salt later when you taste and when needed.
2. If the gravy is thick, and id you want it more in liquid form, you can add water and boil for two minutes.
3. You can use ghee/oil for tempering. But ghee gives great flavors to dal but. Sometimes I use oil too.
Wordpress Recipe Plugin by EasyRecipe
3.2.1311

Lasoonidal_Relishthebite-name_5

Filed Under: NORTH INDIAN GRAVIES/DAL/CURRY, SIDES, VEGAN Tagged With: dal recipe, garlic dal recipe, garlic recipe, lasooni dal tadka recipe, lasuni dal, lentil recipe, lentils, quick dal recipe, quick indian recipe, tempering recipe

Roasted Cauliflower Chickpeas Taco With Cilantro Lime Crema

September 4, 2014 by Suki 27 Comments

Taco_Relishthebite

Taco_Relishthebite-5Cauliflower and chickpeas marinated and roasted in oven and then placed in corn tacos topped with avocado and Cilantro Lime crema. This combination makes the dish juicy and crunchy. This dish is very healthy and also palatable. They look beautiful when you plate them. I always love Mexican food. Burritos, tostadas, taco ..enchiladas. My personal favorite is enchiladas. There is a nearby Mexican restaurant to my place called “ 3 amigos”. I Just love their enchiladas. Whenever I think of outside food, my first choice would be “enchiladas”. Oh la la la! As I type, I got the craving for it already 😀 But it takes some time , so my next choice would be tacos . You can always do your own taco plate with the veggies/meat you have at home. Just top it with some spices and colourful veggies to make it vibrant.

Taco_Relishthebite-3Last night I made this roasted cauliflower and chickpea tacos with lime cilantro crema. I usually make tacos with different veggies or chicken. But this time I had cauliflower at home, so wanted to make it with that. That’s how I cook mostly, whatever I have in refrigerator; I make a dish with that.

Taco_Relishthebite-4


I mixed up the cauliflower and chickpeas in the spice mixture. The spice mixture contains cumin powder, chili powder, pepper, garlic powder, oil and fresh limejuice. I placed them in oven for thirty minutes till they got crispy texture. I started tasting them right after I took it from the oven, I would have finished it up straight 😀 but i wanted to do this dish 😉 so placed them in tacos with this fresh crema 🙂 It was really yummy! Quick and tasty thumbsup 
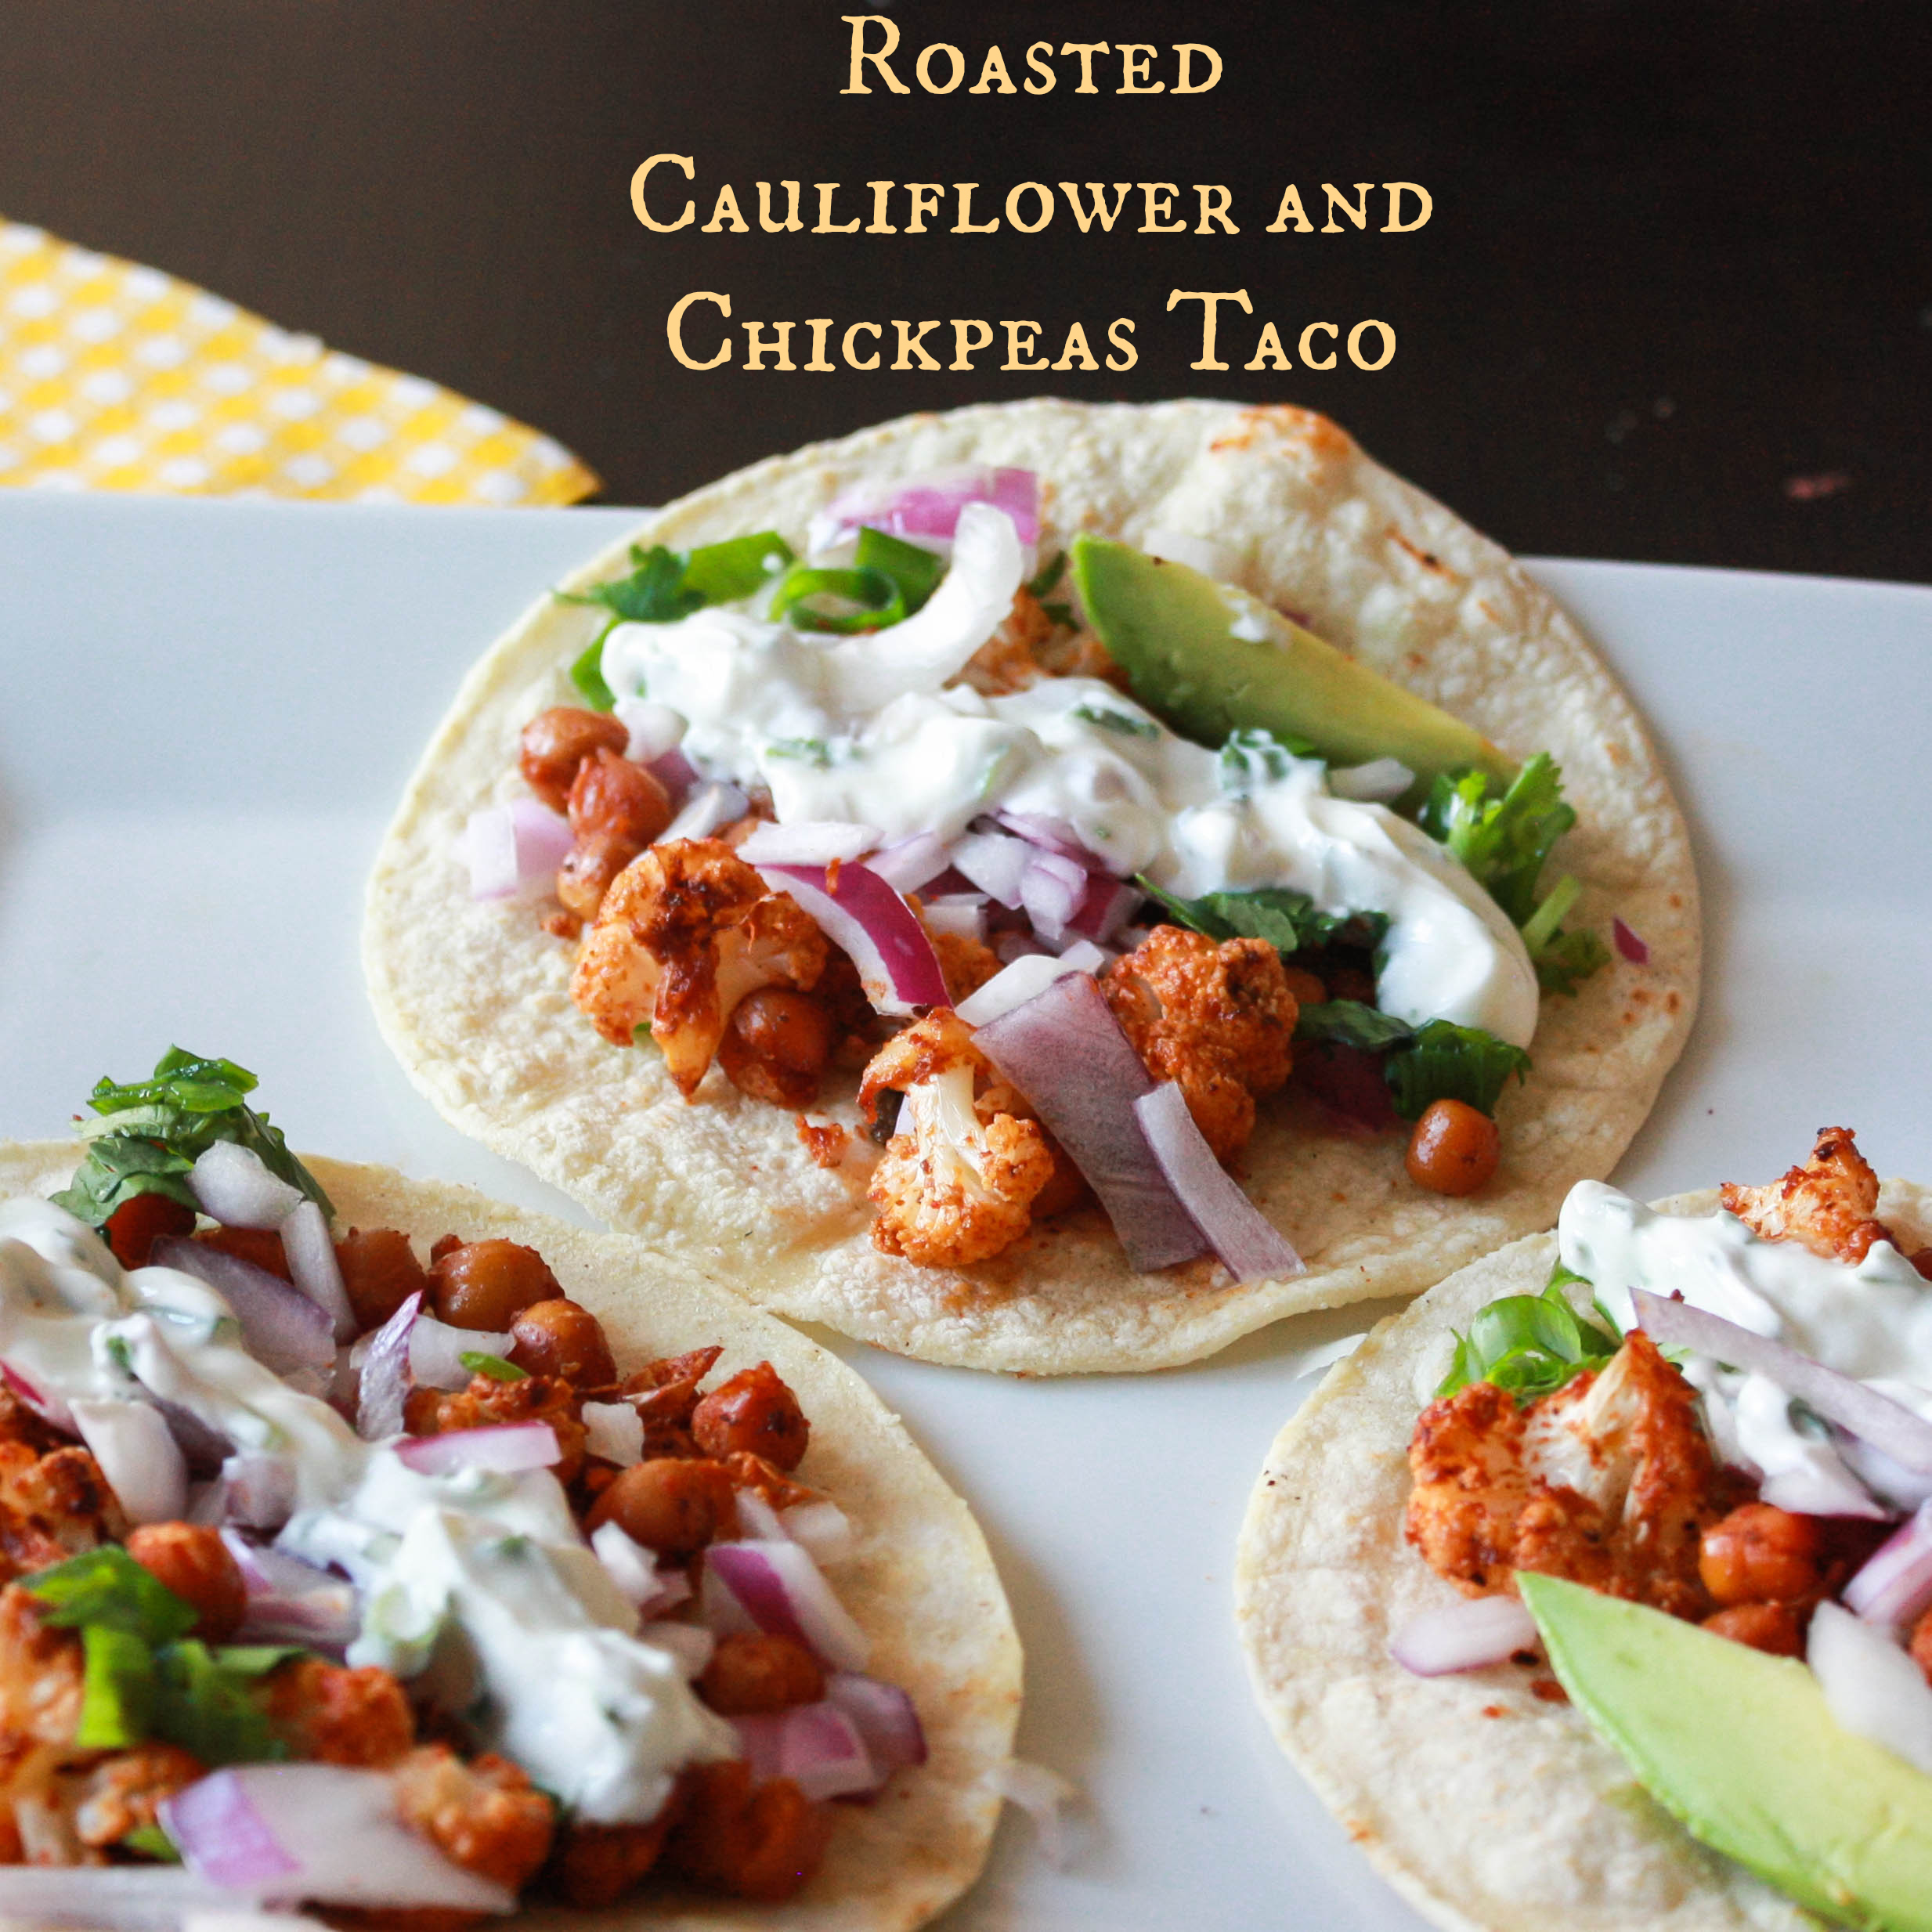
I used store bought corn tortillas. Will make my corn tortilla sometime 🙂 and post the recipe soon 🙂 To make the cilantro lime crema vegan, you can use vegan sour cream or yogurt.


5.0 from 1 reviews
Print
CAULIFLOWER CHICKPEAS TACO WITH CILANTRO LIME CREMA
Author: Suganya Hariharan
Recipe type: Dinner
Cuisine: Mexican
Prep time:  10 mins
Cook time:  45 mins
Total time:  55 mins
Serves: 10 tacos
 
Ingredients
  • For the Cauliflower chickpeas mixture:
  • Cauliflower - 1 small washed cut into small florets
  • Chickpeas - 15oz can washed and drained
  • Chilli powder - 1 tbsp
  • cumin powder - 2 tsp
  • garlic powder - 1 tsp
  • Pepper powder - 1 tsp
  • onion powder - 1 tsp
  • salt - 1 tbsp
  • fresh lime juice - 1 tbsp
  • olive oil - 1 tbsp
    For the tacos:
  • Corn tortillas
  • Avacado - 1 ( seed removed and diced)
  • Spring onions - ¼ cup chopped
  • Cilantro - ¼ cup chopped
  • Red onions - ½ cup chopped
    For the cilantro Lime Crema:
  • Sour cream - 1 cup
  • fresh lime juice - ¼ cup
  • cilantro - ¼ cup chopped
  • Salt and pepper, to taste
Instructions
  1. Preheat oven to 400 degrees.
  2. Take a bowl and mix together cauliflower, chickpeas, red chilli powder, garlic powder, pepper powder, cumin powder, salt, lime juice, olive oil, and water.
  3. Take a baking pan, Place seasoned chickpeas and cauliflower. Roast for 30-40minutes, stirring occasionally which will make all sides of the cauliflower to crispy state. You can stop it when you see that the chickpeas and cauliflower are slightly crispy and cauliflower is tender. Remove from oven and set aside.
  4. To make the cilantro lime mix the sour cream, fresh limejuice, chopped cilantro, chopped French onions, salt and pepper, to taste.
  5. Take a corn tortilla and place roasted cauliflower and chickpeas on top. Top with red onions, avocado, spring onions and cilantro. Drizzle some cilantro lime crema over the tacos and enjoy!!!
Notes
1. You can add jalapeños and red cabbage instead of red onions. They give great color and flavour.
2. You can replace sour cream with Greek yogurt. it gives the same fresh taste.
3. To make the cilantro lime crema vegan, you can use vegan sour cream or yogurt.
Wordpress Recipe Plugin by EasyRecipe
3.2.1311

Taco_Relishthebite-2-name

Filed Under: BAKED RECIPES, PASTA PIZZA & TACOS Tagged With: best taco recipes, Cauliflower recipe, chickpea recipe, crema recipe. cilantro lime crema, mexican quick recipes, mexican recipes, qucik and easy dinner recipes, spicy recipe, taco recipes, tuesday taco recipes, vegan taco recipes, vegetarian taco recipes, vegeterian mexican recipe, vegeterian recipe, vegeterian taco

Bharwan Bhindi/ Stuffed Okra

September 2, 2014 by Suki 9 Comments

Stuffedokra_Relishthebite_name_final

Stuffedokra_Relishthebite_name_finalBharwan Bhindi is stuffed okra. In Hindi, Bharwan means stuffed and Bhindi means okra. Okra’s are stuffed with a spicy delicious filling. In this dish, okra’s are slit and stuffed with masala. When the okra gets cooked with the masala, it gives exotic flavours. It’s a beautiful change from the usual okra/bhindi sabzi.

It greats taste when we eat with roti’s or rice with rasam, dal. It’s a tasty recipe from Indian kitchen that tastes best when we have it as a side for rice. I make it a point to cook okra once in two weeks at least as it’s my favorite veggie and it’s a staple at my home. So, I would like to develop a lot of variations with the veggie. I started stuffing this veggie with a teaspoon watching one of my favorite show on TV :D, and then I lost my patience and started to dig my hands to stuff the okra. It was much quicker.

For this recipe, you need to take tender okra, remove the head, cut them in the center, stuff them and pan fry. You are using besan flour for the masalas to stay inside okra. Try to use a bigger/wider pan so that u can turn it in the middle.

5.0 from 1 reviews
Print
BHARWAN BHINDI / STUFFED OKRA
Author: Suganya Hariharan
Recipe type: Side dish
Cuisine: Indian
Prep time:  10 mins
Cook time:  20 mins
Total time:  30 mins
Serves: 4
 
Ingredients
  • Small okra/bhindi - 300gms
  • Oil- 2 tbsp
  • Asafetid /hing - ¼ tsp
    To Saute & grind
  • Grated fresh/desiccated coconut - 3tbsp
  • Peanuts - 2 tbsp
  • White sesame seeds - ½ tbsp
  • Red chili – 2
  • Coriander seeds – 1 tbsp
    To mix:
  • Besan flour – 3 tbsp
  • Sambhar powder - 1 tbsp
  • Coriander powder - 1 tsp
  • Turmeric powder - 1 tsp
  • Dry mango powder/amchur - 1tsp
  • Ginger garlic paste – 1tsp
  • Salt - to taste
  • Sugar - ½tsp
Instructions
  1. Wash okra well and pat dry. Cut both ends of okra and make a slit in center along the length of okra. Keep it aside.
  2. In a pan, add the "to sauté & grind" ingredients and dry roast. Now blend them nicely.
  3. Mix the blended mixture with besan flour, sambhar powder, coriander powder, turmeric powder, dry mango powder,ginger garlic paste,sugar and salt.
  4. Add some little oil/salt to make the blended mixture a paste. Add little less salt as we are going to sprinkle salt at the end.
  5. Stuff each of the okra with prepared mixture and keep aside.
  6. Heat oil in pan and add asafoetida, then stuffed okra. Keep the okras in the pan so that the masalas are upwards as this way the masalas stay inside okra.
  7. Cover with a lid and cook them on a low flame. Turn them occasionally to cook evenly from all sides and also to turn it soft.
  8. Sprinkle two times little water to make it get cooked and this will shallow fry the okras.
  9. And sprinkle 1 tsp of salt and 1 tsp of sugar in the middle of the process for the okras to have
  10. Switch off. It took around fifteen minutes for me.
Notes
1. Make sure you don’t add water.
2. I used nonstick pan, so that it does not stick anywhere easily. ☺ Otherwise, stir it once in a while.
3. For this recipe, try to use tender okra.
4. If you want the process to be even simpler, just stuff with sambhar powder, besan flour mix. You can add idli gunpowder, chilli powder, it still gives good taste.
5. Try to use a bigger pan so that u can turn it in the middle.
Wordpress Recipe Plugin by EasyRecipe
3.2.1311

Stuffedokra_Relishthebite1_name

Serve warm with hot rice , rasam or roti.

Filed Under: DRY CURRY SIDE DISH/ STIR-FRY, SIDES, VEGAN Tagged With: bharwan bhindi, bhindi dish, dinner, indian dish, lunch, north indian dishes, okra, okra dishes, spicy side dish, stuffed dish, stuffed okra, vegan dish, vegetarian dishes, vendakkai dish

Chettinadu Meen Kuzhambu/ Fish Curry

September 1, 2014 by Suki 6 Comments

Meen_Kuzhambu_Relishthebite_name

Meen_Kuzhambu_Relishthebite_nameMeen Kuzhambu is a very popular and traditional south Indian fish curry. It is very spicy and it has rich flavour. Traditionally it’s cooked in clay or earthen pot, where the fish is cooked in spicy gravy of onions, tomatoes, tamarind and spices sautéed in sesame oil. It’s a classic dish with intense flavors. Eating this would never stop them from licking their fingers 😉 Really!!!!

Cooking this dish in earthen pot is the highlight of the dish and it really enhances the taste. But I don’t think I can do that from Canada. So if you are from India or any place where you can do with the earthen pot, please do so  🙂

The dish is usually rested for some time and then eaten as it helps the fish in absorbing the flavors into it and makes it more juicy and soft.

On healthy note, fishes are rich in iron, calcium; provide good vitamins with less carbohydrate and cholesterol. It makes wonderful addition to any nutritious diet and is always better than eating meat or poultry.

I have another fish curry homestyle which is one of my famous recipes in the blog.

Taste great with rice and spinach with lentils (Spinach dal). Take a cup of hot rice and warm fish curry, mix well and serve with fish fry as side dish or spinachdal or spinach molagootal.

5.0 from 1 reviews
Print
CHETTINADU MEEN KUZHAMBU / FISH CURRY
Author: Suganya Hariharan
Recipe type: Dinner
Cuisine: Indian
Prep time:  10 mins
Cook time:  40 mins
Total time:  50 mins
Serves: 6
 
Ingredients
  • Marinate:
  • Fish – 7
  • Turmeric powder – 1 tsp
  • salt – 1 tbsp
  • Lemon juice – 1 tbsp
    To grind:
  • Small onions -6 chopped roughly
  • Tomato – 2 Chopped roughly
  • Coconut – ¼ cup
  • Fennel seeds – 1 tsp
  • Poppy seeds soaked in water – 1 tsp
  • Coriander seeds – 1 tbsp
  • Garlic – 4
  • Ginger – ½ inch
    To temper:
  • Oil – 1½ tbsp
  • Mustard seeds – 1 tsp
  • Fenugreek – 1 tsp
  • Red chilli – 1
  • Asafetida - a pinch
  • Curry leaves - 6
  • Shallots/Small onion – 5
  • Big onion – 1 chopped nicely
  • Garlic – 5 chopped
  • Turmeric powder – 1 tsp
  • Chilli powder – 1 tbsp
  • Coriander powder – 1 tbsp
  • Tamarind – Lemon sized
Instructions
  1. Soak tamarind in warm water (around 1 /2 cup), extract pulp and keep aside.
  2. Clean fish and marinate the fish in turmeric, salt and lemon juice under “marinate” section. Keep aside.
  3. Take the “to grind” ingredients and Sauté the chopped onion, when its translucent, add the chopped tomatoes. Grind the sautéed onions, tomatoes with other ingredients in the “to grind” items. Keep it aside.
  4. Add oil in a pan, add mustard seeds, and allow it to splutter. Then add fenugreek, red chilli, curry leaves, asafoetida, onions and garlic. Sauté for two - three minutes, then add the blended paste, chilli powder and coriander powder. Sauté for a minute.
  5. Now add the tamarind pulp. Add some more water, I added 2 more cups (adjust according to the thickness you want) and add required salt. Allow it to boil for 20-25 minutes.
  6. When oil gets separated, add the marinated fish pieces. Allow it to boil for five minutes.
  7. I usually don’t boil for more than five minutes. You switch off the flame the fifth minute and serve after an hour at least. That will help the fish to get cooked well.
  8. Garnish them with coriander leaves.
Notes
1. The fish usually will cook faster so be careful not to break them into pieces. So make sure you don’t boil them longer.
2. Give resting time for at least an hour or two. It even taste better the next day.
3. Try to use sesame oil as it gives great flavours to this curry in specific.
Wordpress Recipe Plugin by EasyRecipe
3.2.1311


It goes extremely well with any rice, dosa and rotis.

Meen_Kuzhambu_Relishthebite-2_name

Filed Under: NON-VEG RECIPES Tagged With: Chennai Fish curry, chettinadu fish uzhambu, fish curry, Fish curry hotel recipe, fish curry indian, fish curry south indian style, Fish kuzhambu, fish kuzhambu south indian, fish recipes, fish restaurant style, home style fish curry, Indian fish curry, Indian spicy curry, meen kulambu chettinad recipe, meen kulambu recipes, meen kulambu with coconut, spicy recipes, step by step fih kuzhambu recipe

Page 2 of 2
« Previous 1 2
  1. Pages:
  2. «
  3. 1
  4. 2
  • « Previous Page
  • 1
  • 2
  • Facebook
  • Google+
  • Instagram
  • Pinterest
  • Twitter

LOOKING FOR SOMETHING?

logo
Food Advertisements by
logo
Food Advertisements by

Categories

STAY CONNECTED

  • Facebook
  • Google+
  • Instagram
  • Pinterest
  • Twitter

SUBSCRIBE BY EMAIL

SEARCH RELISH THE BITE

logo
Food Advertisements by

Copyright © 2026 · Lifestyle Pro Theme on Genesis Framework · WordPress · Log in