• Home
  • Page Layouts
  • Page Templates
  • Theme Colors
    • Lifestyle Pro Blue
    • Lifestyle Pro Green
    • Lifestyle Pro Mustard
    • Lifestyle Pro Purple
    • Lifestyle Pro Red
    • Lifestyle Pro Teal

Relish The Bite

Taste of happiness

  • HOME
  • ABOUT
  • RECIPE INDEX
    • SNACKS & APPETIZERS
    • BREAKFAST
    • BAKED RECIPES
    • LUNCH & DINNER
      • RICE/BIRYANI VARIETIES
      • SIDES
        • DRY CURRY/STIR-FRY
        • SOUTH INDIAN CURRY/KUZHAMBU
        • NORTH INDIAN CURRY/DAL
        • RAITA/DIPS/CHUTNEY
        • Soups/Salads
      • PASTA PIZZA & TACOS
      • BREAD
      • CHINESE ASIAN INSPIRED
    • NON-VEG RECIPES
    • DESSERTS
    • BEVERAGES
  • SNACKS
  • BREAKFAST
  • NON-VEG RECIPES
  • RICE/BIRYANI VARIETIES
  • LAMB
  • SOUTH INDIAN CURRY/KUZHAMBU
  • VEGAN
  • NORTH INDIAN CURRY/DAL
  • DRY CURRY/STIR-FRY
  • PASTA & TACOS
  • CHINESE ASIAN INSPIRED
  • BAKED RECIPES
  • COLLECTIONS
  • BREAD
  • BEVERAGES
  • DESSERTS
  • FESTIVAL RECIPES
    • SNACKS & APPETIZERS
    • SWEETS/DESSERTS
  • RESOURCES
    • HOW TO START A BLOG
    • TITBITS
    • PRESS
  • CONTACT
You are here: Home / Archives for Indian

Curd Rice/ Thayir Sadham Recipe

January 28, 2015 by Suki 4 Comments

CurdRice-2name

CurdRice-2name
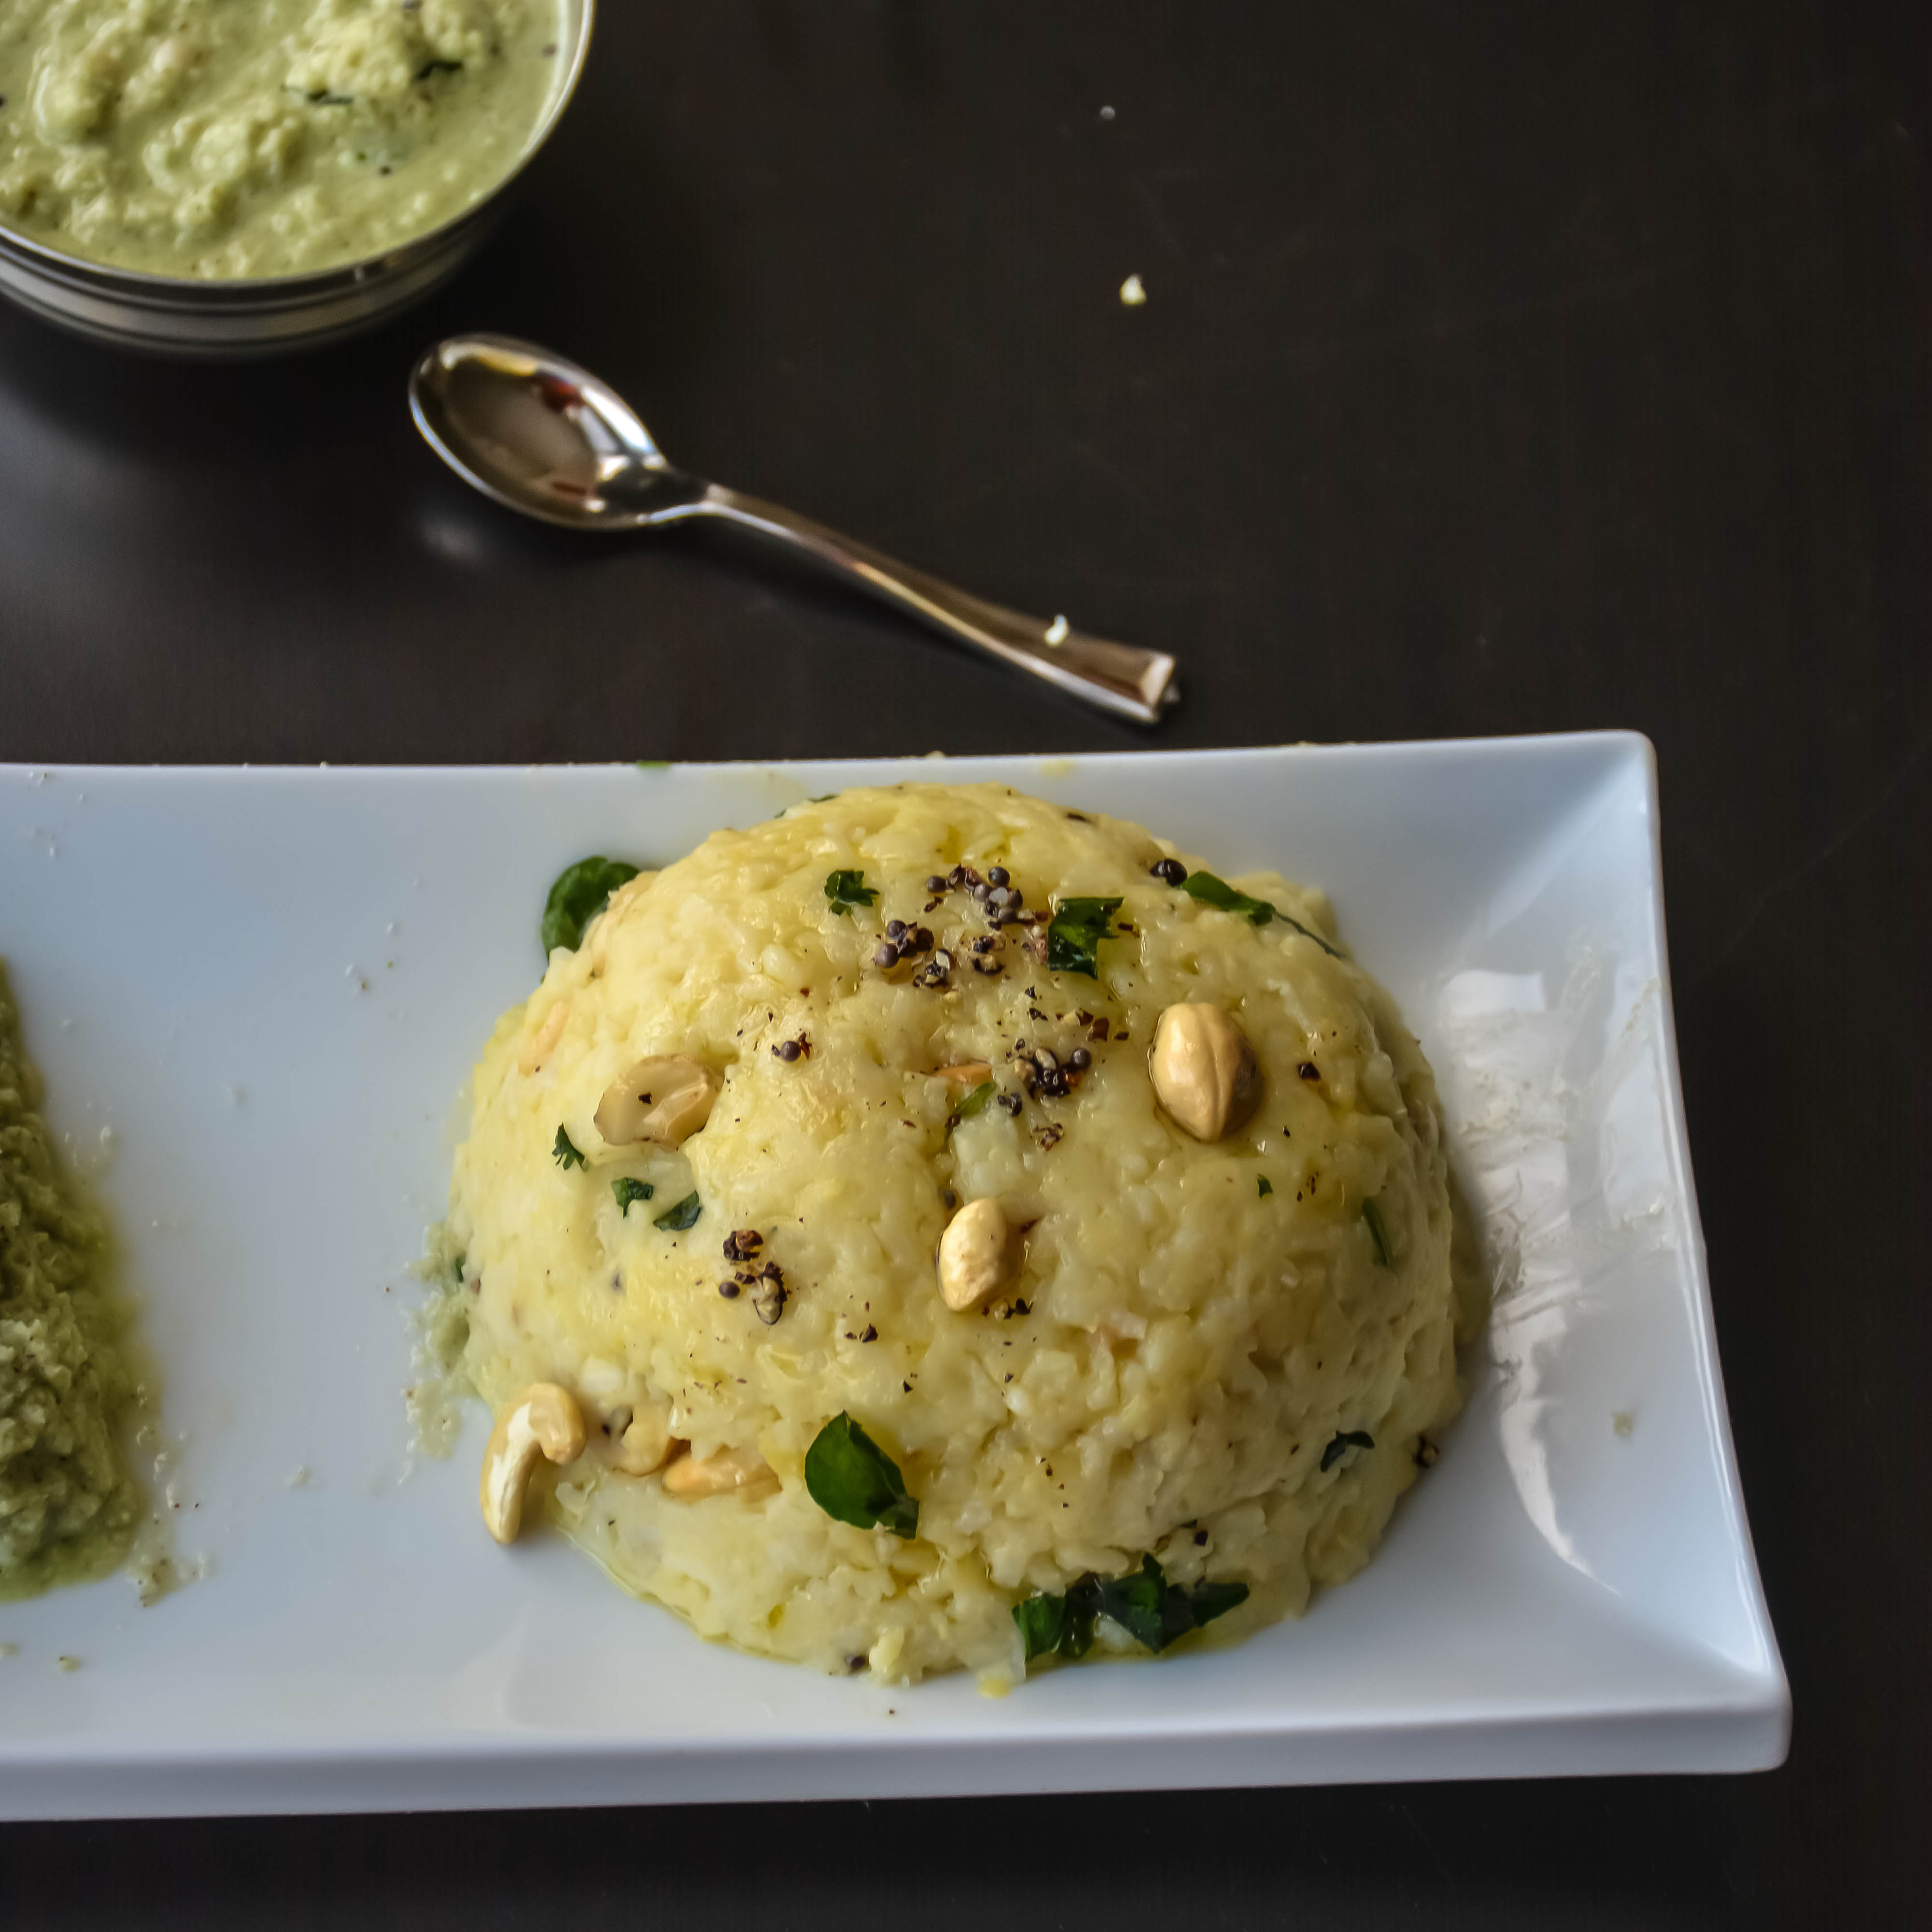
A perfect South Indian Style one pot meal with tips for making it for lunch box and parties.

I am sure many would be wondering if a recipe is needed for curd rice as many would be having it on daily basis. But I guess there would be people who have no idea how to make curd rice or may be perfect curd rice for parties. And also it’s almost my day to day basis food, so wanted to share it here in my space 🙂 It uses the simplest ingredients to create a quick, refreshing and comfort meal. It is great to have when your stomach has not been well. And best to have in summer because of its soothing and cooling properties. And it is easily digestible. 😉 And many days 😉 we will be like “no mood to cook!”, so this is my savior 😀 or sometimes upma or even egg rice would do if you can have eggs.

CurdRice-3

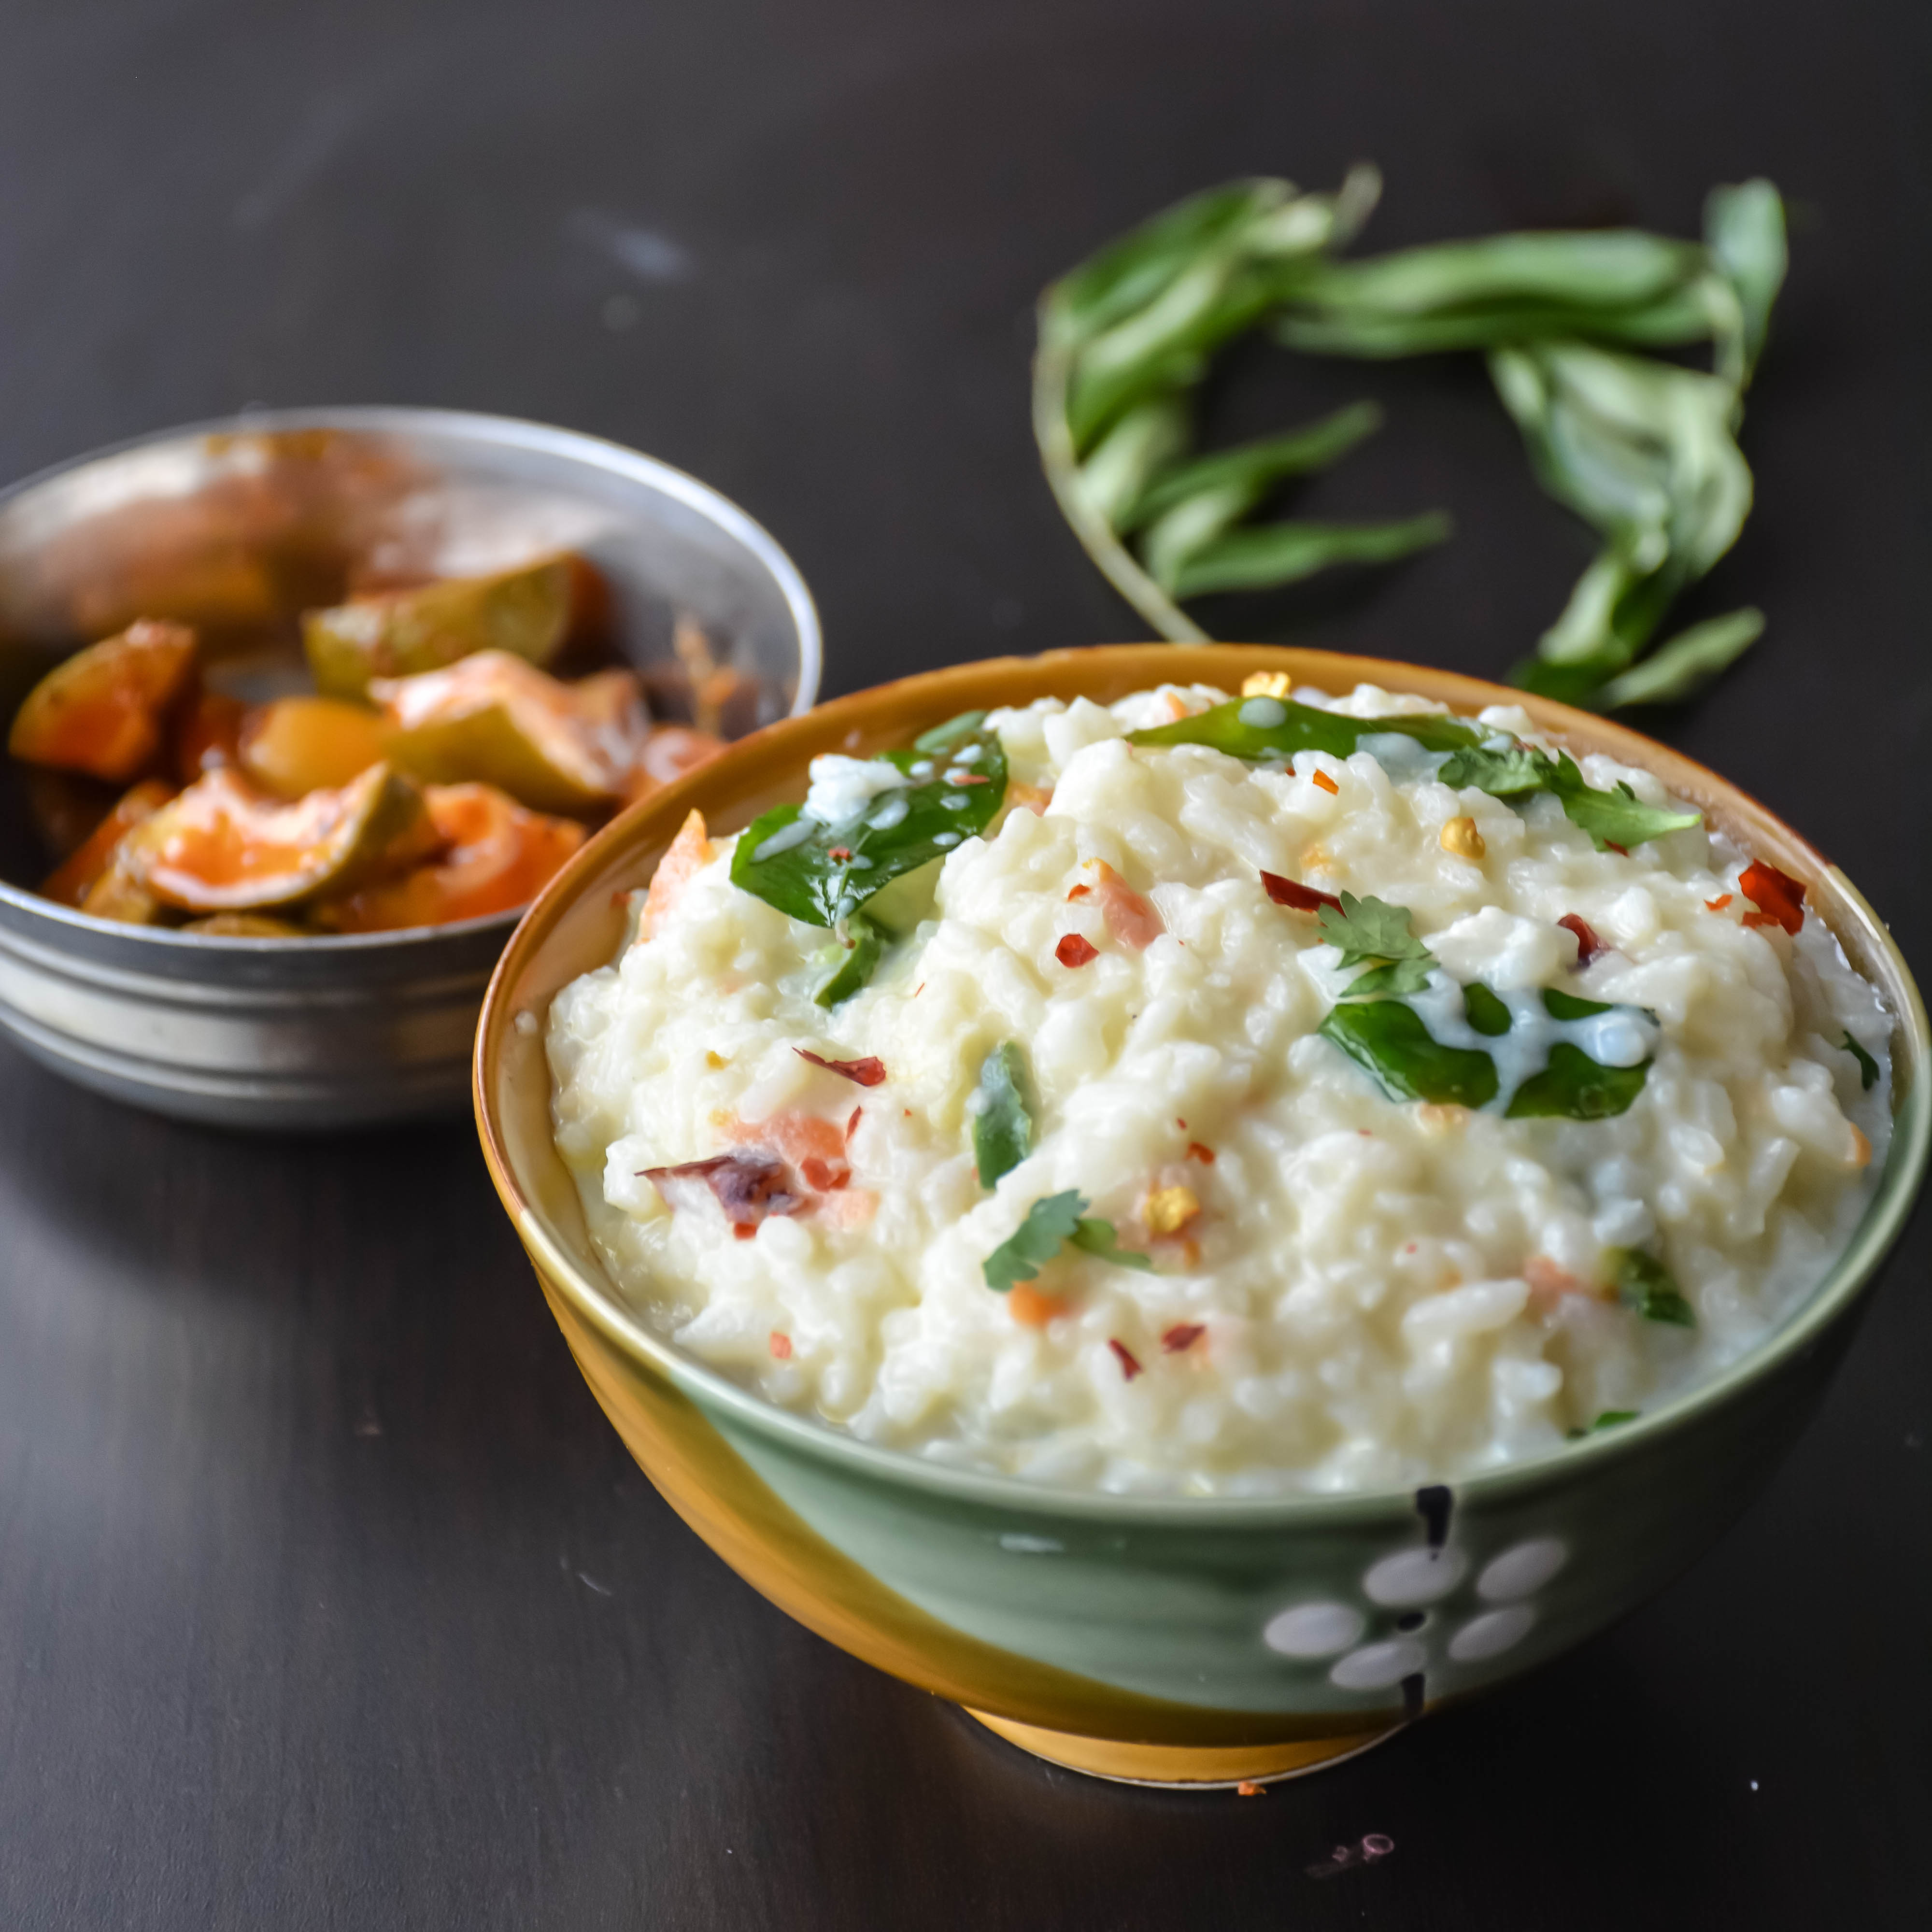
I almost end most of my south Indian meals with curd rice. I would just eat plain rice with buttermilk. But if I wanted to make it for lunch boxes or for parties, I prefer with seasonings.  You can always use your left over rice for making this 🙂

I have prepared the recipe to have immediately, so if you want to make it for lunchbox or parties change the quantity of milk and curd as mentioned in the tips section.

Tips for lunch Box and parties:

  1. If you are making for lunch box or parties, for having 8 hours in advance I mean, add 1.25 cups of milk for 1/2 cup of rice. And 1 tbsp of yogurt should do the job. Bring it to a loose consistency.
  2. Never use hand for mixing if you are preparing this to have later.
  3. Never add curd to the hot rice. It will leave some water. That is the reason that you might see your lunchbox to leak and when you open the box, you will see the rice and curd separate.
  4. And add hot or warm milk to the rice immediately after mashing the rice.
  5. You can also fine chopped mango slices with carrots, nuts, grapes 🙂
  6. It is perfect if the rice is little mashed. So if you are making fresh rice, add some extra water and give two –three whistles extra. Or if you are making with leftover rice, add some water to it and keep it in cooker for another 2 whistles. Or in rice cooker, add some water and it will boil for more minutes and it would be perfect.
  7. Before adding curd, ensure the rice is cooled down, because adding curd to hot rice will kill the live cultures in the curd and it is not good for your stomach.

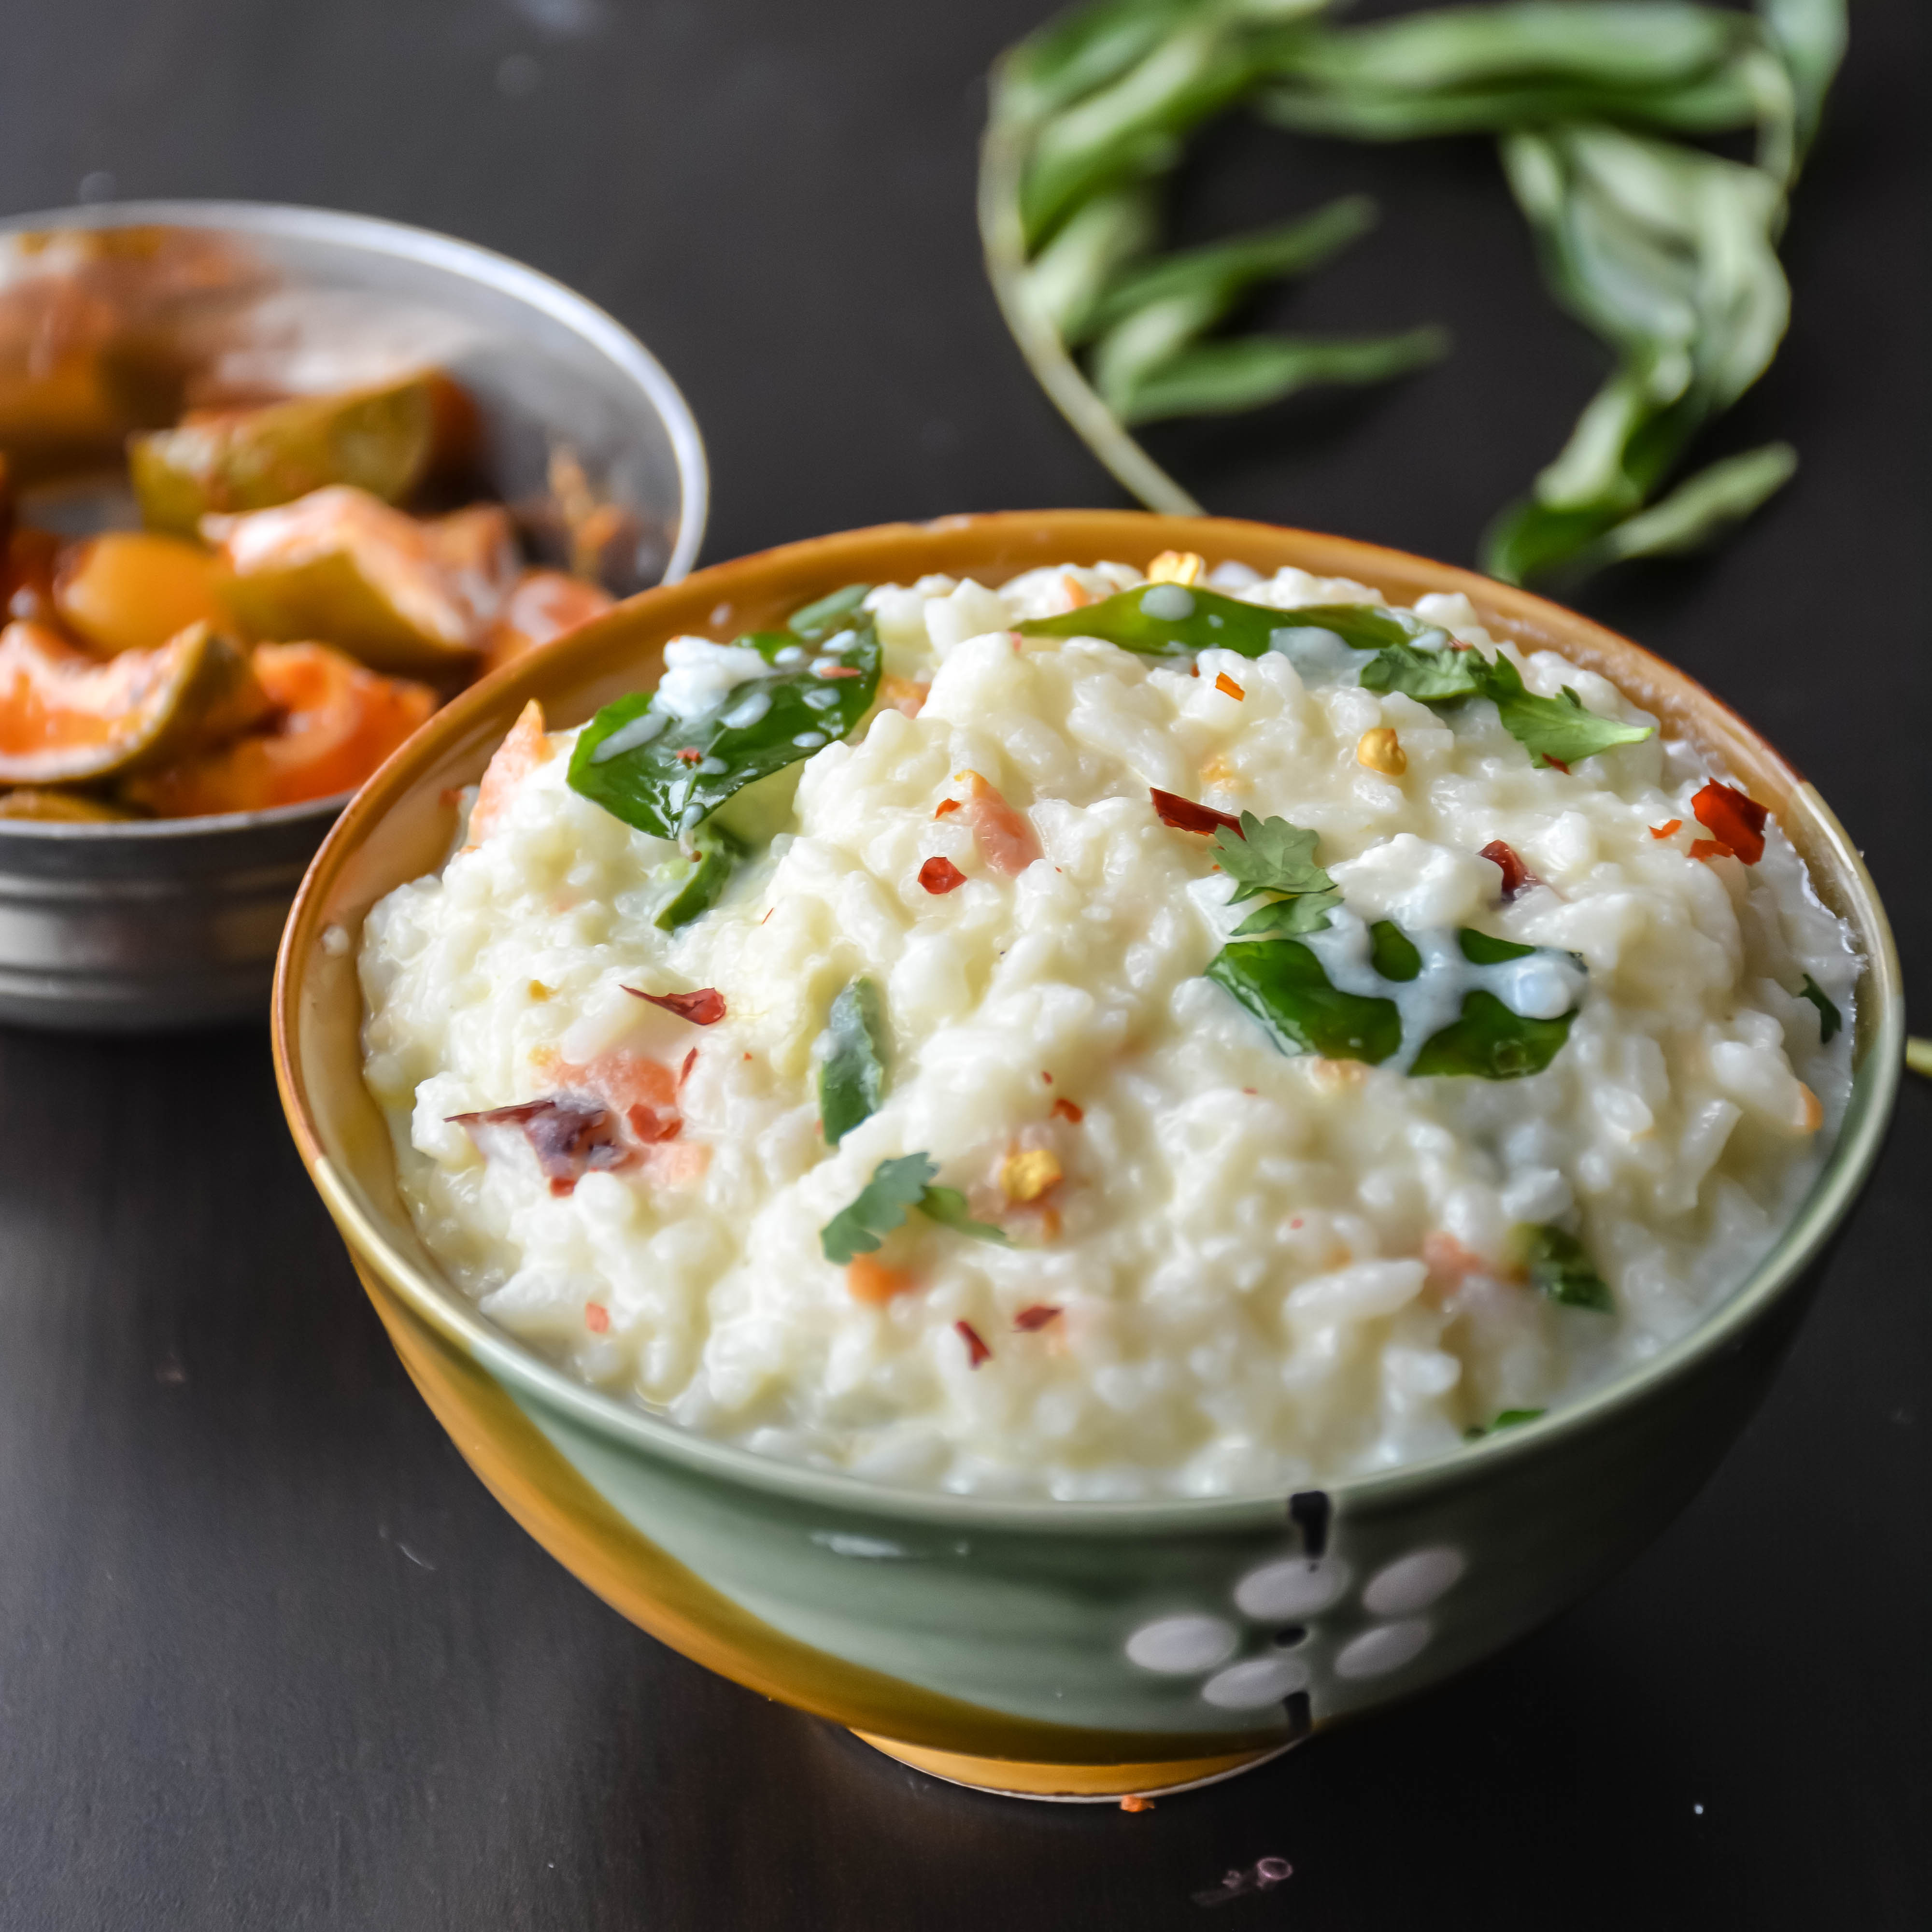
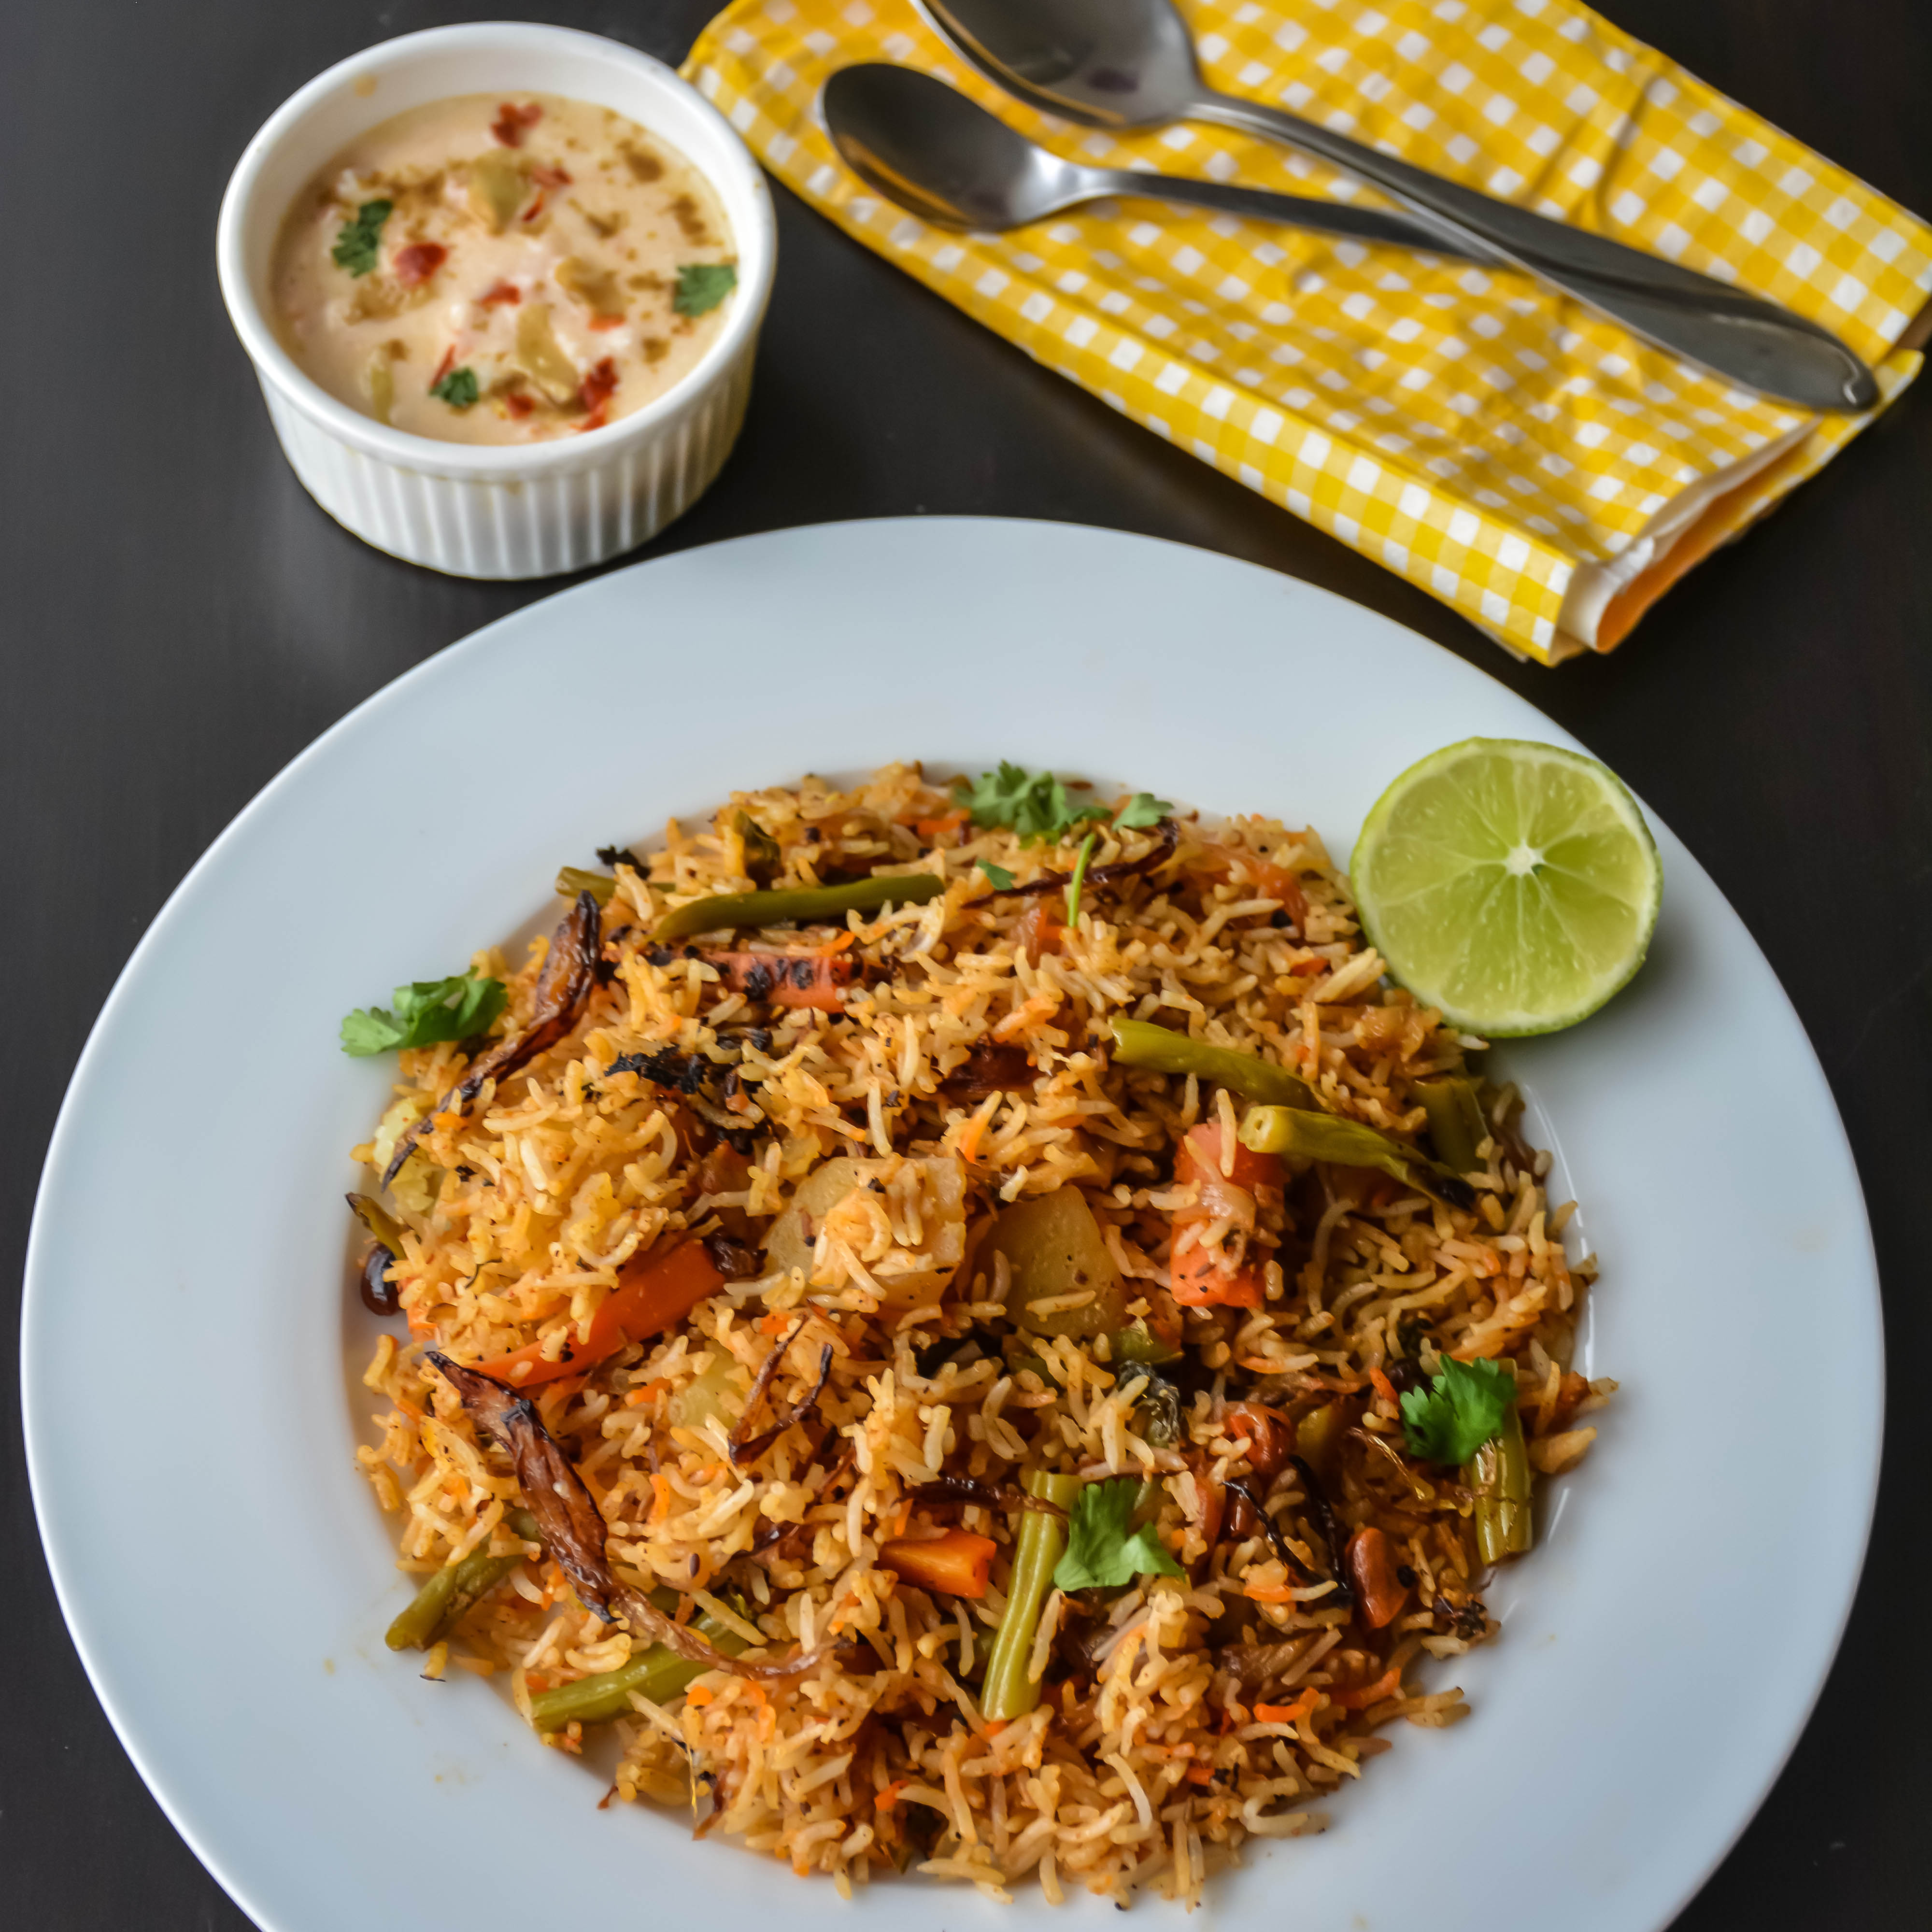
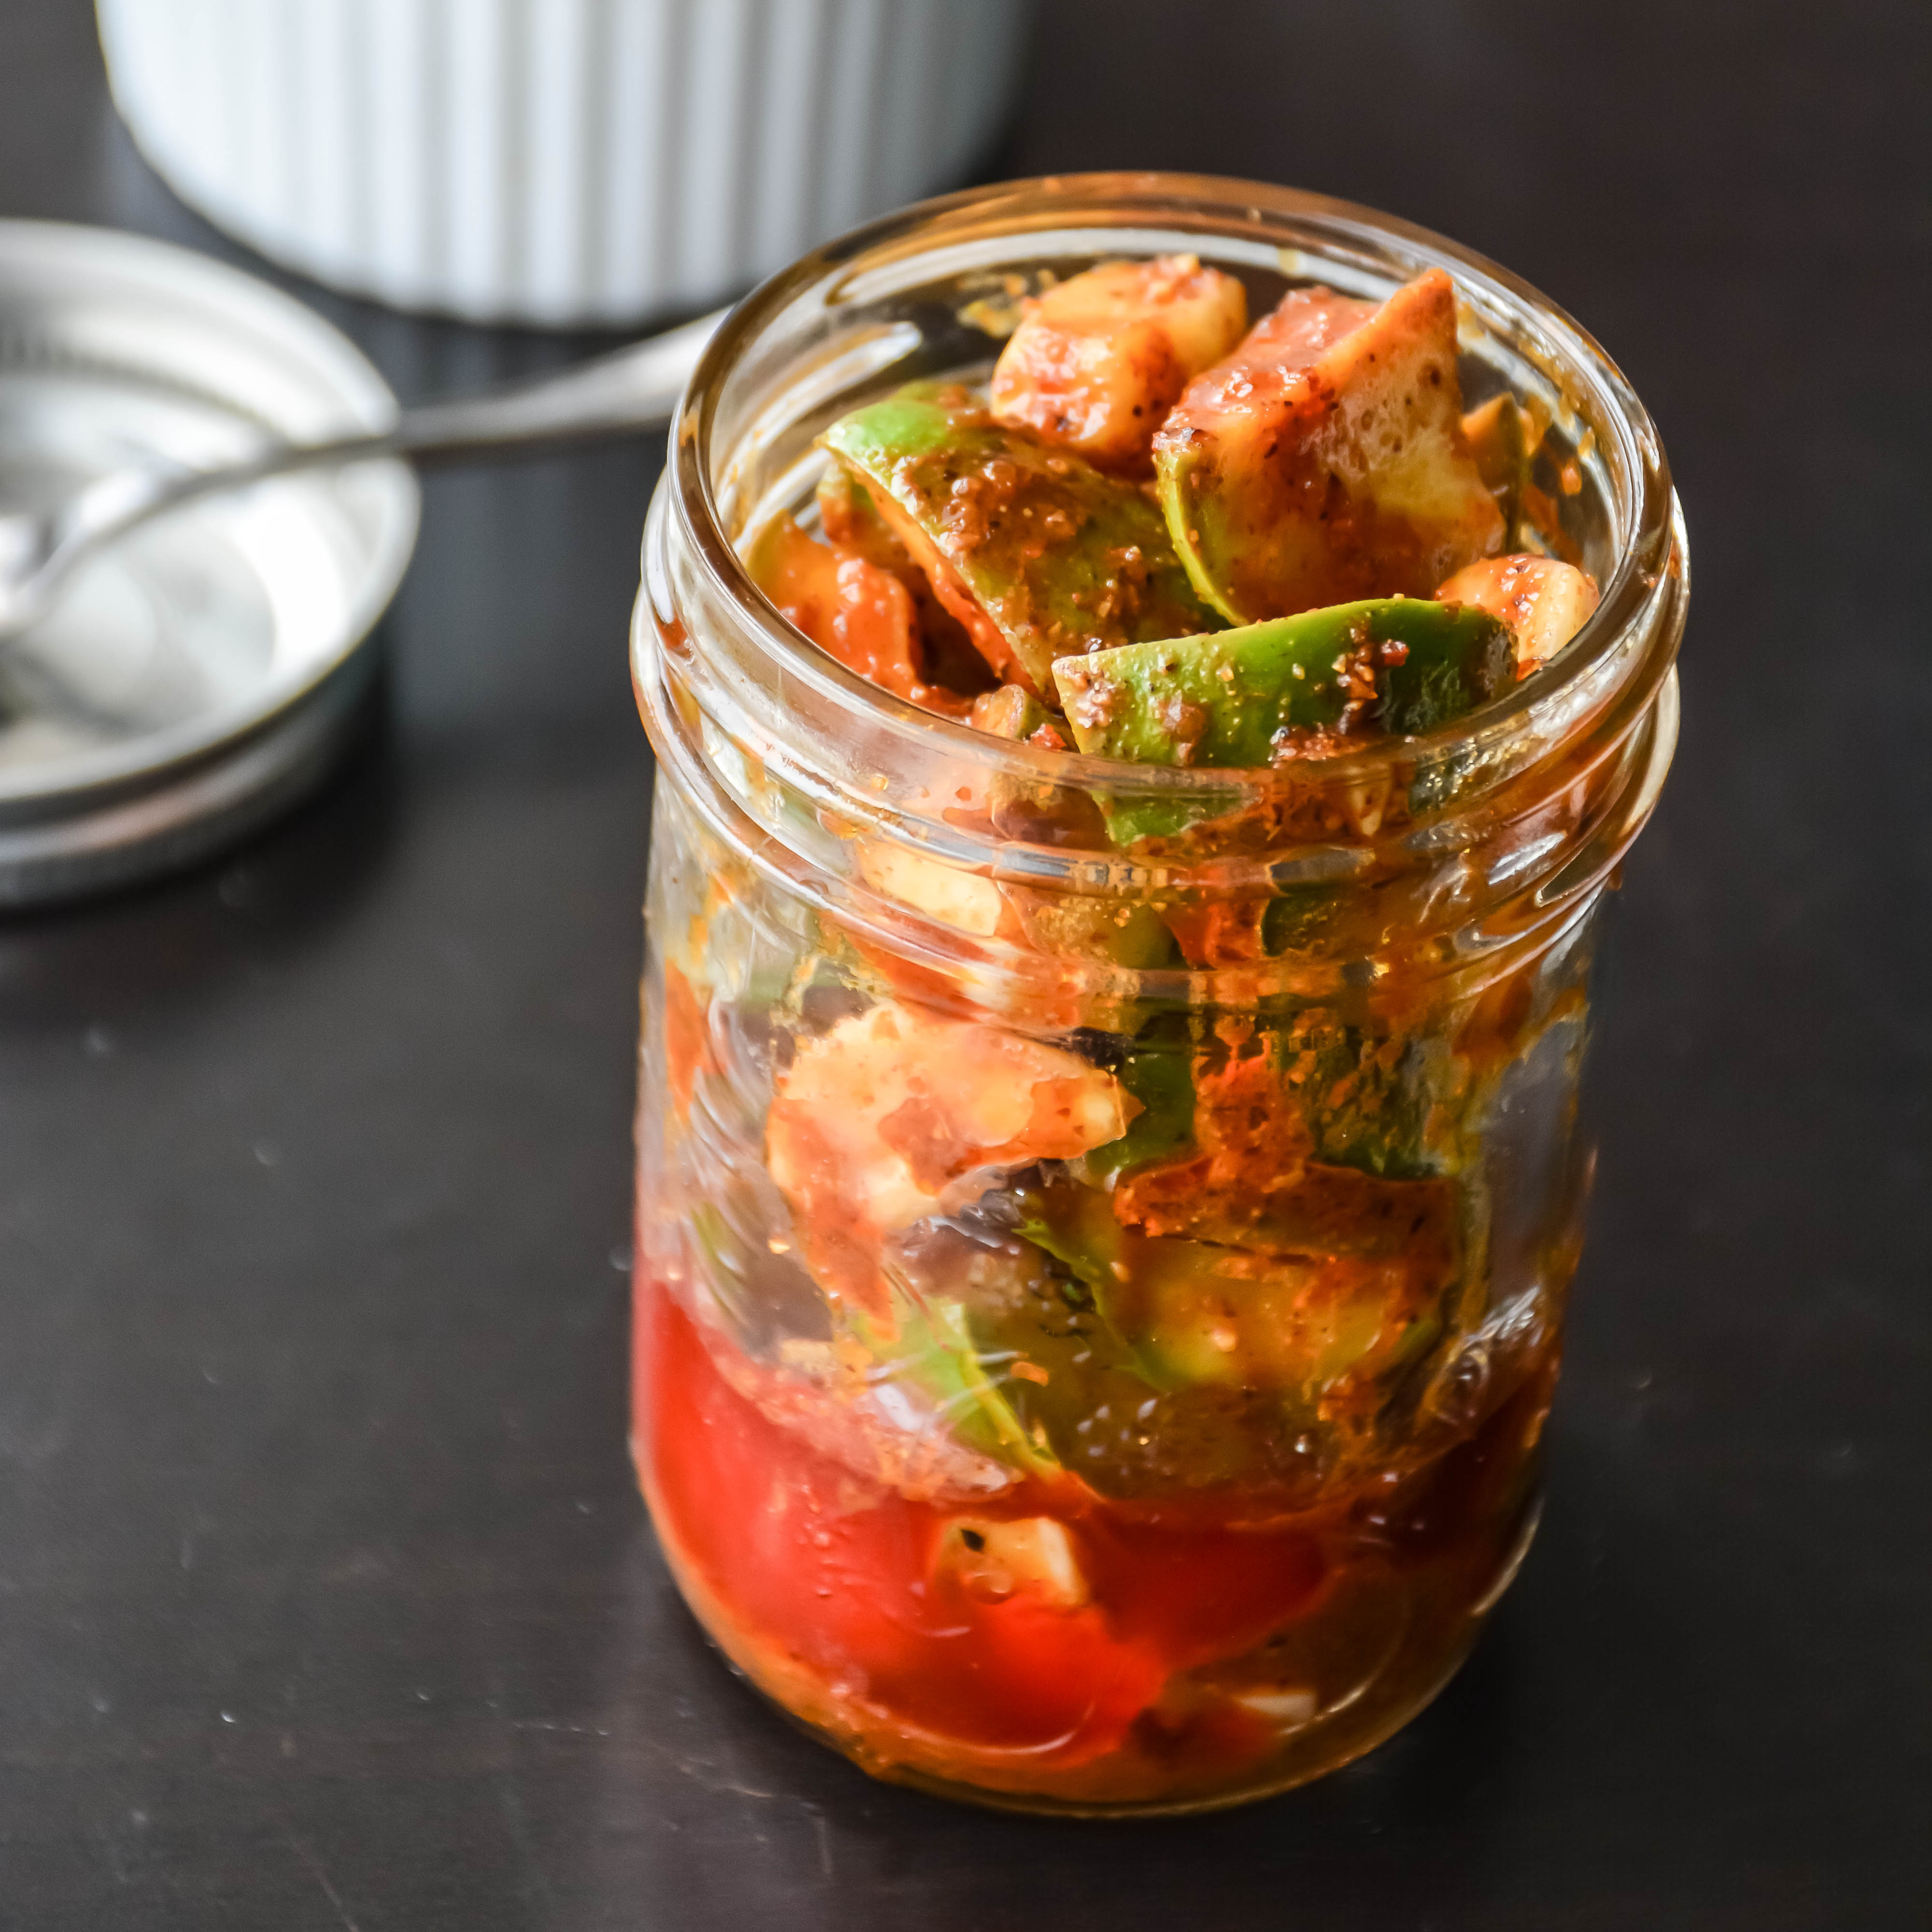
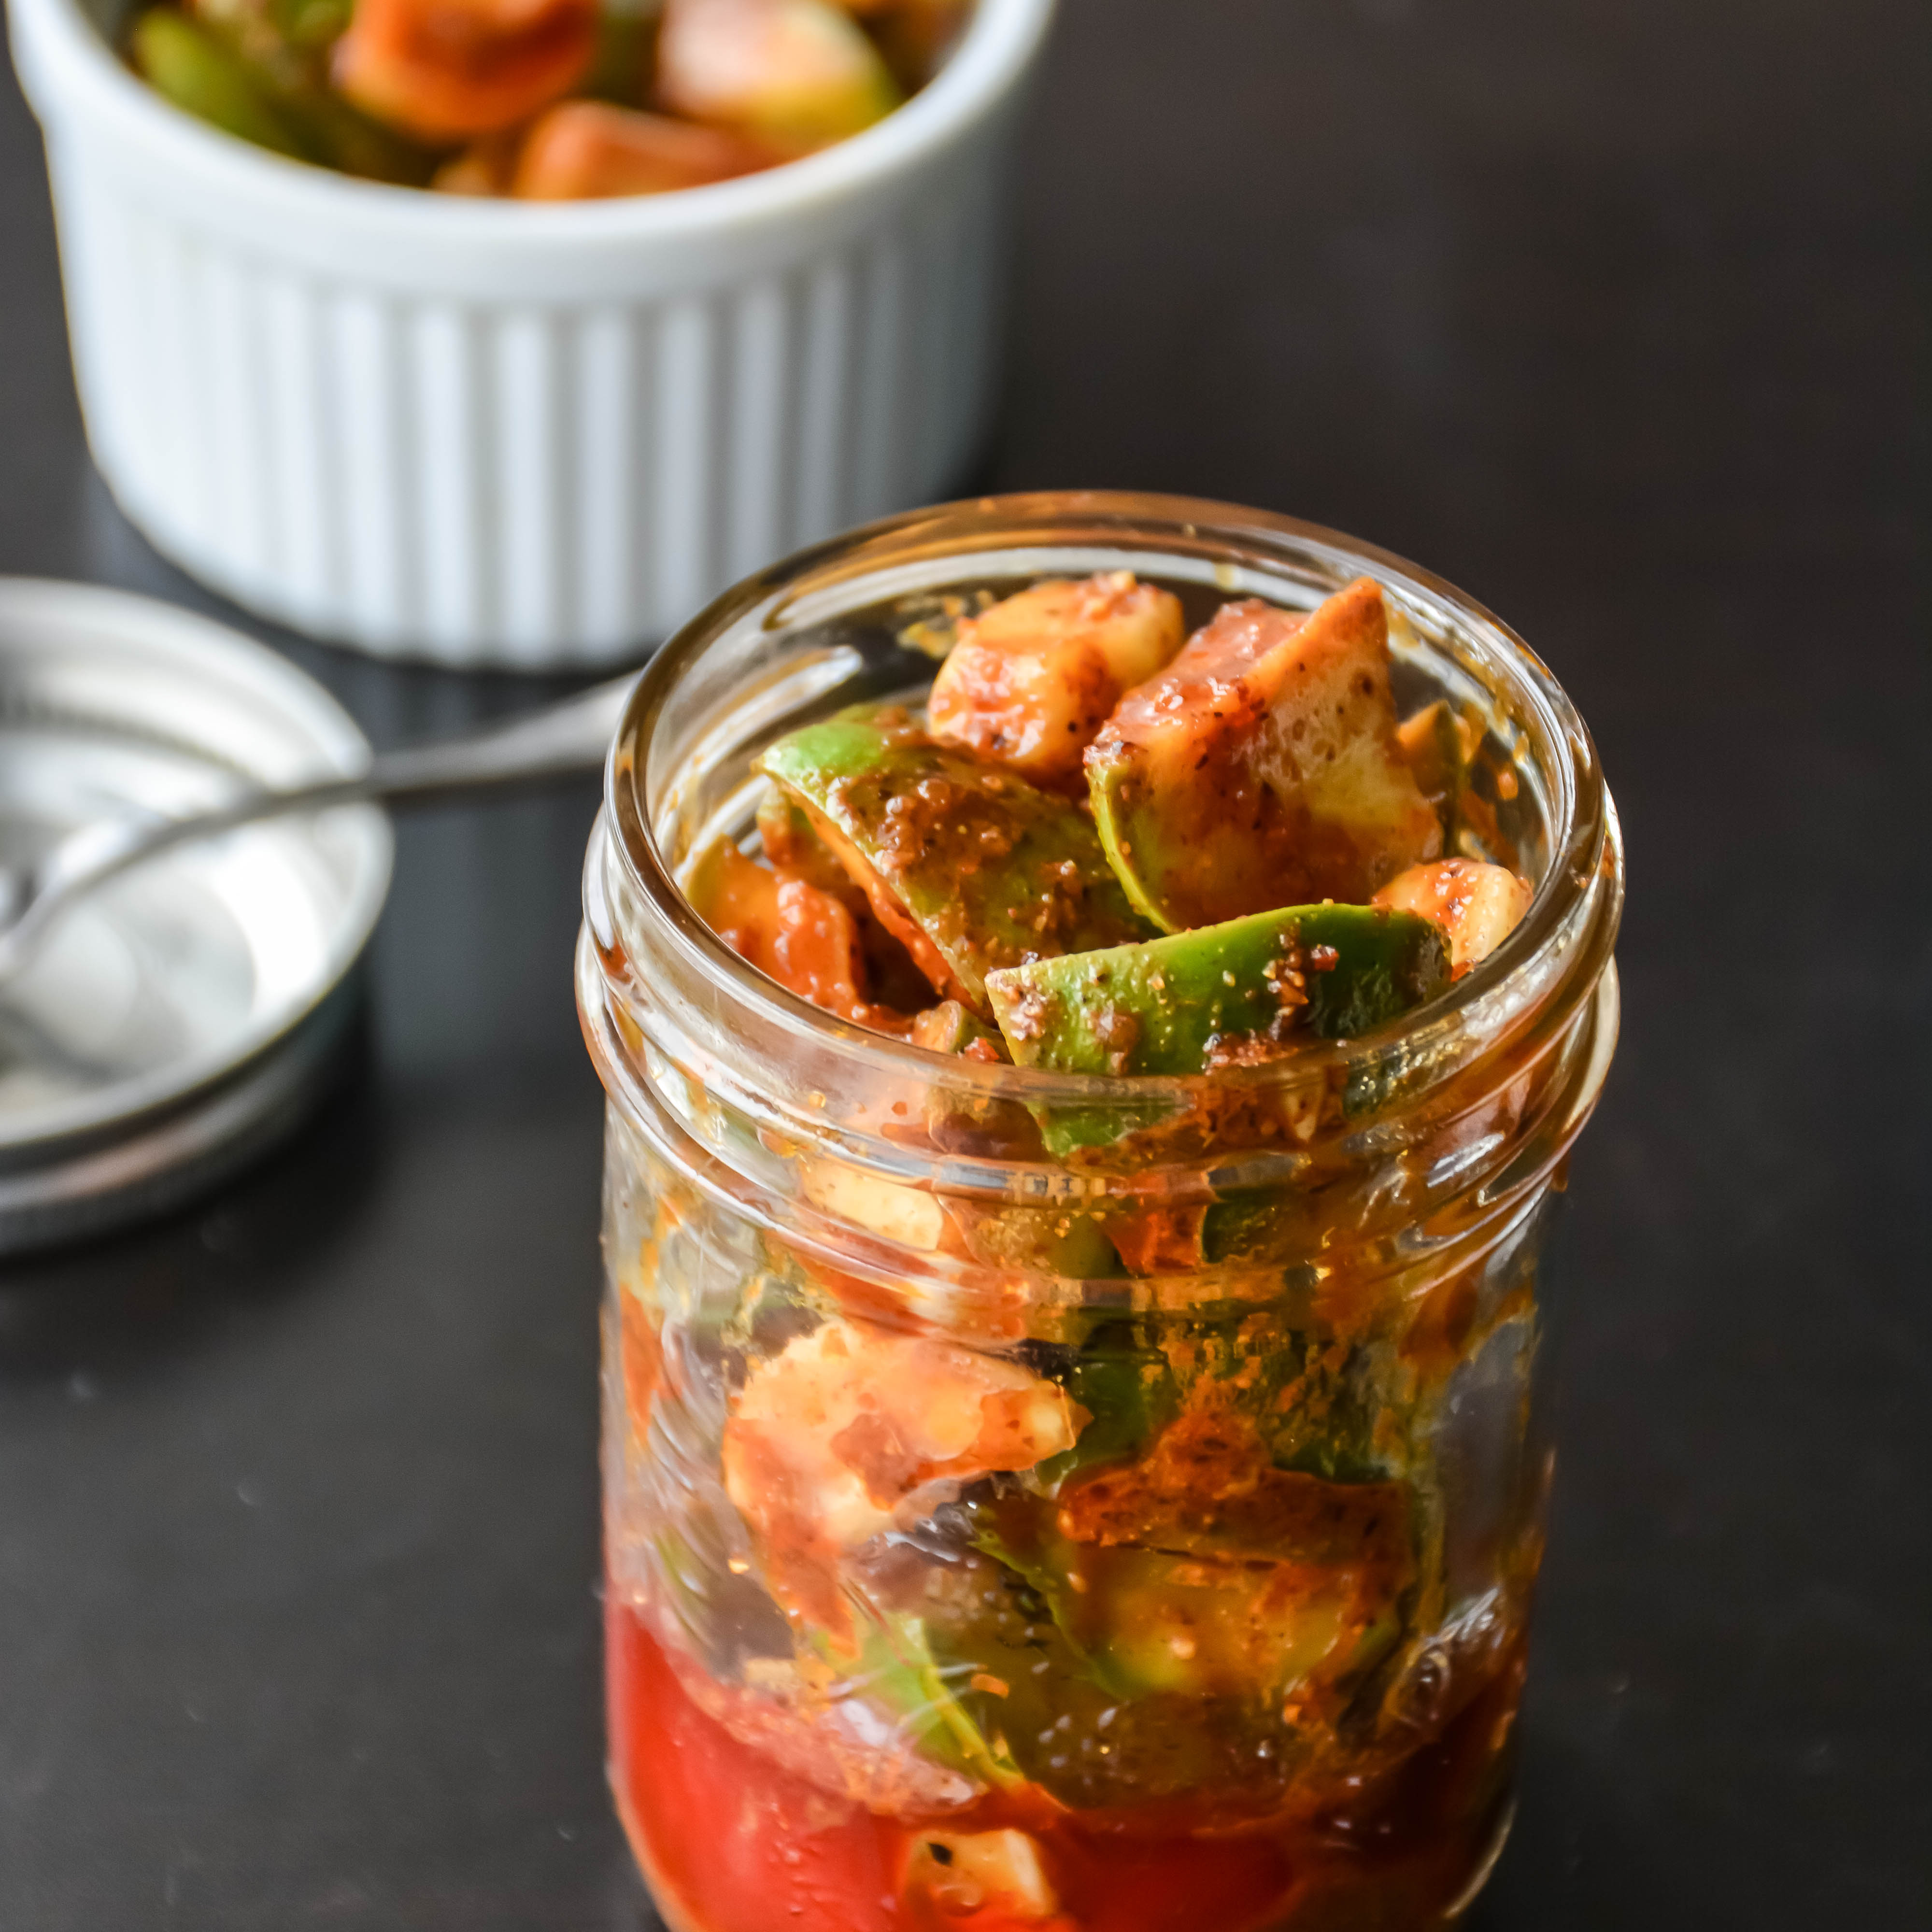
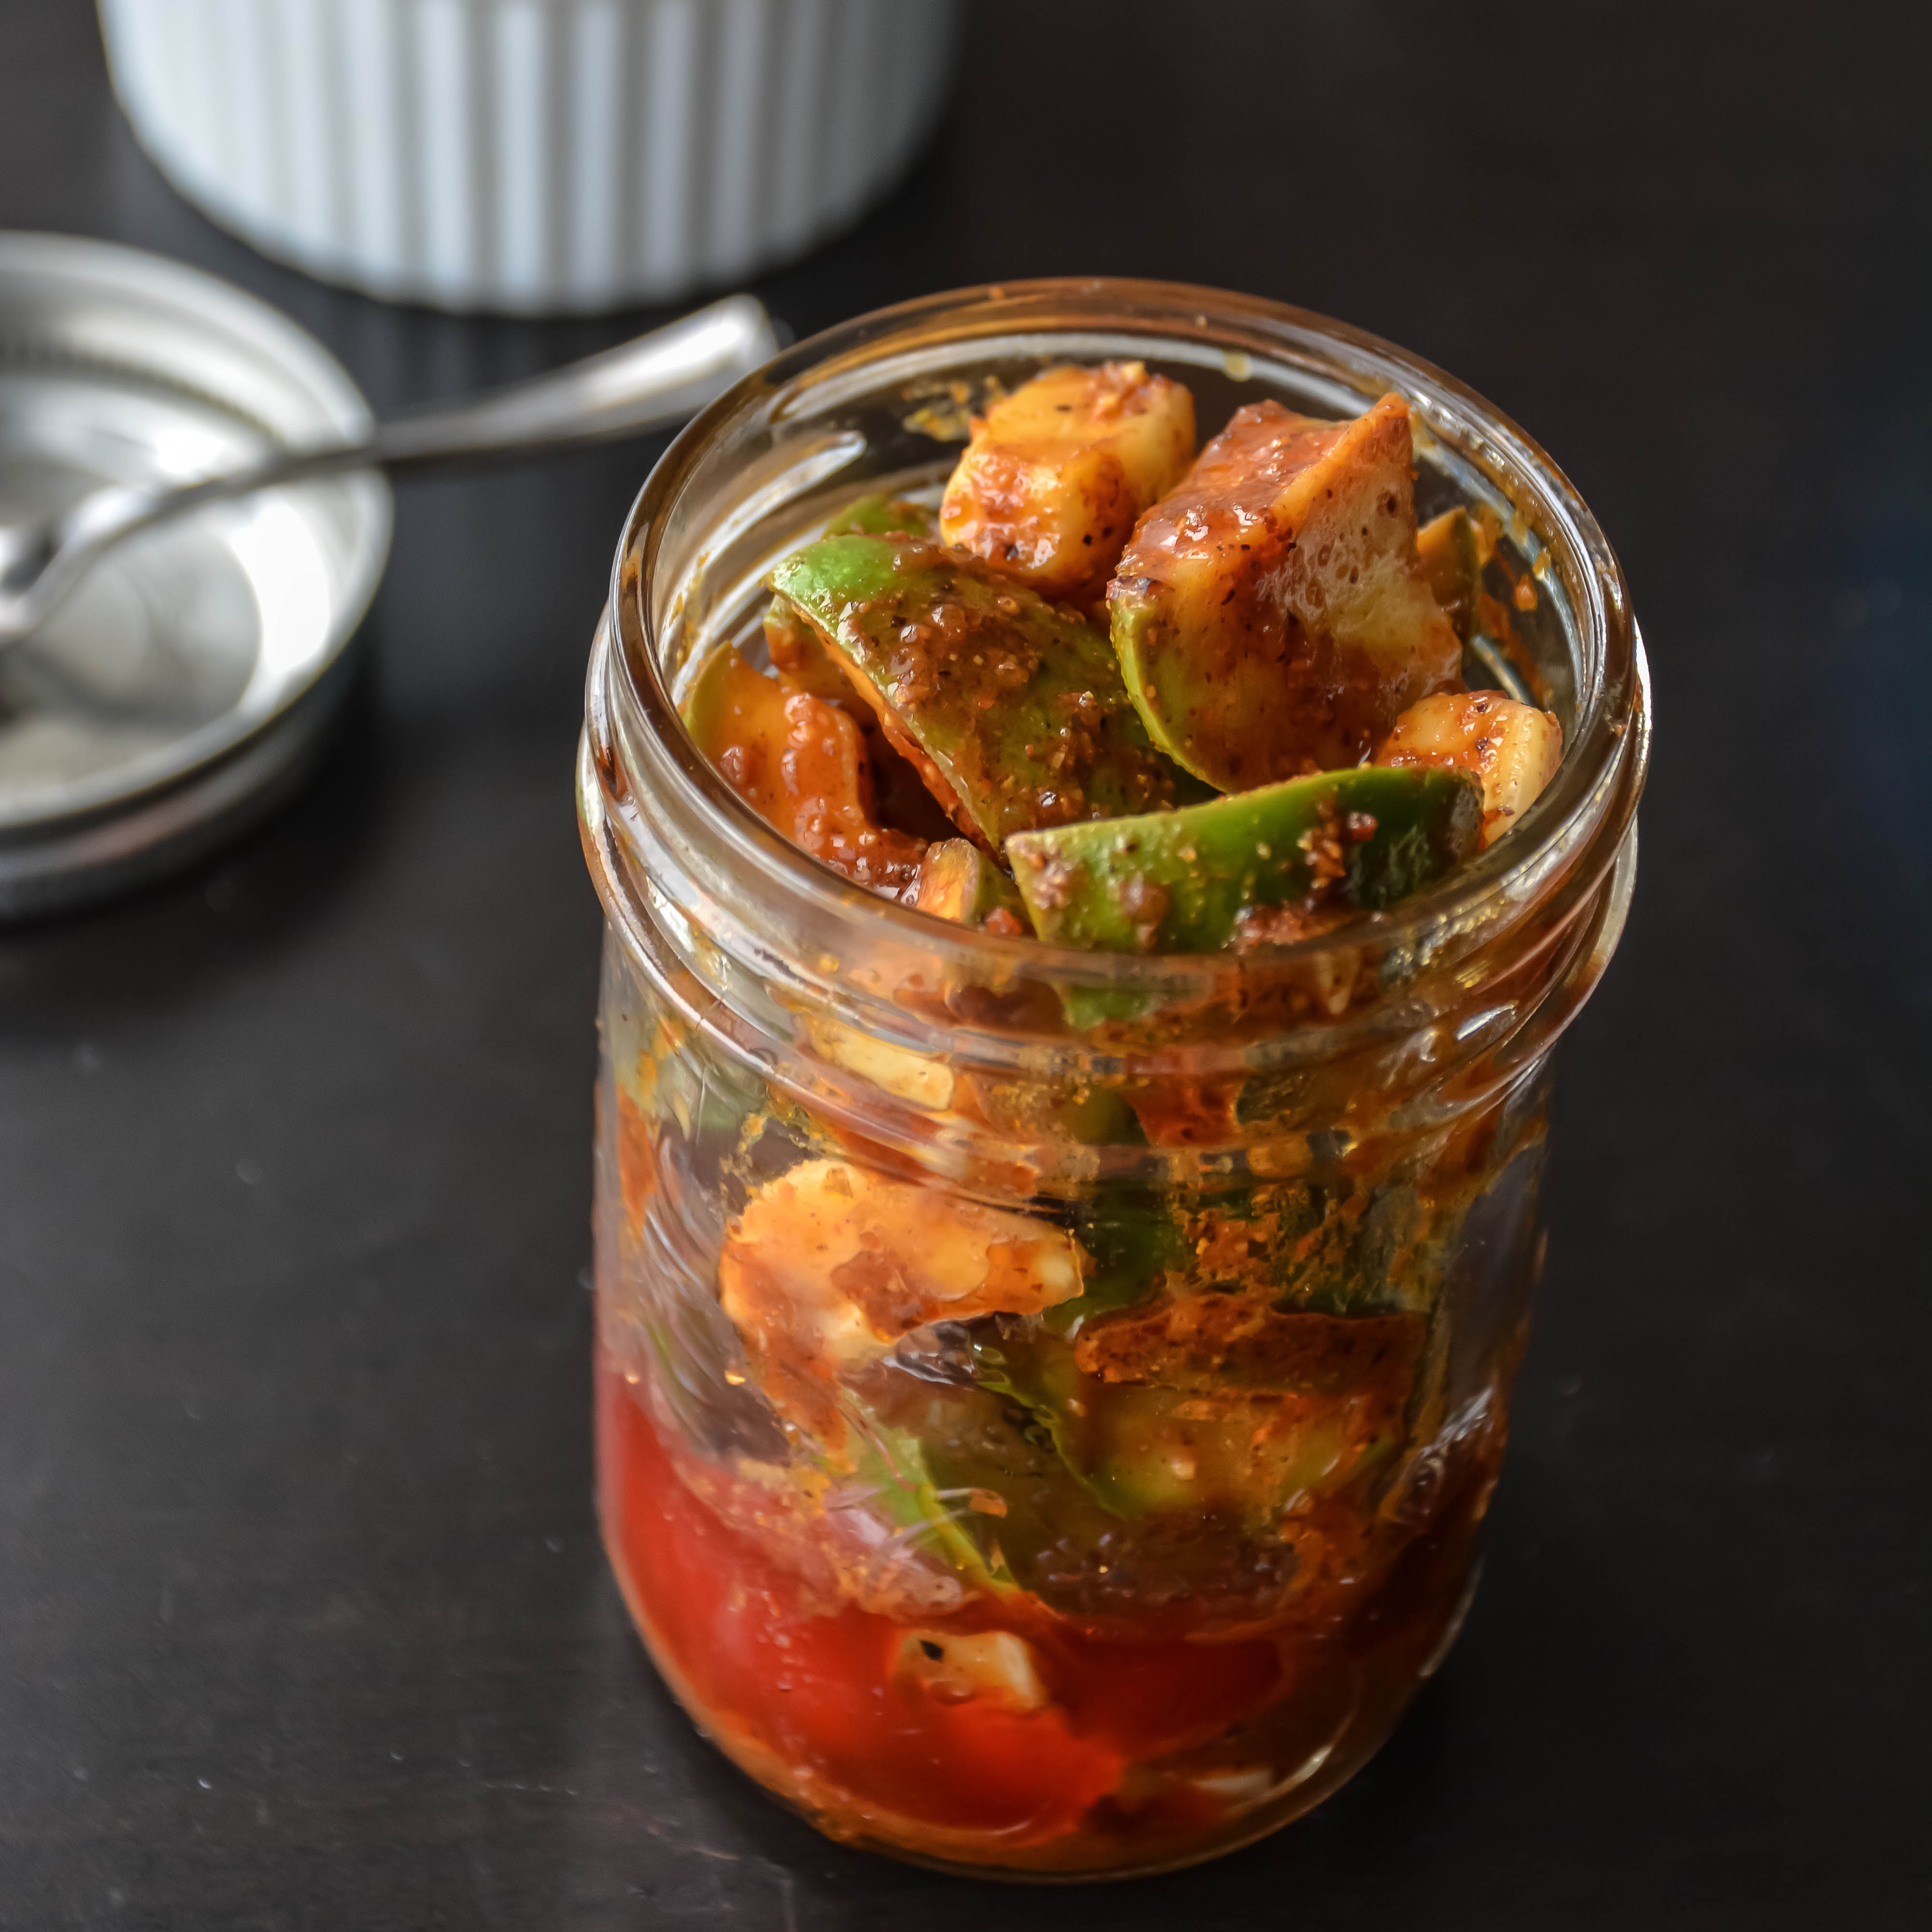
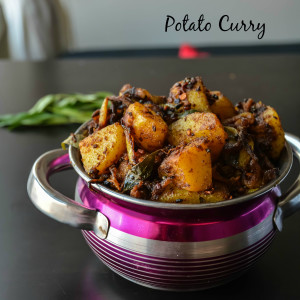
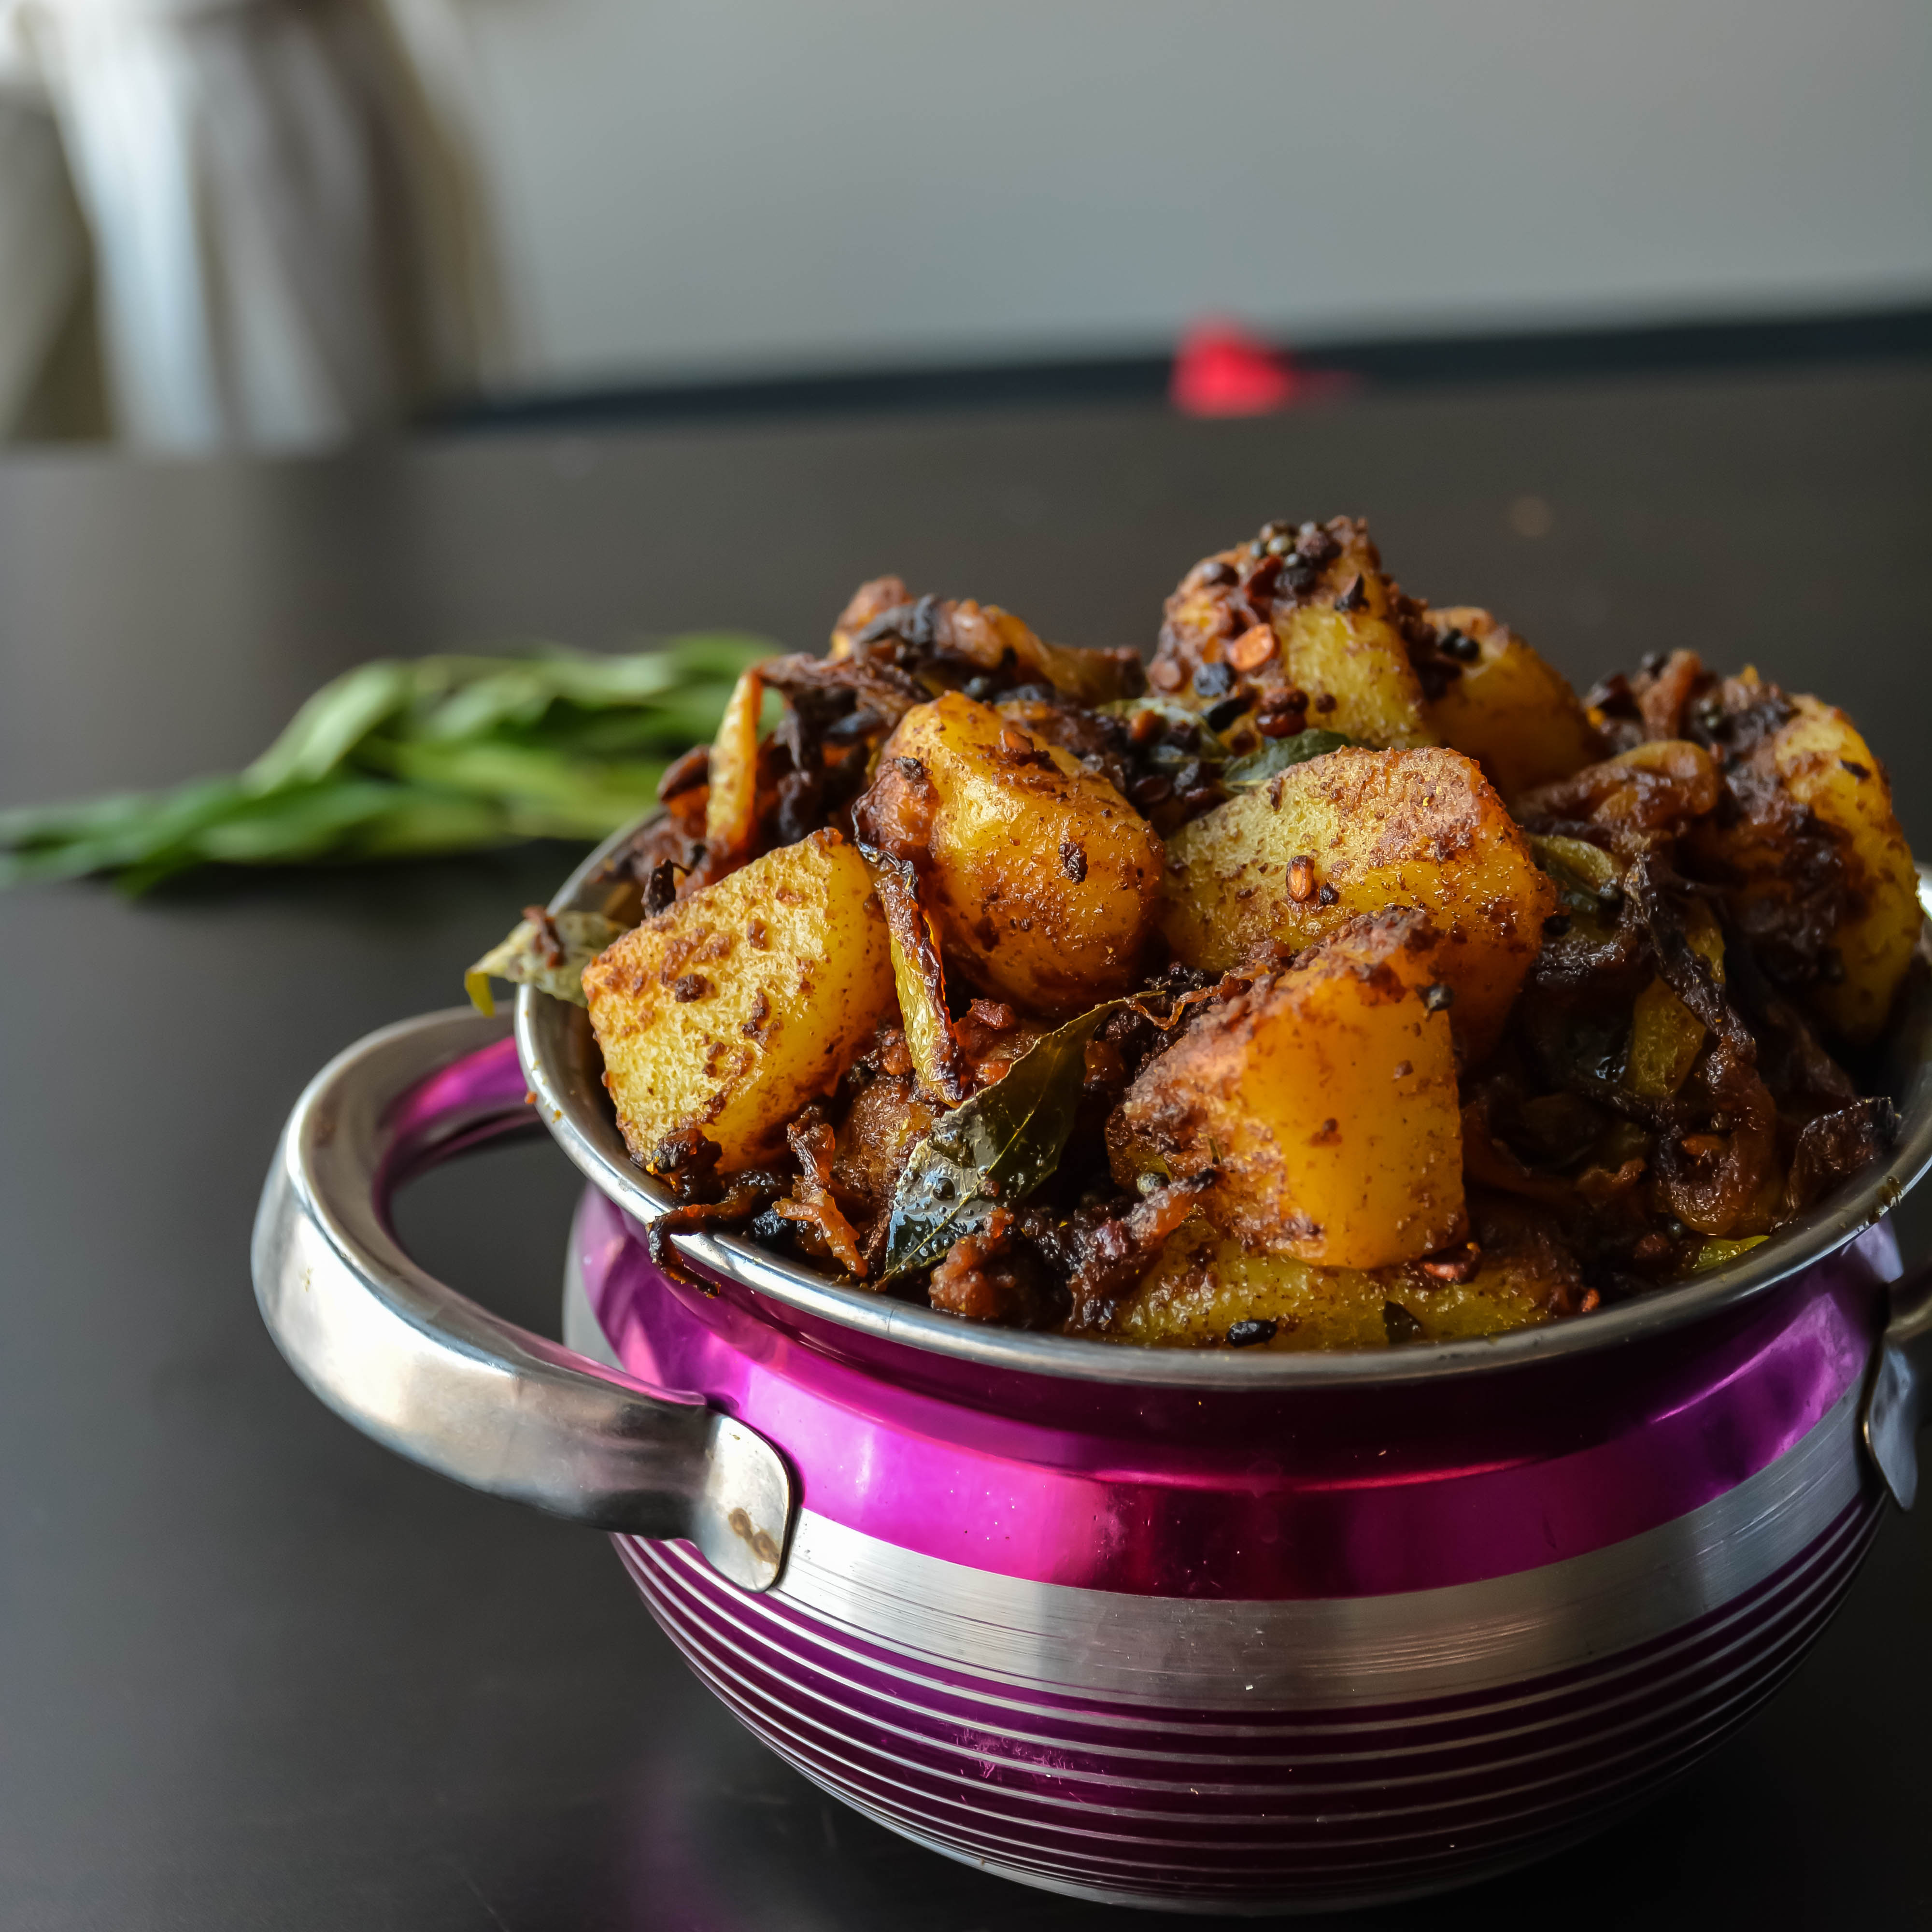
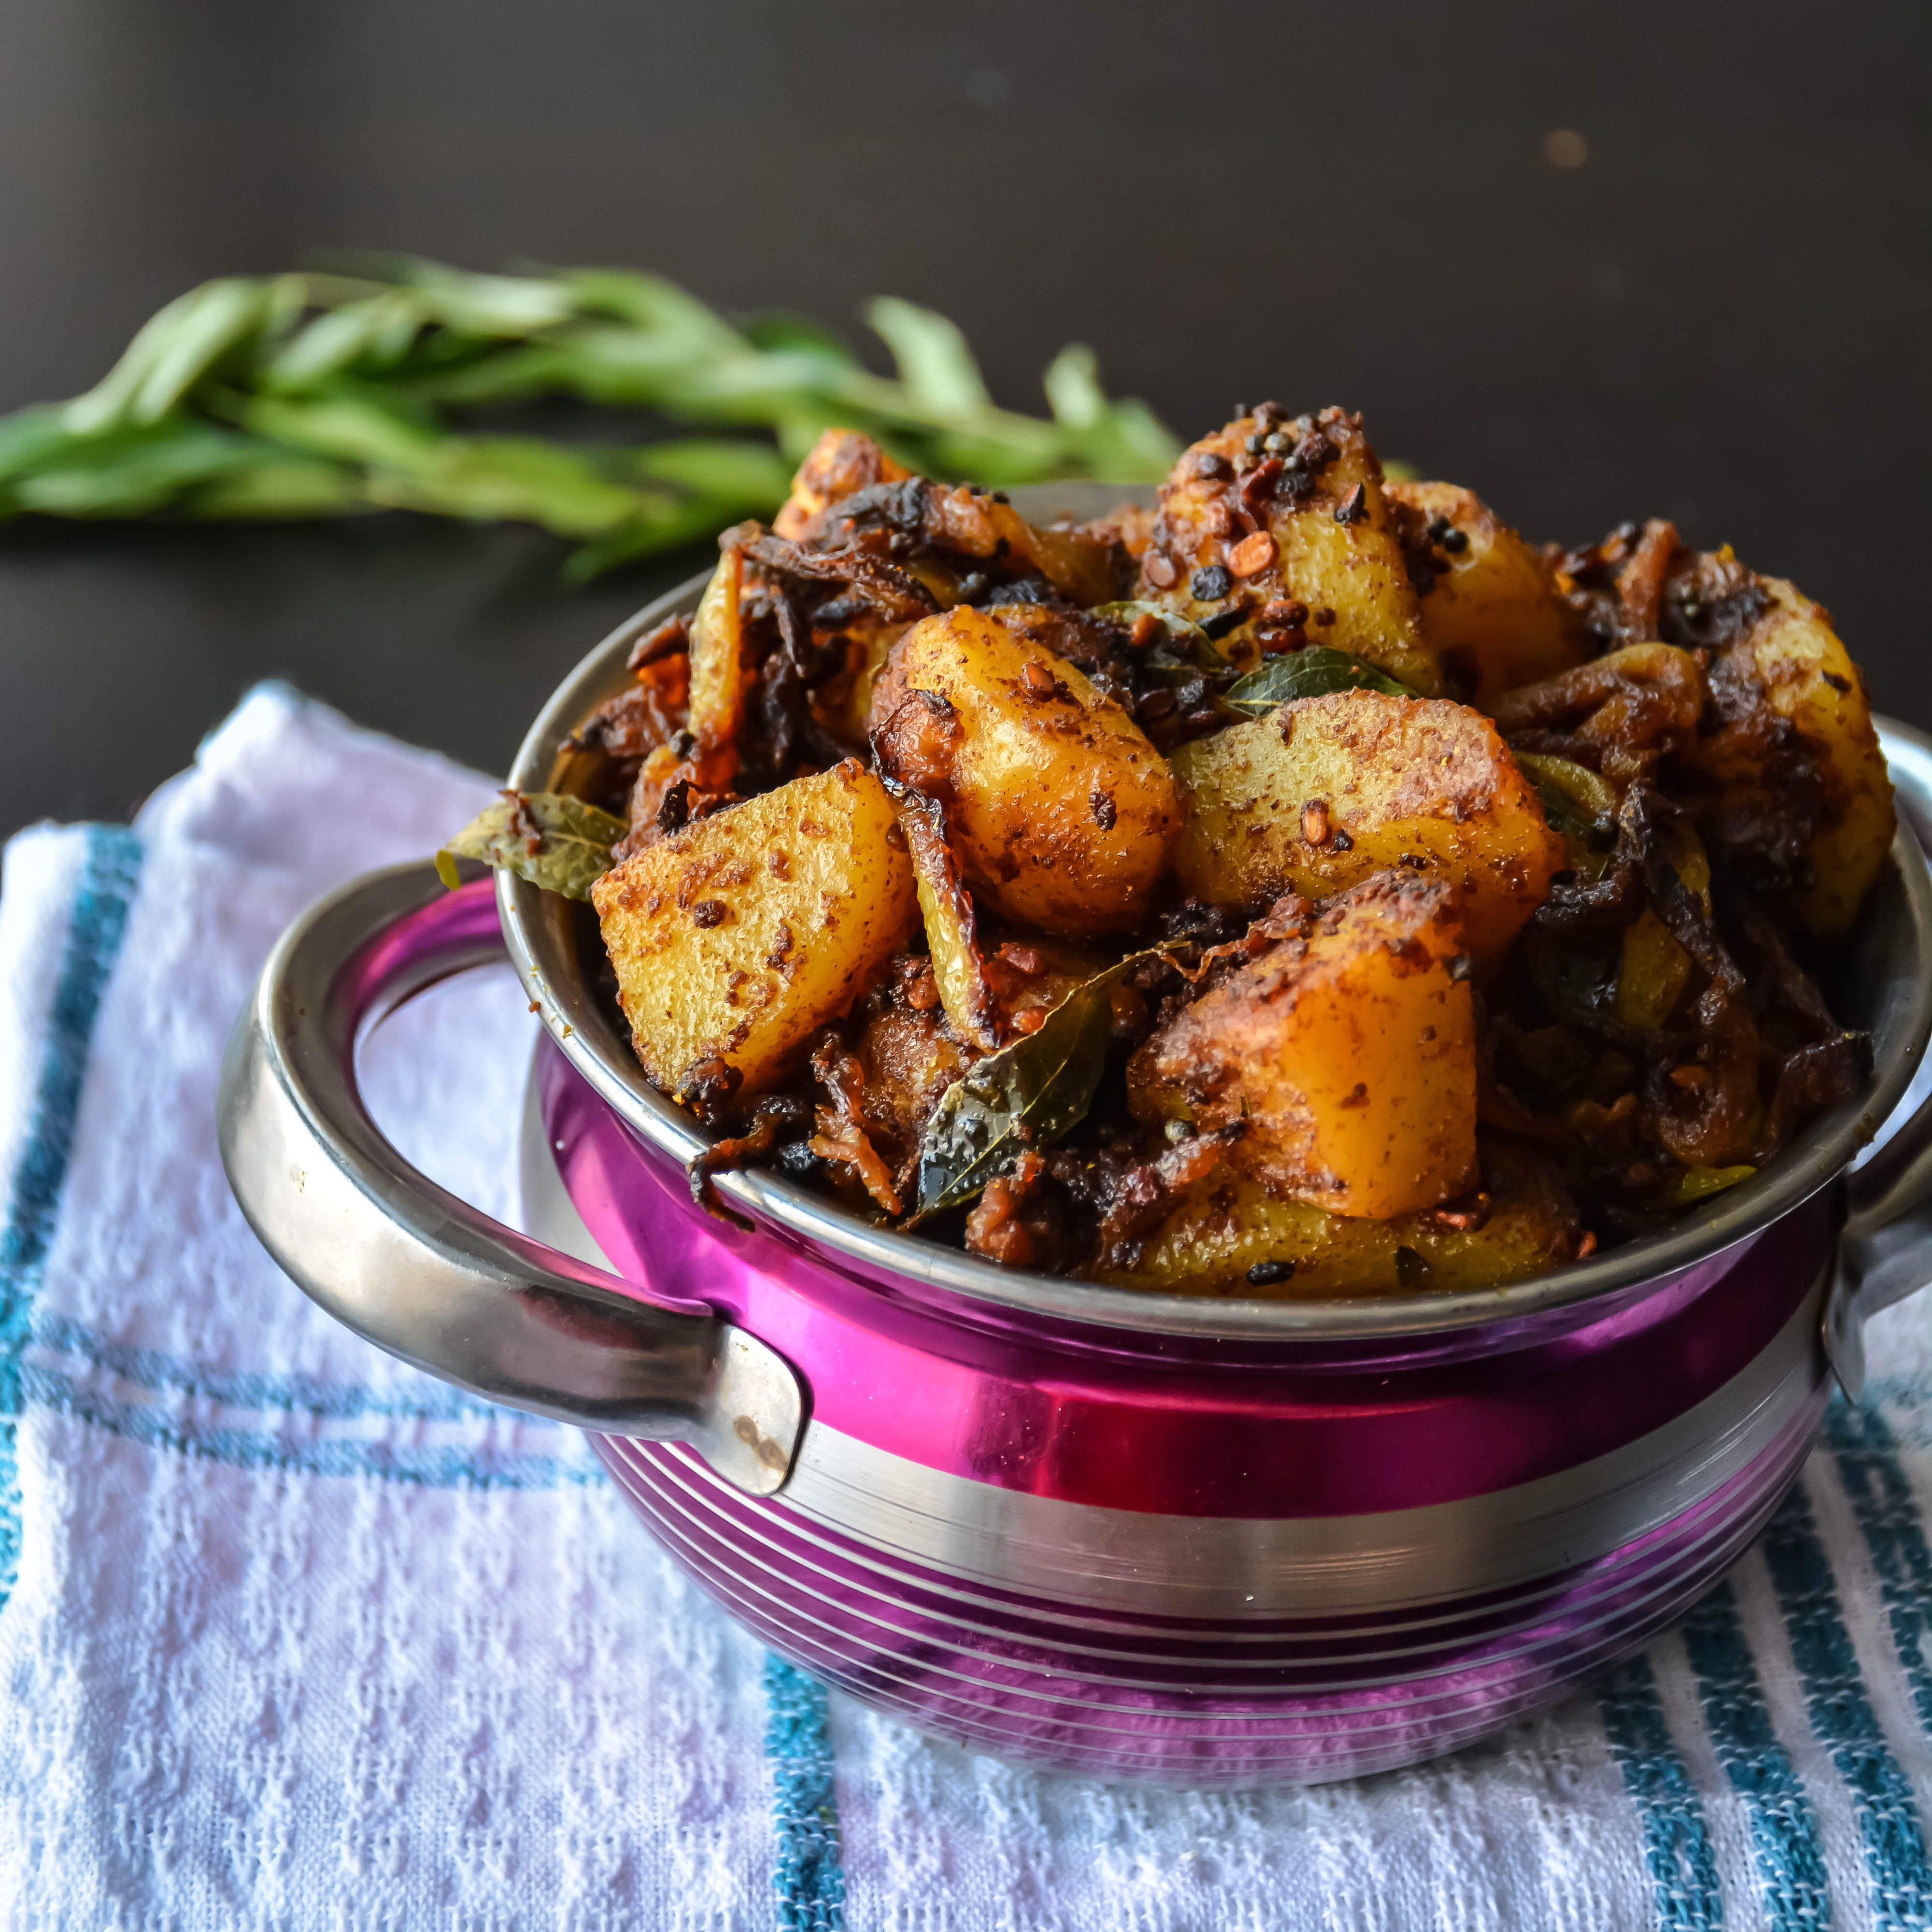
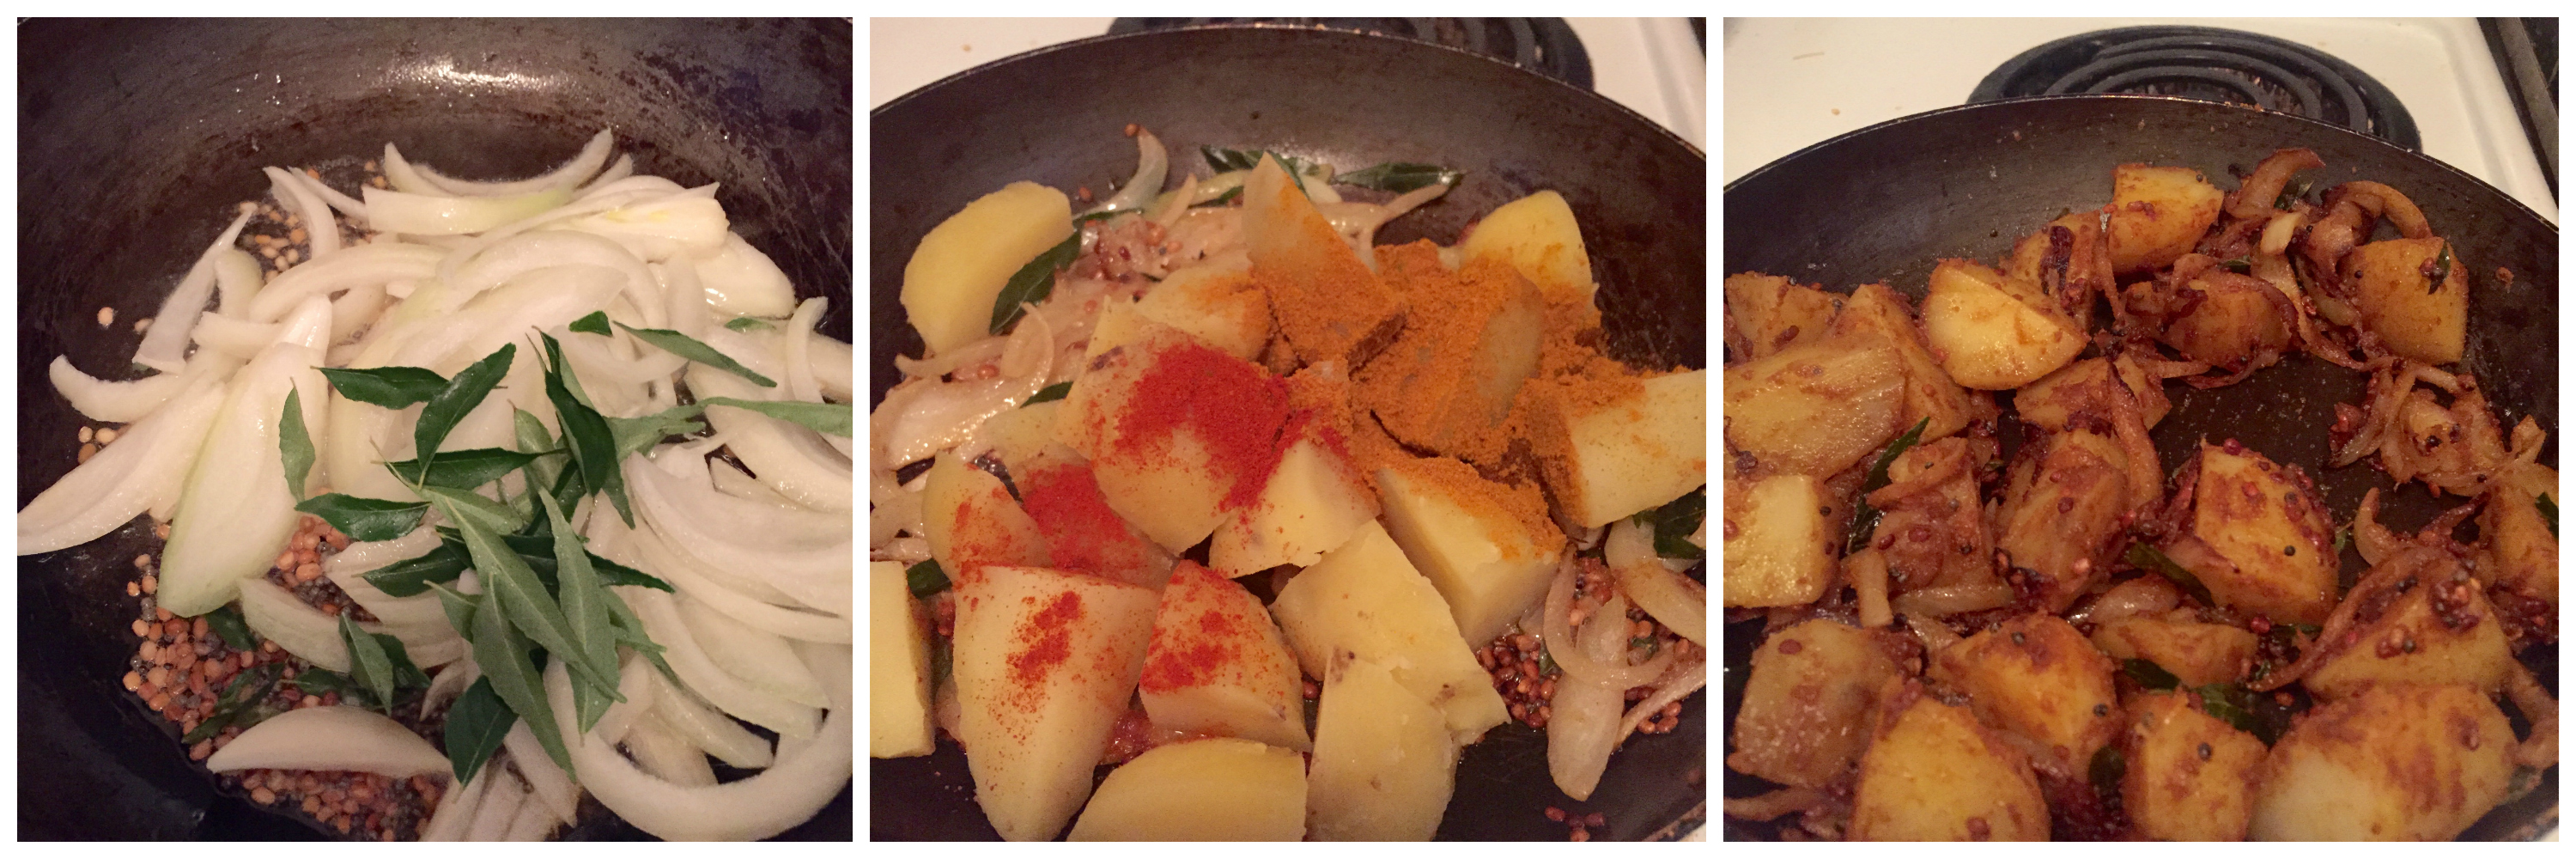
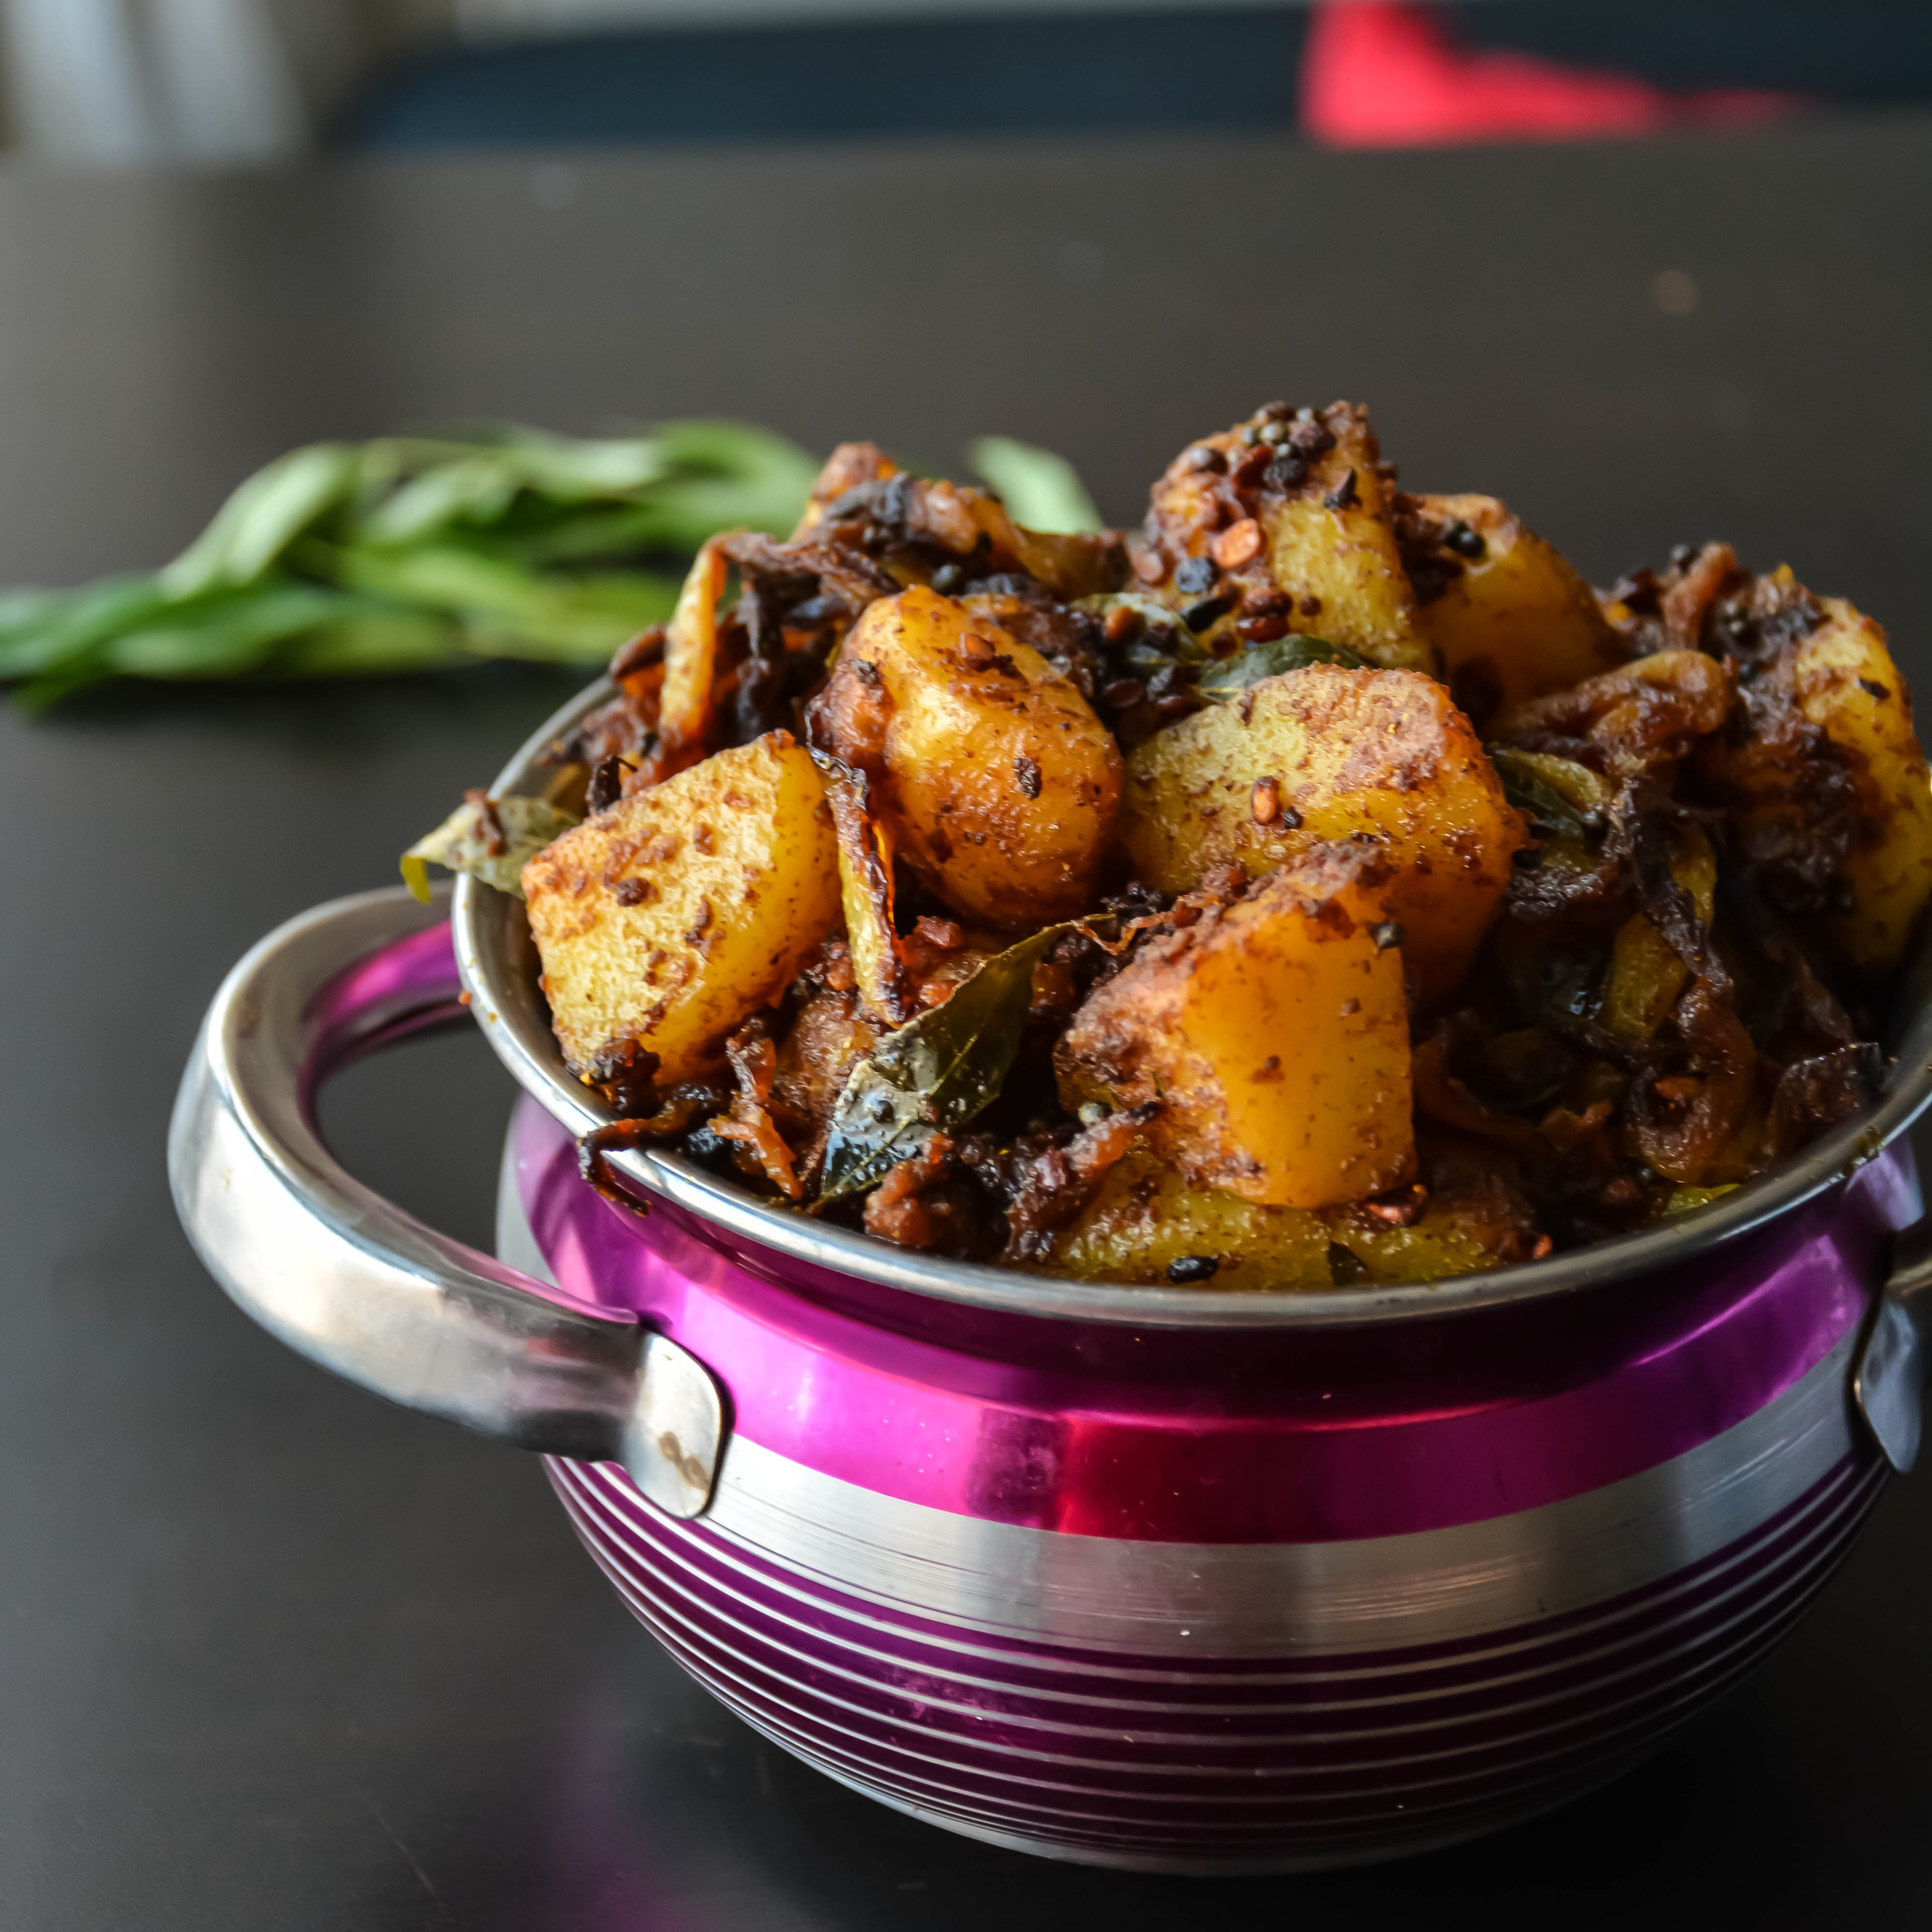
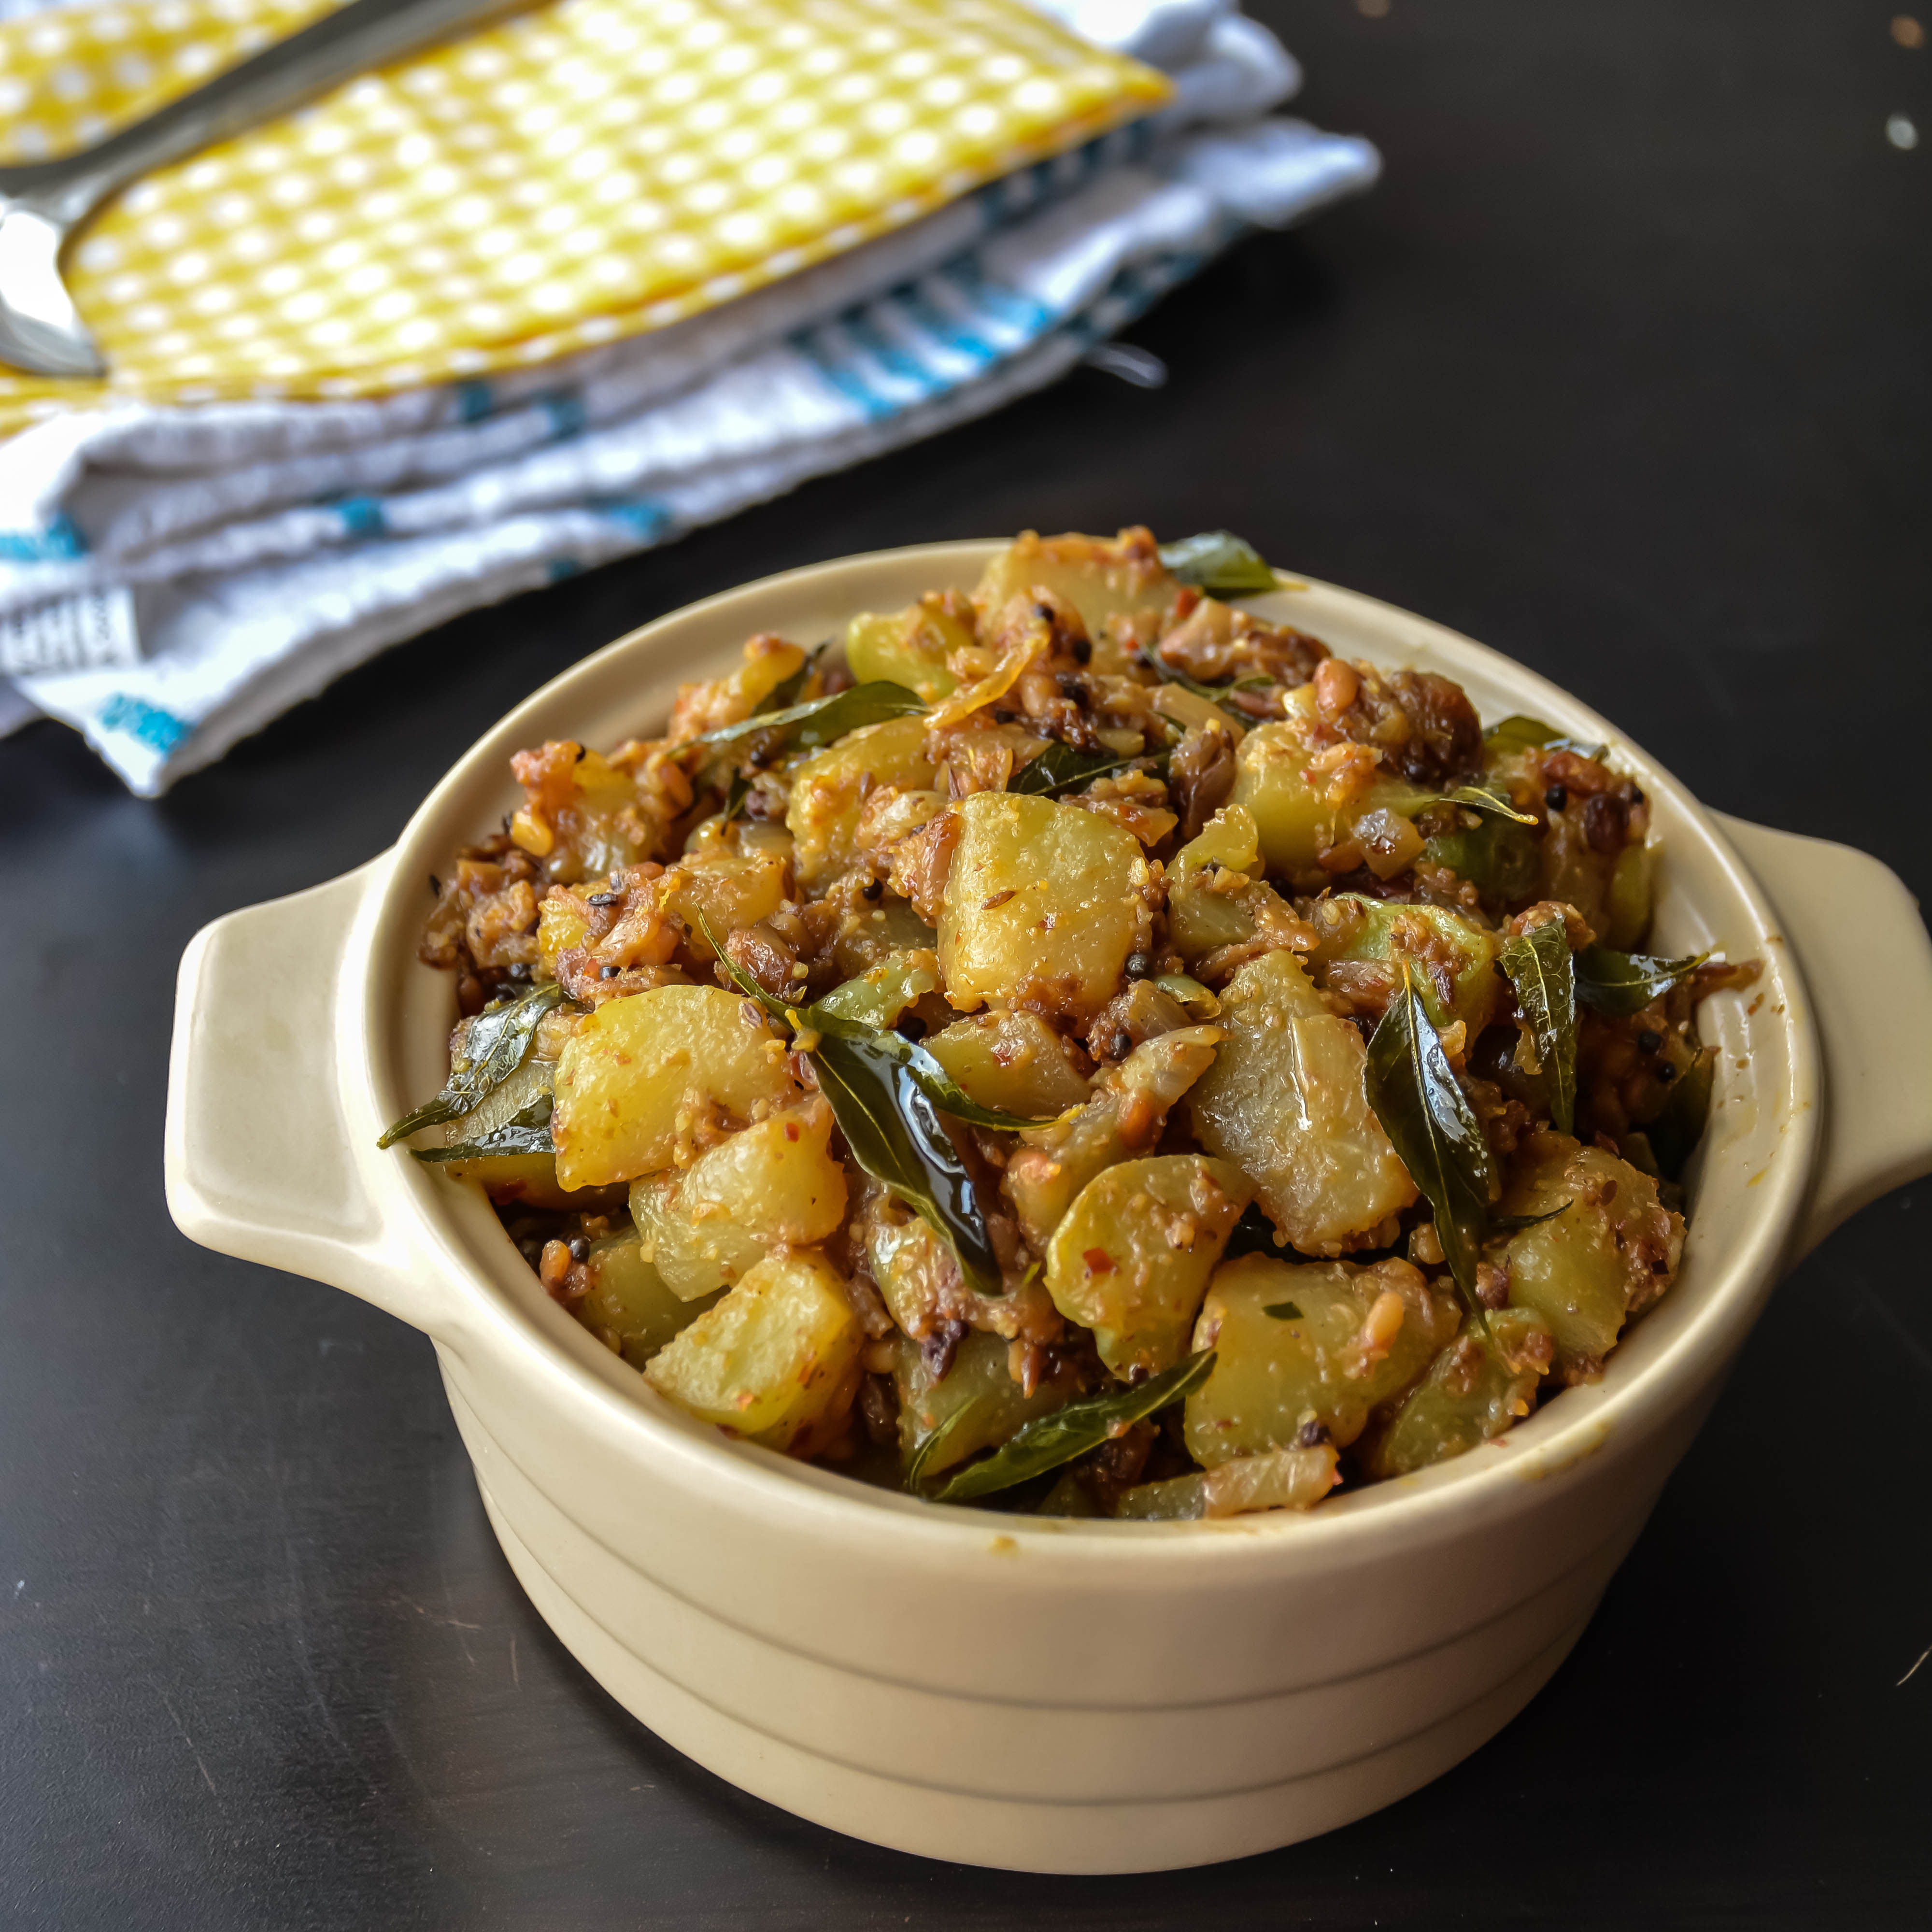
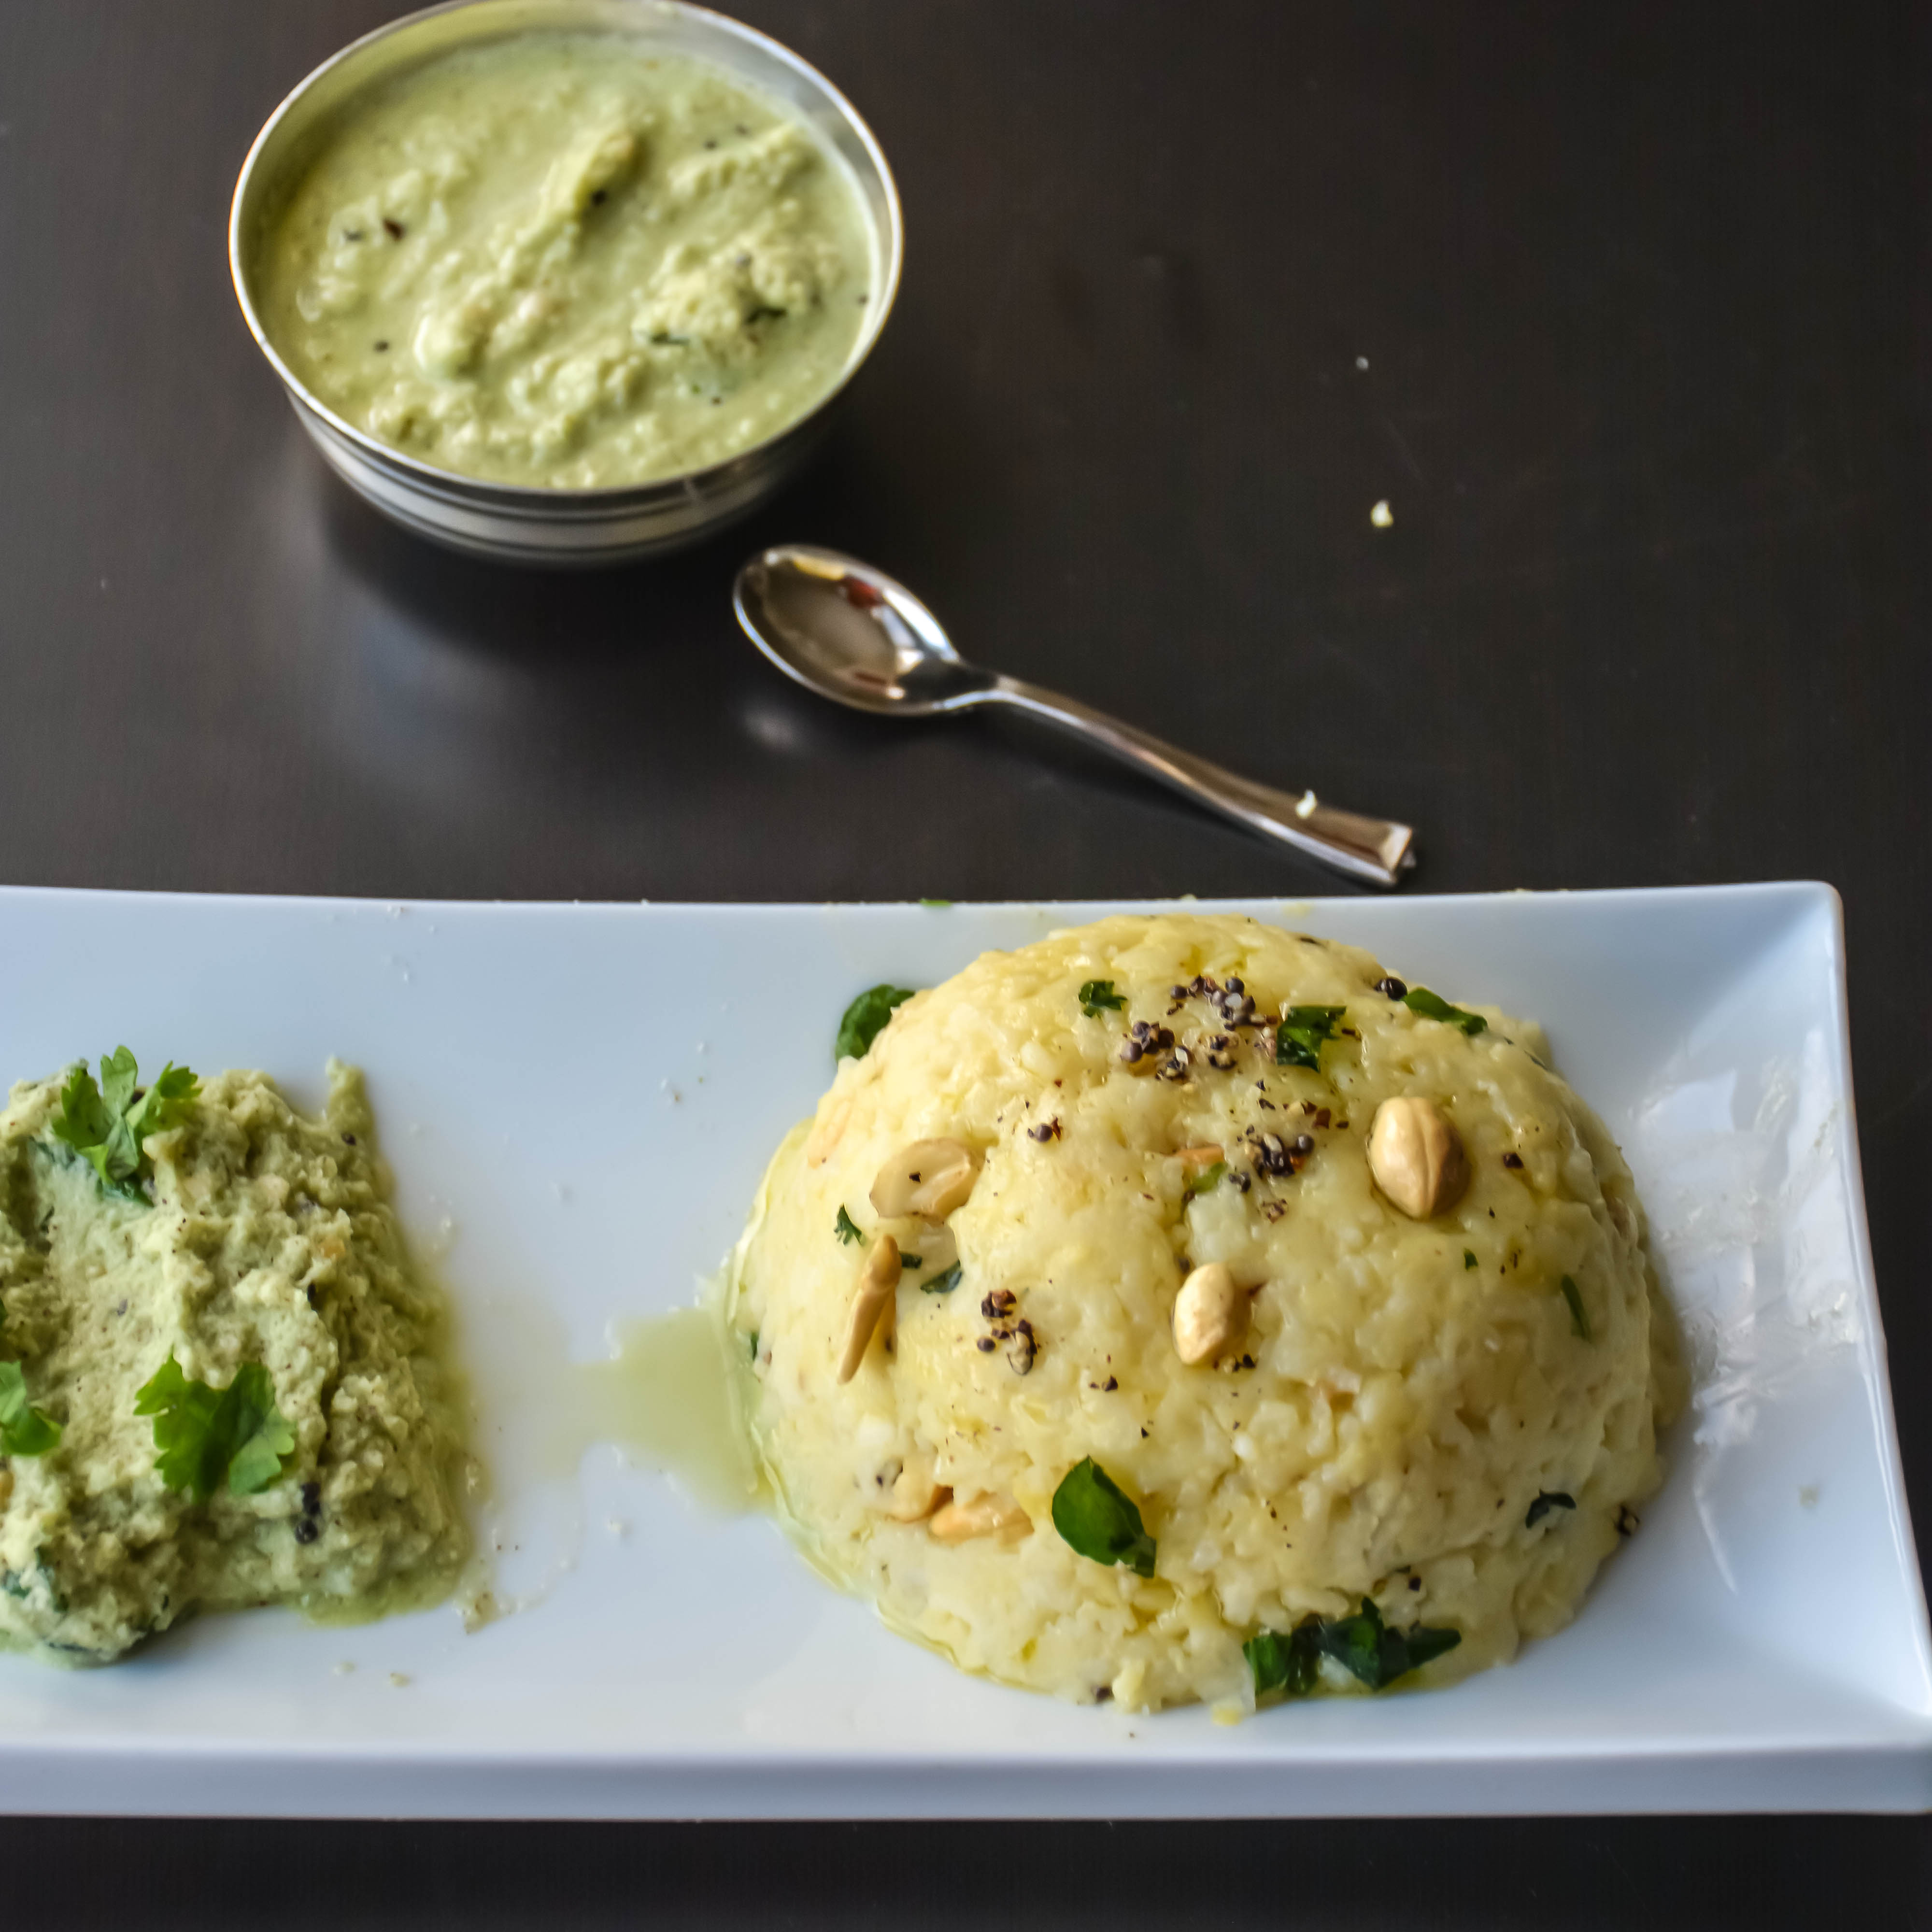
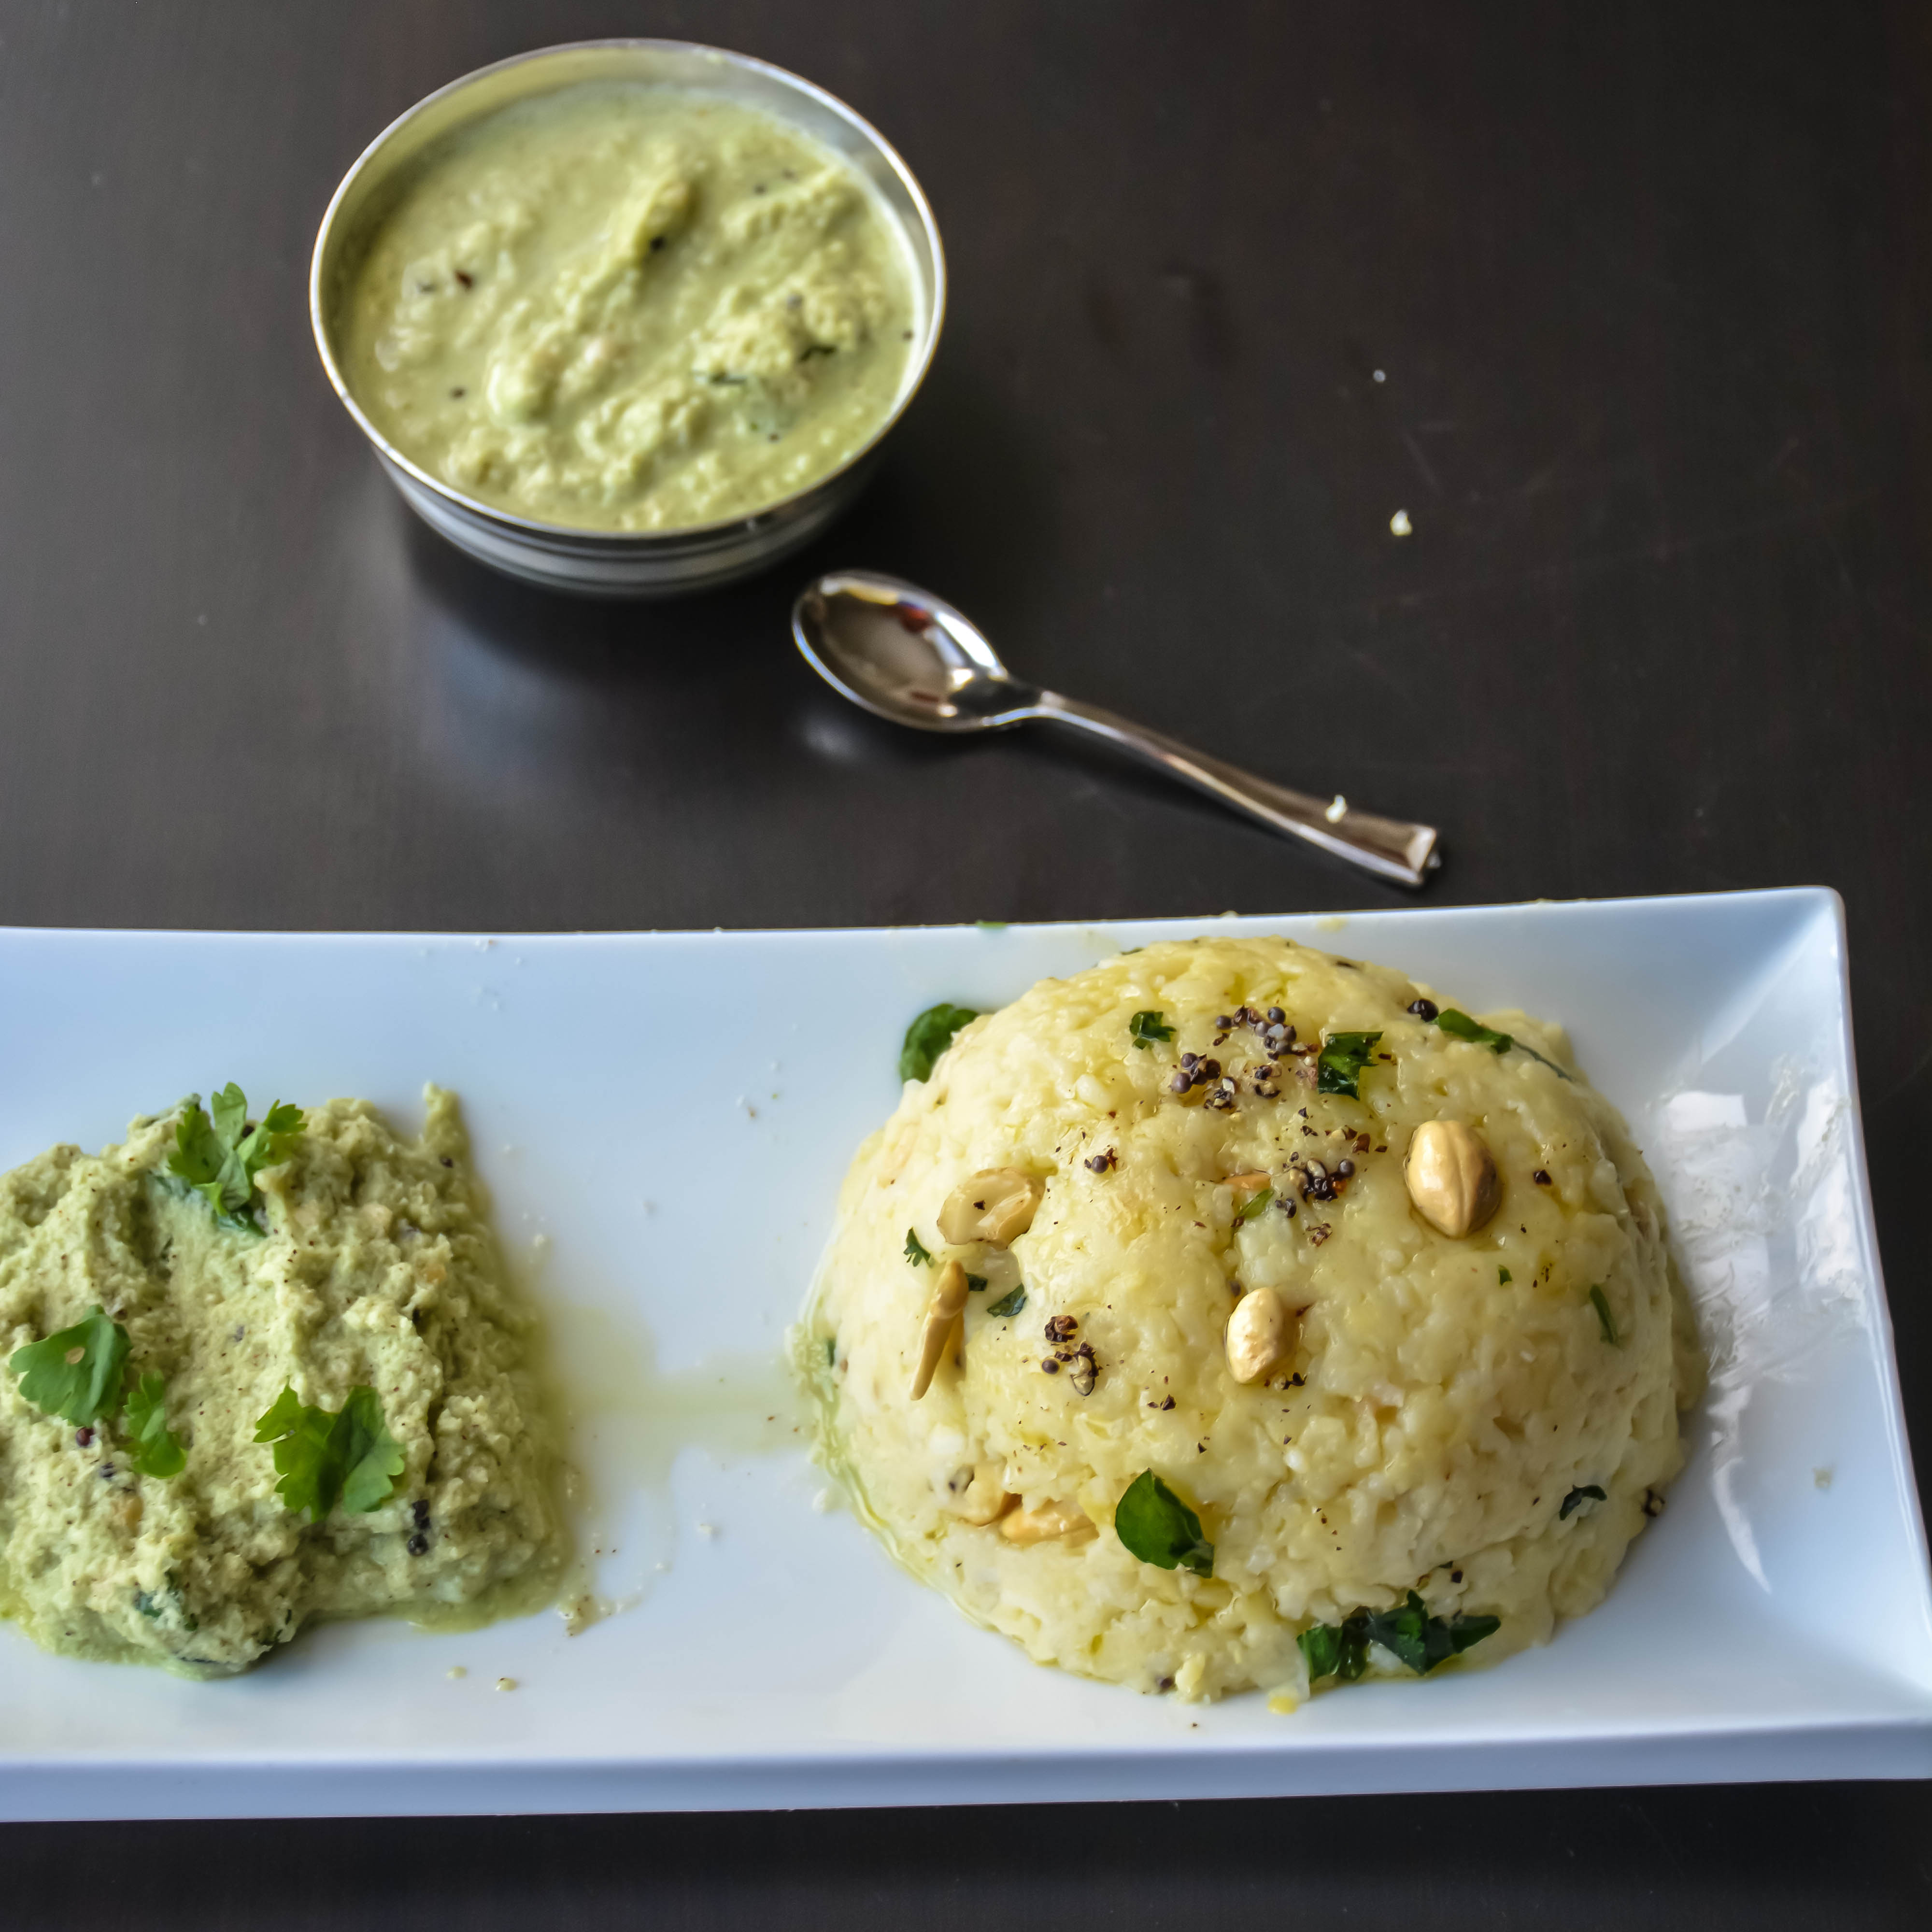
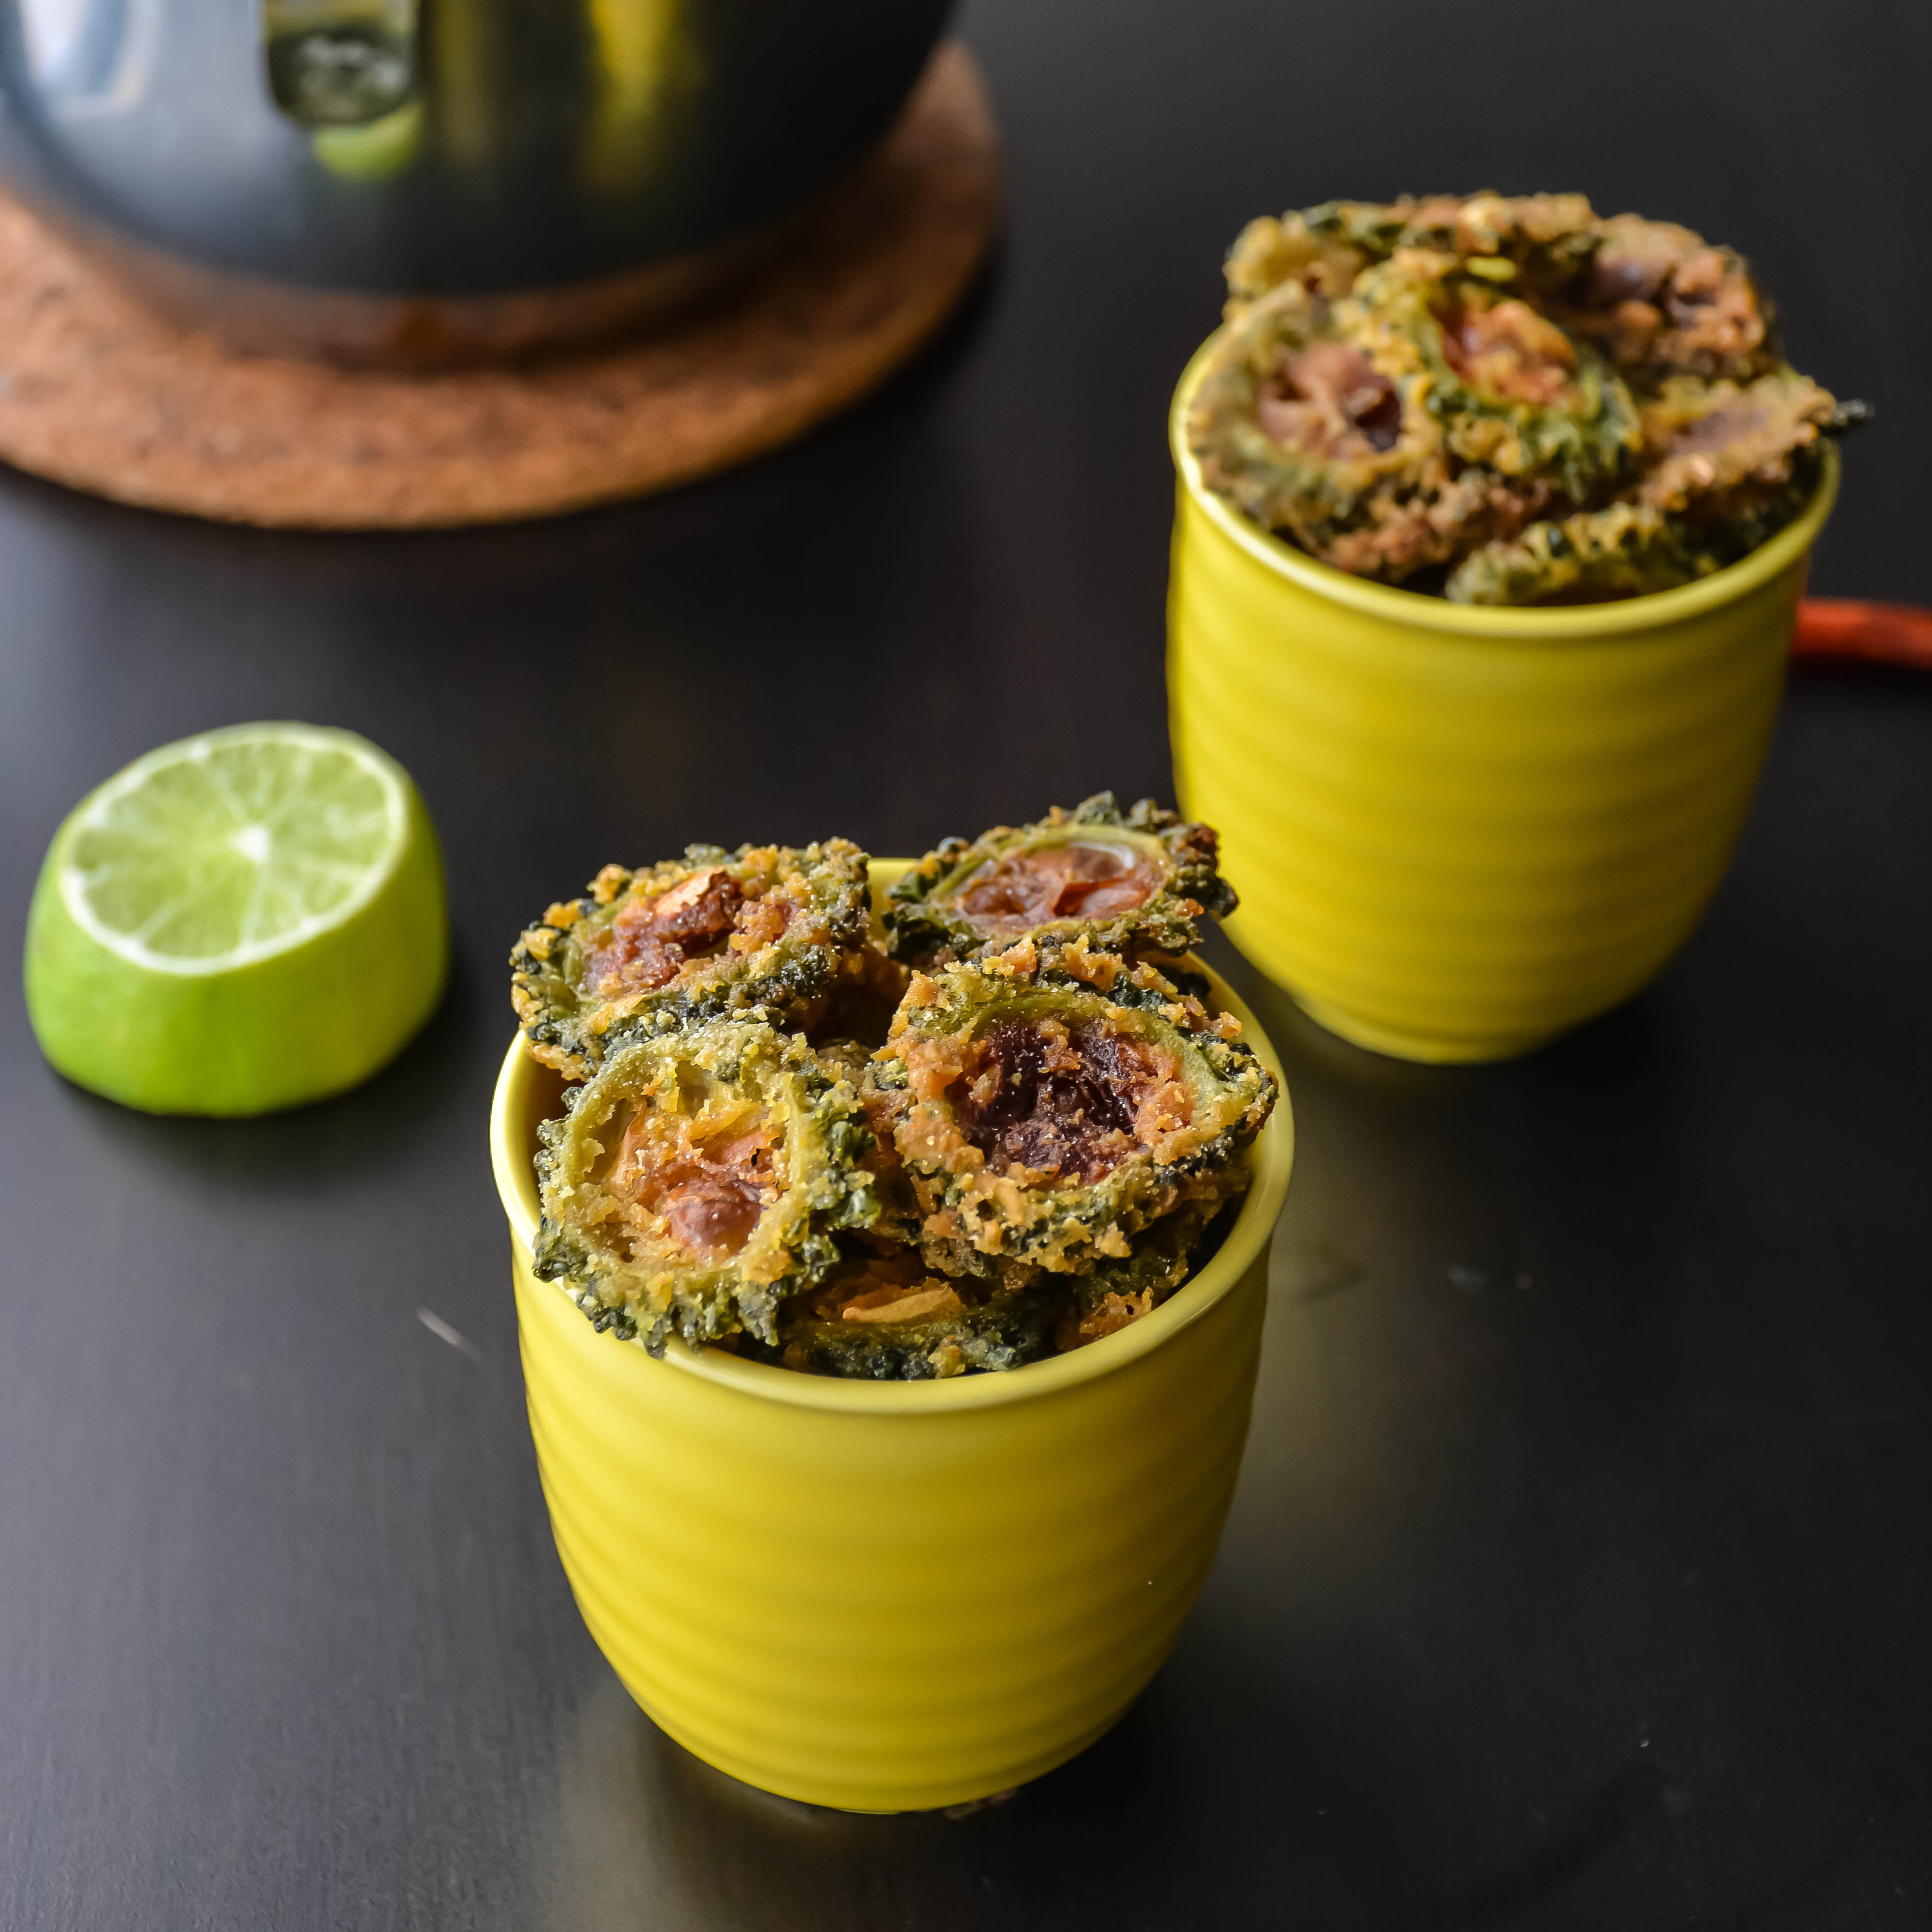
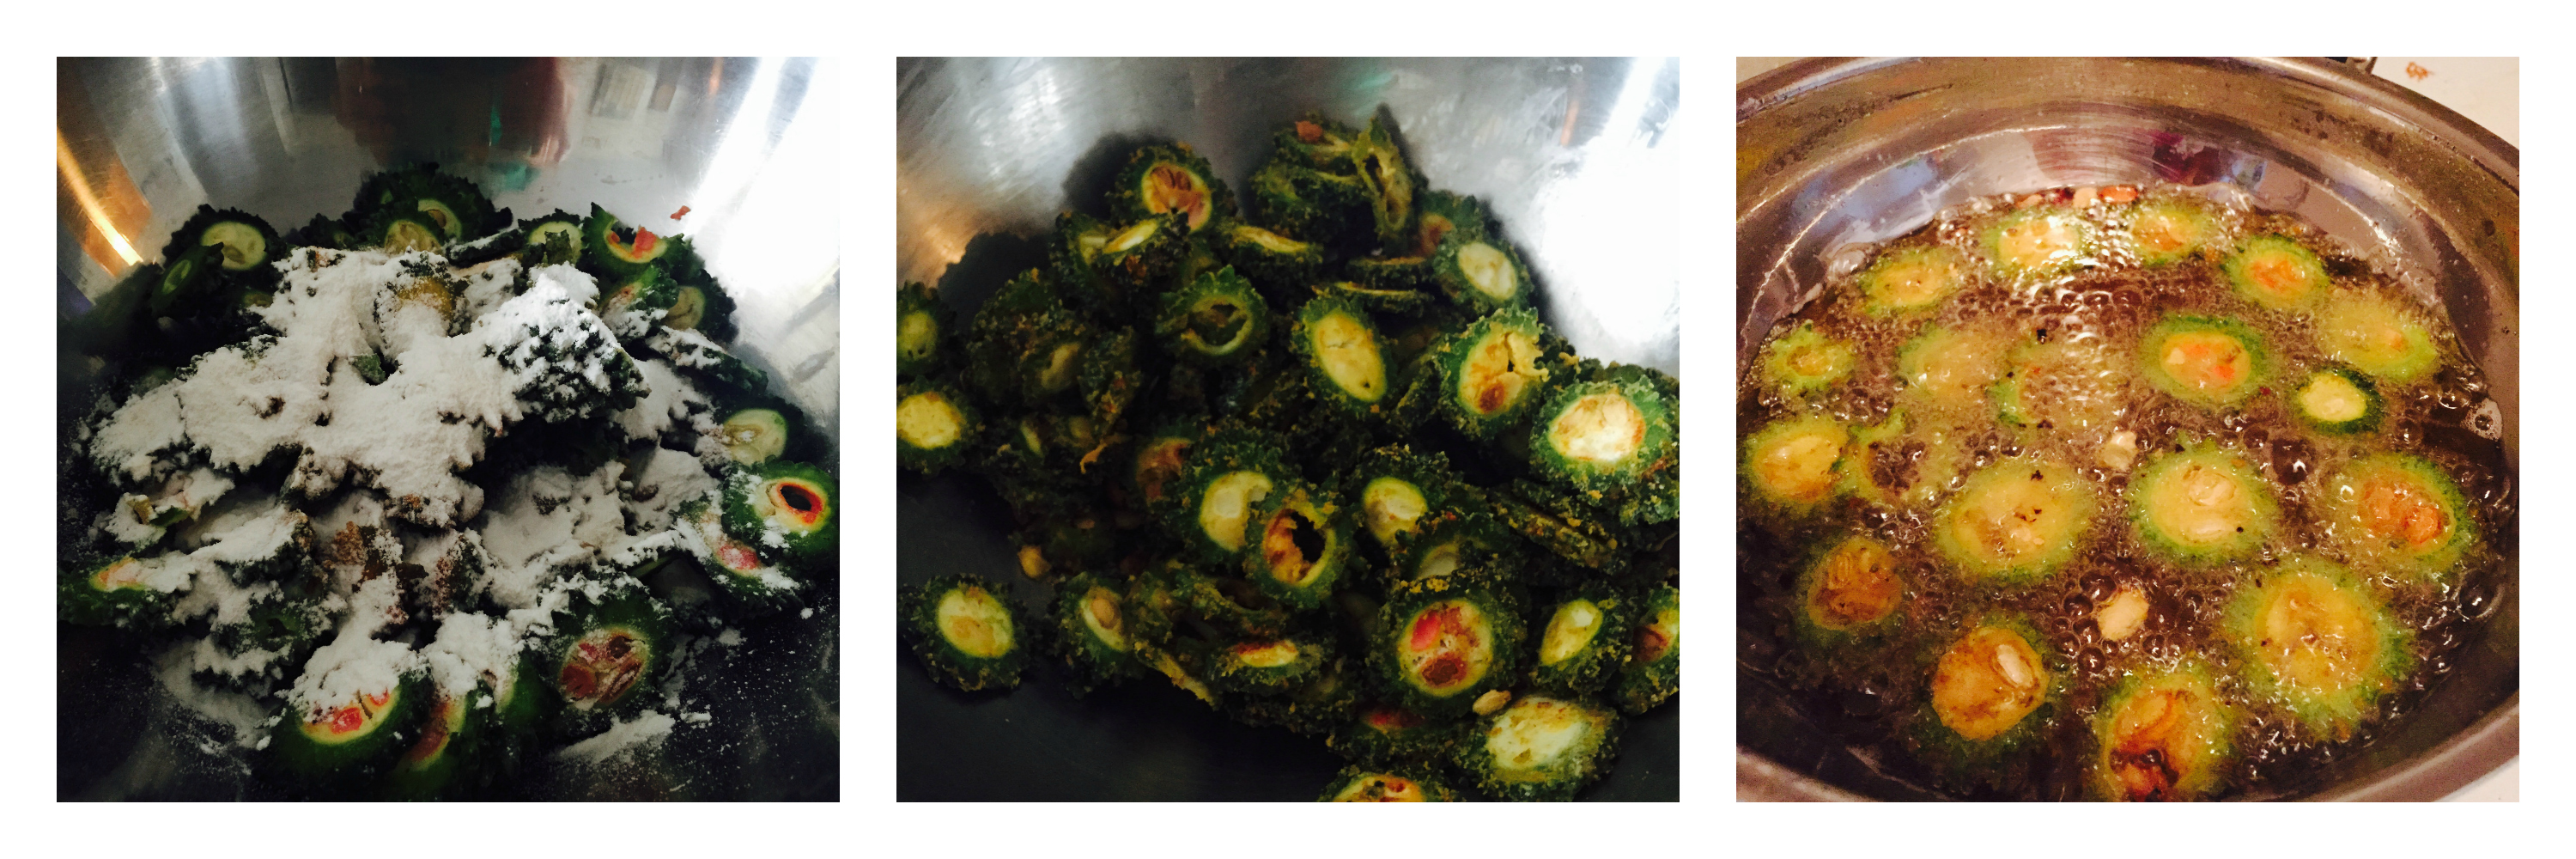
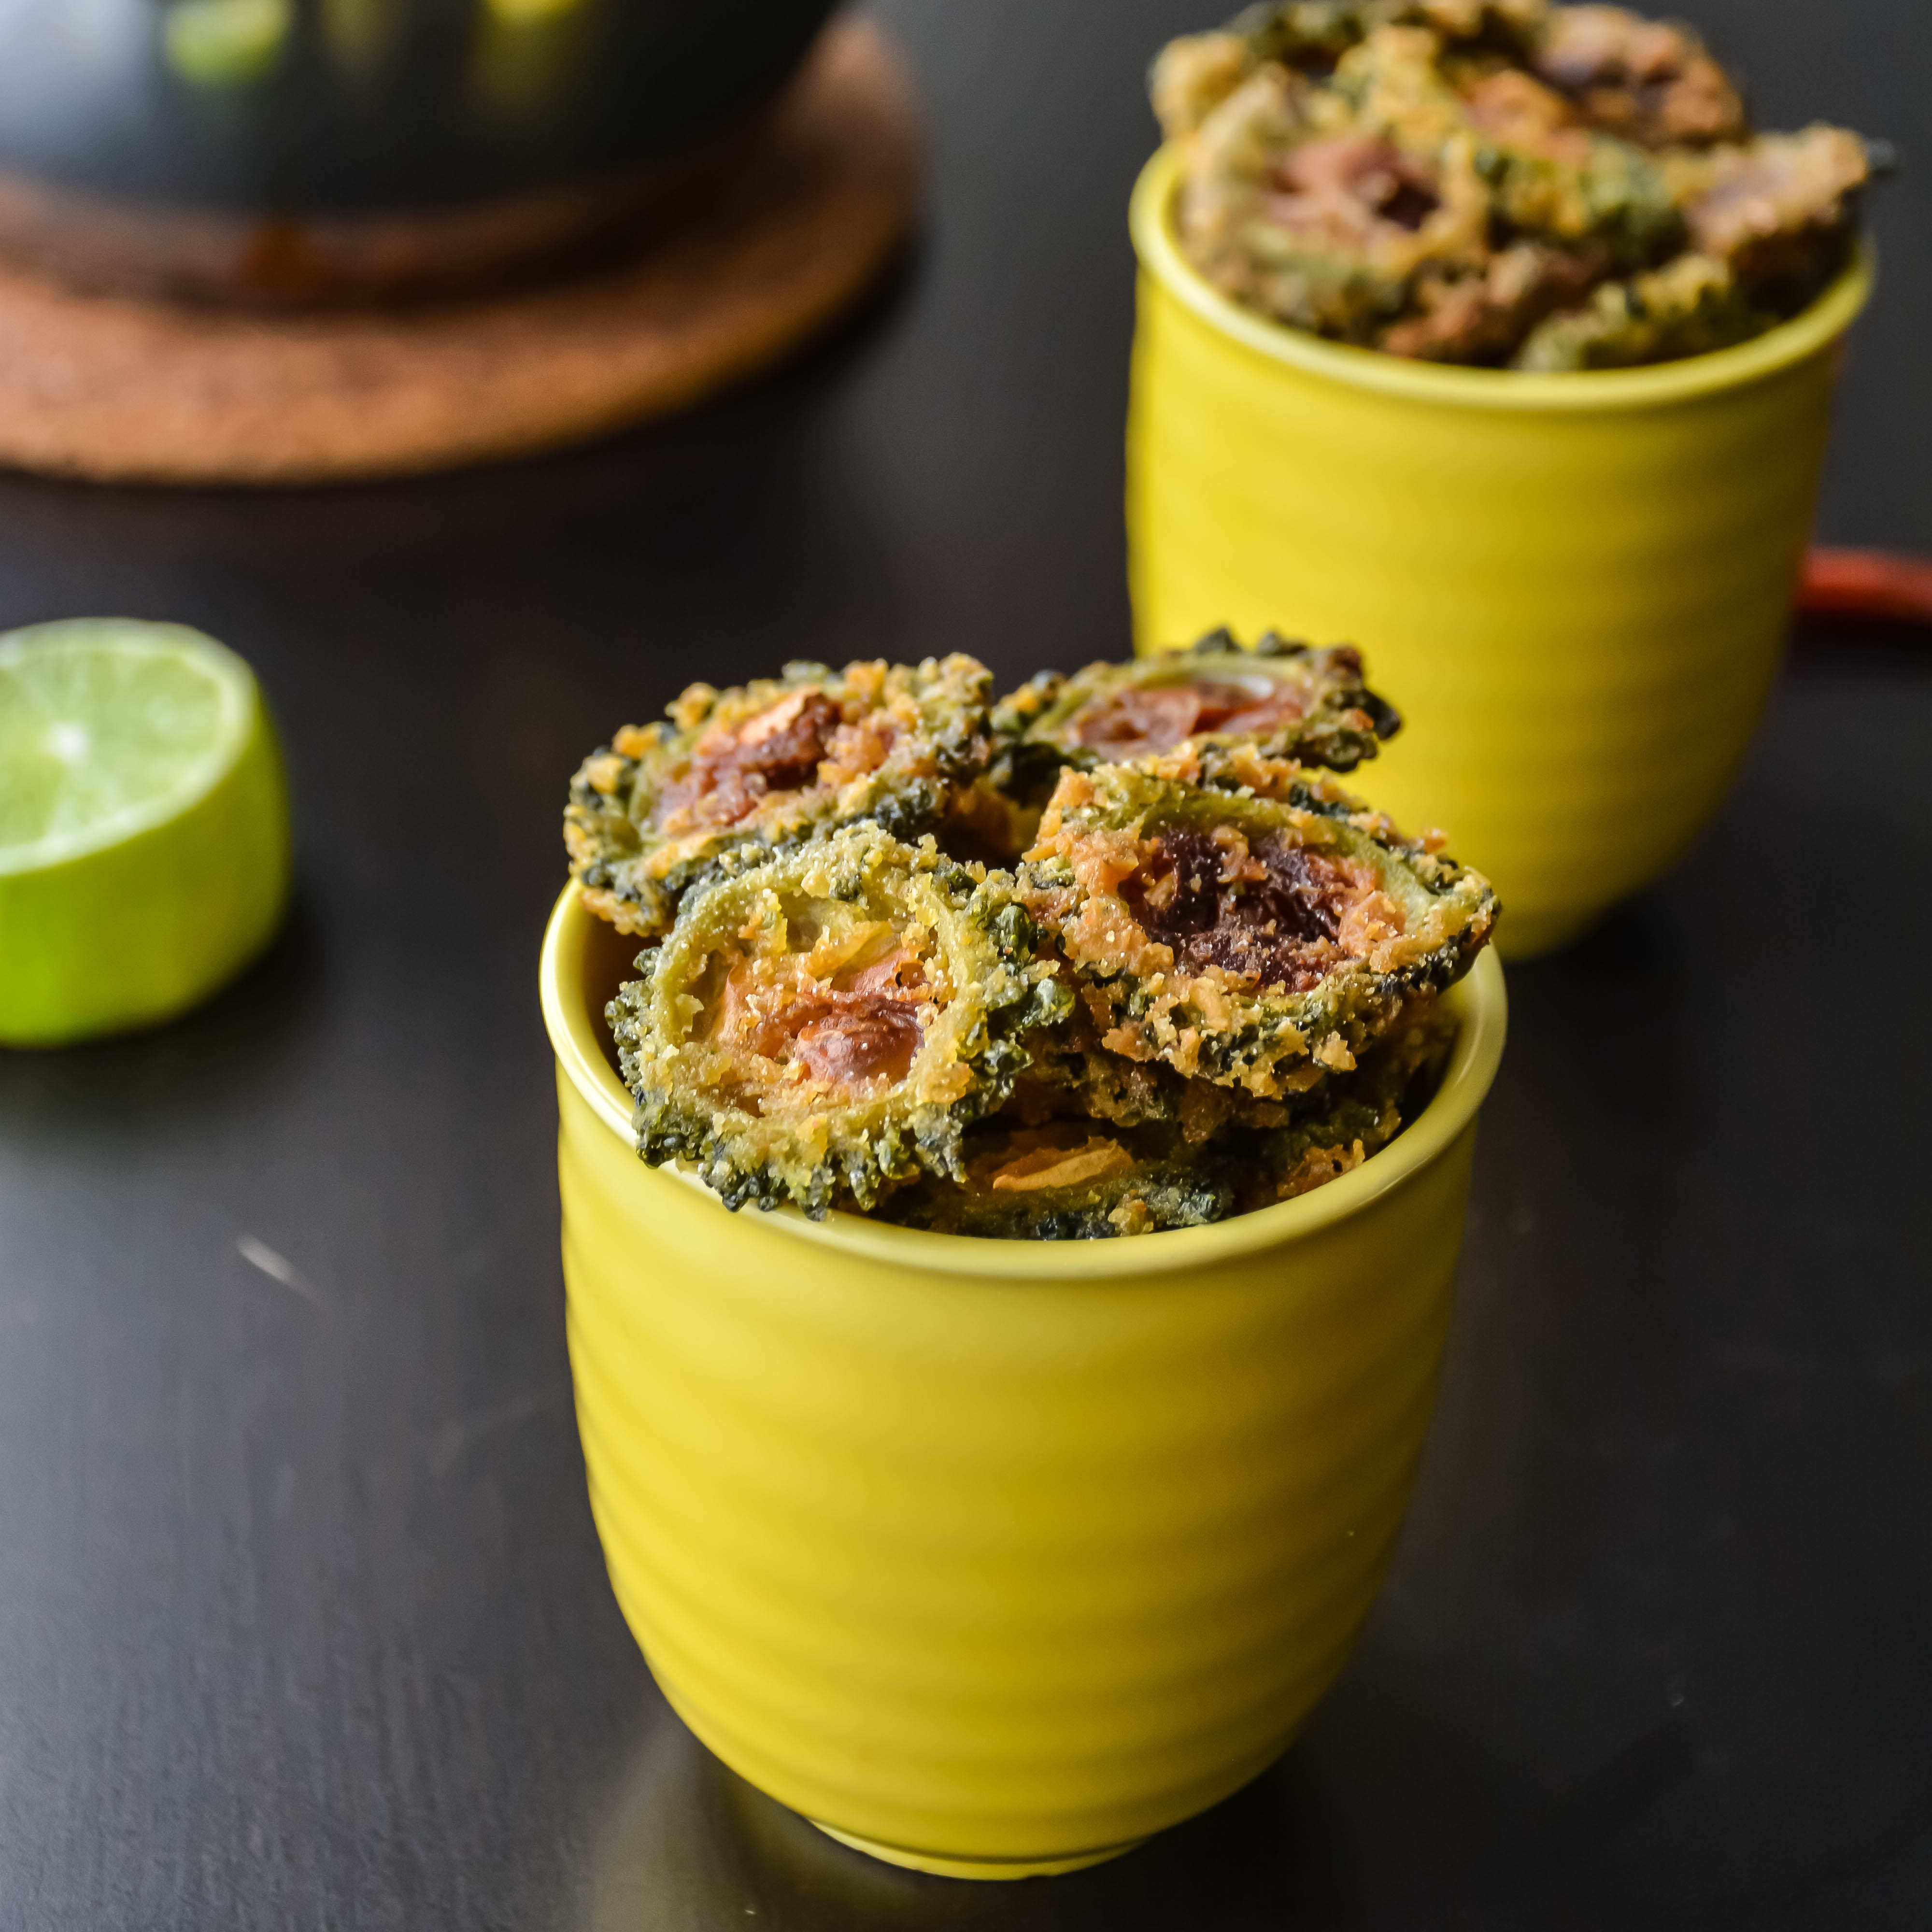
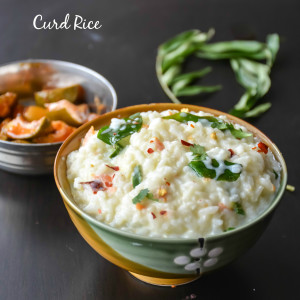
Curd rice taste great with some potato roast and pickle or okra garlic fry.

CurdRice

5.0 from 2 reviews
Print
Curd Rice/ Thayir Sadham Recipe
Author: Suganya Hariharan
Recipe type: Main
Cuisine: Indian
Prep time:  10 mins
Cook time:  15 mins
Total time:  25 mins
Serves: 1 cup
 
Ingredients
  • Raw rice – ½ cup
  • Plain yogurt/Curd – ½ cup
  • Milk – ½ cup
  • Butter – 1 tsp (Optional)
  • Cucumber – 2 tbsp (Finely Chopped)
  • Carrot – 1 tbsp (Finely Chopped)
  • Mango – 2 tbsp (Finely chopped)

    To temper:
  • Oil – 2 tsp
  • Mustard – 1 tsp
  • Urad Dal – 1 tsp
  • Asafoetida – a generous pinch
  • Red chilli - 1, broken
  • Ginger – 1 tsp (Finely chopped)
  • Green chilli – 1, (finely chopped)
  • Curry Leaves – 1 sprig
  • Coriander leaves – 1 tbsp, chopped
Instructions
  1. Wash the rice well and pressure cook with 2 cups of water for 5 whistles in medium flame. Once done, mash the rice well. Pour the hot milk and add butter at this stage and mix well.
  2. Let it cool down fully. Add the curd/yogurt and mix well.
  3. Now add the carrot, cucumber, salt and mango and mix well.
  4. Lastly temper with the items under “to temper” table in the same order and mix well with the rice mixture.
Notes
1. Adjust curd, milk and water according to your consistency.
Wordpress Recipe Plugin by EasyRecipe
3.2.2885


 CurdRice

Filed Under: FESTIVAL RECIPES, RICE/BIRYANI VARIETIES Tagged With: Curd Rice, curd rice for get togethers, curd rice for vegetarians, curd rice tips, healthy vegetarian recipe, potluck ideas, Thayir Sadham Recipe, tips for curd rice for parties, yogurt rice recipe

Roasted Tomato Garlic Raita / Tomato Garlic Yogurt dipping :

January 27, 2015 by Suki

GarlicRaita-2name

GarlicRaita-2nameA must try to give a different flavor to your plain raita! This is a unique combo and that sautéed garlic in yogurt gives great flavor. I always had loved raitas and it is perfect as a side dish or as a dipping sauce for many appetizers, salad dressing and also perfect topping for many tacos :)!

Garlic Raita is famous in Hyderabad and they make it as a side for biryani. I did this for biryani too. And it was perfect! It took my vegetable biryani to another level.  Raita is an Indian side dish where the creamy yogurt is mixed with any kind of vegetable or fruit and a bit of spice. I have my raitas even plain without asking for rice 😉 It is a perfect cooling agent. And whenever I call someone who is not Indian, I make sure I prepare some raita. If they find the food spicy, they can have it with raita.

GarlicRaita-4

I know many might think why to take extra step of sautéing the tomatoes and garlic, instead just add the tomatoes and garlic plain! 🙂 Garlic gives strong flavor if added plain and I wanted to give that tomato color and easy for kids to have if they don’t have big chunks. I usually make cucumber raita, carrot raita, cucumber carrot raita, onion raita, onion tomato raita, okra raita J You can pretty much make raita with any fruits and veggies you fancy!

Print
Roasted Tomato Garlic Raita / Tomato Garlic Yogurt dipping :
Author: Suganya Hariharan
Recipe type: Side
Cuisine: Indian
Cook time:  10 mins
Total time:  10 mins
Serves: 2 cups
 
Ingredients
  • Thick Yoghurt – 1 cups (You could use even greek yogurt)
  • Oil – 2 tsp
  • Tomato – 1 cup, chopped finely
  • Green chilli – 1 Finely Chopped
  • Ground cumin – ½ tsp
  • Salt – 1 tsp
  • Garlic – 2, Minced
  • Garlic – 4 , sliced thin
  • Red chilli flakes – ¼ tsp, garnish
  • Fresh cilantro – 1 tbsp, finely Chopped
Instructions
  1. Take a small pan; add the oil and sliced garlic and roast till golden. Keep aside.
  2. In the same pan, add the chopped tomatoes and minced garlic and salt and sauté well. And keep aside.
  3. Combine the yogurt with the sauted tomatoes and cumin powder. Mix well.
  4. Garnish with red chilli flakes, sliced garlic and coriander leaves.
Wordpress Recipe Plugin by EasyRecipe
3.2.2885

Serve it chill with some spicy dish like pulao or biryani or with parathas or serve it as a dressing for salad or taco.!

GarlicRaita-2

Filed Under: RAITA/DIPS/CHUTNEY Tagged With: burhani recipe, garlic dipping sauce recipe, garlic raita recipe, Garlic yogurt dressing recipe, raita recipe, roasted tomato garlic dressing, side dish for biryani recipe, tomato garlic raita recipe, vegetarian raita recipe, Yogurt dressing recipe

Restaurant Style Vegetable Biryani Recipe

January 26, 2015 by Suki 41 Comments

Vegbiryanititle

Vegbiryanititle

 This delicious layered biryani is fragrant, flavorful, and filling. Carrot, beans, peas and potatoes cooked in gravy of spicy yogurt and served with basmati rice topped with cashews and fried onions.

 If you think biryani is hard to make, I will surely say NO. It surely takes a bit of time. But all the hard work in the kitchen will be well worth the end result.  An authentic vegetable biryani is always slow cooked on “dum”. It is an ancient technique of cooking on dum as they believe it brings out its uniqueness and originality. This is done by cooking in steam by not allowing the steam to pass. The food gets cooked on its own steam and juices on slow fire and infuses the flavors and aroma of the herbs and spices in the food.

Vegbiryani.jpg3


It is a perfect Sunday lunch idea. I made this for the weekend and I just loved it. I usually like to make veg biryanis on a weekend for the time it takes and also 😉 it makes my weekend complete after having a meal like this 🙂 I made veg biryani, garlic tomato raita, curd rice and papad. I love to have biryanis with mirchi ka salan. It feels like you are in India if you have so :). The last time I had restaurant biryani was before three years in India. I am very choosy. If I don’t like it, I really don’t go to that place again. I loved the kailash parbat biryani 🙂 I am drooling as I type! :D! Actually I am drooling at my biryani 😉 picture and want to make it again 😉 even though I had it only yesterday 😀 There will be no one saying  No to biryanis, let it be vegetable biryani, chicken biryani, shrimp biryani, palak biryani ,chickpea briyani, potato biryani and so on!  My favorite is this :)!

Vegbiryani.jpg2


5.0 from 8 reviews
Print
Restaurant Style Vegetable Biryani Recipe
Author: Suganya Hariharan
Recipe type: Main
Cuisine: Indian
Prep time:  20 mins
Cook time:  20 mins
Total time:  40 mins
Serves: 5 or 6
 
Ingredients
  • For the masala:
  • Cashew nuts – 6
  • Khus khus (White poppy seeds) – ½ tbsp.
  • Cumin seeds/ Jeera – ½ tbsp.[


    For fried onions:
  • Onions – ½ cup, 2 small onions, sliced thinly
  • Cashewnuts - 6
  • Oil – to fry


    For layering:
  • Mint leaves – 1 tbsp, chopped
  • Coriander Leaves – 1 tbsp, chopped
  • Saffron – ½ tsp dissolved in ½ cup warm milk
  • Ghee – 2 tbsp


    For the rice:
  • Basmati rice – 2 cups
  • Salt – 2 tbsps
  • Cumin Seeds/ Jeera – 1 tbsp


    For the vegetables:
  • Oil – 1 tbsp
  • Bay leaf – ½
  • Cinnamon – 1 thin piece
  • Cloves – 3
  • Cardamom pods – 2
  • Ginger garlic paste – 2 tsp
  • Full fat yogurt – ½ cup
  • Garlic – 4 whole
  • Green chilli – 2, slit
  • Biryani masala – 1 tbsp
  • Red Chilli powder –1 tsp
  • Mint – ½ cup, chopped finely
  • Coriander leaves – ½ cup, chopped finely
  • Fresh beans – ½ cup, Chopped 1 inch thin
  • Carrot – 1 cup, chopped 1 inch thin
  • Peas – ½ cup
  • Potato – 2, chopped as cubes
Instructions
  1. Grind the cashew, poppy seeds and cumin seeds into a smooth paste, using as little water as possible. Set aside.
  2. Deep fry the sliced onions when it is hot. Don’t overcrowd the oil. When the onions turn light brown, remove from oil and drain on paper towel. The fried onion will crisp up as it drains. Also fry the cashewnuts till golden brown. Set aside.
  3. Wash the rice and soak in water for twenty minutes.
  4. Meanwhile, take a big wide pan, add oil in medium heat, add the spices like Bay leaf ,
  5. Cinnamon,Cloves,Cardamom pods ,sauté for a minute.Add the blended paste, to it add the green chillies, ginger garlic paste and garlic and fry for a minute.
  6. Then to it add the red chilli powder, biryani powder, mint, coriander leaves and sauté them well.
  7. Add the yogurt and mix well. I always move the skillet away from the heat when adding yogurt which prevents it from curdling.
  8. Now after returning the skillet back to the stove, add the vegetables and salt and ½ cup water and mix well. Cook for 10 minutes.
  9. When you do the seventh step, take another big pan, add thrice the cup of rice you use, and boil it. When it is boiling high, add the rice, salt and jeera and mix well. After 7 minutes exact or when the rice is 80% done. Switch off and drain the rice.
  10. The vegetables would have cooked by now and water would have drained.
  11. Now, the layering starts. To the vegetables, pat and level it. Add the drained hot rice on the top of it. Garnish with fried onions, ghee, mint, coriander leaves and saffron dissolved in milk.
  12. Cover the dish and bake in a 350f oven for 15 minutes or till the cooked but not mushy. Or cook in the stove medium heat for 12 minutes and lowest heat for 5 minutes. And switch off. Mix and serve hot!
Notes
1. If you are cooking in oven, do make sure to cook in a big oven safe pan and cover it tight and then keep in oven for the final step.
2. You can skip biryani masala if you don’t have and add just garam masala (1 tsp and red chilli powder – 3 tsp instead of 1 tsp)
3. If it is spicy in the end, squeeze some lemon, it will reduce the heat and enhance the flavors also.
4. Vegans can leave the ghee and replace yogurt with coconut milk
Wordpress Recipe Plugin by EasyRecipe
3.5.3226

Taste perfect with raita or mirchi ka salan. Even having it plain is delicious.

 Vegbiryani.jpg1

Filed Under: RICE/BIRYANI VARIETIES Tagged With: Basmati rice recipe, biryani masala recipe, Biryani recipe, how to make biryani, how to make rice, Indian, Indian food, jasmine rice, one pot meal, restaurant style vegetable biryani recipe, vegan recipe, vegetable recipes, vegetarian recipe

Mango Pickle

January 23, 2015 by Suki 1 Comment

mangoPickle-5

mangoPickle-5Mango pickle made with homemade pickle powder.

It is prepared with spices like mustard powder, red chili powder and salt. It is known for its spiciness 🙂 you can enjoy the goodness of raw mango like this. Mango pickles are my favorite of all the pickles. To be frank, I love all pickles 😉

In India, my mom used to make pickles in summers. She used to make in bulk and store them in jars. They will last almost 6 -8 months! I pretty much have pickles with everything. Especially with parathas, dal and rice, and with of course curd rice. Later, it was more stores bought. But I always would prefer pickles made at home. My boyfriend does not like pickle much, so never felt like making it. But this time, it was more for me! 😉

mangoPickle-7

The combinations of mustard seeds, fenugreek seeds are perfect that it will give you the flavor of store bought pickle. You can use sesame oil or mustard oil. It is just, we need to heat and add the mustard oil and sesame oil can be added directly. If you do not have split mustard seeds or fenugreek seeds, just coarsely blend and add them (like pulse and grind)


mangoPickle-4


Print
Mango Pickle
Author: Suganya Hariharan
Recipe type: Main
Cuisine: Indian
Prep time:  8 hours
Cook time:  10 mins
Total time:  8 hours 10 mins
Serves: 3 cups
 
Ingredients
  • Mangoes – 5 small, or 3 big, or 3 cups , chop with skin
  • Turmeric powder - 2tsp
  • Asafoetida powder – 1 tsp
  • Split Fenugreek seeds – 2 tbsp (methi kuria ), you can use whole fenugreek seeds
  • Broken Mustard seeds – 2 tbsp (rai kuria), you can use whole mustard seeds
  • Red chilli powder – ¼ cup
  • Red chilli – 3
  • Nigella seeds (Kalonji) – 1 tbsp
  • Fennel seeds, coarsely powdered – 1 tbsp
  • Coriander seeds – 1 tbsp
  • Mustard oil – ½ cup, (or sesame oil, but do not heat if sesame oil)
  • Garlic – 4 (Remove the extra outer layers of garlic and keep just one thin layer intact with the pod.)
  • Salt – ¼ cup
Instructions
  1. Wash mangoes and dry them completely. You are doing this to make sure there is no moisture or dust left there.
  2. Cut the mangoes in half, deseed them and cut them into 1 inch pieces.
  3. Take a bowl, combine 1 tbsp salt, turmeric powder and cut mangoes. And soak them overnight or 6 hours until the mangoes release a large quantity of water.
  4. Drain the mangoes and place in a clean cloth/tissue for 2 hours.
  5. Heat a pan, roast the coriander seeds, red chilli for a min. Turn off the heat, cool it and blend them coarsely.
  6. Heat oil in a pan and keep aside till it cools down.
  7. In a bowl which is completely dry, combine the mangoes, salt, oil and other ingredients. Mix well Store it in a container for a week or two till they completely get the flavor and tenderness in the pickle. And they are ready to use
Notes
1. You can use whole fenugreek seeds and mustard seeds and grind them.
Wordpress Recipe Plugin by EasyRecipe
3.2.2885


Storage instructions:

  1. First and foremost step is to remove moisture. Moisture is the worst thing for pickles, so store them in refrigerator.
  2. Make sure to use clean spoon, clean jar to store without no moisture.
  3. Always make sure the lid is closed tight.
  4. I stored in few jars like this to use when I can. You can store them up to 4 months.


This taste perfect with plan rice or dal.

mangoPickle-2

Filed Under: HOMEMADE, VEGAN Tagged With: andhra manga urukai, avakai pickle, Mango Pickle recipe, pickle recipes, raw mango pickle, urukai recipe, vegan spicy pickle, vegetarian spicy pickle

Potato Roast

January 21, 2015 by Suki 4 Comments

PotatoCurry2Perfectly roasted spicy potatoes with caramelized onions!

This recipe is my Mom’s recipe. She always make this for me J whenever there is garlic rasam or onion kuzhambu, she makes sure she prepares this. I missed it so I prepared this for myself  :D! I love to eat them always. It reminds me of my childhood. 🙂 I am sure she will be happy if she checks this recipe here. I am sure this is a bachelors cooking recipe, as we can make it easily in no time.

PotatoCurry-3

All you need to do is to boil the potatoes and roast them with the spice powers and onions. If you don’t have sambar powder just makes the recipe with red chilli powder and turmeric powder.

PotatoCurry

Print
Roasted Potato Curry
Author: Suganya Hariharan
Recipe type: Main
Cuisine: Indian
Prep time:  10 mins
Cook time:  15 mins
Total time:  25 mins
Serves: 4
 
Ingredients
  • Oil – 1 tbsp
  • Mustard – 1 tsp
  • Urad dal – 1 tsp
  • Curry leaves – 1 Sprig
  • Onion – 1, lengthwise cut (sliced)
  • Chilli powder – 1 tsp
  • Sambar powder – 2 tsp
  • Turmeric powder – ¼ tsp
  • Potato – 3 Large
  • Salt -1 tbsp
Instructions
  1. Cut each potatoes into four and pressure cook for three whistles or microwave for 12 minutes. Cool it down, peel off the skin, cut each piece into two or three.
  2. Heat a pan with 2 tbsp of oil, and temper with mustard seeds. When it crackles, add urad dal and when it turns golden brown , add the curry leaves and onion and fry till it becomes golden brown.
  3. Add salt, sambar powder, turmeric powder, chilli powder and the cubed potatoes. Add a tbsp. of water and mix well.
  4. Cook in low to medium flame for ten minutes, you don’t want to mash them, It has to be perfectly shaped and roasted. So turn carefully every 2-3 minutes. Cook until golden roasted evenly.
Notes
1. If you think the potatoes are getting stuck to the pan or getting brunt , just add more oil while turning.
2. You can garnish with chopped coriander leaves.
3. You can replace the sambar powder with chilli powder.
Wordpress Recipe Plugin by EasyRecipe
3.2.2885

PotatoCurry-4

Filed Under: DRY CURRY SIDE DISH/ STIR-FRY, VEGAN Tagged With: dry potatoes recipe, indian potatoes recipe, potato onion roast recipe, potato recipes, pottao curry recipe, roasted potatoes recipe, sidedish for rice recipe, vegetarian recipes

Chayote dry curry /Chow chow curry

January 19, 2015 by Suki 9 Comments

Perfect Vegan healthy dry curry recipe using chayote!

Chayote1Chayote is called the vegetable pear. In Tamil Nadu in South India, it is known as “chow chow” and usually used in everyday cooking for “sambhar” or “kootu”. It is mostly handled like summer squash and generally cooked to retain the crisp flavor. It is a good source of vitamin C and a perfect cooling vegetable. I usually make chow chow kootu, sambhar and this time I made dry curry and tasted perfect! Healthy and tasty! Less oil, vegan and perfect for Saturday afternoon lunch.

Chayote

5.0 from 3 reviews
Print
Chayote dry curry /Chow chow curry
Author: Suganya Hariharan
Recipe type: Main
Cuisine: Indian
Prep time:  5 mins
Cook time:  20 mins
Total time:  25 mins
Serves: 4
 
Ingredients
  • Chow Chow/ Chayote - 1
  • Oil – 2 tsp
  • Mustard – 1 tsp
  • Urad dal – 1 tsp
  • Channa dal – 1 tsp
  • Onion – 1 medium sized, finely chopped
  • Garlic – 4 (small), finely chopped
  • Curry leaves – 1 sprig
  • Green chilli – 1, finely chopped
  • Salt – 1tbsp

    To roast & grind:
  • Channa dal – 2 tsp
  • Red Chillies – 4
  • Fennel seeds – ¼ tsp
  • Coriander seeds – 1 tsp
  • Coconut – 1 tbsp
Instructions
  1. Heat a pan and roast channa dal, red chilli chillies, fennel seeds and coriander seeds to golden brown. Cool down and blend them with coconut to a coarse mixture and keep aside.
  2. Peel and cut chow chow to medium sized pieces.
  3. Add oil in a pan and add the mustard seeds, and when they crackle, add the channa dal, after it turns golden brown, add the chopped onion, garlic, curry leaves, green chilli and wait till onion becomes translucent.
  4. Then add chow chow with salt, turmeric, enough water and cook for 4-5minutes covered till it is boiled in medium flame.
  5. Water will be reduced by this time to very little and then add the ground paste, stir well and fry for 2-3 minutes till all the water has evaporated.
  6. Switch off and serve with rice/phulka.
Wordpress Recipe Plugin by EasyRecipe
3.5.3226

 Perfect side dish for rice, rasam, sambhar, milagu kozhambu, phulka.

Chayote-4

Filed Under: DRY CURRY SIDE DISH/ STIR-FRY, VEGAN Tagged With: Chayote dry curry, chayote thoran recipe, Chow chow curry, chow how thoran, helathy indian side dish recipe, quick lunch recipe, quick vegetarian poriyal recipe, vegan stir fry recipe

Gulab Jamun

January 18, 2015 by Suki 7 Comments

Jamun

JamunA popular Indian dessert of fried dumplings in rose scented sugar syrup.

 Gulab Jamun! Just the name tempts many of us 😉 I know many would be drooling looking at it! This has been the most favorite sweet for many. Popular sweet recipe liked by almost everyone. I have never seen anyone saying No to gulab jamuns. You can make this classic Indian dessert on any occasion and can make it even if there is no occasion. You can make jamuns using readymade mix, khoya or just milk powder. You can make khoya from scratch or just get it from some Indian store. I have tried using readymade mix and also using khoya or milk powder. All are equally good. The one I made today is using milk powder, yogurt, salt and water. I have tried even using MTR gulab jamun mix and its good :)! Usually I always take step-by-step pictures, I have some old step by step pictures too for these jamuns, may be I will add them later to it if requested. Its simple to do ! looks complex, but easy to make and comes perfect if we make them with some time and patience. Gulab means rose and jamuns are deep coloured berries. gulab means rose and jamuns are deep purple colored berries available in india. all you need is milk powder, yogurt, sugar and water to make a basic gulab jamun at home.

Jamun-4

 If you get the right consistency in the gulab jamun dough, you will never buy in the stores. I have mentioned some tips and suggestions, which might help.

  1. If you are making this with readymade mix, just mix it with milk till you get the right consistency, (not dry crumble but stickly soft)
  2. For sugar solution, on cooling if the sugar syrup crystallizes, then just add two or three tablespoons of water and warm the syrup again. It will be back to the syrup consistency.
  3. Apply some oil on your palms and make smalls balls from the dough. It may double the size after soaking in water, so be careful to make them small sized.
  4. There should be no cracks on the dough balls. They should be smooth, If there are cracks, then just add some 1 oe 2 tbsp of yogurt/milk and continue making the balls.
  5. Do cover them and keep aside for ten minutes before frying them. it makes a great difference.
  6. Do not make the jamun dough hard, it should be soft or else the syrup will not go inside after soaking.
  7. When you fry them, when the oil becomes medium hot, lower the flam, add a small in the oil, it should slowly rise to the top from bottom. If it rises instantly, then the oil is too hot to fry which is not good. One jamun should get fried for about 6 -8 mins, its that slow for a perfect jamun.
  8. If jamun cracks while frying, then add 1 or 2 tspof flour to the dough and form the balls again.
  9. Don’t crowd the pan when deep frying, it might make the oil totally zero hot. Jamun might look dark when you take out from oil, but its perfect when you soak them as you see.
  10. Use a wooden spatula to rotate the oil after adding the jamuns without touching them, so that they are evenly gold.

 Jamun-3

Gulab jamuns can be served warm or cold. You can always warm them in microwave when serving. It can be stored for 5 -7 days in refrigerator.

Print
Gulab Jamun
Author: Suganya Hariharan
Recipe type: Main
Cuisine: Indian
Prep time:  30 mins
Cook time:  25 mins
Total time:  55 mins
Serves: 15
 
Ingredients
  • For the sugar syrup:
  • Water – 3 cups
  • Sugar – 2.5 Cups
  • Cardamom powder – 2 tsp
  • Saffron – a pinch
  • Rose water – 1 tsp

    For the Gulab Jamuns:
  • Milk Powder – 1½ cup
  • All purpose flour – ½ cup
  • Oil/ Ghee – 1 tsp
  • Baking soda – a pinch
  • Salt – a pinch
  • Yogurt – 2 tbsp
Instructions
  1. To prepare the sugar syrup:
  2. Mix water, sugar, cardamom and saffron in a pan, heat it till you get a syrup consistency. There should not be any thread formation, as it might form crystals later. usually it takes around 8 – 10 mins for that consistency in medium flame.
  3. Add the rose water and keep it aside.

    To prepare the jamuns:
  4. Mix the milk powder, baking soda, salt, all purpose flour, oil/ghee, yogurt in a bowl. Mix and keep on adding little of the yogurt to get a soft sticky mixture. If the mixture is dry or crumble, add some yogurt. Keep it covered for ten minutes and keep aside.
  5. Make small smooth balls from the dough after ten minutes.
  6. Heat the oil and reduce the flame to low. Add the balls and keep fry them. Use a wooden ladle and without touching the jamuns, just rotate the oil.
  7. When they become nice and dark golden in color, remove it from oil (with no oil totally) and add them to the sugar syrup.
  8. Let them soak for atleast 2 hours.
Notes
1. please read my summary above for more tips
2. If you want , you can fry the jamuns in 50:50 Oil and ghee.
Wordpress Recipe Plugin by EasyRecipe
3.2.2885

 Jamun-2

Filed Under: DESSERTS, SWEETS/DESSERTS Tagged With: dessert recipes, Eggless dessert recipe, Gulab jamun recipe, gulab jamun using milk powder, indian sweet recipes, Jamun recipe, Recipe for jamun, tips and tricks for dessert recipe, tips for perfect jamun recipe

Ven Pongal / Ghee Khara Pongal

January 14, 2015 by Suki 2 Comments

relishthebite-4

relishthebite-4Pongal means prosperity and abundance 🙂 Wishing you all a Happy Pongal 🙂 Thanking the farmers for the food I eat everyday!!!

Pongal is a harvest festival celebrated by Tamilians at the end of the harvest season. It usually takes place for four days from Jan 13 to Jan 16 every year. The first day of the Tamil month which is actually second day of the festival is the Thai pongal, which is also celebrated as Makara Sankrathi all over the India. It is mainly celebrated to convey the appreciation and thankfulness to the “Sun God”. We do so as it is the primary energy behind agriculture and a good harvest.  And also to thank every farmer!  We thank sun for burning himself to save us!!!

relishthebite-6

 On the day of pongal, at the time of sunrise, they usually boil milk in new clay pots and when the milk boils out of the vessel, people shout “pongalo pongal!!”. Exciting? ! Right? My Mom used to do it at my grandparents place when I was a kid 🙂 I still remember that, but coming to apartments we never got the chance to do so! The day preceding Pongal is called Bhogi when people discard old things and focus on new belongings. The day after pongal is called maatu pongal, where maatu means “cow”. In rural tamilnadu, there were adventurous games such as the Jallikattu, I am not sure if it is still happening. Kanu pidi is a tradition on the fourth day for the ladies and young girls to follow; we feed birds and pray for well-being of mom and brothers. Myself and my sis usually do that with my Mom 🙂 early morning in the terrace feasting all variety rice, sweet, fruits and we spread in a banana leaf and we will invite birds to have the food :)!  Lav Sis, if you are reading this 😉 do you remember that 😀

Ven pongal is a very easy and comfort food. It is not just made on a pongal day as we usually make it on many weekends. But mainly weekends as it is little heavy and might make you sleepy. You can serve it with chutney to make it simple or with some brinjal or any sort of gotsu or sambhar. I used to struggle to get the right consistency. But now I know how to crack it and sharing it here.

Trouble shooting ideas and tips to make it right:

  1. Use equal quantities of raw rice and moong dal.
  2. Use three times of water to the total of raw rice and moong dal. For instance I used ¾ cup raw rice, ¾ cup moong dal and 4 ½ cups of water. If you add more water, it will be soggy. And less water will make it dry.
  3. Adding ghee to the mixture when you boil helps it not burnt.
  4. Soaking the moong dal and rice in water makes it smooth.
  5. Some roast the moong dal for extra flour. I would say it is not necessary.
  6. If the pongal is watery when you open, then keep it in stove open till the water evaporates.
  7. If the rice is not cooked well, it should cook perfect for the measurements I gave, if you change something and if you think the rice is not cooked well, add some ½ cup of water and give two more whistles.
  8. If you serve it later when it is not hot and thinks it is dry, add some water and a tsp of ghee, give a quick boil and serve.
  9. You can also add salt when it is boiling.
  10. On pongal day, we usually make ven pongal and sakkara pongal. So usually do the boiling of raw rice and moong dal for both in same cooker and keep aside half of it for the Sakkara pongal separately. ( that is when you don’t add salt to the boiling mixture)

Other Pongal Festival Recipes are Sakkara pongal, vada, sambar, 7 kootu kari, milk pongal, coconut rice, ginger rice, mint rice, coriander rice, puliyodara! You can always do different sweets :)!

relishthebite-2

Print
Ven Pongal / Ghee Pongal
Author: Suganya Hariharan
Recipe type: Breakfast
Cuisine: Indian
Cook time:  20 mins
Total time:  20 mins
Serves: 5
 
Ingredients
  • Raw rice – ¾ cup
  • Moong dal / Pasi paruppu – ¾ cup
  • Water – 4 ½ cups
  • Ghee – 1 tbsp

    To temper
  • Ghee – 2 tbsp
  • Jeera – 1 tbsp
  • Pepper Balls / Milagu – 1 tbsp
  • Cashews – 10, broken
  • Ginger – 1 tbsp, chopped finely
  • Curry leaves – 1 sprig
  • Asafoetida – 2 pinches
  • Salt – 2 tbsp
Instructions
  1. Wash rice and dal together in a pressure cooker. And keep aside.
  2. Add 4 ½ cups of water to the rice and dal mixture and keep aside by soaking them for 15 minutes. Pressure cook for 4 whistles in medium heat. Wait until pressure gets released by itself, open & mash.
  3. Season with the items given under to temper table. First add ghee in a pan in a medium to low heat, when hot add jeera and when it is golden brown, add the pepper balls and let it start splutter. Then add cashews and ginger and fry till it starts to get golden, add curry leaves and asafetida lastly. Mix well and add to the pongal with salt and mix well.
Wordpress Recipe Plugin by EasyRecipe
3.2.2885


Serve it super hot with chutney or gothsu or sambhar.

relishthebite

Filed Under: BREAKFAST, FESTIVAL RECIPES Tagged With: best indian breakfast recipe, ghee pongal recipe, indian breakfast recipe, khara pongal recipe, pongal recipe, quick breakfast ideas, quick indian breakfast recipe, vegetarian breakfast recipe, ven pongal recipe

Bitter Gourd Chips / Karela Chips / Pavakkai Chips

January 12, 2015 by Suki 8 Comments

pavakkai-3

pavakkai-3
Crispy, evenly fried bitter gourd with very mild bitterness!!!!

This is one of the simple recipes to make with bittergourd. Whenever you fry this veggie, you will have very mild bitterness or nil bitterness. I have already posted a pavakkai fry recipe without frying in deep oil.  I removed the bitterness by soaking in yogurt. But for this recipe, you don’t need to do that is the plus of the frying part for this bittergourd. I would say the tip to get them crispy is adding rice flour and not any other flour. And also one more tip is to slice them thinly. If you slice them evenly, you will never go to shops to buy them, they are so perfect!

pavakkai-2

I used to avoid bitter gourd till my college days, and then started to have it after my mom packed in my lunch box. Then I never bought this veggie here as I have to travel a little bit, and also never felt like having this 😉 ! My boyfried loves veggies in all forms 😀 so I started to make for him and then tried to include these veggies in our meal somehow. And as we all know, it’s really good to include vegetables and fruits in our daily life. I wanted to make it a habit but sometimes I am so bored to chop them as I don’t take frozen vegetables much, I tried to skip them.

They can be served with rasam/sambar/kuzhambu or any gravy with rice. Or as a snack for tea time snack.

pavakkai

Print
Bitter Gourd Chips / Karela Chips / Pavakkai Chips
Author: suganya hariharan
Recipe type: main
Cuisine: Indian
Prep time:  5 mins
Cook time:  20 mins
Total time:  25 mins
Serves: 3 cups
 
Ingredients
  • Bitter gourd / Pavakkai – 5
  • Sambar powder – ½ tbsp.
  • Chilli powder – ½ tbsp. ( or just use any one – chilli powder or sambar powder)
  • Rice flour – 4 tbsp
  • Turmeric powder– ¼ tsp
  • Salt – 1 tbsp
  • Water – 1 tbsp( approx..)
  • Oil – For deep frying
Instructions
  1. Wash and remove the ends of the bitter gourd. Slice and thin evenly the bitter gourd, so that we can cook them evenly.
  2. Add the rice flour, turmeric powder, chilli powder, salt and water to the chopped bitter gourd.Mix well and keep aside.
  3. Heat oil in a pan and when it is hot, add the sliced bitter gourd evenly like in a sprinkled way. Do not crowd the pan as it may reduce the heat of the oil and make the bittergourd oily and not crispy. Cook in medium to high flame until the bitter gourd turns golden brown. Turn it and when both sides are golden brown, drain in kitchen tissue.
Notes
1. Do not fry in low heat or high heat, frying in medium flame will get them cook evenly and will make them crispy.
2. Do not add more water; bitter gourd will ooze out some water too. The water is just to make the rice flour stick to the veggie.
Wordpress Recipe Plugin by EasyRecipe
3.2.2885

Taste best with rasam/sambar/kuzhambu.

pavakkai-4

Filed Under: DRY CURRY SIDE DISH/ STIR-FRY, VEGAN Tagged With: Bitter Gourd Chips, bittergourd recipe, diabetic recipes, Karela Chips, karela recipes, Pavakkai Chips, pavakkai fry recipe, pavakkai recipe, pavakkai varuval, south indian recipes, vegan indian recipe, vegetarian recipes

Kadai Ghost / Lamb Curry

January 11, 2015 by Suki 20 Comments

KadaiGhost-4

KadaiGhost-4

Kadai Ghost is one of the famous dish from mughlai. This dish is also called as “karahi ghost”. They are named as kadai ghost as they are traditionally prepared in “kadai” (Indian pot). They have even biryani using this recipe. The name looks complicated but the recipe is very simple to make. I always feel lamb recipes are easy to make and taste great. You have to be careful with the oil you use as lamb itself oozes out oil from its fat.

KadaiGhost

I made this today before sometime and posting it now. I wanted to make this for a long time but never got some time and usually I don’t make much non veg recipes. You can use with bone or boneless meat for this recipe. Adding the lamb to the oil before boiling gives good taste. It taste great with Indian breads/ naan/ paratha/parotta or plain rice.

KadaiGhost-2

5.0 from 3 reviews
Print
Kadai Ghost / Lamb Curry
Author: Suganya Hariharan
Recipe type: Main
Cuisine: Indian
Prep time:  5 mins
Cook time:  25 mins
Total time:  30 mins
Serves: 4
 
Ingredients
  • Lamb Meat(breast)– 1 lb , cut into 2 inch chunks
  • Cardamom – 1
  • Cloves – 2
  • Cinnamon stick – small piece
  • Onion – ¾ cup, Sliced thinly
  • Shallots – ¼ cup (optional)
  • Tomato – 1 cup, Sliced thinly
  • Yogurt – 4 tbsp, beaten
  • Turmeric powder – 1 tsp
  • Red chilli powder – 1 tsp
  • Garlic – 4, Minced finely
  • Ginger – 1 inch, julienne cut
  • Green chilli – 2, slit
  • Mint – 1 tbsp, chopped finely,
  • Coriander leaves – 1 tbsp, chopped finely
  • Curry leaves – 1 sprig
  • Lime - ½ , garnish
  • Coriander leaves – 1 tbsp, Garnish
  • Salt - 2 tbsp

    Roast & grind:
  • Red Chilli – 4
  • Urad dal – 1 tbsp
  • Coriander seeds – 1 tbsp
  • Whole pepper balls – 1 tbsp
  • Cumin seeds – 2 tsp
  • Fennel seeds – 1 tsp
  • Fenugreek leaves – 2 tsp, crushed
Instructions
  1. Wash lamb pieces and drain well.
  2. Dry roast the ingredients under “roast & grind” except fenugreek leaves in medium flame and when there is good aroma and they are golden brown. Switch off and add fenugreek leaves and mix well. Now blend them in a blender or “mortar pestle” to a smooth (little coarse is fine too). Keep it aside.
  3. In a pressure cooker, heat oil. Add cardamom, cinnamon and cloves and sauté for few seconds till it gives good aroma. Add the lamb and roast in that oil for two minutes.
  4. Add the onions, tomatoes, turmeric powder and salt. Mix well, add enof water to just cover the meat and whistle for 3 counts. Or cover it and let it get cooked for 35-40 minutes in medium-low flame.
  5. Now remove the cover, add yogurt, grounded ingredients, ginger, garlic, mint, coriander leaves, curry leaves, green chillies and red chilli powder. Mix well and cook it till the oil oozes out and it has thick gravy consistency.
  6. Switch off, Garnish with limejuice and coriander leaves.
Wordpress Recipe Plugin by EasyRecipe
3.2.2885


Taste best with Indian breads/naan/paratha/parotta or rice.

KadaiGhost-3

Filed Under: LAMB, NON-VEG RECIPES Tagged With: indian lamb, kadai ghost recipe, Kadai lamb curry recipe, Lamb Breast recipes, Lamb curry recipe, lamb kuzhambu recipe, mutton curry recipe, Quick lamb recipe

Cauliflower Potato Peas Masala / Aloo Gobi Matar Masala

January 7, 2015 by Suki Leave a Comment

AlooGobiMatar-2

AlooGobiMatar-2Simple stir fry of potatoes, peas and cauliflower flavoured with aromatic Indian spices.

The thought of cooking curry from scratch probably scares many of us, but it’s really easy when you know the flavor combinations of the different spices. This recipe is for those days where you literally want to dump everything on the pot and return to your dent in the couch. This isn’t tricky to make at the best of times. You just need one pan and one spoon to make this and you may as well have cooked the whole meal on your one stovetop. I made this long back and drafted it, but posting it now. I have a lot of recipes in my draft, it is just sometimes I take some break and it slips out from my mind.  

AlooGobiMatar

There are many ways of making aloo gobi and here is my favourite version from my kitchen. This recipe is warm and hearty. This is a dry version and this curry ought not to be too soupy, as you want the potatoes to absorb all the flavors in the dish. The potatoes should be juicy from the cauliflower and onion tomato juices but not mushy. Gobi means cauliflower and aloo means potato. Peas are optional here and I just wanted to add it for more flavors. This will take some time to cook but you don’t have any job in the kitchen, just simmer to the point where there is moisture left in the pan for the consistency that you find is signature to this dish. 


Print
Cauliflower Potato Peas Masala / Aloo Gobi Matar Masala
Author: Suganya Hariharan
Recipe type: Main
Cuisine: Indian
Prep time:  10 mins
Cook time:  20 mins
Total time:  30 mins
Serves: 4
 
Ingredients
  • Potato – 2, about 2 cups, scrubbed, peeled and cut into ½ inch cubes
  • Cauliflower – 1, small, 2 cups, cut into mediym sized florets
  • Peas – ½ cup, boiled or frozen
  • Hing – a pinch
  • Cumin seeds (jeera) – 2 tsp
  • Onion – ½ cup, chopped finely
  • Tomato – ¼ cup, finely chopped
  • Green chilli – 1, chopped finely
  • Ginger garlic paste – 1 tsp
  • Chilli powder – 1 tbsp
  • Garam masala – 1 tsp
  • Coriander powder – 1 tbsp
  • Cumin powder – 1 tbsp
  • Oil – 2 tbsp
  • Salt – as needed
  • Kasuri Methi/ Dried fenugreek leaves – ½ tbsp
  • Lime juice – 2 tsp- for garnishing
  • Corainder leaves – 2 tbsp ,finely chopped for garnish
Instructions
  1. Heat oil in a large heavy bottomed non-stick skillet over medium heat, add hing, cumin seeds, and add the onions, chillies and fry until they are translucent. Then add the ginger garlic paste. Give it a stir till raw smell disappears for a minute.
  2. Add chopped tomatoes and turmeric powder. Saute for a minute till it becomes mushy.
  3. Now add the potatoes, and give a good stir for 2 minute. Now add the cauliflower florets and peas and Mix well.
  4. Now add the chilli powder,garam masala, coriander powder and cumin powder. Add 2 tbsp of water; mix well and make sure each piece is coated with the spice powder and simmer it for 7-10 minutes
  5. Stir in the mixture a few handfuls at a time. Add crushed methi leaves to it and mix well. The potatoes and cauliflower should be little roasted and have the flavors deep in it.
  6. Garnish with coriander leaves and squeeze in some lime.
Notes
1. Be careful when adding water, it might become mushy if you add more water.
Wordpress Recipe Plugin by EasyRecipe
3.2.1311


You can serve this delicious Aloo Gobi with any Indian flat breads ( Paratha, Parotta, naan)

Or with plain/ flavored Basmati rice.

Or in a wrap topped with few salad leaves and Greek yogurt or sour cream! 🙂

AlooGobiMatar-3

Filed Under: NORTH INDIAN GRAVIES/DAL/CURRY, VEGAN Tagged With: aloo gobi matar best recipe, aloo gobi recipe, caulflower potato peas masala recipe, potato peas masala, vegan indian recipes, vegan recipe, vegetarian indian recipes, vegetarian recipes

Egg Pepper Roast / Muttai Milagu Varuval

January 7, 2015 by Suki 13 Comments

eggpepperfry-2


eggpepperfry-2Easy, spicy egg pepper masala made with simple ingredients.

If you have eggs at home, this is one of the flavorful luscious recipes that you can make for a quick lunch. If you are having some guest coming home, and you wanted to make a quick tasty side dish, this is the one you need to make. :)!  I will always have eggs at home, because I don’t eat eggs much, it always stays there, sometimes I like to have them as omlettes or scrambled eggs 😀 But I even stopped that now . Then why do you get them 😀 is the question I get when I buy them! Ok, I buy them always for my face pack and hair pack :D! I made this egg pepper masala long back when some of my friends came for lunch. It was drafted for a long time in my list to post, thought this is the right time to post it because I did not pretty much cook anything for past one week.

eggpepperfry-3

 I cooked this in a similar manner to the way I prepared pepper chicken fry. The masalas in this egg roast is finger licking good. When my friend used to make pepper chicken fry before years, I used to just taste the masala and would go WOW! 😀 So, I am sure this is very tasty. If you like egg and spicy food then you will love this recipe. I think eggs have no taste as such and you just have to add the flavors to make it tasty. So this is a perfect egg recipe. Eggs are the best friend for bachelor cooking I guess, easy to make it for a side dish. So, if you wanted to make it special with a comfort lunch without much of work and grocery shopping 😉 Then go for this! The main flavor for this recipe is the flavors of pepper corns, coriander seeds and fennel seeds. If you want to reduce spiciness, reduce the pepper quantity or skip the chilli powder. If you make a simple tomato rasam, sambhar, biryani, pulao for this egg fry 🙂 , that’s a complete lunch. Even it tastes great with phulka. You can make the blended masala and store in an air right container, it’s equally good. 

4.0 from 2 reviews
Print
Egg Pepper Roast / Muttai Milagu Varuval
Author: Suganya Hariharan
Recipe type: Main
Cuisine: Indian
Prep time:  5 mins
Cook time:  25 mins
Total time:  30 mins
Serves: 4
 
Ingredients
  • Eggs – 4
  • Oil – 2 tbsp
  • Hing – a pinch
  • Jeera/ cumin seeds – 1 tsp
  • Red chilli – 1, broken
  • Onion – ¾ cup, very finely chopped
  • Garlic – 4, very finely chopped
  • Ginger – ½ inch, finely chopped
  • Curry leaves – 1 sprig
  • Green chilli – 1, small, finely chopped
  • Tomato – ¼ cup, finely chopped
  • Turmeric powder – ¼ tsp
  • Garam Masala – ½ tsp
  • Red chilli powder – ½ tsp
  • Coconut powder/ Grated coconut – 2 tsp
  • Salt – 1 tbsp

    Roast & Grind
  • Coriander seeds – ½ tbsp
  • Whole black pepper – ½ tbsp.
  • Fennel seeds – 1 tsp
Instructions
  1. Hard boil the eggs by boiling the eggs – Boil water, add a tsp. of salt, add eggs and cook for 10 mins in medium flame. Once done, add them to cold water and set aside for 5 mins, make a small crack using knife or just cracking in nearby object and remove the egg shell carefully. Cut the eggs vertically set aside.
  2. Meanwhile when the eggs are getting cooked, heat a pan, and fry roast the ingredients under to “roast & grind” until light brown. You will get nice aroma, switch off, allow it to cool and blend into a smooth powder but little coarse. I used my mortar & pestle. So it was perfect.
  3. Heat oil in a pan; add hing, broken red chilli and jeera and sauté for few seconds. Add chopped onion, curry leaves, chopped ginger, and chopped green chilli, chopped garlic and sauté till onion becomes translucent and golden brown. Add chopped tomatoes and turmeric powder, sauté till its little mushy.
  4. Add powdered pepper spice powder, garam masala, red chilli powder, coconut powder and fry in medium to slow heat for a minute. Add 3 tbsp of water, salt, add the sliced eggs, cover and cook for 2 mins in medium flame.
  5. Gently turn the eggs and add another 2 tbsp of water, cover and cook for another 2 mins and switch off when the masala becomes roasted, garnish with coriander leaves and 1 tsp of lime juice.
Notes
1. This pepper fry is little on the spicy side, so adjust according to your taste. You can add the blended masalas slowly and taste them. Skip the chilli powder if you want. You have green chilli, pepper, red chilli powder, and one broken red chilli. So skip any one if you think it’s spicy for your taste buds.
2. You can replace with ginger garlic instead of chopped ginger garlic if you think it’s a big step to do.
3. Do roast the pepper masala well to remove the rawness smell.
4. Do not overcook eggs as it might become rubbery or hard.
Wordpress Recipe Plugin by EasyRecipe
3.2.1311


Taste great with simple tomato rasam, sambhar, biryani or pulao.

eggpepperfry

Filed Under: NON-VEG RECIPES Tagged With: bachelor cooking recipes, Chettiandu egg recipe, egg indian recipes, Egg pepper fry recipe, Egg pepper roast recipe, egg recipes, egg roast recipes, egg side dish recipes, muttai milagu varuval recipe, pepper recipes, South indian classic egg recipe, spicy egg pepper masala recipe

Page 14 of 19
« Previous 1 … 9 10 11 12 13 14 15 16 17 18 19 Next »
  1. Pages:
  2. «
  3. 1
  4. ...
  5. 11
  6. 12
  7. 13
  8. 14
  9. 15
  10. 16
  11. 17
  12. 18
  13. 19
  14. »
  • « Previous Page
  • 1
  • …
  • 12
  • 13
  • 14
  • 15
  • 16
  • …
  • 19
  • Next Page »
  • Facebook
  • Google+
  • Instagram
  • Pinterest
  • Twitter

LOOKING FOR SOMETHING?

logo
Food Advertisements by
logo
Food Advertisements by

Categories

STAY CONNECTED

  • Facebook
  • Google+
  • Instagram
  • Pinterest
  • Twitter

SUBSCRIBE BY EMAIL

SEARCH RELISH THE BITE

logo
Food Advertisements by

Copyright © 2025 · Lifestyle Pro Theme on Genesis Framework · WordPress · Log in